- 13 -
DOWNLOAD OF THE FIRMWARE
1. Outline
Download the firmware to the ROM of the projector by the
program.
2. Operating conditions
Microsoft
®
Windows
®
98/Me/XP shall operate correctly.(The
program doesn’t run on Windows
®
95.) A display device
supporting VGA (640 x 480) or above is required.
3. Necessary files
The following files are necessary to run the program.
-[XD8100_v***] folder : Firmware data
(*** indicates the version.)
-[FlashUpgrader.exe] : Download program
- [FlashAll.inf] : Information file for download
- [XXXX.hex]
: Firmware data
4. Preparation before starting the
program
1.
Read the factory adjustment data of the PCB MAIN
ASSY and save them using ChangePWBMAIN
according to "REPLACEMENT OF THE MAIN PCB
ASSY".
2. Copy the data folder to any desired folder on the desktop.
3. Turn OFF the main power switch on the projector.
4. Connect the COM port of the PC and the RS-232C
terminal of the projector using an RS-232C cable
(attachment).
5. Operating procedure
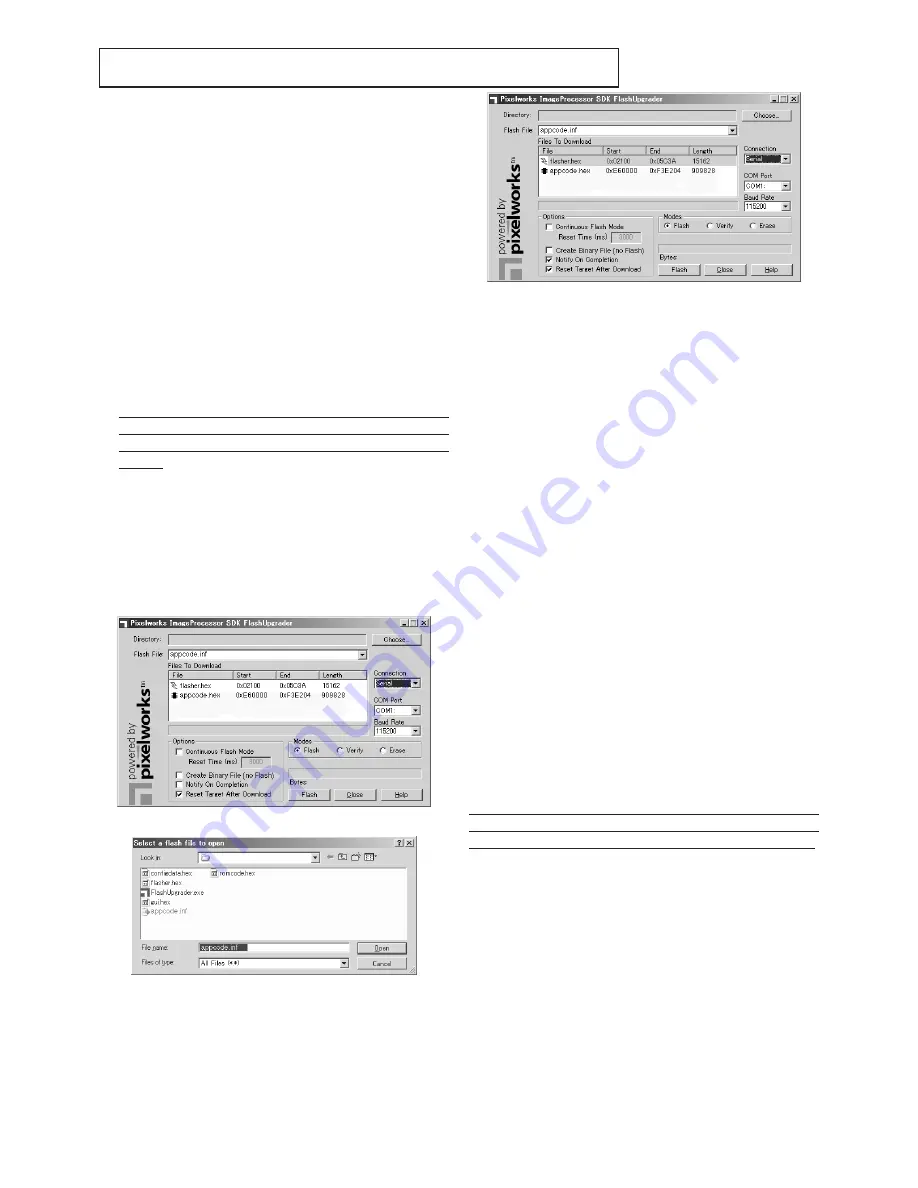
1. Double-click “FlashUpgrader.exe”. The dialog box shown
below appears.
2. Click [Choose] on the dialog box.
XD8100v200
3. Select [FlashAll.inf] in the firmware folder and click [Open].
4. Set [Connection], [COM Port], and [Baud Rate] depending
on the PC to be used. Set [Connection] to [Serial], [Com
Port] to [COM1], and [Baud Rate] to [115200] in most
cases.
5. In the “Options” field, clear a check mark from the box of
“Continuous Flash Mode,” and put a check mark in the
boxes of “Notify On Completion” and “Reset Target After
Download.” In the “Modes” field, select “Flash.” And then,
click the Flash button. Here, preparation of the program is
completed.
6. Turn the main power switch to ON while pressing the “◄
(COMPUTER)” button on the projector, and keep pressing
the “◄(COMPUTER)” button for 3 seconds or longer.
STATUS indicator illuminates in orange. The level meter
starts running and the download starts.
7. When download is completed, a dialog box indicating
[Flash Completed] appears. Click [OK] to close the dialog
box.
8. The same dialog box as that appears at the beginning
of this procedure appears again. Click [Close] to exit the
program.
9. If the E
2
PROM is used for the first time, it will be
automatically initialized after download is completed. Don’t
unplug the power cord until the POWER LED flashes
green and red.
10. Turn the main power switch to OFF and remove the RS-
232C cable.
6. Task after downloading the
firmware
Retransfer the factory adjustment data of the PCB MAIN
ASSY that were read in clause 4 using ChangePWBMAIN
according to "REPLACEMENT OF THE MAIN PCB ASSY".
7. Switching the COM port
If communication with the PC is not available, switch the COM
port. Select the serial port to which the cable is connected.
Содержание DLP XD8100U
Страница 9: ... 4 PCB LOCATION Fig 1 1 2 7 5 8 3 4 6 9 10 11 12 13 14 ...
Страница 11: ... 6 EXPOSED VIEW Fig 2 1 5 3 Fx1 Hx2 7 2 Dx2 Cx3 8 Ex1 Gx1 1 Ax1 4 6 Kx2 Jx1 Bx1 9 DLP ASSY ...
Страница 13: ... 8 Chassis ASSY 1 Fig 2 2 1 Ax10 Bx2 Cx2 4 5 Fx5 Gx2 Hx2 6 8 9 2 Kx5 Lx3 3 Dx2 7 Jx1 Ex2 ...
Страница 15: ... 10 1 Ax5 4 5 6 8 7 Bx2 Cx4 Dx2 Ex4 Hx2 11 2 3 10 9 Hx2 Fx1 Gx2 Chassis ASSY 2 Fig 2 3 ...
Страница 22: ... 17 1 2 3 4 5 6 7 8 9 10 E x 2 C x 2 D x 2 B x 2 A x 2 Filter ASSY Fig 2 7 ...
Страница 146: ... MEMO ...


