- 8 -
DOWNLOAD OF THE FIRMWARE
Outline
Download the firmware to the ROM in the projector using
the program. Before downloading the firmware, install DLP
Composer (TM) Lite and make necessary preparations.
Operating conditions
Microsoft
®
Windows
®
98/Me/XP shall operate correctly.
(The program doesn’t run on Windows
®
95. For Windows
®
98, use SE or later.)
A display device supporting VGA (640 x 480) or above is
required.
Necessary files
The following files are necessary to run the program.
- [DLP Composer (TM) Lite] : Program for download
- [MelcoService_ddp2000_060316a.projector] : file
- [BP_DDP2000_Library_35] : folder
- [SD420_Flash_v***.img] : Firmware data (for SD420U)
- [SD430_Flash_v***.img] : Firmware data (for SD430U)
- [XD420_Flash_v***.img] : Firmware data (for XD420U)
- [XD430_Flash_v***.img] : Firmware data (for XD430U)
- [XD435_Flash_v***.img] : Firmware data
(for XD435U/XD435U-G)
(*** indicates the version.)
Operation procedure
1. Install DLP Composer (TM) Lite and make necessary
preparations referring to INSTALLATION OF DLP
COMPOSER (TM) LITE AND PREPARATIONS.
2.Unplug the projector from the wall outlet.
3. Remove the lamp cover from the projector.
4. Start DLP Composer (TM) Lite.
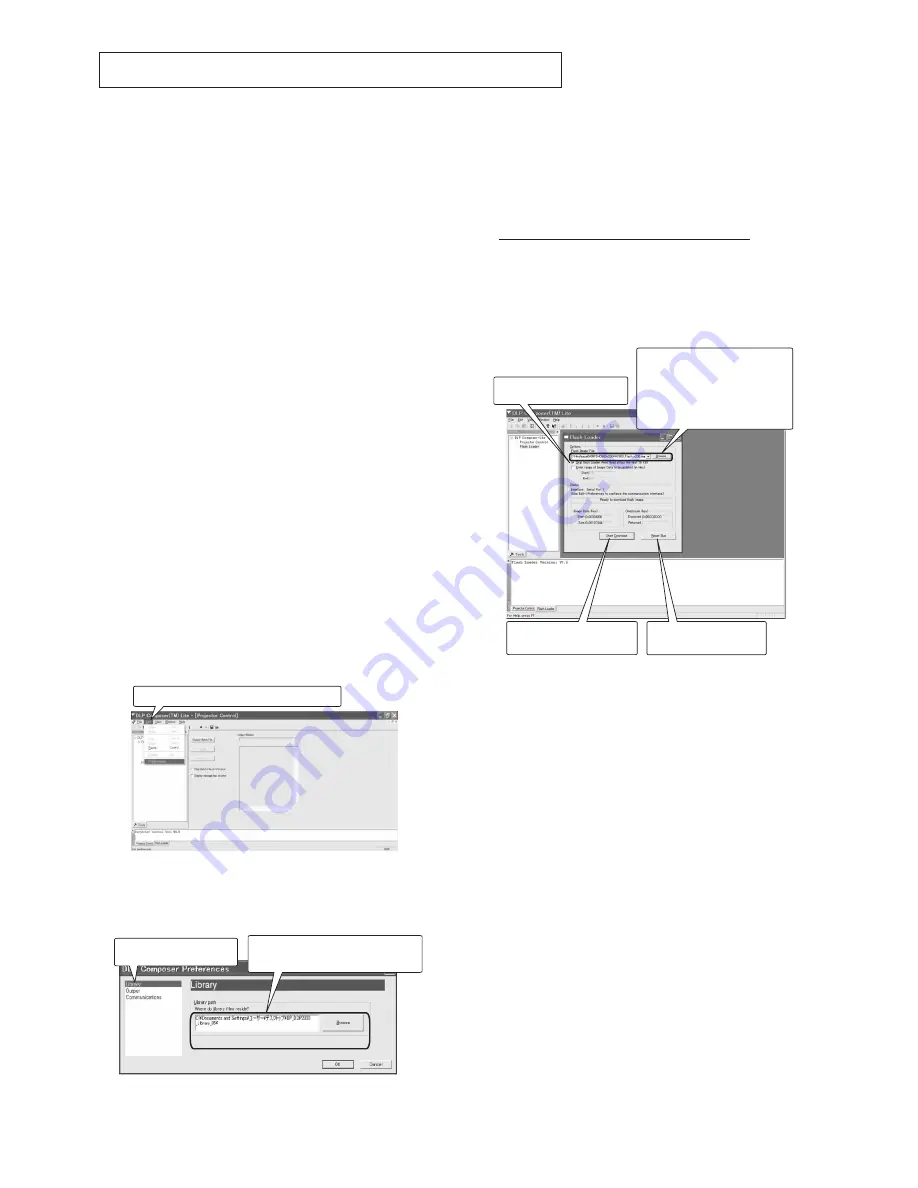
5. Select [Preferences] from the Edit menu.
(The DLP Composer Preferences dialog appears.)
6. Select [Library] and click the [Browse] button.)
(The Browse for Folder dialog appears.)
7. Select [BP_DDP2000_Library_35] and click [OK].
8. Click [OK] in the DLP Composer Preferences dialog.
9. Put the cursor to [Flash Loader] in the Project window of
DLP Composer (TM) Lite.
(The Flash Loader dialog appears.)
10. Click the [Browse] button of [Flash Image File] of
[Options]. Select firmware to download, from among
SD420_Flash_v***.img,SD430_Flash_v***.img,XD420_
Flash_v***.img,XD430_Flash_v***.img and
XD435_Flash_v***.img.
11. Put a checkmark to [Skip Boot Loader Area].
12. Plug the power code of the projector into the wall outlet.
13. The STATUS LED of the projector illuminates green for 5
seconds. While the LED illuminates green, click the
[Reset Bus] button in the Flash Loader dialog and then
click the [Start Download] button.
When a dialog appears, click [Yes].
Note:
If you do nothing for 5 seconds after plugging in the
power cord, the STATUS LED goes out and the
POWER LED blinks red and green alternately
indicating that download is impossible any longer due
to timeout. In this case, plug the power cord again
and perform the step described above.
Note:
When the EEPROM is new, don't turn off the power
after downloading the firmware because the
EEPROM initialization process automatically starts.
(The STATUS LED illuminates red during the
initialization. Upon completion of the initialization, the
POWER LED blinks red and green alternately.)
Even if you turn off the power wrongly during the
initialization, the initialization automatically starts at
the next power-on.
14. Unplug the projector.
15. Attach the lamp cover to the projector.
Click the [Reset Bus]
button.
Click the [Start Download]
button.
q
w
Put a checkmark to [Skip
Boot Loader Area].
Click the [Browse] and select
[SD420_Flash_v***.img],
[SD430_Flash_v***.img],
[XD420_Flash_v***.img],
[XD430_Flash_v***.img], or
[XD435_Flash_v***.img]
e
r
Select [Preferences] from the Edit menu.
q
Select [Library].
w
Click the [Browse] button and
select [BP_DDP2000_Library_35].


