[
IV
Remote Controller ]
- 44 -
HWE15070
GB
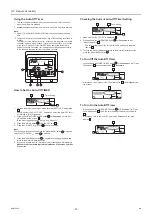
<2> Setting the Water Temperature
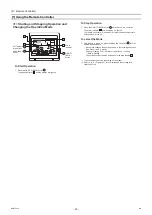
The current water temperature will appear in the area
labeled .
How to Change the Temperature Setting
1. To lower the water temperature setting
Press the
Set Temperature button
.
2. To raise the water temperature setting
Press the
Set Temperature button
.
• Each press increases or decreases the temperature by 1 °C (1 °F).
The current setting will appear in the area labeled
in the figure on the
previous page.
• The settable ranges for the “Hot Water” and “Heating” modes are as
follows. *1, *2
Note:
*1 Available ranges vary depending on the type of unit connected.
*2 If the temperature ranges are restricted from the remote controller, the
settable ranges may be narrower than shown above. If an attempt is made
to set a value outside of the restricted range, the display will show a
message indicating that the range is currently restricted.
For information about how to set and clear the restrictions, refer to
[4]–2. (3) (page 49).
*3 Temperatures can be displayed in Celsius or Fahrenheit (factory setting:
Fahrenheit). For information about how to select °C or °F , refer to
[4]–4. (1) (page 49).
*4 If the target water temperature setting for the Heating mode has been set
to a temperature outside of the remote controller’s setting range (above
55°C) from the circuit board, any signal from the remote controller to
change the temperature setting will be ignored. If this happens, disconnect
the remote controller, set the target temperature to 55°C or below from the
circuit board, reconnect the remote controller, and then change the
temperature setting from the remote controller.
• Water temperature can be controlled based on the inlet or outlet
temperature.
*
The water temperature range that can be displayed is between 0 °C to
100 °C. Outside this range, the display flashes either 0 °C or 100 °C.
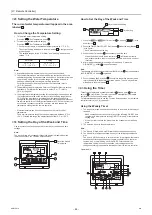
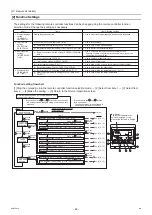
<3> Setting the Day of the Week and Time
Use this screen to set and change the current day of the week and time
settings.
Note:
The day and time will not appear if the clock display is disabled from the
remote controller on the Function Selection menu.
How to Set the Day of the Week and Time
1. Press the
or
Set Time button
to bring up
in the
area labeled
.
2. Press the TIMER ON/OFF (SET DAY) button
to set the day (labeled
in the figure).
* Each press advances the day.
3. Press the Set Time button
as necessary to set the time.
* When the button is held down, the time (at
) will increment first in
one-minute intervals, then in ten-minute intervals, and then in one-hour
intervals.
4. After making the appropriate settings in Steps 2 and 3, press the
CIR.WATER
button
to save the values.
Note:
The changes will be lost unless the Mode (BACK) button
is pressed before
the CIR.WATER
button
is pressed.
5. Press the Mode (BACK) button
to complete the setting procedure and
return the display to the normal operation screen. The new day and time
will appear in the area labeled
.
<4> Using the Timer
Three types of timers are available as follows:
Weekly timer,
Simple
timer, or
Auto-Off timer. The timer type can be selected from the remote
controller on the Function Selection menu.
For information about how to use the Function Selection menu on the remote
controller, refer to [4]–3. (3) (page 49).
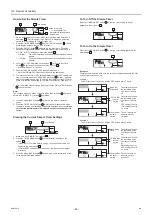
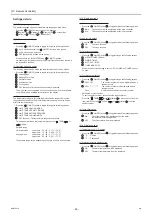
Using the Weekly Timer
1. The weekly timer can be used to schedule up to six events for each day of
the week.
• Each operation event can consist of any of the following: ON/OFF time
together with a temperature setting, ON/OFF time only, or temperature
setting only.
• When the timer reaches the preset time, the schedule event will take
place.
2. The time can be set to the nearest minute.
Note:
*1 The Weekly, Simple, and Auto-Off timers cannot be used concurrently.
*2 The weekly timer will not operate when any of the following conditions is
met.
The timer is off; the system is in error; a test run is in progress; the remote
controller is performing self-check or remote controller check; the timer,
function, day, or time is being set. If the ON/OFF status and/or the
temperature setting is centrally controlled, their settings cannot be
changed according to a schedule that was set from the remote controller.
Operation No.
Hot Water
Heating
25 °C - 70 °C
77 °F - 158 °F *3
25 °C - 55 °C
77 °F - 131 °F *3
3
3
PAR-W21MAA
ON/OFF
TEMP.
MENU
BACK
DAY
CHECK
TEST
MONITOR/SET
CLOCK
CLEAR
ON/OFF
INITIAL SETTING
CIR.WATER
˚C
TIME SUN
Day of the Week &
Time display
TIME SUN
Day of the Week Setting
Time Setting
2
3
4
3
PAR-W21MAA
ON/OFF
TEMP.
MENU
BACK
DAY
CHECK
TEST
MONITOR/SET
CLOCK
CLEAR
ON/OFF
INITIAL SETTING
CIR.WATER
˚C
SUN
ON
WEEKLY
2
4
9
1
11
2
11
9
10
4
1
7 8
3
12
4
2
3
1
2
3
4
1
11
11
4
4
2
2
1
2
3
3
3
0000001906.book 44 ページ 2015年11月5日 木曜日 午前11時55分
Содержание CAHV-P500YB-HPB
Страница 1: ......
Страница 7: ...CONTENTS HWE15070 GB ...
Страница 9: ... 2 HWE15070 GB ...
Страница 19: ... 12 HWE15070 GB ...
Страница 37: ... 30 II Restrictions GB HWE15070 ...
Страница 39: ... 32 HWE15070 GB ...
Страница 48: ... 41 HWE15070 GB IV Remote Controller 1 Using the Remote Controller 43 2 Function Settings 48 ...
Страница 49: ... 42 HWE15070 GB ...
Страница 57: ... IV Remote Controller 50 HWE15070 GB ...
Страница 58: ... 51 HWE15070 GB V Electrical Wiring Diagram 1 Electrical Wiring Diagram 53 ...
Страница 59: ... 52 HWE15070 GB ...
Страница 65: ... 58 V Electrical Wiring Diagram GB HWE15070 ...
Страница 66: ... 59 HWE15070 GB VI Refrigerant Circuit 1 Refrigerant Circuit Diagram 61 2 Principal Parts and Functions 62 ...
Страница 67: ... 60 HWE15070 GB ...
Страница 71: ... VI Refrigerant Circuit 64 HWE15070 GB ...
Страница 73: ... 66 HWE15070 GB ...
Страница 111: ... 104 HWE15070 GB ...
Страница 117: ... VIII Test Run Mode 110 HWE15070 GB ...
Страница 119: ... 112 HWE15070 GB ...
Страница 163: ... IX Troubleshooting 156 HWE15070 GB ...
Страница 164: ... 157 HWE15070 GB X Attachments 1 R407C saturation temperature table 159 ...
Страница 165: ... 158 HWE15070 GB ...
Страница 167: ... X Attachments 160 HWE15070 GB ...
Страница 168: ......


