background image

Deutsch-60

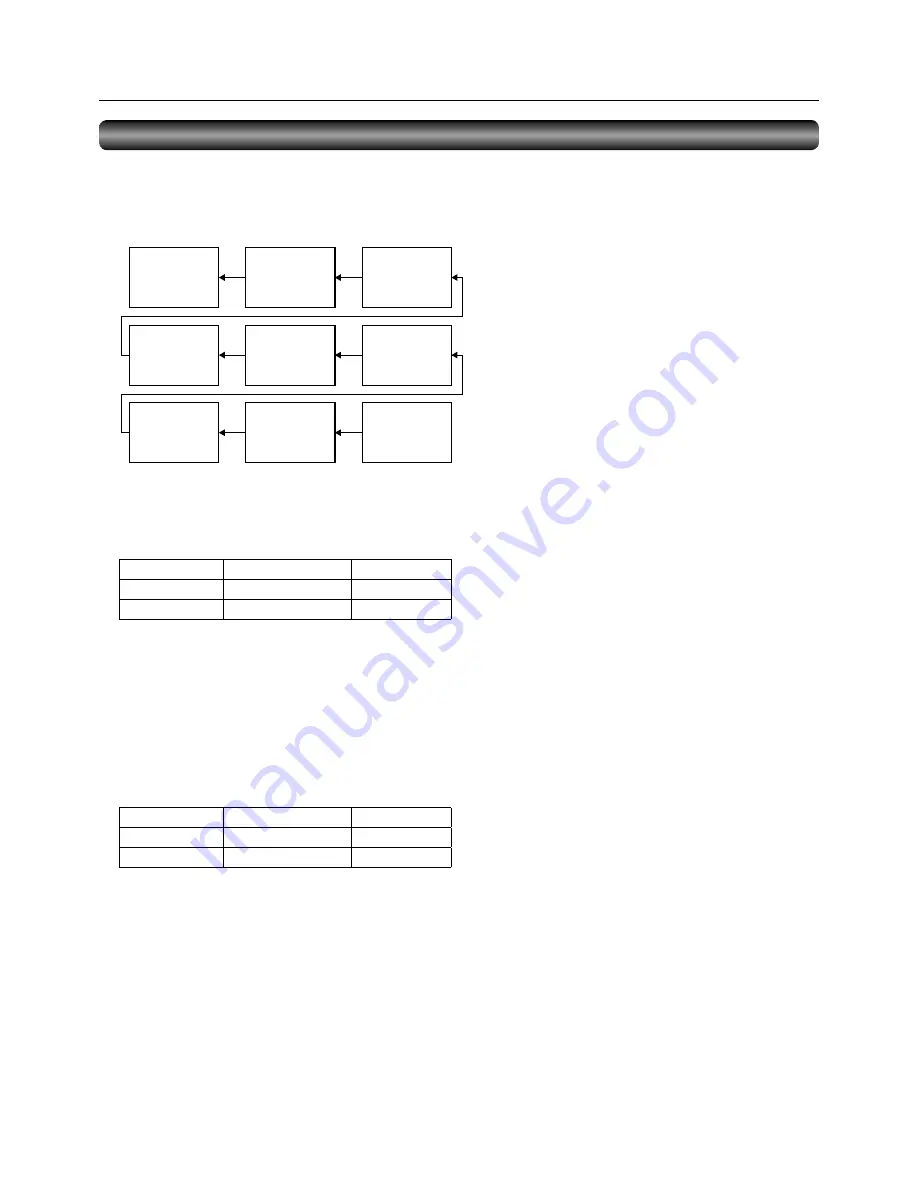
Monitor

ID = 9

(Slave)

Monitor

ID = 6

(Slave)

Monitor

ID = 3

(Slave)

Monitor

ID = 8

(Slave)

Monitor

ID = 5

(Slave)

Monitor

ID = 2

(Slave)

Monitor

ID = 7

(Slave)

Monitor

ID = 4

(Slave)

Monitor

ID = 1

(Master)

Zusatzinformationen über die Helligkeitsautomatik

Gemeinsame Ansteuerung mehrerer Monitore

Wird in solch einem Fall die TILING-Funktion genutzt, so lässt sich die Helligkeitsautomatik über die Erfassungsresultate des 
Helligkeitssensors eines bestimmten Monitors in der zusammengeschalteten Kette ansteuern.

1.  Führen Sie einen Multi-Anschluss der Monitore mit Hilfe der RS-232C-Kabel (im Handel erhältlich) gemäß dem folgenden 

Beispiel durch.

2.  Ordnen Sie allen Monitoren MDT552S anhand von MONITOR-ID jeweils eine Kennung zu. (Siehe Seite 54.)
 

Als Monitor-Kennung sind die Nummern 1 bis 26 wählbar.


Die Monitor-Kennung der Master-Einheit muss „1“und die der Slave-Einheiten ungleich „1“ ein.

 Es 

empfi ehlt sich, die Kennungen den Monitoren in aufsteigender numerischer Reihenfolge – also 1, 2, 3 usw. – zuzuordnen.

3.  Stellen Sie AUTOM. HELLIGKEIT auf dem OSD-Schirm (BILD) wie folgt ein.

AUTOM. HELLIGKEIT

KONTROLLE

Master-Einheit

LOKAL

PRIMÄR

Slave-Einheiten

GESTEUERT

SEKUNDÄR

Steuerung der Monitore über Computer

Bei Steuerung der Monitore über Computer müssen Sie selbst ein entsprechendes Steuerprogramm eingeben.
Die Helligkeit aller Monitore kann zentral über einen Computer geregelt werden, wenn der Benutzer eine entsprechende Anwendung 
für das Ferneinlesen der Werte von zwei Helligkeitssensoren eines beliebigen Monitors einsetzt und diese an alle Monitore überträgt.

1.  Verbinden Sie den Eingang RS-232C IN an der Master-Einheit wie oben abgebildet und den RS-232C-Anschluss am Computer 

über ein RS-232C-Kabel.


Die Kommunikationskontrollfunktion über LAN wird auf dem Monitor alleine nicht unterstützt, ist jedoch verfügbar, wenn Sie den 
Monitor zusammen mit dem Computer verwenden.

2.  Ordnen Sie allen Monitoren MDT552S anhand von MONITOR-ID jeweils eine Kennung zu. (Siehe Seite 54.)
 

Als Monitor-Kennung sind die Nummern 1 bis 26 wählbar.

3.  Stellen Sie AUTOM. HELLIGKEIT auf dem OSD-Schirm (BILD) wie folgt ein.

AUTOM. HELLIGKEIT

KONTROLLE

Master-Einheit

GESTEUERT

SEKUNDÄR

Slave-Einheiten

GESTEUERT

SEKUNDÄR

4.  Eine vom Benutzer eingesetzte Regelungsanwendung liest die Werte von zwei Helligkeitssensoren eines beliebigen Monitors ein 

und überträgt diese an alle Monitore. Die Spezifi kationen zu den Kommunikationsbefehlen erhalten Sie von Ihrem Händler.

Weitere Funktionen (Fortsetzung)

Master:  Als Master-Einheit konfi gurierter Monitor, der das 

Außenlicht erfasst (Monitor-Kennung „1“.)

Slave: 

Von der Master-Einheit gesteuerter Monitor 
(Monitor-Kennung ungleich „1“.)

Содержание A2129

Страница 1: ...LCD Display Monitor MODEL ...

Страница 2: ......

Страница 3: ...English English Deutsch Español Français Italiano Русский Deutsch Español Français Italiano Русский ...

Страница 4: ......

Страница 5: ...SDI for long distance connection or multiple monitor connection English 25 Connecting OPS compliant computer English 26 P 6 Connecting RS 232C English 27 Monitor control via RS 232C English 27 P 7 Connecting LAN English 28 Monitor connection using LAN English 28 P 8 Connecting a USB device English 29 Connecting multiple USB devices using the USB hub function English 29 P 9 Connecting the power cor...

Страница 6: ...ignage applications this product is equipped with four screen saver functions GAMMA COOLING FAN BRIGHTNESS MOTION Power on Delay Page 57 For installations employing numerous monitors the power on delay function can power up the monitors sequentially with delay between 2 50 seconds after the power is applied Using this function can prevent inrush current problems and reduce the overall electrical l...

Страница 7: ...n manual may cause harmful interference to radio communications Operation of this equipment in a residential area is likely to cause harmful interference in which case the user will be required to correct the interference at his own expense 3 You are cautioned that changes or modifications not expressly approved by the party responsible for compliance could void your authority to operate the equip...

Страница 8: ...GGED FROM WALL SOCKET TO FULLY DISENGAGE THE POWER TO THE UNIT PLEASE DISCONNECT THE POWER CORD FROM THE AC OUTLET DO NOT REMOVE COVER OR BACK NO USER SERVICEABLE PARTS INSIDE REFER SERVICING TO QUALIFIED SERVICE PERSONNEL This symbol warns user that uninsulated voltage within the unit may have sufficient magnitude to cause electric shock Therefore it is dangerous to make any kind of contact with ...

Страница 9: ...can be recycled and or reused This symbol means that electrical and electronic equipment batteries and accumulators at their end of life should be disposed of separately from your household waste If a chemical symbol is printed beneath the symbol shown above this chemical symbol means that the battery or accumulator contains a heavy metal at a certain concentration This will be indicated as follow...

Страница 10: ...llow adequate ventilation around the monitor so that heat can properly dissipate Do not block ventilated openings or place the monitor near a radiator or other heat sources Do not put anything on top of the monitor The power cable connector is the primary means of detaching the system from the power supply The monitor should be installed close to a power outlet which is easily accessible Handle wi...

Страница 11: ... Corner protector x 4 Clamper x 2 For holding the HDMI cables Clamper x 2 For fall prevention Option slot cover Label to cover the logo Use it as necessary Wireless Remote Control and AAA Batteries Your LCD monitor MDT552S comes with the following For the use in the other regions use a power cord that matches the AC voltage of the power outlet and has been approved by and complies with the safety ...

Страница 12: ...ithin 2 seconds after turning off the power by the POWER button on the wireless remote control or the monitor or by a communication command don t turn off the main power switch don t disconnect the power cord and don t turn off the breaker If the AC power is turned off immediately after the power off operation all the OSD settings including the language selection may be reset to the factory defaul...

Страница 13: ...connected MDT552S Connectors and Terminals IN IN OUT IN OUT 9 LAN connector Connects with a LAN cord 10 VIDEO IN OUT S connector BNC Connects with video equipment S VIDEO IN S video input connector MINI DIN 4 pin VIDEO IN BNC connector VIDEO OUT BNC connector 11 AUDIO ANALOG IN Connects with the audio output connector of external equipment such as a computer VCR and DVD player 12 AUDIO ANALOG OUT ...

Страница 14: ...IP or POP mode on off INPUT button Selects video to be displayed in the sub picture CHANGE button Changes the main picture with the sub picture Description PIP Picture In Picture The sub picture is displayed within the main picture POP Picture Outside Picture The sub picture is displayed to the bottom right of the main picture SBS Side By Side The main picture and the sub picture are displayed sid...

Страница 15: ...emote control batteries The wireless remote control is powered by 1 5 V AAA batteries How to install the batteries 1 Unlock and pull up the cover in the arrow s direction 2 Align the batteries according to the and indications inside the case 3 Replace the cover How to remove the batteries 1 Unlock and pull up the cover in the arrow s direction 2 Remove the batteries CAUTION Incorrect use of batter...

Страница 16: ...ices using the USB hub function Installing the monitor Installing and removing the stands The stands are optionally available Using the wall mount or ceiling mount Preventing the handles from touching the wall Removing the stand guide frames Using the wall mount spacers Installing in the portrait or face up position Attaching the corner protectors Using the monitor without the bezel Pages 14 to 17...

Страница 17: ...sure its effectiveness against any kind of earthquake or disaster Do not sleep where the monitor may topple over or fall in case of an earthquake or other disaster Before moving the monitor remove the rope that is securing the monitor Failure to do so may result in injury or breakdown of the monitor Determine the installation location CAUTION DO NOT ATTEMPT TO INSTALL THE LCD MONITOR BY YOURSELF I...

Страница 18: ... x 2 Longer portion comes to the front Guide frame 200 200 624 624 200 200 307 5 411 5 52 CAUTION For preventing the monitor from falling Install the monitor with metal brackets for wall or ceiling installation commercially available on your own responsibility For detailed procedures of installation refer to the instructions of the metal brackets To lessen the probability of injury and damage resu...

Страница 19: ...pacers 9 pcs between the metal bracket and the wall mount screw holes of the monitor and attach them using screws a a For mounting use M6 iron screws with a loose proof spring washer long enough to accommodate the thickness of the metal bracket and that of the wall mount spacer 17 mm and penetrate the monitor to a depth of 10 mm and tighten them securely 10 mm 17 mm 339 276 Normal handle position ...

Страница 20: ...n be sure to set COOLING FAN to ON using SCREEN SAVER in the CONFIGURATION1 menu of the OSD screen function Installation in the portrait position The logo should be on the LEFT side when viewed from the front of the monitor NOTE This monitor doesn t have a function to rotate displayed images To display images in the portrait orientation use already rotated images Installation in the face up positi...

Страница 21: ...1 Assemble the supplied protective cover according to the following procedure 2 Unscrew the screws a that hold the bezel to remove the bezel from the monitor CAUTION If you remove other screws than the screws a the bezel falls apart If you do so the bezel may fall causing injury or damaging the monitor a a 3 Peel off the separators from the protective cover b assembled in step 1 and then attach th...

Страница 22: ... into the SPEAKER S R NOTE Match the polarity of the speaker cables and that of the terminals red black Unmatched polarity may cause problems with audio output P 3 Installing the optional speakers Carry out as necessary NOTE Switch the built in speaker mode to the optional speaker mode after you power on the monitor See the page for How to Use on page 31 for further details CAUTION Don t hold the ...

Страница 23: ... First turn off the power of all the connected equipment before making connections Refer to the user manual of each piece of equipment NOTE Please use the audio cable without resistance when the audio output terminal of the audio device and PC is stereo mini Jack When the audio cable with resistance is used the audio level may be affected or no sound could be heard Wiring diagram P 4 Connection pr...

Страница 24: ...er accessory and a band accessory Remove the screw from the monitor Attach the clamper to the monitor using the screw you have removed in step Secure the HDMI cable and the clamper using the band NOTE The band isn t reusable The monitor comes with 2 spare bands To replace the band cut and remove the existing band and attach a new one of the same shape commercially available 2 5 mm in width and app...

Страница 25: ... continued The monitor automatically distinguishes the timings shown in the table below and sets the screen information When a PC or other device is connected it automatically displays images properly See the page describing AUTO SETUP AUTO ADJUST Factory preset timing Resolution Frequency Remarks Resolution Frequency Remarks Horizontal Vertical Horizontal Vertical 1 640 x 480 31 5 kHz 60 Hz 9 128...

Страница 26: ... connectable monitors in advance in your installation environment Set RGB of POWER SAVE in the CONFIGURATION1 menu to OFF when using DVI D in the daisy chain mode Audio connection Connect an audio cable ø3 5 mm stereo mini commercially available to the AUDIO ANALOG IN connector When connecting an HDMI cable select HDMI1 or HDMI2 according to the connected connector by pressing the INPUT button on ...

Страница 27: ...n the monitor or the YPbPr button on the wireless remote control At the moment of the selection the audio is automatically switched to ANALOG To make audio connection connect an audio cable ø3 5 mm stereo mini RCA to the AUDIO ANALOG IN connector Because the audio is automatically switched to ANALOG when YPbPr is selected the audio is output just by connecting the cable To connect a DVD player equ...

Страница 28: ...ne end of a BNC cable to the VIDEO OUT connector of the first monitor and the other end to the VIDEO IN connector of the second monitor NOTE In the daisy chain connection you can connect up to 5 monitors when using 5 meter cables However the maximum number of connectable monitors may be limited depending on the connected devices to be used It is recommended to check the number of connectable monit...

Страница 29: ... connection made in 2 1 above connect the SDI OUT connector on the first SDI BOX and the SDI IN connector on the second SDI BOX using a commercially available SDI cable BNC NOTE The usable cable length when SDI BOX DP 1SDI 3G is mounted is as follows When one SDI BOX is connected 100 m 3G SDI Based on the result of the actual measurement using the recommended cable Recommended cable 1694A made by ...

Страница 30: ...t cover accessory using the 5 screws b that you have removed in step 2 b Removal of the SDI BOX Hold the handle on the SDI BOX for removal CAUTION Use the handle to extract the SDI BOX only Pulling on the SDI cable BNC or by other means may cause damage 4 Insert an OPS compliant computer commercially available in the option slot and secure it on the monitor using the 2 screws b that you have remov...

Страница 31: ...r more monitors as shown in the illustration below connect the RS 232C OUT connector of the first monitor and the RS 232C IN connector of the second monitor using a reverse type RS 232C cable commercially available By repeating the connection in the similar way you can connect monitors in a daisy chain configuration NOTE Though you can connect up to 26 monitors the maximum number of connectable mo...

Страница 32: ...y available Connect this monitor and the LAN hub using a straight type LAN cable commercially available When you connect two or more monitors you can connect the monitor and the LAN hub using a straight type LAN cable commercially available as described above NOTE When you use a cross type LAN cable commercially available you can connect the monitor and the computer one to one without using a LAN ...

Страница 33: ...B upstream port Standard B on the monitor using a USB cable commercially available When using an OPS compliant computer Install an OPS compliant computer connected internally 2 Connect a USB device to the downstream port of this monitor NOTE The USB hub function cannot control the monitor Up to 5 hubs can be cascaded in the hub function of this monitor Carry out operation check in advance even if ...

Страница 34: ... cord 1 Insert the power connector of the power cord fully and firmly into the AC IN connector of the monitor 2 Secure the power connector using the cable holder accessory CAUTION Don t insert the cable holder into the power outlet socket Doing so may cause electric shock Fit both ends of the cable holder to the monitor Engage the cable holder in Parts A Secure the power connector with the cable h...

Страница 35: ...Page 38 Page 39 Page 38 Pages 40 to 41 Pages 42 to 44 Page 45 Turning on all the connected devices Selecting the video input Controlling the external devices Selecting the OSD language D SUB only Auto setup Selecting the picture mode Screen adjustment Picture adjustment Volume balance and tone control Speaker setting Schedule setting Remote control Setting the USB hub How to Use ...

Страница 36: ... main power switch is off the power indicator is off When using them check that the Main Power Switch is on the power indicator is on Main power switch 3 When the power indicator glows red press the POWER button on the monitor The power indicator turns green Wireless remote control Power button Power button or NOTE Within 2 seconds after turning off the power by the POWER button on the wireless re...

Страница 37: ...D D SUB DISPLAYPORT is terminated the monitor will be in the sleep mode in several seconds VIDEO When the sync signal of video input YPbPr S VIDEO or VIDEO is terminated the monitor will be in the sleep mode in approximately 10 minutes Description DPM Acronym for Display Power Management NOTE The default power management settings power savers for RGB and VIDEO are ON When an expansion module is in...

Страница 38: ...n the monitor the video input OSD menu is displayed and you can select the video input using the and buttons Selectable video inputs are HDMI1 HDMI2 DVI D D SUB OPTION DISPLAYPORT YPbPr S VIDEO and VIDEO When you press the INPUT button again the selected video input is displayed OPTION can be used when an expansion module is mounted on the option slot NOTE The selection you make doesn t complete u...

Страница 39: ...anguage Display the OSD menu by pressing the MENU button on the wireless remote control or the EXIT button on the rear of the monitor Using LANGUAGE in the CONFIGURATION1 menu of the OSD screen function you can select the OSD language See page 53 U 3 Controlling the external devices DVD player etc Personal computer ...

Страница 40: ...he monitor to display the OSD screen and then display the AUTO SETUP menu by selecting AUTO SETUP in the CONFIGURATION1 menu By pressing the SET button you can automatically and properly adjust the screen size horizontal vertical position clock clock phase and input signal level NOTE The auto setup works on D SUB only Displaying the AUTO SETUP menu directly Displaying the OSD menu AUTO SETUP menu ...

Страница 41: ...m zoom and horizontal vertical resolutions to obtain proper screen condition NOTE The position adjustment works on D SUB YPbPr S VIDEO and VIDEO only The clock adjustment and the resolution adjustment work on D SUB only The zoom adjustment works on all video inputs U 6 Selecting the picture mode HIGHBRIGHT The brightness is maximized STANDARD Factory default setting sRGB Suitable for color matchin...

Страница 42: ...contrast and sharpness to obtain desired image quality U 9 Speaker setting Carry out as necessary Select the built in speakers or the external special stereo speakers option in the speaker setting in the OSD menu Display the OSD menu by pressing the MENU button on the wireless remote control or the EXIT button on the rear of the monitor Using SPEAKER in the AUDIO menu of the OSD screen function yo...

Страница 43: ...enu of the OSD screen function For adjustment display the OSD menu by pressing the MENU button on the wireless remote control or the EXIT button on the rear of the monitor NOTE If no audio is output when an OPS compliant computer is in use check that the monitor is selected as the audio output source by the operating system of the computer For the selection method see the help or the user s manual...

Страница 44: ...ENU button on the wireless remote control or the EXIT button on the rear of the monitor Using SCHEDULE in the CONFIGURATION2 menu of the OSD screen function you can program power on off and input selection U 11 Schedule setting Carry out as necessary ...

Страница 45: ...n to execute the schedule every day When you select EVERY DAY you cannot select any days of the week and EVERY WEEK MON SUN Select the days of the week on which you want to execute the schedule Unless you select EVERY WEEK too the selection of the days of the week is cleared after the schedule is executed one time EVERY WEEK Select this option to execute the schedule on the selected days of the we...

Страница 46: ...mmands with a keypad using terminal software select 2s or 30s for CONTROL TIME OUT in CONFIGURATION2 in the OSD menu Follow the same procedure for LAN control Address code Function code Data code End code HEX 30h 30h Function Data 0Dh ASCII 0 0 Function Data Address code 30h 30h ASCII code 0 0 fixed Function code Code unique to each control function Data code Data unique to each control function N...

Страница 47: ...mmand wait for at least 14 seconds to send the next command After sending a command for video input selection wait for at least 5 seconds to send the next command Otherwise the monitor may not reply within 600 ms Set the timeout value of the control device on the host side to 30 seconds or longer In the power off mode only the POWER ON operation command and the power status acquisition commands de...

Страница 48: ...Resolution 1 C tc2 ex 31 74 63 32 2B 20 33 31 OPTION can be used when an expansion module is mounted on the option slot NOTE The monitor will acknowledge the power on off command issued from the OPS compliant computer however it will not execute the command This is not a malfunction For automatic operation use SCHEDULE in the CONFIGURATION2 menu of the OSD screen function LAN Remote control When y...

Страница 49: ...nized The USB hub of this monitor is detected by the computer and the OS standard device driver is installed automatically Some computers may not recognize the USB hub even if it is connected In such a case install the device driver for the USB hub referring to the user s manual of the computer NOTE It takes several seconds for the computer to recognize this monitor Do not pull out the USB cable b...

Страница 50: ...Sub menu screen When you select a sub menu an OSD screen is displayed Sub menus contain information screens adjustment menu screens and selection menu screens as shown below Sub menu screen Picture reset for example Page 48 Page 50 Page 51 Page 52 Page 53 Page 54 Page 56 Configuration of OSD screen This monitor is equipped with the OSD On Screen Display function for easy screen adjustment The OSD ...

Страница 51: ... screen and then press the button to select the main menu Press the EXIT button to display the OSD screen and then press the button to select the main menu When you press the SET button to accept the selected main menu the sub menu at the top is selected When you press the INPUT button to accept the selected main menu the sub menu at the top is selected Press the button to select a sub menu Press ...

Страница 52: ... level Press the PLUS button to increase the value to lessen the noise NOTE This adjustment doesn t work in the sRGB picture mode TINT TINT You can adjust all the colors at the same time Press the PLUS button to add a green tint Press the MINUS button to add a purple tint RED MAGENTA BLUE CYAN GREEN or YELLOW You can adjust each color individually Press the PLUS button to shift the selected color ...

Страница 53: ... automatically NOTE When you select AUTO you cannot adjust any other items than CONTROL individually LOCAL The AUTO BRIGHTNESS function is enabled and you can adjust CONTROL and subsequent items individually REMOTE The AUTO BRIGHTNESS function is enabled In addition the monitor enters the intercommunication mode where multiple monitors are controlled collectively See page 60 OFF This function is d...

Страница 54: ... screen with different magnifications at the screen center and the screen edges CUSTOM You can stretch the image horizontally and vertically as you desire using the CUSTOM ZOOM setting REAL The image is displayed without being stretched or reduced NOTE The DYNAMIC mode displays images having the 16 9 aspect ratio such as those with 1920 x 1080 resolution in the same way as in the FULL mode CUSTOM ...

Страница 55: ... the treble sound Press the MINUS button to decrease the treble sound BASS You can adjust the low frequency sound Press the PLUS button to increase the bass sound Press the MINUS button to decrease the bass sound SPEAKER You can switch the built in speakers and external stereo speakers option INTERNAL To output from the built in speakers Maximum output 10 W 10 W EXTERNAL To output from external sp...

Страница 56: ...picture is output PIP H POSITION You can adjust the horizontal position of the sub screen Press the PLUS button to move the sub screen to the right Press the MINUS button to move the sub screen to the left PIP V POSITION You can adjust the vertical position of the sub screen Press the PLUS button to move the sub screen up Press the MINUS button to move the sub screen down SUB INPUT You can select ...

Страница 57: ...e built in fan automatically starts running according to the operating temperature BRIGHTNESS When you select ON the brightness decreases MOTION The screen slightly moves horizontally and vertically at regular intervals to reduce the effect of the image persistence NOTE While TILING in the ADVANCED OPTION menu is active you cannot set MOTION to ON When you select a time period in the MOTION settin...

Страница 58: ...e value set by the DHCP server PORT The port number 3007 and 63007 of the monitor is displayed RESET LAN settings are reset CONTROLLER SETTING When controlling the monitor via a network using a 2 Series control processor made by Crestron set the communication parameters CONTROLLER IP Set the IP address of the control processor PORT NUMBER Set the port number used for communication IP ID Set the IP...

Страница 59: ...wn arrows to move the number 1 to 7 of the schedule Use the and buttons to move the cursor horizontally within the particular schedule Use the and buttons to increase the time and select the input port The SET button is used to make a selection If you create a schedule but do not want to set the power on time select in the ON time slot If you do not want to use a power off time select in the OFF t...

Страница 60: ...ority of the input signal is as follows DVI D D SUB NOTE You cannot select other inputs than DVI D OPTION and D SUB When an expansion module is mounted the monitor doesn t enter the sleep mode VIDEO DETECT The target video inputs are HDMI1 YPbPr S VIDEO VIDEO and D SUB When the HDMI1 YPbPr S VIDEO or VIDEO input is detected the detected input is automatically selected When the video signal being d...

Страница 61: ...xceeds the operation guaranteed range the message TEMPERATURE WARNING is displayed on the screen POWER ON DELAY You can adjust the delayed time until the power on mode is activated at the time of recovery from the sleep mode or power on The time is selectable from OFF and 2 4 6 8 10 20 30 40 and 50 seconds TERMINAL SETTING You can select the mode to display the HDMI1 HDMI2 or DVI D signal accordin...

Страница 62: ...longer you can lock the operation buttons By holding down both the and button on the monitor for 3 seconds or longer again you can unlock the operation buttons NORMAL NORMAL DYNAMIC NORMAL Squeeze signal NORMAL FULL Normal size of each signal Recommend picture size OSD information OPTION SDI 3G 1920 x 1080 67kHz 60Hz AUDIO SDI SIZE FULL YPbPr AUDIO ANALOG SIZE FULL S VIDEO NTSC AUDIO ANALOG SIZE F...

Страница 63: ...election of the video signal input Operation HDMI1 or HDMI2 ANALOG HDMI DVI D ANALOG only D SUB ANALOG only OPTION PC OPS compliant computer ANALOG OPS ANALOG OPS DIGITAL SDI SDI BOX ANALOG SDI DISPLAYPORT ANALOG DISPLAYPORT YPbPr ANALOG only S VIDEO ANALOG only VIDEO ANALOG only The audio of HDMI1 or HDMI2 being selected is output as the HDMI audio OPTION can be used when an expansion module is m...

Страница 64: ...AUTO BRIGHTNESS on the OSD screen PICTURE as follows AUTO BRIGHTNESS CONTROL Master monitor LOCAL PRIMARY Slave monitors REMOTE SECONDARY To use a computer to control the monitors When using a computer to control the monitors you must prepare an application software program for control by yourself Brightness of all the monitors can be controlled centrally using a computer if the customer create a ...

Страница 65: ... is mounted on the option slot By pressing the PIP ON OFF button on the wireless remote control you can change the PIP POP and SBS modes in the order shown below Alternatively you can change the modes using the PIP MODE setting of PIP in the OSD main menu See page 52 The resolutions in the PIP and SBS FULL modes are as follows PIP SIZE SMALL 450 pixels X 338 pixels MIDDLE 675 pixels X 450 pixels L...

Страница 66: ...l sensor of the PRIMARY monitor OSD appears on the monitor having the ID number you selected NOTE When the ID selection OSD is being displayed on the PRIMARY monitor press the DISPLAY button on the remote controller again to cancel the ID selection OSD and then control the monitor you selected If you set the remote control mode wrongly and remote control operation becomes unavailable press any but...

Страница 67: ...ings may need to be re adjusted Check the monitor and your display card with respect to the compatibility and recommended signal timings If the displayed text is garbled change the video mode to the non interlace mode and use 60 Hz refresh rate Image of component signal is greenish Check to see if the YPbPr input connector is selected LED on the monitor is not lit No green or red color can be seen...

Страница 68: ...ported Resolution Composite S terminal NTSC PAL SECAM 4 43 NTSC PAL 60 Component 480i 480p 576i 576p 1080i 720p 1080p SDI 480i 576i SD SDI 720p 1080i HD SDI 1080p 3G SDI Audio Input Output Input Connector Analog ø3 5 mm stereo mini jack Digital HDMI x 2 digital audio DISPLAYPORT SDI option Output Connector Analog ø3 5 mm stereo mini jack Digital SDI option External speaker output Speaker connector...

Страница 69: ... Shield 12 TMDS Clock 19 Hot Plug Detect 6 TMDS Data1 13 CEC 7 TMDS Data0 14 Reserved N C on device 3 Digital RGB input DVI D Pin Assignment of DVI D connector 1 TMDS Data2 9 TMDS Data1 17 TMDS Data0 2 TMDS Data2 10 TMDS Data1 18 TMDS Data0 3 TMDS Data2 Shield 11 TMDS Data1 Shield 19 TMDS Data0 Shield 4 NC 12 NC 20 NC 5 NC 13 NC 21 NC 6 DDC Clock 14 5V Power 22 TMDS Clock Shield 7 DDC Data 15 Grou...

Страница 70: ...DEO input MINI DIN 4 pin Pin No Name 1 GND 2 GND 3 Y Luminance 4 C Chroma 6 RS 232C input output Pin No Name 1 NC 2 RXD 3 TXD 4 NC 5 GND 6 NC 7 NC 8 NC 9 NC 7 LAN Modular 8 pin Pin at RJ45 Signal Pair 1 Orange White stripe 2 Orange 3 Green White stripe 4 Blue 5 Blue White stripe 6 Green 7 Brown White stripe 8 Brown ...

Страница 71: ...en oder den Anschluss mehrerer Monitore Deutsch 25 Anschluss eines OPS konformen Computers Deutsch 26 P 6 Anschluss an RS 232C Deutsch 27 Anschluß der RS 232C Steuerung Deutsch 27 P 7 Anschluss an LAN Deutsch 28 Anschluß der LAN Verbindung Deutsch 28 P 8 Anschluss eines USB Geräts Deutsch 29 Anschließen mehrerer USB Geräte mithilfe der USB Hub Funktion Deutsch 29 P 9 Anschluss des Netzkabels an de...

Страница 72: ...ungen zu optimieren ist dieses Produkt mit vier Bildschirmschoner Funktionen ausgestattet GAMMA VENTILATOR HELLIGKEIT BEWEGUNG Einschaltverzögerung Seite 57 Bei Installationen mit vielen Monitoren können Sie mit der Funktion zur Einschaltverzögerung die Monitore nacheinander einschalten Dabei können Sie eine Verzögerung zwischen 2 und 50 Sekunden nach dem Einschalten einstellen Mit dieser Funktion...

Страница 73: ...n im Hochfrequenz Bereich kommen Beim Betrieb dieses Gerätes in Wohngebieten werden wahrscheinlich Störungen hervorgerufen die der Betreiber auf eigene Kosten beheben muss 3 Wir weisen Sie darauf hin dass Änderungen oder Modifikationen die nicht ausdrücklich durch die für die Konformität verantwortlichen Parteien genehmigt wurden zu einem Verfallen der Genehmigung zum Betreiben dieses Gerätes führ...

Страница 74: ...AUS DER STECKDOSE UM STROMSCHLÄGE ZU VERHINDERN ERST NACH DEM TRENNEN DES GERÄTS VOM STROMNETZ IST GEWÄHRLEISTET DASS AN KEINER GERÄTEKOMPONENTE SPANNUNG ANLIEGT IM INNEREN BEFINDEN SICH KEINE VOM BENUTZER ZU WARTENDEN KOMPONENTEN LASSEN SIE WARTUNGSARBEITEN VON QUALIFIZIERTEN WARTUNGSTECHNIKERN DURCHFÜHREN Dieses Symbol weist den Benutzer auf nicht isolierte spannungsführende Komponenten im Gerät...

Страница 75: ... ihrer Nutzungsdauer von Hausmüll getrennt zu entsorgen sind Wenn ein chemisches Symbol unterhalb des oben abgebildeten Symbols erscheint bedeutet dies dass die Batterie bzw der Akku ein Schwermetall in einer bestimmten Konzentration enthält Dies wird wie folgt angegeben Hg Quecksilber 0 0005 Cd Cadmium 0 002 Pb Blei 0 004 In der Europäischen Union gibt es unterschiedliche Sammelsysteme für gebrau...

Страница 76: ...n noch verschlucken Achten Sie auf ausreichende Luftzufuhr damit die entstehende Wärme abgeführt werden kann Decken Sie die Lüftungsschlitze nicht ab und stellen Sie den Monitor nicht neben Heizkörpern oder anderen Wärmequellen auf Stellen Sie keine Gegenstände auf den Monitor Durch Ziehen des Netzkabelsteckers kann das Gerät vom Stromnetz getrennt werden Der Monitor muss in der Nähe einer Steckdo...

Страница 77: ...nenten In allen anderen Ländern ist ein für die Spannung des Stromnetzes geeignetes und zugelassenes Netzkabel zu verwenden dass den Sicherheitsstandards des betreffenden Landes entspricht Folgendes Zubehör ist erhältlich Externe Lautsprecher Monitorfüße SDI BOX Schraube M4 2 Stück Sturzpräventionsklemmen für den Monitor Wandhalterungs Abstandhalter 9 Stück Schutzabdeckung Aufkleber für die Abdeck...

Страница 78: ...einen Mitteilungs Befehl nicht den Hauptnetzschalter ausschalten nicht das Netzkabel abtrennen und auch nicht den Unterbrecher ausschalten Wenn der Wechselstrom unmittelbar nach dem Ausschaltvorgang eingeschaltet wird werden beim nächsten Einschalten alle OSD Einstellungen einschließlich der Auswahl der Sprache wieder auf die Werkseinstellungen zurückgesetzt Wenn die OSD Einstellungen wie oben bes...

Страница 79: ...anderen angeschlossenen MDT552S Anschlüsse IN IN OUT IN OUT 9 LAN Anschluss Dient zum Anschließen eines LAN Kabels 10 VIDEO IN OUT S BNC Buchse Dient zum Anschließen von Videogeräten S VIDEO IN S Video Eingangsanschluss Mini DIN 4 polig VIDEO IN BNC Buchse VIDEO OUT BNC Buchse 11 AUDIO ANALOG IN Eingang für das Audiosignal von externen Geräten wie etwa Computern Videorekordern oder DVD Playern 12 ...

Страница 80: ...s Videos das im Teilbild angezeigt werden soll Taste CHANGE Tauscht das Hauptbild gegen das Teilbild aus und umgekehrt Beschreibung PIP Picture In Picture Bild im Bild Das Teilbild wird im Hauptbild angezeigt POP Picture Outside Picture Bild außerhalb des Bildes Das Teilbild wird rechts unterhalb des Hauptbildes angezeigt SBS Side By Side Nebeneinander Das Hauptbild und das Teilbild werden nebenei...

Страница 81: ... Entriegeln Sie die Abdeckung und ziehen Sie sie in Pfeilrichtung auf 2 Legen Sie die Batterien entsprechend der und Markierungen im Gehäuse ein 3 Bringen Sie die Abdeckung wieder an Vorgehensweise zur Entnahme der Batterien 1 Entriegeln Sie die Abdeckung und ziehen Sie sie in Pfeilrichtung auf 2 Nehmen Sie die Batterien heraus VORSICHT Die falsche Verwendung von Batterien kann dazu führen dass di...

Страница 82: ...USB Hub Funktion Installation des Monitors Anbringen und Entfernen der Monitorfüße Die Standfüße sind optional erhältlich Wand oder Deckenbefestigung Verhindern der Wandberührung durch die Griffe Entfernen der Standfußrahmen Verwendung der Wandhalterungs Abstandhalter Installation im Hochformat oder mit der Vorderseite nach oben Anbringen der Kantenschützer Verwendung des Monitors ohne Blende Seit...

Страница 83: ...n oder eine Naturkatastrophe Legen Sie sich auf keinen Fall dort schlafen wo Sie durch ein Umkippen oder Herunterfallen des Monitors im Falle eines Erdbebens oder anderen Unglücks getroffen werden könnten Entfernen Sie vor einem Transport des Monitors das Seil zur Sicherung desselben Falls Sie dies unterlassen könnte es zu Personenschäden oder einer Beschädigung des Monitors kommen Wählen Sie den ...

Страница 84: ...ßnahmen zur Verhinderung des Herabfallens oder Fallenlassens für den Fall dass es ein Problem mit dem Metallbügel oder dem Einbauort gibt P 2 Installation des Monitors Bei Bedarf durchführen Wand oder Deckenbefestigung Bei auf der Vorderseite liegendem Monitor Legen Sie die Schutzfolie in die der LCD Monitor beim Transport eingewickelt war unter den Bildschirm um ein Verkratzen der Bildschirmoberf...

Страница 85: ...rhältlich 1 Setzen Sie die Wandhalterungs Abstandhalter 9 Stück zwischen den Metallbügel die Wandhalterungs Schraubenlöcher des Monitors und befestigen Sie sie mit Hilfe von Schrauben a a Verwenden Sie für die Montage M6 Eisenschrauben mit einer verliersicheren Federscheibe lang genug um die Dicke des Metallbügels und der des Wandhalterungs Abstandhalters 17 mm aufzunehmen und den Monitor bis zu e...

Страница 86: ...te ist stellen Sie sicher dass VENTILATOR auf EIN gestellt ist indem Sie im KONFIGURATION 1 Menü der OSD Bildschirm Funktion den BILDSCHIRMSCHONER benutzen Installation im Hochformat Das Logo von MITSUBISHI sollte sich von vorne betrachtet auf der LINKE Seite des Monitors befinden HINWEIS Der Monitor verfügt über keine Funktion um die angezeigten Bilder rotieren zu lassen Um Bilder im Hochformat a...

Страница 87: ...g nach dem folgenden Verfahren 2 Lösen Sie die Befestigungsschrauben a der Einfassung um diese vom Monitor zu entfernen VORSICHT Wenn Sie andere Schrauben als die Schrauben a entfernen fällt die Blende auseinander Wenn Sie dies tun könnte die Blende herabfallen was zu Verletzungen oder Schäden am Monitor führen kann a a 3 Ziehen Sie die Trennstreifen von der Schutzabdeckung b ab welche im Schritt ...

Страница 88: ...Sie darauf dass die Polarität der Lautsprecherkabel und der Anschlüsse übereinstimmt rot schwarz Wenn die Polarität nicht übereinstimmt können Probleme mit der Audioausgabe auftreten P 3 Installation der optionalen Lautsprecher Bei Bedarf durchführen HINWEIS Wechseln Sie vom eingebauten Lautsprechermodus zum optionalen Lautsprechermodus sobald Sie den Monitor eingeschaltet haben Weitere Details au...

Страница 89: ...eräte aus und stellen Sie die Verbindungen her Ausführliche Hinweise entnehmen Sie den Handbüchern zu den einzelnen Geräteeinheiten HINWEIS Benutzen Sie ein Audiokabel ohne Widerstand wenn der Audioausgang des Audiogerätes und des PCs eine Stereo Klinkenbuchse aufweist Wird ein Audiokabel mit Widerstand verwendet kann der Audiopegel nicht erhöht werden oder es erfolgt keine Audioausgabe Anschlussü...

Страница 90: ...nd einem Band Zubehör Entfernen Sie die Schraube von dem Monitor Befestigen Sie die Klemme an dem Monitor mit der Schraube die Sie in Schritt entfernt haben Sichern Sie das HDMI Kabel und die Klemme mit dem Band HINWEIS Das Band ist nicht wiederverwendbar Der Monitor wird mit 2 Ersatz Bändern geliefert Um das Band zu ersetzen schneiden Sie das vorhandene Band ab entfernen Sie es und bringen Sie ei...

Страница 91: ...gten Wiederholfrequenzen und stellt die Bildschirminformationen ein Wenn ein PC oder ein anderes Gerät angeschlossen wird werden die Bilder automatisch richtig dargestellt Weitere Informationen finden Sie auf der Seite zum Thema AUTOM EINRICHTUNG AUTOM EINSTELLUNG Werkseitig voreingestellte Wiederholfrequenz Auflösung Frequenz Bemerkungen Auflösung Frequenz Bemerkungen Horizontal Vertikal Horizont...

Страница 92: ...erprüfen Stellen Sie die RGB Funktion unter ENERGIESPAREN im Menü KONFIGURATION 1 auf AUS wenn DVI D im Reihenschaltungsmodus verwendet wird Audioanschluss Schließen Sie ein Audiokabel ø3 5 mm Stereo Klinke im Handel erhältlich an den AUDIO ANALOG IN Anschluss an Wählen Sie beim Anschließen eines HDMI Kabels HDMI1 oder HDMI2 entsprechend der angeschlossenen Anschlussbuchse durch Drücken der INPUT ...

Страница 93: ...nitor oder mit der Taste YPbPr auf der Fernbedienung YPbPr aus Im Moment der Auswahl wird das Audiosignal automatisch auf ANALOG geschaltet Um eine Audioverbindung herzustellen schließen Sie ein Audiokabel ø3 5 mm Stereo Klinke RCA an die Anschlussbuchse AUDIO ANALOG IN an Da der Ton wird automatisch auf ANALOG umgeschaltet wird wenn YPbPr gewählt wird wird der Ton nur bei Anschluss des Kabels aus...

Страница 94: ...ein Ende eines BNC Kabels an den VIDEO OUT Anschluss des ersten Monitors und das andere Ende an den VIDEO IN Anschluss des zweiten Monitors angeschlossen werden HINWEIS Mit Hilfe der Reihenschaltung können Sie bis zu 5 Monitore bei Verwendung von 5 Meter Kabeln verbinden Jedoch kann die maximale Anzahl der anschließbaren Monitore je nach den zu benutzenden angeschlossenen Geräten begrenzt sein Es ...

Страница 95: ...deckung die Sie entfernt haben auf weil Sie wieder eingesetzt wird wenn die SDI BOX nicht montiert ist 3 Installieren Sie die optionale Steckplatz Abdeckung Zubehör mit den 5 Schrauben b die Sie in Schritt 2 entfernt haben b 4 Legen Sie die SDI BOX option in den optionalen Steckplatz und befestigen Sie sie am Monitor mit den 2 Schrauben b die Sie in Schritt 2 entfernt haben Befestigen Sie den Grif...

Страница 96: ...in Schritt 2 entfernt haben b 4 Legen Sie den OPS konformen Computer im Handel erhältlich in den optionalen Steckplatz und befestigen Sie ihn am Monitor mit den 2 Schrauben b die Sie in Schritt 2 entfernt haben Befestigen Sie den Griff mit den 2 Schrauben a die Sie in Schritt 2 entfernt haben a b VORSICHT Nach der Installation der optionalen Steckplatz Abdeckung stellen Sie sicher dass der OPS kon...

Страница 97: ...lich an den Computer an Wenn Sie darüber hinaus zwei oder mehr Monitore anschließen wie in der nachstehenden Abbildung dargestellt schließen Sie den RS 232C OUT Anschluss des ersten Monitors und den RS 232C IN Anschluss des zweiten Monitors über ein Reverse Kabel vom Typ RS 232C im Handel erhältlich an Indem Sie diese Verbindungen mehrfach auf ähnliche Weise herstellen können Sie mehrere Monitore ...

Страница 98: ...ht gekreuztes LAN Kabel im Handel erhältlich an den LAN Hub an Schließen Sie den Monitor über ein nicht gekreuztes LAN Kabel im Handel erhältlich an den LAN Hub an Wenn Sie zwei oder mehr Monitore anschließen können Sie den Monitor wie oben beschrieben über ein nicht gekreuztes LAN Kabel im Handel erhältlich an den LAN Hub anschließen HINWEIS Wenn Sie ein gekreuztes LAN Kabel im Handel erhältlich ...

Страница 99: ...rt Standard B am Monitor mit einem USB Kabel im Handel erhältlich an Bei Verwendung eines OPS konformen Computers Installieren Sie einen OPS konformen Computer intern angeschlossen 2 Anschluss eines USB Geräts an den nachgeschalteten Port dieses Monitors HINWEIS Die USB Hub Funktion kann den Monitor nicht kontrollieren Bis zu 5 Hubs können über die Hub Funktion dieses Monitors hintereinandergescha...

Страница 100: ...ersehen vom Monitor getrennt wird 1 Stecken Sie den Netzstecker des Netzkabels ganz und fest in die Anschlussbuchse AC IN des Monitors 2 Sichern Sie den Netzstecker mit Hilfe des Kabelhalters Zubehör VORSICHT Stecken Sie den Kabelhalter nicht in die Steckdose Andernfalls besteht die Gefahr eines Stromschlages Machen Sie beide Enden des Kabelhalters am Monitor fest Lassen Sie den Kabelhalter im Tei...

Страница 101: ...eite 38 Seiten 40 bis 41 Seiten 42 bis 44 Seite 45 Einschalten aller angeschlossenen Geräte Auswahl des Videoeingangs Steuern der externen Geräte Auswahl der OSD Sprache Nur D SUB Automatische Einrichtung Auswahl des Bildmodus Bildschirmeinstellung Bildeinstellung Lautstärke Balance und Klangregelung Lautsprechereinstellungen Zeitplaneinstellung Fernbedienung Einstellung des USB Hubs Bedienung ...

Страница 102: ...ie die Tasten verwenden möchten überprüfen Sie ob der Hauptnetzschalter eingeschaltet ist Betriebsanzeige leuchtet Hauptnetzschalter 3 Wenn die Betriebsanzeige rot leuchtet drücken Sie den Netzschalter des Monitors Die Betriebsanzeige wird grün Netzschalter Netzschalter oder Fernbedienung HINWEIS Innerhalb von 2 Sekunden nach dem Ausschalten der Stromversorgung durch die POWER Taste auf der drahtl...

Страница 103: ...erhalb von wenigen Sekunden in den Energiesparmodus VIDEO Wenn das Sync Signal des Videoeingangs YPbPr S VIDEO oder VIDEO beendet wird wechselt der Monitor innerhalb von etwa 10 Minuten in den Energiesparmodus Beschreibung DPM Akronym für Display Power Management Energiesparfunktion HINWEIS Die Standardeinstellung der Energiesparfunktion für RGB und VIDEO lautet EIN eingeschaltet Wenn sich ein Erw...

Страница 104: ...OSD Menü des Videoeingangs angezeigt Mit den Tasten und können Sie den gewünschten Videoeingang auswählen Folgende Videoeingänge stehen zur Verfügung HDMI1 HDMI2 DVI D D SUB OPTION DISPLAYPORT YPbPr S VIDEO und VIDEO Wenn Sie die INPUT Taste erneut drücken wird der ausgewählte Video Eingang angezeigt OPTION kann verwendet werden wenn ein Erweiterungsmodul in den optionalen Steckplatz eingesetzt wi...

Страница 105: ...D Sprache Zeigen Sie das OSD Menü durch Drücken der Taste MENU auf der Fernbedienung oder der Taste EXIT auf der Rückseite des Monitors an Unter Verwendung der Option SPRACHE im Menü KONFIGURATION 1 der OSD Bildschirmfunktion können Sie die OSD Sprache auswählen Siehe Seite 53 U 3 Steuern der externen Geräte DVD Player usw PC ...

Страница 106: ... dort dann das Menü AUTOM EINRICHTUNG indem Sie im Menü KONFIGURATION 1 den Punkt AUTOM EINRICHTUNG wählen Durch Drücken der Taste SET können Sie automatisch und korrekt die Display Größe horizontale vertikale Position den Takt die Taktphase und den Pegel des Eingangssignals einstellen HINWEIS Die automatische Einrichtung funktioniert nur bei D SUB Anzeigen des OSD Menüs Direktes Anzeigen des AUTO...

Страница 107: ...die horizontalen vertikalen Auflösungen einstellen um einen passenden Bildschirmzustand zu erhalten HINWEIS Die Positionseinstellung funktioniert nur bei D SUB YPbPr S VIDEO und VIDEO Die Einstellung von Takt und Auflösung funktioniert nur bei D SUB Die Zoomeinstellung funktioniert bei allen Videoeingängen U 6 Auswahl des Bildmodus HIGHBRIGHT Maximale Helligkeit STANDARD Werkseitige Einstellung sR...

Страница 108: ... die gewünschte Bildqualität zu erhalten U 9 Lautsprechereinstellungen Bei Bedarf durchführen Wählen Sie die eingebauten Lautsprecher oder die speziellen externen Lautsprecher Option in der Lautsprechereinstellung im OSD Menü aus Zeigen Sie das OSD Menü durch Drücken der Taste MENU auf der Fernbedienung oder der Taste EXIT auf der Rückseite des Monitors an Mit LAUTSPRECHER im Menü AUDIO der OSD Bi...

Страница 109: ...nstellung zeigen Sie das OSD Menü durch Drücken der Taste MENU auf der Fernbedienung oder der Taste EXIT auf der Rückseite des Monitors an HINWEIS Wenn kein Ton ausgegeben wird wenn ein OPS konformer Computer verwendet wird überprüfen Sie ob der Monitor als Audio Ausgangs Quelle vom Betriebssystem des Computers ausgewählt worden ist Für das Auswahlverfahren schauen Sie bitte in den Hilfsinformatio...

Страница 110: ...rnbedienung oder der Taste EXIT auf der Rückseite des Monitors an Unter Verwendung von ZEITPLAN im Menü KONFIGURATION 2 der OSD Bildschirmfunktion können Sie die Funktionen Ein Ausschalten sowie die Eingangsauswahl programmieren U 11 Zeitplaneinstellung Bei Bedarf durchführen ...

Страница 111: ...auszuführen Wenn Sie JEDEN TAG auswählen können Sie keine einzelnen Wochentage oder JEDE WOCHE auswählen MO SO Wählen Sie die Wochentage aus an denen der Zeitplan ausgeführt werden soll Wenn Sie nicht zusätzlich JEDE WOCHE auswählen wird die Auswahl der Wochentage nach der ersten Ausführung des Zeitplans gelöscht JEDE WOCHE Wählen Sie diese Option aus um den Zeitplan an den ausgewählten Wochentage...

Страница 112: ...raus bei Ihrem Händler Wählen Sie zum Senden von Befehlen über ein Tastenfeld 2s oder 30s für den KONTROLLE TIME OUT in KONFIGURATION 2 im OSD Menü Gehen Sie bei der LAN Steuerung entsprechend vor Adresscode Funktionscode Datencode Endcode HEX 30h 30h Function Data 0Dh ASCII 0 0 Function Data Addresscode 30h 30h ASCII Code 0 0 unveränderlich Funktionscode Ein Code für jede feste Steuerbewegung Dat...

Страница 113: ...n Befehls mindestens 14 Sekunden lang warten Nach dem Senden des Befehls für Videoeingangsauswahl warten Sie bis zum Senden des nächsten Befehls mindestens 5 Sekunden lang Andernfalls kann der Monitor eventuell nicht innerhalb von 600 ms antworten Setzen Sie den Timeout Wert des Steuergerätes auf der Host Seite auf 30 Sekunden oder länger Im Power Off Modus funktionieren nur die im nächsten Abschn...

Страница 114: ...2B 20 33 31 OPTION kann verwendet werden wenn ein Erweiterungsmodul in den optionalen Steckplatz eingesetzt wird HINWEIS Obwohl der Monitor auf den Steuerbefehl für das Ein Ausschalten reagiert der vom OPS konformen Computer gesendet wird führt er kein Ein Ausschalten durch Dies ist keine Fehlfunktion Für den automatischen Betrieb verwenden Sie ZEITPLAN im Menü KONFIGURATION 2 der OSD Bildschirmfu...

Страница 115: ...USB Hub erkannt wird Der USB Hub dieses Monitors wird vom Computer erkannt und der standardmäßige Gerätetreiber des Betriebssystems wird automatisch installiert Einige Computer erkennen den USB Hub möglicherweise nicht auch wenn er angeschlossen ist In diesem Fall installieren Sie den Gerätetreiber für den USB Hub mithilfe der Gebrauchsanweisung des Computers HINWEIS Der Computer benötigt einige S...

Страница 116: ...hend dargestellten Informationsbildschirme Menübildschirme für Einstellungen und für Auswahlen Bildschirm des Untermenüs Bild zurücksetzen Beispiel Seite 48 Seite 50 Seite 51 Seite 52 Seite 53 Seite 54 Seite 56 KONFIGURATION 1 CONFIGURATION1 KONFIGURATION 2 CONFIGURATION2 ERWEITERTE EINSTELLUNGEN ADVANCED OPTION Konfiguration des OSD Bildschirms Dieser Monitor ist mit der OSD Funktion On Screen Di...

Страница 117: ...ücken Sie Taste SET um das ausgewählte Untermenü zu übernehmen Drücken Sie die Taste um die Einstellung auszuwählen und drücken Sie dann die Taste SET um diese zu übernehmen Drücken Sie Taste INPUT um das ausgewählte Untermenü zu übernehmen Drücken Sie die Taste um die Einstellung auszuwählen und drücken Sie dann die Taste INPUT um diese zu übernehmen Der OSD Bildschirm wird ausgeblendet wenn Sie ...

Страница 118: ...schminderungsniveaus Drücken Sie die Taste um das Rauschminderungsniveau zu erhöhen HINWEIS Der sRGB Bildmodus ist standardmäßig eingestellt und kann nicht geändert werden TÖNUNG TINT TÖNUNG Sie können alle Farben gleichzeitig einstellen Drücken Sie die Taste PLUS um eine grüne Tönung hinzuzufügen Drücken Sie die Taste MINUS um eine violette Tönung hinzuzufügen ROT MAGENTA BLAU CYAN GRÜN oder GELB...

Страница 119: ...Sie keine anderen Punkte außer KONTROLLE einzeln anpassen LOKAL Die AUTOM HELLIGKEIT Funktion ist aktiviert und Sie können KONTROLLE und nachfolgende Punkte individuell anpassen GESTEUERT Die AUTOM HELLIGKEIT Funktion ist aktiviert Zusätzlich schaltet der Monitor in den Interkommunikationsmodus in dem mehrere Monitore gemeinsam gesteuert werden Siehe Seite 60 AUS Die zugehörige Funktion ist deakti...

Страница 120: ... der Bildschirm durch verschiedene Vergrößerungen in der Mitte und an den Rändern des Bildschirms ausgefüllt wird ANWENDER Mit der Einstellung ANWENDER ZOOM können Sie das Bild horizontal und vertikal nach Wunsch strecken REAL Das Bild wird ohne Vergrößerung oder Verkleinerung dargestellt HINWEIS Der DYNAMISCH Modus zeigt Bilder mit einem Seitenverhältnis von 16 9 wie etwa solche mit einer Auflösu...

Страница 121: ... die Höhen zu dämpfen TIEFEN BASS Durch Erhöhen oder Verringern des Werts werden die Tiefen verstärkt bzw gedämpft Drücken Sie die Taste um die Tiefen zu verstärken Drücken Sie die Taste um die Tiefen zu dämpfen LAUTSPRECHER SPEAKER Sie können zwischen den eingebauten und den externen Stereo Lautsprechern Option wechseln INTERN Die Tonausgabe erfolgt über die eingebauten Lautsprecher Maximale Ausg...

Страница 122: ...nstellen Drücken Sie die Taste PLUS um den Teilbildschirm nach rechts zu verschieben Drücken Sie die Taste MINUS um den Teilbildschirm nach links zu verschieben BIB V POSITION PIP V POSITION Sie können die vertikale Position des Teilbildschirms einstellen Drücken Sie die Taste PLUS um den Teilbildschirm nach oben zu verschieben Drücken Sie die Taste MINUS um den Teilbildschirm nach unten zu versch...

Страница 123: ... automatisch eingeschaltet HELLIGKEIT Wenn Sie EIN auswählen verringert sich die Helligkeit BEWEGUNG Der Bildschirm wird in regelmäßigen Abständen leicht in horizontaler und vertikaler Richtung verschoben um Bildschatten zu vermeiden HINWEIS Wenn TILING im Menü ERWEITERTE EINSTELLUNGEN aktiviert ist können Sie nicht BEWEGUNG auf EIN stellen Wenn Sie bei der Einstellung BEWEGUNG einen Zeitraum ausw...

Страница 124: ...tors werden angezeigt RÜCKSETZEN Die LAN Einstellungen werden zurückgesetzt CONTROLLER SETTING CONTROLLER SETTING Stellen Sie bei der Steuerung des Monitors über ein Netzwerk mit einem 2 Serien Steuerprozessor von Crestron die Kommunikationsparameter ein CONTROLLER IP Legen Sie die IP Adresse des Steuerprozessors fest PORT NUMBER Stellen Sie die Portnummer ein welche für die Kommunikation verwende...

Страница 125: ...an auszuwählen verwenden Sie die Pfeiltasten nach oben bzw unten mit denen Sie die Nummer 1 bis 7 des gewünschten Zeitplans auswählen Mit den Tasten und verschieben Sie den Cursor horizontal innerhalb des Zeitplans Mit den Tasten und erhöhen Sie die Zeiteinstellung und wählen den Eingangsanschluss aus Mit der Taste SET wählen Sie eine Option aus Wenn Sie einen Zeitplan erstellen möchten ohne eine ...

Страница 126: ...es Eingangssignals ist wie folgt DVI D D SUB HINWEIS Sie können keine anderen Eingänge als DVI D OPTION und D SUB auswählen Wenn ein Erweiterungsmodul montiert ist wechselt der Monitor nicht in den Ruhemodus VIDEO DETECT Die Ziel Videoeingänge sind HDMI1 YPbPr S VIDEO VIDEO und D SUB Wenn der Eingang HDMI1 YPbPr S VIDEO oder VIDEO erkannt wird wird der erkannte Eingang automatisch ausgewählt Wenn ...

Страница 127: ...chalteten Modus zum Zeitpunkt des Wechsels vom Energiesparmodus in den eingeschalteten Modus einstellen Dabei können Sie zwischen OFF und 2 4 6 8 10 20 30 40 und 50 Sekunden wählen ANSCHLUSS EINSTELLUNG TERMINAL SETTING Sie können auswählen in welchem Modus das HDMI1 HDMI2 oder DVI D Signal angezeigt wird Dies hängt vom Signalformat und vom Quellgerät ab HDMI SIGNAL Wählen Sie diese Einstellung be...

Страница 128: ...tivieren halten Sie die Tasten und mindestens 3 Sekunden lang gedrückt Um die Tasten zu aktivieren halten Sie die Tasten und erneut mindestens 3 Sekunden lang gedrückt NORMAL DYNAMISCH NORMAL Komprimiertes Signal NORMAL NORMAL VOLLBILD Normalgröße jedes Signals Empfohlene Bildgröße OSD Informationen OPTION SDI 3G 1920 x 1080 67kHz 60Hz AUDIO SDI SIZE FULL YPbPr AUDIO ANALOG SIZE FULL S VIDEO NTSC ...

Страница 129: ...ren Auswahl des Videoeingangssignals Betrieb HDMI1 oder HDMI2 ANALOG HDMI DVI D Nur ANALOG D SUB Nur ANALOG OPTION PC OPS konformer Computer ANALOG OPS ANALOG OPS DIGITAL SDI SDI BOX ANALOG SDI DISPLAYPORT ANALOG DISPLAYPORT YPbPr Nur ANALOG S VIDEO Nur ANALOG VIDEO Nur ANALOG Das ausgewählte HDMI1 oder HDMI2 Audiosignal wird als das HDMI Audiosignal ausgegeben OPTION kann verwendet werden wenn ei...

Страница 130: ...r Computer müssen Sie selbst ein entsprechendes Steuerprogramm eingeben Die Helligkeit aller Monitore kann zentral über einen Computer geregelt werden wenn der Benutzer eine entsprechende Anwendung für das Ferneinlesen der Werte von zwei Helligkeitssensoren eines beliebigen Monitors einsetzt und diese an alle Monitore überträgt 1 Verbinden Sie den Eingang RS 232C IN an der Master Einheit wie oben ...

Страница 131: ...den optionalen Steckplatz eingesetzt wird Drücken Sie auf der Fernbedienung die Tasten PIP ON OFF BIB EIN AUS um zwischen dem PIP dem POP und dem SBS Modus wie in der unten stehenden Abbildung zu wechseln Alternativ können Sie die Modi über die Einstellung BIB MODUS unter PIP im OSD Hauptmenü ändern Siehe Seite 52 Auflösung PIP und SBS VOLLBILD Modus PIP GRÖSSE Bild Im Bild BIB KLEIN 450 Pixel X 3...

Страница 132: ...un wird die Anzeige auf dem Bildschirm des Monitors angezeigt der die von Ihnen ausgewählte ID Nummer aufweist HINWEIS Drücken Sie bei ID Auswahlanzeige durch den PRIMÄR Monitor erneut die DISPLAY Taste auf der Fernbedienung um die ID Auswahlanzeige zu beenden und den ausgewählten Monitor zu steuern Falls Sie den Fernbedienungsmodus falsch eingestellt haben und der Fernbedienungsbetrieb nicht zur ...

Страница 133: ...d der Anzeigemodus geändert müssen die OSD Bildeinstellungen gegebenenfalls erneut angepasst werden Überprüfen Sie ob für Monitor und Grafikkarte die empfohlenen Signaltimings eingestellt wurden und ob die Geräte kompatibel sind Ist der Text verstümmelt aktivieren Sie einen Videomodus ohne Zeilensprung Non Interlaced und eine Wiederholfrequenz von 60 Hz Das Komponentensignal wird grünlich angezeigt...

Страница 134: ...osit S Klemme NTSC PAL SECAM 4 43NTSC PAL 60 Komponent 480i 480p 576i 576p 1080i 720p 1080p SDI 480i 576i SD SDI 720p 1080i HD SDI 1080p 3G SDI Audioeingang ausgang Eingang Analog ø 3 5 mm Stereo Mini Klinkenstecker Digital HDMI x 2 digitales Audio DISPLAYPORT SDI Option Ausgang Analog ø 3 5 mm Stereo Mini Klinkenstecker Digital SDI Option Externer Lautsprecherausgang Lautsprecheranschluss L R Imp...

Страница 135: ...19 Hot Plug Erkennung 6 TMDS Daten 1 13 CEC 7 TMDS Daten 0 14 Nicht verbunden N C on device 3 Digitaler RGB Eingang DVI D Pinbelegung für DVI D Anschluss 1 TMDS Daten2 9 TMDS Daten1 17 TMDS Daten0 2 TMDS Daten2 10 TMDS Daten1 18 TMDS Daten0 3 TMDS Daten 2 Abschirmung 11 TMDS Daten 1 Abschirmung 19 TMDS Daten 0 Abschirmung 4 NC 12 NC 20 NC 5 NC 13 NC 21 NC 6 DDC Takt 14 5 V Versorgungsspannung 22 T...

Страница 136: ...hnung 1 GND 2 GND 3 Y Luminiszenz 4 C Sättigung 6 RS 232C Eingang Ausgang Pin Nr Bezeichnung 1 NC 2 RXD 3 TXD 4 NC 5 GND 6 NC 7 NC 8 NC 9 NC 7 LAN Modular 8 polig Kontakt Nr bei RJ45 Signal Paar 1 Orange weiß gestreift 2 Orange 3 Grün weiß gestreift 4 Blau 5 Blau weiß gestreift 6 Grün 7 Braun weiß gestreift 8 Braun Pinbelegung Fortsetzung ...

Страница 137: ...xiones de múltiples monitores Español 25 Conexión de un ordenador compatible con OPS Español 26 P 6 Conexión del cable RS 232C Español 27 Control del monitor a través del cable RS 232C Español 27 P 7 Conexión de LAN Español 28 Conexión del monitor mediante LAN Español 28 P 8 Conexión de un dispositivo USB Español 29 Conexión de varios dispositivos USB mediante la función de concentrador USB Españo...

Страница 138: ...del panel incluso durante exigentes aplicaciones de señalización este producto está equipado con cuatro funciones de protección de pantalla GAMMA VENTILADOR BRILLO MOVIMIENTO Demora del encendido Página 57 Para instalaciones en las que se emplea un gran número de monitores la función de demora del encendido puede encender los monitores en secuencia con una demora entre 2 50 segundos después de que...

Страница 139: ...adiofrecuencia y si no se instala y utiliza de acuerdo con las instrucciones podría generar interferencia en las radio comunicaciones La operación de este equipo en un área residencial comúnmente ocasiona interferencia por lo que el usuario debe corregir la interferencia por su propia cuenta 3 Se le advierte que los cambios o modificaciones no expresamente aprobados por la parte responsable de con...

Страница 140: ...TÁ DESCONECTADO DEL ENCHUFE DE PARED PARA ASEGURARSE COMPLETAMENTE DE QUE NO LLEGA CORRIENTE A LA UNIDAD DESCONECTE EL CABLE DE ALIMENTACIÓN DE LA TOMA DE CA NO RETIRE LA CUBIERTA O LA PARTE TRASERA EL MONITOR NO CONTIENE PIEZAS QUE DEBA MANIPULAR EL USUARIO DEJE QUE SEA EL PERSONAL DE SERVICIO CUALIFICADO QUIEN SE ENCARGUE DE LAS TAREAS DE SERVICIO Este símbolo advierte al usuario de que el produ...

Страница 141: ...nte del resto de sus residuos domésticos Si hay un símbolo químico impreso debajo del símbolo mostrado arriba este símbolo químico significa que la pila batería o el acumulador contienen un metal pesado con cierta concentración Esto se indicará de la forma siguiente Hg mercurio 0 0005 Cd cadmio 0 002 Pb plomo 0 004 En la Unión Europea existen sistemas de recogida específicos para productos eléctri...

Страница 142: ...ventilado para permitir que el calor se disipe sin problemas No bloquee las aberturas ventiladas ni coloque el monitor cerca de un radiador u otras fuentes de calor No coloque nada sobre el monitor En caso de emergencia tire del conector del cable de alimentación si debe desconectar el sistema de la tensión de alimentación El monitor debería estar instalado cerca de una caja de enchufe de fácil ac...

Страница 143: ... de la salida de potencia que esté autorizado y cumpla las normas de seguridad del país correspondiente Los componentes siguientes son opcionales Altavoz externo Soportes SDI BOX Abrazadera x 2 Para la protección contra caídas Abrazadera x 2 Para sujetar los cables HDMI Cantonera x 4 Abrazadera x 3 Para los cables de fijación Tope para montar en la pared x 9 Cubierta protectora Cubierta de la ranu...

Страница 144: ...e encendido NOTA Durante 2 segundos tras apagar la alimentación mediante el botón POWER del control remoto inalámbrico o del monitor o mediante un comando de comunicación no apague el interruptor principal de encendido no desconecte el cable de alimentación ni apague el interruptor diferencial Si la alimentación de CA se desconecta inmediatamente después de la operación de apagado puede que todos ...

Страница 145: ...2S conectado Conectores y terminales IN IN OUT IN OUT 9 Conector LAN Se conecta con un cable de LAN 10 VIDEO IN OUT Conector S BNC Sirve para conectar dispositivos de vídeo S VIDEO IN Conector de entrada S Video mini DIN de 4 clavijas VIDEO IN Conector BNC VIDEO OUT Conector BNC 11 AUDIO ANALOG IN Para la entrada de señal de audio desde dispositivos externos como ordenadores VCR o reproductores de...

Страница 146: ...el video que se muestra en la subimagen Botón CHANGE Cambia la imagen principal por la subimagen Descripción PIP Picture In Picture Imagen en Imagen La subimagen se muestra dentro de la imagen principal POP Picture Outside Picture Imagen fuera de Imagen La subimagen se muestra en la parte inferior derecha de la imagen principal SBS Side By Side Lado Con Lado La imagen principal y la subimagen se m...

Страница 147: ...distancia El mando a distancia funciona con pilas AAA de 1 5 V Cómo instalar las pilas 1 Desbloquee la tapa y tire de ella en la dirección que indica la flecha 2 Coloque las pilas siguiendo la indicación de los polos y que hay en el receptáculo 3 Vuelva a colocar la tapa Cómo retirar las pilas 1 Desbloquee la tapa y tire de ella en la dirección que indica la flecha 2 Retire las pilas PELIGRO La ut...

Страница 148: ...ón de concentrador USB Instalación del monitor Instalación y retirada del soportes Los soportes están disponibles de forma opcional Utilización del soporte para montar en la pared o bajo el techo Cómo evitar que las asas toquen la pared Retirada de los bastidores guía del soporte Uso de los topes para montar en la pared Instalación en posición vertical o con la pantalla mirando hacia arriba Coloca...

Страница 149: ... cualquier clase de terremotos o desastres No duerma en un lugar donde el monitor pueda caer en caso de terremoto u otros desastres Antes de trasladar el monitor retire la cuerda que lo asegura De lo contrario podría ocurrir un accidente o el monitor podría sufrir daños Determine la ubicación de la instalación PELIGRO NO INTENTE INSTALAR EL MONITOR LCD USTED MISMO La instalación de la pantalla LCD...

Страница 150: ... opcional Bastidor guía 200 200 624 624 200 200 307 5 411 5 52 PELIGRO Para evitar que el monitor caiga o vuelque Instale el monitor utilizando soportes metálicos para instalación en paredes o techos disponible por separado bajo su propia responsabilidad Para una descripción detallada del procedimiento de instalación consulte las instrucciones suministradas con los soportes metálicos Para reducir ...

Страница 151: ... montar en la pared 9 piezas entre el soporte metálico y los orificios de los tornillos para montar en la pared del monitor y fíjelos mediante tornillos a a Para el montaje utilice tornillos de hierro M6 con arandela de retención con una longitud suficiente como para atravesar el grosor del soporte metálico y del tope para montar en la pared 17 mm y penetrar en el monitor a una profundidad de 10 m...

Страница 152: ...ición hacia arriba asegúrese de ajustar la opción VENTILADOR en ENCENDIDO usando PROTECTOR PANTALLA en el menú CONFIGURACIÓN 1 de la función de pantalla OSD Instalación en posición vertical El logotipo de MITSUBISHI debe quedar situado a la IZQUIERDO mirando el monitor desde la parte delantera NOTA Este monitor no dispone de una función que permita rotar las imágenes visualizadas Para visualizar l...

Страница 153: ...ta protectora de acuerdo con el procedimiento siguiente 2 Desenrosque los tornillos a que sujetan el marco para desmontarlo del monitor PELIGRO Si quita cualquier otro tornillo a que no sea uno de los marcados a el panel se desarmará Si así lo hiciera el panel se podría caer provocando una lesión personal o dañando el monitor a a Despegar los separadores 3 Despegue los separadores de la cubierta p...

Страница 154: ...polaridad de los cables del altavoz con la de las terminales rojo negro Una polaridad equivocada provocaría problemas con la señal de salida de audio P 3 Instalación de los altavoces opcionales Llevar a cabo si fuera necesari NOTA Cambie del modo de altavoces incorporados al modo de altavoces opcionales una vez que haya encendido el monitor Consulte la sección Cómo utilizar de la página 31 para ob...

Страница 155: ...gar apague todos los equipos acoplados y realice las conexiones Consulte el manual del usuario incluido con cada pieza del equipo NOTA Utilice el cable de audio sin resistencia si el terminal de salida de audio del dispositivo de audio y PC es una miniclavija estéreo Si se utiliza un cable de audio con resistencia puede que el nivel de la señal de audio no aumente o que no se emita Esquema de cone...

Страница 156: ...cesorio Retire el tornillo del monitor Instale la abrazadera en el monitor con el tornillo que ha retirado en el paso Fije el cable HDMI y la abrazadera con la brida NOTA La brida no se puede reutilizar Con el monitor se suministran 2 bridas de recambio Para sustituir la brida corte y retire la brida existente y coloque una nueva que tenga la misma forma disponible por separado 2 5 mm de anchura y...

Страница 157: ...ingue automáticamente las cadencias que se muestran en la tabla a continuación y ajusta la información de la pantalla Cuando se conecta un PC u otro dispositivo las imágenes se muestran correctamente de forma automática Consulte la página en la que se describe CONFIG AUTOMÁTICA AUTO AJUSTE Temporizador definido de fábrica Resolución Frecuencia Comentarios Resolución Frecuencia Comentarios Horizont...

Страница 158: ...se pueden conectar en su entorno de instalación Ajuste RGB de AHORRO DE ENERGÍA del menú CONFIGURACIÓN 1 en APAGADO cuando utilice DVI D en el modo de cadena de margarita Conexión de audio Conecte un cable de audio mini estéreo de ø 3 5 mm disponible por separado al conector AUDIO ANALOG IN Al conectar un cable HDMI seleccione HDMI1 o HDMI2 según el conector que utilice pulsando el botón INPUT del...

Страница 159: ...ne YPbPr mediante el botón INPUT del monitor o el botón YPbPr del control remoto inalámbrico En el momento en que se realiza la selección el audio cambia automáticamente a ANALOG Para la conexión de audio conecte un cable de audio mini estéreo de ø 3 5 mm RCA al conector AUDIO ANALOG IN Puesto que el audio cambia automáticamente a ANALOG al seleccionar YPbPr la señal de audio se envía simplemente ...

Страница 160: ...te uno de los extremos de un cable BNC al conector VIDEO OUT del primer monitor y el otro extremo al conector VIDEO IN del segundo monitor NOTA En la conexión de cadena puede conectar hasta 5 monitores si utiliza cables de 5 metros Sin embargo el número máximo de monitores que se pueden conectar puede verse limitado en función de los dispositivos conectados que se vayan a utilizar Le recomendamos ...

Страница 161: ...imentación para evitar averías y descargas eléctricas 2 Afloje los 2 tornillos a y retire el asa Afloje los 7 tornillos b y retire la cubierta opcional b b b b a a NOTA Conserve la cubierta opcional que ha retirado ya que deberá volver a colocarla cuando no monte la SDI BOX 3 Instale la cubierta de la ranura de opciones accesorio con los 5 tornillos b que ha retirado en el paso 2 b 4 Inserte la SD...

Страница 162: ...cciones del SDI BOX Extracción del módulo SDI BOX Sujete la manilla del módulo SDI BOX para extraerlo PELIGRO Utilice la manilla únicamente para extraer el módulo SDI BOX Se pueden ocasionar daños si se tira del cable SDI BNC o si se utilizan otros medios 3 Instale la cubierta de la ranura de opciones accesorio con los 5 tornillos b que ha retirado en el paso 2 b 4 Inserte un ordenador compatible ...

Страница 163: ...le RS 232C de tipo inverso disponible por separado Asimismo cuando conecte dos o más monitores como se indica en la siguiente ilustración conecte el conector RS 232 OUT del primer monitor con el conector RS 232 IN del segundo monitor mediante un cable RS 232C de tipo inverso disponible por separado Al repetir de nuevo esta misma conexión puede conectar monitores en una configuración de cadena NOTA...

Страница 164: ...r LAN mediante un cable LAN de tipo directo disponible por separado Conecte este monitor con el concentrador LAN mediante un cable LAN de tipo directo disponible por separado Cuando vaya a conectar dos o más monitores puede conectar el monitor y el concentrador LAN mediante un cable LAN de tipo directo disponible por separado como se ha descrito anteriormente NOTA Si utiliza un cable LAN de tipo c...

Страница 165: ...del monitor mediante un cable USB disponible por separado Cuando se utilice un ordenador compatible con OPS Instale un ordenador compatible con OPS conectado de forma interna 2 Conecte un dispositivo USB al puerto de recepción del monitor NOTA La función de concentrador USB no puede controlar el monitor La función de concentrador de este monitor admite hasta 5 concentradores en cascada Realice una...

Страница 166: ... de corriente 1 Inserte el conector del cable de alimentación totalmente y con firmeza en el conector AC IN del monitor 2 Fije el conector de alimentación con la sujeción para el cable accesorio PELIGRO No inserte la sujeción para el cable en la toma de corriente Si lo hace puede provocar una descarga eléctrica Coloque ambos extremos de la sujeción para el cable en el monitor Encaje la sujeción pa...

Страница 167: ... Página 38 Páginas 40 a 41 Páginas 42 a 44 Página 45 Encender todos los dispositivos conectados Seleccionar la señal de entrada de vídeo Controlar los dispositivos externos Seleccionar el idioma de OSD Sólo D SUB Auto setup Configuración automática Seleccionar el modo de imagen Ajuste de la pantalla Ajuste de la imagen Control de volumen balance y tono Ajuste de los altavoces Ajustar el programa C...

Страница 168: ...y los ajustes de programación no funcionan mientras el interruptor principal de encendido está apagado el indicador de corriente está apagado Cuando los vaya a utilizar compruebe que el interruptor principal de encendido está activado el indicador de corriente está encendido Interruptor principal de encendido Mando a distancia inalámbrico Botón de encendido Botón de encendido o NOTA Durante 2 segu...

Страница 169: ...de vídeo YPbPr S VIDEO o VIDEO se pierde el monitor quedará en el modo de suspensión al cabo de 10 minutos aproximadamente Descripción DPM Abreviación de Display Power Management Gestión de la alimentación de la pantalla NOTA El ajuste predeterminado de la gestión de la alimentación ahorro de energía para las opciones RGB y VIDEO es ENCENDIDO Cuando se haya insertado un módulo de extensión en la r...

Страница 170: ...e señal de entrada de vídeo en el que puede seleccionar la señal de entrada de vídeo deseada por medio de los botones o Las señales de entrada de vídeo entre las que se pueden seleccionar son HDMI1 HDMI2 DVI D D SUB OPTION DISPLAYPORT YPbPr S VIDEO y VIDEO Al pulsar el botón INPUT de nuevo se muestra la entrada de vídeo seleccionada OPTION se puede utilizar cuando se haya montado un módulo de exte...

Страница 171: ...ualice el menú OSD pulsando el botón MENU del control remoto inalámbrico o el botón EXIT situado en la parte trasera del monitor Seleccione el idioma de OSD mediante la opción IDIOMA en el menú CONFIGURACIÓN 1 de la función de pantalla OSD Consulte la página 53 U 3 Controlar los dispositivos externos Reproductor de DVD etc Ordenador personal ...

Страница 172: ...e el menú CONFIG AUTOMÁTICA seleccionando CONFIG AUTOMÁTICA en el menú CONFIGURACIÓN 1 Pulsando el botón SET puede ajustar correctamente y de forma automática el tamaño de la pantalla la posición horizontal vertical el reloj la fase de reloj y el nivel de la señal de entrada NOTA La configuración automática sólo funciona en D SUB Cómo visualizar el menú CONFIG AUTOMÁTICA directamente Visualización...

Страница 173: ...l zoom personalizado y la resolución horizontal vertical para obtener el estado correcto de la pantalla NOTA El ajuste de la posición funciona sólo con D SUB YPbPr S VIDEO y VIDEO El ajuste del reloj y el ajuste de la resolución sólo funciona con D SUB El ajuste del zoom funciona con todas las señales de entrada de vídeo U 6 Seleccionar el modo de imagen HIGHBRIGHT Se maximiza el brillo ESTÁNDAR A...

Страница 174: ...idez para obtener la calidad de imagen deseada U 9 Ajuste de los altavoces Llevar a cabo si fuera necesari Seleccione los altavoces incorporados o los altavoces externos especiales opción en el ajuste de altavoces del menú OSD Visualice el menú OSD pulsando el botón MENU del control remoto inalámbrico o el botón EXIT situado en la parte trasera del monitor Seleccione los altavoces mediante la opci...

Страница 175: ...trol remoto inalámbrico o el botón EXIT situado en la parte trasera del monitor NOTA Si no se emite la señal de audio cuando esté utilizando un ordenador compatible con OPS compruebe que se haya seleccionado el monitor como fuente de salida de audio a través del sistema operativo del ordenador Para más información sobre el método de selección vea la página de ayuda o el manual del usuario del sist...

Страница 176: ...to inalámbrico o el botón EXIT situado en la parte trasera del monitor Puede programar el encendido apagado y la selección de entrada mediante la opción PROGRAMA del menú CONFIGURACIÓN 2 de la función de pantalla OSD U 11 Ajustar el programa Llevar a cabo si fuera necesari ...

Страница 177: ...rada de vídeo de forma independiente DIARIO Seleccione esta opción para ejecutar este programa a diario Cuando selecciona DIARIO no puede seleccionar cualquier día de la semana ni SEMANAL LUN DOM Seleccione los días de la semana en los que desea ejecutar el programa A menos que también seleccione SEMANAL la selección de los días de la semana se omite una vez ejecutada la programación una vez SEMAN...

Страница 178: ...utilice las líneas RXD TXD y GND 2 Esquema del comando de control El comando se estructura mediante un código de dirección un código de función un código de datos y un código final La longitud del comando es distinta para cada función NOTA Este ejemplo indica un comando básico que se utiliza cuando se encuentran conectados un único ordenador y un único monitor Si desea conectar múltiples monitores...

Страница 179: ...PTION _r5 5Fh 72h 35h ENTRADA DISPLAYPORT _r6 5Fh 72h 36h ENTRADA VIDEO _v1 5Fh 76h 31h ENTRADA YPbPr _v2 5Fh 76h 32h ENTRADA S VIDEO _v3 5Fh 76h 33h SUBIR VOLUMEN r06 72h 30h 36h BAJAR VOLUMEN r07 72h 30h 37h CONFIGURACIÓN AUTOMÁTICA r09 72h 30h 39h SILENCIAR SONIDO ra6 72h 61h 36h Se utiliza cuando el ordenador compatible con OPS no responde OPTION se puede utilizar cuando se haya montado un mód...

Страница 180: ...e extensión en la ranura de opciones NOTA Aunque el monitor responde al comando de control de encendido apagado enviado desde el ordenador compatible con OPS este no se enciende apaga No se trata de un fallo de funcionamiento Para activar el funcionamiento automático utilice la opción PROGRAMA del menú CONFIGURACIÓN 2 de la función de pantalla OSD Control remoto LAN Si conecta el monitor y el orde...

Страница 181: ...ruebe que se haya reconocido el concentrador USB El ordenador detectará el concentrador USB del monitor y se instalará automáticamente el controlador del dispositivo para un sistema operativo estándar Puede que algunos ordenadores no reconozcan el concentrador USB a pesar de estar conectado En tal caso instale el controlador del dispositivo para el concentrador USB siguiendo las instrucciones del ...

Страница 182: ...ntallas de selección de menús como se indica a continuación Pantalla de submenú Reajuste de la imagen por ejemplo Página 48 Página 50 Página 51 Página 52 Página 53 Página 54 Página 56 IMAGEN PICTURE PANTALLA SCREEN AUDIO AUDIO IMAGEN EN IMAGEN PIP CONFIGURACIÓN 1 CONFIGURATION1 CONFIGURACIÓN 2 CONFIGURATION2 OPCIÓN AVANZADA ADVANCED OPTION Configuración de la pantalla OSD Este monitor está equipad...

Страница 183: ...n para seleccionar el menú principal Pulse el botón EXIT para visualizar la pantalla OSD y a continuación pulse el botón para seleccionar el menú principal Al pulsar el botón SET para aceptar el menú principal seleccionado se seleccionará también el primer submenú Al pulsar el botón INPUT para aceptar el menú principal seleccionado se seleccionará también el primer submenú Pulse el botón para sele...

Страница 184: ...señales de entrada RGB Ajusta el nivel de reducción de ruido Pulse el botón para aumentar el nivel de reducción NOTA El modo de imagen sRGB es estándar y no se puede cambiar TONO TINT TONO Puede ajustar todos los colores al mismo tiempo Pulse el botón MÁS para añadir un tono verde Pulse el botón MENOS para añadir un tono morado RED MAGENTA BLUE CYAN GREEN o YELLOW Puede ajustar cada color de forma...

Страница 185: ...ionar AUTO no podrá ajustar individualmente ningún otro elemento que no sea CONTROL LOCAL Se habilita la función BRILLO AUTOM y puede ajustar individualmente el CONTROL y los elementos posteriores REMOTE La función de BRILLO AUTOM está habilitada Además el monitor entra en el modo de intercomunicación en el que se controlan varios monitores de forma colectiva Consulte la página 60 APAGADO Esta fun...

Страница 186: ... de aspecto DYNAMIC La imagen se extiende hasta llenar la pantalla a través de diferentes aumentos en el centro de la pantalla y en los extremos CUSTOM Puede extender la imagen de forma horizontal y vertical según desee por medio del ajuste CUSTOM ZOOM REAL La imagen se visualiza sin extenderla o reducirla NOTA El modo DYNAMIC muestra las imágenes con relación de aspecto 16 9 tales como las que ti...

Страница 187: ... de AGUDOS GRAVES BASS Para acentuar o reducir el sonido de baja frecuencia Pulse el botón para aumentar el sonido de GRAVES Pulse el botón para reducir el sonido de GRAVES SPEAKER SPEAKER Puede alternar entre los altavoces incorporados y los altavoces externos estéreo opción INTERNAL Para escuchar el sonido a través de los altavoces incorporados salida máxima 10 W 10 W EXTERNAL Para escuchar el s...

Страница 188: ...ontal de la subpantalla Pulse el botón MÁS para desplazar la subpantalla a la derecha Pulse el botón MENOS para desplazar la subpantalla a la izquierda POSICION V PIP PIP V POSITION Puede ajustar la posición vertical de la subpantalla Pulse el botón MÁS para desplazar la subpantalla hacia arriba Pulse el botón MENOS para desplazar la subpantalla hacia abajo ENTRADA SUB SUB INPUT Puede seleccionar ...

Страница 189: ... incorporado comenzará a funcionar de acuerdo con la temperatura de funcionamiento BRILLO Al seleccionar ENCENDIDO el brillo se reduce MOVIMIENTO La imagen se desplaza ligeramente de forma horizontal y vertical en intervalos regulares para reducir el efecto de la persistencia de la imagen NOTA Si la opción TILING del menú OPCIÓN AVANZADA está activa no podrá ajustar la opción MOVIMIENTO en ENCENDI...

Страница 190: ...HCP PORT Se muestra el número de puerto 63007 y 3007 del monitor REAJUSTE Se restauran los ajustes de LAN CONTROLLER SETTING CONTROLLER SETTING Cuando controle el monitor a través de una red mediante un procesador de control de la serie 2 fabricado por Creston establezca los parámetros de comunicación CONTROLLER IP Establezca la dirección IP del procesador de control PORT NUMBER Establezca el núme...

Страница 191: ...va a establecer utilice las flechas hacia arriba y hacia abajo para desplazar el número 1 a 7 del programa Utilice los botones y para desplazar el cursor en sentido horizontal en un programa concreto Utilice los botones y para aumentar el tiempo y seleccionar el puerto de entrada El botón SET se utiliza para realizar una selección Si crea un programa pero no desea aplicar una hora de encendido sel...

Страница 192: ...uiente DVI D D SUB NOTA No podrá seleccionar otras señales de entrada que no sean DVI D OPTION y D SUB Si se ha montado un módulo de extensión el monitor no entrará en el modo de suspensión VIDEO DETECT Las señales de vídeo objetivo son HDMI1 YPbPr S VIDEO VIDEO y D SUB Si se detecta alguna de las señales de entrada HDMI1 YPbPr S VIDEO o VIDEO dicha señal de entrada se seleccionará automáticamente...

Страница 193: ...A DEL ENCENDIDO POWER ON DELAY Puede ajustar el tiempo de demora hasta que se active el modo de encendido cuando se recupere del modo de suspensión o del encendido El intervalo de tiempo se puede seleccionar entre OFF y 2 4 6 8 10 20 30 40 y 50 segundos TERMINALES DE ENTRADA TERMINAL SETTING Puede seleccionar el modo de visualización de la señal HDMI1 HDMI2 o DVI D de acuerdo con su formato y en f...

Страница 194: ... a la vez durante 3 segundos como mínimo Para activar los botones vuelva a pulsar y a la vez durante 3 segundos como mínimo NORMAL DYNAMIC NORMAL Señal comprimida NORMAL NORMAL COMPLETA Tamaño normal de cada señal Tamaño recomendado de la imagen OSD de información OPTION SDI 3G 1920 x 1080 67kHz 60Hz AUDIO SDI SIZE FULL YPbPr AUDIO ANALOG SIZE FULL S VIDEO NTSC AUDIO ANALOG SIZE FULL DVI D 1024 x ...

Страница 195: ...a Selección de la señal de entrada de vídeo Funcionamiento HDMI1 o HDMI2 ANALOG HDMI DVI D Solo ANALOG D SUB Solo ANALOG OPTION PC Ordenador compatible con OPS ANALOG OPS ANALOG OPS DIGITAL SDI SDI BOX ANALOG SDI DISPLAYPORT ANALOG DISPLAYPORT YPbPr Solo ANALOG S VIDEO Solo ANALOG VIDEO Solo ANALOG El audio de HDMI1 o HDMI2 que se haya seleccionado se enviará como el audio HDMI OPTION se puede uti...

Страница 196: ...ncipal LOCAL PRIMARIO Monitores secundarios REMOTE SECUNDARIO Para utilizar un ordenador a fin de controlar los monitores Para utilizar un ordenador a fin de controlar los monitores tendrá que preparar un programa de software de aplicación para control usted mismo Se puede controlar el brillo de todos los monitores de una forma centralizada mediante un ordenador si el cliente crea una aplicación d...

Страница 197: ...de opciones Pulse los botones PIP ON OFF del mando a distancia para alternar entre los modos PIP POP y SBS tal y como se muestra en el siguiente diagrama Como alternativa puede cambiar los modos a través del ajuste MODO PIP dentro de PIP del menú principal OSD Vea la página 52 Modo de resolución PIP y SBS FULL TAMAÑO PIP PEQUEÑO 450 píxeles X 338 píxeles MEDIANO 675 píxeles X 450 píxeles GRANDE 90...

Страница 198: ...ensor de señales de mando a distancia del monitor PRIMARIO La pantalla OSD aparece en el monitor que tiene el número ID seleccionado NOTA Mientras visualiza la pantalla OSD de selección de ID en el monitor PRIMARIO vuelva a pulsar el botón DISPLAY del mando a distancia para cancelar la pantalla OSD de selección de ID y a continuación controle el monitor que ha seleccionado Si ajusta el modo de man...

Страница 199: ...necesario reajustar las configuraciones de ajuste de la imagen de OSD Compruebe que el monitor y su tarjeta de visualización son compatibles y la cadencia de las señales es la recomendada Si el texto es ininteligible pase al modo de vídeo no entrelazado y utilice una velocidad de regeneración de la imagen de 60 Hz La imagen de la señal componente es verdosa Compruebe si se ha seleccionado el conect...

Страница 200: ...sto Terminal S NTSC PAL SECAM 4 43NTSC PAL 60 Componente 480i 480p 576i 576p 1080i 720p 1080p SDI 480i 576i SD SDI 720p 1080i HD SDI 1080p 3G SDI Entrada salida de audio Conector de entrada Analógico Conector hembra mini estéreo ø3 5 mm Digital HDMI x 2 audio digital DISPLAYPORT SDI opción Conector de salida Analógico Conector hembra mini estéreo ø3 5 mm Digital SDI opción Salida para altavoces ex...

Страница 201: ...conexión en caliente Hot Plug 6 TMDS Data1 13 CEC 7 TMDS Data0 14 Reservado N C en el dispositivo 3 Entrada RGB digital DVI D Asignacion de clavijas del conector DVI D 1 TMDS Data2 9 TMDS Data1 17 TMDS Data0 2 TMDS Data2 10 TMDS Data1 18 TMDS Data0 3 TMDS Data2 Shield 11 TMDS Data1 Shield 19 TMDS Data0 Shield 4 NC 12 NC 20 NC 5 NC 13 NC 21 NC 6 DDC Clock 14 5V Power 22 TMDS Clock Shield 7 DDC Data...

Страница 202: ...IDEO MINI DIN de 4 clavijas Nº clavijas Nombre 1 GND 2 GND 3 Y luminancia 4 C crominancia 6 Entrada salida RS 232C Nº clavijas Nombre 1 NC 2 RXD 3 TXD 4 NC 5 GND 6 NC 7 NC 8 NC 9 NC 7 LAN Modular de 8 clavijas Núm de clavija en RJ45 Señal Par 1 Raya naranja blanca 2 Naranja 3 Raya verde blanca 4 Azul 5 Raya azul blanca 6 Verde 7 Raya marrón blanca 8 Marrón ...

Страница 203: ... ordinateur compatible OPS Français 26 P 6 Connexion RS 232C Français 27 Contrôle du moniteur via RS 232C Français 27 P 7 Connexion LAN Français 28 Connexion du moniteur via un réseau local Français 28 P 8 Brancher un périphérique USB Français 29 Brancher plusieurs périphériques USB à l aide de la fonction concentrateur USB Français 29 P 9 Branchement du cordon d alimentation sur le moniteur Franç...

Страница 204: ...t équipé de quatre fonctions d économiseur d écran GAMMA VENTILATEUR LUMINOSITÉ MOUVEMENT Délai de mise sous tension Page 57 Pour les applications qui utilisent plusieurs moniteurs la fonction de délai de mise sous tension permet d allumer les moniteurs de manière séquentielle avec un délai compris entre 2 et 50 secondes après la mise sous tension L utilisation de cette fonction permet d éviter de...

Страница 205: ...rences nuisibles aux communications radio Pour la même raison l utilisation de cet équipement dans une zone résidentielle peut provoquer aussi des interférences nuisibles pouvant conduire l utilisateur à devoir corriger ces interférences à ses propres frais 3 Vous êtes avertis que tout changement ou toute modification effectué e pour plus de souplesse sans l approbation du tiers responsable pourra...

Страница 206: ... MURALE POUR SUPPRIMER TOUTE ALIMENTATION DE L APPAREIL DÉCONNECTEZ LE CORDON D ALIMENTATION DE LA PRISE SECTEUR NE PAS ENLEVER LE COUVERCLE OU L ARRIÈRE VOUS NE POUVEZ RÉPARER AUCUNE PIÈCE INTERNE CONFIEZ TOUS LES TRAVAUX DE DÉPANNAGE À DU PERSONNEL TECHNIQUE QUALIFIÉ Ce symbole prévient l utilisateur qu une tension non isolée dans l appareil peut être suffisante pour provoquer une électrocution ...

Страница 207: ... métal lourd Elle sera indiquée comme suit Hg mercure 0 0005 Cd cadmium 0 002 Pb plomb 0 004 Dans l Union Européenne il existe des systèmes sélectifs de collecte pour les produits électriques et électroniques les batteries et les accumulateurs usagés Nous vous prions donc de confier cet équipement ces batteries et ces accumulateurs à votre centre local de collecte recyclage Aidez nous à conserver ...

Страница 208: ...nt ne les avalez pas et ne les inhaler pas Prévoyez une aération suffisante autour du moniteur pour que la chaleur puisse se dissiper correctement N obstruez pas les ouvertures de ventilation et ne placez pas le moniteur près d un radiateur ou d une autre source de chaleur Ne posez rien sur le moniteur La prise du cordon d alimentation est le moyen principal de débrancher le système de l alimentat...

Страница 209: ...r MDT552S doit contenir les éléments suivants Dans tous les autres cas utilisez un cordon d alimentation conforme aux normes de sécurité et à la tension en vigueur dans votre pays Les composants suivants sont prévus en option Haut parleurs externes Supports SDI BOX Serre fils x 3 pour attacher les câbles Entretoise de fixation murale x 9 Étrier de câble pour maintenir le cordon d alimentation Étiq...

Страница 210: ...ale REMARQUE Dans les 2 secondes suivant l arrêt de l alimentation à l aide du bouton POWER de la télécommande sans fil ou de l écran ou d une commande de communication ne coupez pas le interrupteur d alimentation principal ne débranchez pas le cordon d alimentation et ne déclenchez pas le disjoncteur Si l alimentation CA est coupée immédiatement après la mise à l arrêt tous les réglages OSD dont ...

Страница 211: ...teurs et terminaux IN IN OUT IN OUT 9 Connecteur LAN Permet de connecter un câble LAN 10 VIDEO IN OUT connecteur S BNC Se branche sur un équipement vidéo S VIDEO IN Connecteur d entrée S video mini DIN 4 broches VIDEO IN Connecteur BNC VIDEO OUT Connecteur BNC 11 AUDIO ANALOG IN Pour recevoir le signal audio provenant d un matériel externe ordinateur magnétoscope ou lecteur de DVD 12 AUDIO ANALOG ...

Страница 212: ...IDI ou POP IHI Bouton INPUT Sélectionne la vidéo à afficher dans l image secondaire Bouton CHANGE Intervertit l image principale et la sous image Description PIP Picture In Picture Image dans image La sous image est affichée dans l image principale POP Picture Outside Picture Image hors image La sous image est affichée en bas à droite de l image principale SBS Side By Side Côte À Côte L image prin...

Страница 213: ...omment installer les piles 1 Débloquez et tirez vers le haut le couvercle dans le sens de la flèche 2 Alignez les piles à l intérieur du boîtier en respectant les indications et 3 Remettez le couvercle en place Comment retirer les piles 1 Débloquez et tirez vers le haut le couvercle dans le sens de la flèche 2 Retirez les piles ATTENTION Une mauvaise utilisation des piles peut provoquer des fuites...

Страница 214: ...niteur Installation et retrait du supports Les supports sont disponibles en option Utilisation du support de montage mural ou du support de montage au plafond Prévention du contact entre les poignées et le mur Retrait des guides de support Utilisation des entretoises de montage mural Installation en position portrait ou la face avant dirigée vers le haut Fixation des protège coins Utiliser le moni...

Страница 215: ...ficacité contre n importe quel type de séisme ou de sinistre Ne pas dormir là où le moniteur risque de se renverser ou de tomber en cas de tremblement de terre ou autre catastrophe naturelle Avant de déplacer le moniteur ôtez le fil qui fixe le moniteur Sans quoi vous risquez de vous blesser et d endommager le moniteur Choix de l emplacement du moniteur ATTENTION NE TENTEZ PAS D EFFECTUER VOUS MÊM...

Страница 216: ...s supports métalliques le maintien de l écran en plusieurs points et des mesures de prévention de la chute en cas de défaillance du support métallique ou du point de fixation P 2 Installation du moniteur À réaliser le cas échéant Utilisation du support de montage mural ou du support de montage au plafond Placement de l écran face vers le bas Etalez en dessous du moniteur la feuille de protection q...

Страница 217: ... commerce 1 Placez les entretoises de fixation murale 9 unités entre le support métallique et les trous de vis pour la fixation murale de l écran puis fixez les à l aide des vis a a Pour le montage utilisez des vis en acier M6 avec une rondelle frein élastique suffisamment longue pour traverser l épaisseur du support métallique et celle de l entretoise de fixation murale 17 mm et pénétrer de 10 mm...

Страница 218: ...orientée vers le haut assurez vous de régler VENTILATEUR sur MARCHE en utilisant ÉCONOMISEUR ÉCRAN dans le menu CONFIGURATION1 de la fonction de l écran OSD Installation en position portrait Le logo MITSUBISHI devrait se trouver du côté gauche lorsque le moniteur est vu de face REMARQUE Ce moniteur ne dispose pas d une fonction permettant de faire pivoter les images Pour les afficher au format por...

Страница 219: ... 1 Montez le cache de protection conformément à la procédure suivante 2 Dévissez les vis a qui maintiennent le cadre en place puis retirez le cadre du moniteur ATTENTION Si vous retirez d autres vis que les vis a le cadre se démonte Si vous faites cela le cadre peut tomber ce qui peut entraîner des blessures ou un endommagement du moniteur a a 3 Décollez les séparateurs du cache de protection b mo...

Страница 220: ...correspondre la polarité des câbles d enceinte et des bornes rouge noir Si les polarités ne correspondent pas des problèmes de sortie audio peuvent se produire P 3 Installation des enceintes en option À réaliser le cas échéant REMARQUE Passez du mode haut parleurs intégrés au mode haut parleurs externes après avoir mis le moniteur en marche Veuillez consulter la page Méthode d utilisation à la pag...

Страница 221: ...bord mettez hors tension tous les périphériques reliés et effectuez les connexions Consultez le guide utilisateur fourni avec chaque périphérique REMARQUE Veuillez utiliser le câble audio sans résistance lorsque la borne de sortie audio de l appareil audio et de l ordinateur sont une mini prise stéréo Si vous utilisez le câble audio avec résistance il est possible que le niveau du son ne puisse pa...

Страница 222: ... l écran Fixez le serre fil à l écran à l aide de la vis que vous avez retirée à l étape Fixez le câble HDMI et le serre fil à l aide du collier REMARQUE Le collier n est pas réutilisable L écran est livré avec 2 colliers de rechange Pour remplacer le collier coupez et retirez le collier existant et fixez en un nouveau de la même forme disponible dans le commerce 2 5 mm de large et environ 100 mm ...

Страница 223: ...tions indiquées dans le tableau ci dessous et configure les informations de l écran Lorsqu un ordinateur ou un autre appareil est connecté il affiche automatiquement les images de manière appropriée Voir la page décrivant les fonctions INSTALLATION AUTO RÉGLAGE AUTO Temporisation préréglée en usine Résolution Fréquence Remarques Résolution Fréquence Remarques Horizontal Vertical Horizontal Vertica...

Страница 224: ...le nombre d écrans pouvant être raccordés dans votre environnement d installation Placez le RGB du ÉCONOMIE D ÉNERGIE dans le menu CONFIGURATION1 sur ARRÊT lorsque vous utilisez un câble DVI D dans une connexion en chaine Branchement audio Branchez un câble audio mini prise stéréo ø3 5 mm disponible dans le commerce sur le connecteur AUDIO ANALOG IN Lors du raccordement d un câble HDMI sélectionne...

Страница 225: ... du bouton INPUT du moniteur ou du bouton YPbPr de la télécommande sans fil Au moment de la sélection le son passe automatiquement à ANALOG Pour procéder à un branchement audio branchez un câble audio mini prise stéréo ø3 5 mm RCA sur le connecteur AUDIO ANALOG IN Comme le son passe automatiquement à ANALOG lorsque YPbPr est sélectionné il est restitué sur simple branchement du câble Pour brancher...

Страница 226: ...ande sans fil Pour brancher deux moniteurs branchez un bout du câble BNC au connecteur VIDEO OUT du premier moniteur et l autre bout au connecteur VIDEO IN du second moniteur REMARQUE Vous pouvez raccorder jusqu à 5 écrans dans une connexion en chaîne en utilisant des câbles de 5 mètres Le nombre maximum d écrans pouvant être raccordés peut cependant être restreint en fonction des périphériques br...

Страница 227: ...ez retirées à l étape 2 Fixez la poignée à l aide des 2 vis a que vous avez retirées à l étape 2 a b ATTENTION Une fois le couvercle de fente option installé assurez vous que la SDI BOX est convenablement positionnée et orientée puis insérez la complètement dans la fente L appareil peut être endommagé s il est installé dans une position ou une orientation inappropriée 2 Connexion SDI Il y a deux p...

Страница 228: ...manuel d exploitation de la SDI BOX Retrait du SDI BOX Tenez la poignée du SDI BOX pour son retrait ATTENTION Utilisez uniquement la poignée pour extraire le SDI BOX Tirer sur le câble SDI BNC ou de toute autre manière peut entraîner des dommages 3 Montez le couvercle de fente option accessoire à l aide des 5 vis b que vous avez retirées à l étape 2 b 4 Insérez un ordinateur compatible OPS disponi...

Страница 229: ... moniteurs ou plus comme indiqué sur l illustration ci dessous raccordez le connecteur RS 232C OUT du premier moniteur au connecteur RS 232C IN du second moniteur à l aide d un câble RS 232C de type inversé disponible dans le commerce En répétant la connexion de manière similaire vous pouvez raccorder des moniteurs dans une configuration en chaîne REMARQUE Bien que vous puissiez raccorder jusqu à ...

Страница 230: ...merce Raccordez ce moniteur et le concentrateur LAN à l aide d un câble LAN de type direct disponible dans le commerce Lorsque vous raccordez deux moniteurs ou plus vous pouvez raccorder le moniteur et le concentrateur LAN à l aide d un câble LAN de type direct disponible dans le commerce comme indiqué ci dessus REMARQUE Si vous utilisez un câble LAN de type croisé disponible dans le commerce vous...

Страница 231: ...un câble USB disponible dans le commerce Lors de l utilisation d un ordinateur compatible OPS Installez un ordinateur compatible OPS raccordé en interne 2 Branchez un périphérique USB au port descendant de ce moniteur REMARQUE La fonction concentrateur USB ne peut pas contrôler le moniteur Jusqu à 5 concentrateurs peuvent être branchés en cascade dans la fonction concentrateur de ce moniteur Effec...

Страница 232: ...accidentelle du cordon d alimentation 1 Insérez complètement et fermement le connecteur d alimentation du cordon d alimentation dans le connecteur AC IN de l écran 2 Fixez le connecteur d alimentation à l aide de l étrier de câble accessoire ATTENTION N insérez pas l étrier de câble dans la prise secteur Cela pourrait entraîner une électrocution Fixez les deux extrémités de l étrier de câble à l é...

Страница 233: ...0 à 41 Pages 42 à 44 Page 45 Mise sous tension de tous les appareils branchés Sélection de l entrée vidéo Sélection de la langue de l OSD Commande d appareils externes D SUB uniquement Configuration automatique Sélection du mode d image Réglage de l écran Réglage de l image Contrôle du volume de la balance et de la tonalité Réglages des haut parleurs Réglage du calendrier Télécommande Réglage du c...

Страница 234: ...indicateur d alimentation est éteint Lorsque vous les utilisez vérifiez que l interrupteur principal d alimentation est activé l indicateur d alimentation est allumé Interrupteur d alimentation principal 3 Si l indicateur d alimentation s allume en rouge appuyez sur le bouton POWER du moniteur L indicateur d alimentation devient vert Télécommande sans fil Bouton d alimentation Bouton d alimentatio...

Страница 235: ...le quelques secondes plus tard VIDEO Lorsque le signal de synchronisation de l entrée vidéo YPbPr S VIDEO ou VIDEO est coupé le moniteur passe en mode veille environ 10 minutes plus tard Description DPM acronyme de Display Power Management REMARQUE Les réglages par défaut de la gestion de l énergie économiseurs d énergie sont activés pour RGB et VIDEO Lorsqu un module d extension est dans la fente...

Страница 236: ...uton INPUT du moniteur le menu OSD d entrée vidéo s affiche et vous pouvez sélectionner l entrée vidéo à l aide des boutons et Les entrées vidéo sélectionnables sont HDMI1 HDMI2 DVI D D SUB OPTION DISPLAYPORT YPbPr S VIDEO et VIDEO Lorsque vous appuyez à nouveau sur le bouton INPUT l entrée vidéo sélectionnée s affiche OPTION peut être utilisée lorsqu un module d extension est installé dans la fen...

Страница 237: ...langue de l OSD Affichez le menu OSD en appuyant sur le bouton MENU de la télécommande sans fil ou sur le bouton EXIT à l arrière du moniteur À l aide de LANGUE dans le menu CONFIGURATION1 de la fonction écran OSD vous pouvez sélectionner la langue de l OSD Voir page 53 U 3 Commande d appareils externes Lecteur DVD etc Ordinateur ...

Страница 238: ...INSTALLATION AUTO en sélectionnant INSTALLATION AUTO dans le menu CONFIGURATION1 En appuyant sur le bouton SET vous pouvez automatiquement ajuster convenablement la taille de l écran la position horizontale verticale l horloge la phase de l horloge et le niveau du signal d entrée REMARQUE La configuration automatique ne fonctionne qu avec D SUB Affichage direct du menu INSTALLATION AUTO Afficher l...

Страница 239: ...e verticale afin d obtenir une configuration correcte de l écran REMARQUE Le réglage de la position fonctionne uniquement avec D SUB YPbPr S VIDEO et VIDEO Le réglage de l horloge et le réglage de la résolution ne fonctionnent qu avec D SUB Le réglage du zoom fonctionne avec toutes les entrées vidéo U 6 Sélection du mode d image HIGHBRIGHT La luminosité est portée à son maximum STANDARD Réglage d ...

Страница 240: ...é pour obtenir la qualité d image souhaitée U 9 Réglages des haut parleurs À réaliser le cas échéant Sélectionnez les haut parleurs intégrés ou les haut parleurs stéréo spéciaux externes option dans les réglages du haut parleur du menu OSD Affichez le menu OSD en appuyant sur le bouton MENU de la télécommande sans fil ou sur le bouton EXIT à l arrière du moniteur Utilisez HP du menu AUDIO de la fo...

Страница 241: ... de la fonction écran OSD Pour le réglage affichez le menu OSD en appuyant sur le bouton MENU de la télécommande sans fil ou sur le bouton EXIT au dos du moniteur REMARQUE En l absence d une sortie audio lors de l utilisation d un ordinateur compatible OPS vérifiez que le moniteur est sélectionné comme source de sortie audio par le système d exploitation de l ordinateur Pour la méthode de sélectio...

Страница 242: ...ande sans fil ou sur le bouton EXIT à l arrière du moniteur À l aide de CALENDRIER dans le menu CONFIGURATION2 de l écran fonction OSD vous pouvez programmer l activation désactivation de l alimentation et la sélection d entrée U 11 Réglage du calendrier À réaliser le cas échéant ...

Страница 243: ...calendrier tous les jours Lorsque vous sélectionnez CHAQUE JOUR vous ne pouvez sélectionner aucun autre jour de la semaine ni CHAQUE SEM LUN DIM Permet de sélectionner les jours de la semaine auxquels vous souhaitez exécuter le calendrier À moins que vous ne sélectionnez aussi CHAQUE SEM la sélection des jours de la semaine est effacée après une exécution du calendrier CHAQUE SEM Sélectionnez cett...

Страница 244: ...un RS 232C utilisez les lignes RXD TXD et GND 2 Diagramme de la commande de contrôle La commande est composée du code d adresse du code de la fonction du code des donées et du code de fin La longueur de la commande varie en fonction de la fonction REMARQUE Cet exemple présente une commande de base utilisée lorsqu un ordinateur et un moniteur sont connectés Si vous voulez connecter plusieurs monite...

Страница 245: ...PUT HDMI1 _r1 5Fh 72h 31h INPUT HDMI2 _r7 5Fh 72h 37h INPUT DVI D _r2 5Fh 72h 32h INPUT D SUB _r3 5Fh 72h 33h INPUT OPTION _r5 5Fh 72h 35h INPUT DISPLAYPORT _r6 5Fh 72h 36h INPUT VIDEO _v1 5Fh 76h 31h INPUT YPbPr _v2 5Fh 76h 32h INPUT S VIDEO _v3 5Fh 76h 33h VOLUME UP r06 72h 30h 36h VOLUME DOWN r07 72h 30h 37h AUTO SETUP r09 72h 30h 39h AUDIO MUTE ra6 72h 61h 36h Utilisé lorsque l ordinateur comp...

Страница 246: ...e option REMARQUE Bien que le moniteur réponde à la commande de contrôle pour une activation désactivation de l alimentation envoyée par l ordinateur compatible OPS son alimentation n est pas activée désactivée Cela n est pas un dysfonctionnement Pour un fonctionnement automatique utilisez CALENDRIER dans le menu CONFIGURATION2 de la fonction écran OSD U 12 Télécommande suite À réaliser le cas éch...

Страница 247: ...us pouvez sélectionner l ordinateur EXTERNE OPS à utiliser 2 Veillez à ce que le concentrateur USB soit reconnu Le concentrateur USB de ce moniteur est détecté par l ordinateur et le pilote du périphérique du système d exploitation standard est automatiquement installé Certains ordinateurs pourraient ne pas reconnaître le concentrateur USB même s il est branché Dans ce cas installez le pilote du p...

Страница 248: ...es écrans de menu de réglage et des écrans de menu de sélection comme indiqué ci dessous Écran de sous menu Réinitialisation de l image par exemple Page 48 Page 50 Page 51 Page 52 Page 53 Page 54 Page 56 IMAGE PICTURE ÉCRAN SCREEN AUDIO AUDIO IMAGE DANS IMAGE PIP CONFIGURATION1 CONFIGURATION1 CONFIGURATION2 CONFIGURATION2 OPTION AVANCÉE ADVANCED OPTION Configuration de l écran OSD Ce moniteur est ...

Страница 249: ...l Appuyez sur le bouton EXIT pour afficher l écran OSD puis appuyez sur le bouton pour sélectionner le menu principal Lorsque vous appuyez sur le bouton SET pour accepter le menu principal sélectionné le sous menu du haut est sélectionné Lorsque vous appuyez sur le bouton INPUT pour accepter le menu principal sélectionné le sous menu du haut est sélectionné Appuyez sur le bouton pour sélectionner ...

Страница 250: ...e la réduction du bruit Appuyez sur le bouton pour augmenter le niveau de réduction REMARQUE Le mode Image sRGB est un mode standard et ne peut pas être changé TEINTE TINT TEINTE Vous pouvez ajuster toutes les couleurs en même temps Appuyez sur le bouton PLUS pour ajouter une teinte verte Appuyez sur le bouton MOINS pour ajouter une teinte violette ROUGE MAGENTA BLEU CYAN VERT ou JAUNE Vous pouvez...

Страница 251: ...égler individuellement aucun autre élément que CONTROL LOCAL La fonction LUMINOSITÉ AUTO est activée et vous pouvez régler individuellement CONTROL et les éléments suivants REMOTE La fonction de LUMINOSITÉ AUTO est autorisée En outre le moniteur bascule en mode d intercommunication dans lequel plusieurs moniteurs sont contrôlés collectivement Voir page 60 ARRÊT Cette fonction est mise hors service...

Страница 252: ...ntre et aux bords de l écran PERSONNALISE Vous pouvez étirer l image horizontalement et verticalement comme désiré à l aide du paramètre ZOOM PERSONNALISE RÉEL L image est affichée à sa taille réelle sans modifications REMARQUE Le mode DYNAMIC affiche des images dont le rapport hauteur largeur est de 16 9 comme celles d une résolution de 1920 x 1080 de la même manière qu en mode PLEIN ZOOM PERSONN...

Страница 253: ... diminuer les aigus GRAVES BASS Pour accentuer ou réduire le son basses fréquences Appuyez sur le bouton pour augmenter les graves Appuyez sur le bouton pour diminuer les graves HP SPEAKER Vous pouvez passer des haut parleurs intégrés aux haut parleurs stéréo externes option INTERNE A la sortie des haut parleurs intégrés Sortie maximale 10 W 10 W EXTERNE A la sortie des haut parleurs externes Sort...

Страница 254: ...bouton PLUS pour déplacer l écran secondaire vers la droite Appuyez sur le bouton MOINS pour déplacer l écran secondaire vers la gauche PIP POSITION VERT PIP V POSITION Vous pouvez régler la position verticale de l écran secondaire Appuyez sur le bouton PLUS pour déplacer l écran secondaire vers le haut Appuyez sur le bouton MOINS pour déplacer l écran secondaire vers le bas SELECTION PIP SUB INPU...

Страница 255: ...tiquement selon la température d opération LUMINOSITÉ Si vous sélectionnez MARCHE la luminosité est réduite MOUVEMENT L écran se déplace légèrement horizontalement et verticalement à des intervalles réguliers pour réduire l effet de rémanence REMARQUE Tant que MOSAIQUE dans le menu OPTION AVANCÉE est actif vous ne pouvez pas régler MOUVEMENT sur MARCHE Lorsque vous sélectionnez une période pour le...

Страница 256: ...ort 63007 et 3007 du moniteur s affiche RÉINIT Les paramètres LAN sont réinitialisés CONTROLLER SETTING CONTROLLER SETTING Lors du contrôle du moniteur par un réseau utilisant un processeur de contrôle de série 2 fabriqué par Crestron réglez les paramètres de communication CONTROLLER IP Réglez l adresse IP du processeur de commande NUMERO PORT Réglez le numéro de port utilisé pour la communication...

Страница 257: ... le numéro 1 à 7 du calendrier Utilisez les boutons et pour déplacer le curseur horizontalement au sein du calendrier sélectionné Utilisez les boutons et pour augmenter l heure et sélectionnez un port d entrée Utilisez le bouton SET pour effectuer une sélection Si vous créez un calendrier mais ne voulez pas utiliser l heure de mise sous tension sélectionnez pour l intervalle de temps MARCHE Si vou...

Страница 258: ... REMARQUE Vous ne pouvez pas sélectionner d autres entrées que DVI D OPTION et D SUB En présence d un module d extension l écran ne passe pas en mode veille VIDEO DETECT Les entrées vidéo cibles sont HDMI1 YPbPr S VIDEO VIDEO et D SUB Lorsque l entrée HDMI1 YPbPr S VIDEO ou VIDEO est détectée l entrée détectée est automatiquement sélectionnée Lorsque le signal vidéo affiché est perdu l entrée D SU...

Страница 259: ...OUS TENSION POWER ON DELAY Vous pouvez ajuster le délai d activation du mode de mise sous tension lors du réveil du mode veille ou de mise sous tension La durée sélectionnable parmi OFF et 2 4 6 8 10 20 30 40 et 50 secondes SELECTION ENTREES TERMINAL SETTING Vous pouvez sélectionner le mode pour afficher le signal HDMI1 HDMI2 ou DVI D selon leur format de signal en fonction de l appareil source SI...

Страница 260: ...is sur les boutons et pendant au moins 3 secondes Pour activer les boutons appuyez de nouveau sur les deux boutons et pendant au moins 3 secondes NORMAL DYNAMIC NORMAL signal compressé NORMAL NORMAL PLEIN Taille normale de chaque signal Taille d image conseillée Informations OSD Gestionnaire à l écran OPTION SDI 3G 1920 x 1080 67kHz 60Hz AUDIO SDI SIZE FULL YPbPr AUDIO ANALOG SIZE FULL S VIDEO NTS...

Страница 261: ... vidéo en entrée Fonctionnement HDMI1 ou HDMI2 ANALOG HDMI DVI D ANALOG uniquement D SUB ANALOG uniquement OPTION PC Ordinateur compatible OPS ANALOG OPS ANALOG OPS DIGITAL SDI SDI BOX ANALOG SDI DISPLAYPORT ANALOG DISPLAYPORT YPbPr ANALOG uniquement S VIDEO ANALOG uniquement VIDEO ANALOG uniquement Le son de HDMI1 ou HDMI2 sélectionné est restitué en tant que son HDMI OPTION peut être utilisée lo...

Страница 262: ... sur l écran OSD IMAGE de la manière suivante LUMINOSITÉ AUTO CONTROL Moniteur principal LOCAL PRIMAIRE Moniteurs asservis REMOTE SECONDAIRE Utilisation d un ordinateur pour contrôler les moniteurs Lorsqu on utilise un ordinateur pour contrôler les moniteurs vous devez préparer un programme d application faisant partie du logiciel pour pouvoir contrôler par vous même La luminosité de tous les moni...

Страница 263: ...nsion est installé dans la fente option Appuyez sur les touches PIP ON OFF Marche Arrêt PIP de la télécommande pour changer entre les modes PIP POP et CAC comme indiqué dans le schéma ci dessous Vous pouvez également modifier les modes à l aide du paramètre PIP de l option MODE PIP dans le menu OSD Voir page 52 Résolution de mode PIP et CAC FORMAT PIP PETIT 450 pixels X 338 pixels MOYEN 675 pixels...

Страница 264: ...Pointez la télécommande vers le capteur de signal de télécommande du moniteur PRIMAIRE L OSD s affiche sur le moniteur dont vous avez sélectionné le numéro d ID REMARQUE Lorsque l OSD de sélection d ID s affiche sur le moniteur PRIMAIRE appuyez à nouveau sur la touche DISPLAY de la télécommande pour annuler l OSD de sélection d ID et contrôler le moniteur que vous avez sélectionné Si vous réglez d...

Страница 265: ... diminuant la valeur de finesse Après un changement de mode d affichage les paramètres de réglage d image OSD peuvent demander un réajustement Vérifiez la compatibilité et les paramètres recommandés de votre moniteur et de votre carte graphique Si votre texte est altéré passez en mode vidéo non entrelacé et utilisez un taux de rafraîchissement de 60 Hz L image du signal sur le composant est verdâtre ...

Страница 266: ...omposite BNC Numérique SDI option Résolution prise en charge Composite Borne S NTSC PAL SECAM 4 43NTSC PAL 60 Composantes 480i 480p 576i 576p 1080i 720p 1080p SDI 480i 576i SD SDI 720p 1080i HD SDI 1080p 3G SDI Entrée sortie audio Connecteur d entrée Analogique Mini prise stéréo ø 3 5 mm Numérique HDMI x 2 audio numérique DISPLAYPORT SDI option Connecteur de sortie Analogique Mini prise stéréo ø 3...

Страница 267: ...ranchement à chaud 6 TMDS Données 1 13 CEC 7 TMDS Données 0 14 Réservé N C sur appareil 3 Entrée RGB numérique DVI D Brochage de la prise DIV D 1 TMDS Données2 9 TMDS Données1 17 TMDS Données0 2 TMDS Données2 10 TMDS Données1 18 TMDS Données0 3 TMDS Ecran Données 2 11 TMDS Ecran Données 1 19 TMDS Ecran Données 0 4 NC 12 NC 20 NC 5 NC 13 NC 21 NC 6 DDC Horloge 14 Puissance 5V 22 TMDS Ecran Horloge ...

Страница 268: ...MINI DIN 4 broches N broche Nom 1 GND 2 GND 3 Y Luminosité 4 C Chroma 6 Entrée sortie RS 232C N broche Nom 1 NC 2 RXD 3 TXD 4 NC 5 GND 6 NC 7 NC 8 NC 9 NC 7 LAN modulaire 8 broches N de l ergot à RJ45 Signal Paire 1 Orange bande blanche 2 Orange 3 Vert bande blanche 4 Bleu 5 Bleu bande blanche 6 Vert 7 Marron bande blanche 8 Marron ...

Страница 269: ...r Italiano 25 Collegamento del PC conforme OPS Italiano 26 P 6 Connessione RS 232C Italiano 27 Controllo monitor via RS 232C Italiano 27 P 7 Connessione LAN Italiano 28 Connessione Monitor via LAN Italiano 28 P 8 Collegamento di un dispositivo USB Italiano 29 Collegamento di più dispositivi USB mediante la funzione hub USB Italiano 29 P 9 Collegamento del cavo di alimentazione al monitor Italiano ...

Страница 270: ...rata del monitor in caso di utilizzo di applicazioni esigenti questo prodotto è dotato di quattro funzioni screen saver GAMMA VENTILATORE LUMINOSITÁ MOVIMENTO Ritardo in accensione Pagina 57 Per le installazioni che coinvolgono più monitor la funzione di ritardo in accensione consente di accendere i monitor in sequenza con un ritardo di 2 50 secondi dopo l attivazione dell alimentazione Questa fun...

Страница 271: ...frequenze radio e se non installata ed usata in conformità con il manuale delle istruzioni può causare dannose interferenze alle comunicazioni radio L uso di questa apparecchiatura in un area residenziale può facilmente causare dannose interferenze In tal caso l utente sarà tenuto a correggere le interferenze a proprie spese 3 Si avvisa l utente che eventuali modifiche non espressamente autorizzat...

Страница 272: ... MURO PER TOGLIERE COMPLETAMENTE ALIMENTAZIONE ALL UNITA SCOLLEGARE IL CAVO DI ALIMENTAZIONE DALLA PRESA C A NON TOGLIERE IL COPERCHIO O LA PARTE POSTERIORE ALL INTERNO NON VI SONO PARTI MANUTENIBILI DALL UTENTE PER LA MANUTENZIONE RIVOLGERSI A PERSONALE DI MANUTENZIONE QUALIFICATO Questo simbolo avverte l utente che tensioni non isolate all interno dell unita possono essere sufficientemente eleva...

Страница 273: ...bbricato con materiali e componenti di alta qualità che possono essere riciclati e o riutilizzati Questo simbolo significa che i prodotti elettrici ed elettronici le batterie e gli accumulatori devono essere smaltiti separatamente dai rifiuti casalinghi alla fine della loro vita di servizio Se sotto il simbolo mostrato sopra è stampato un simbolo chimico il simbolo chimico significa che la batteri...

Страница 274: ... calore Non ostruire le aperture di ventilazione o mettere il monitor vicino a radiatori o altre fonti di calore Non mettere nulla sopra il monitor Il connettore del cavo di alimentazione è il mezzo principale per scollegare il sistema dalla rete di alimentazione Il monitor deve essere posto vicino ad una presa di alimentazione facilmente accessibile Maneggiare con cura durante il trasporto Conser...

Страница 275: ... opzione Altoparlanti esterni Supporto SDI BOX Morsetti x 2 Per prevenire cadute Fascetta x 2 Per bloccare i cavi HDMI Para angoli x 4 Vite M4 x 2 Per le fascette usate per prevenire cadute Cinturino x 4 Per le fascette di blocco del cavo HDMI Vite M3 x 4 Per i para angoli Fascetta x 3 Per legare i cavi Distanziatore per montaggio a parete x 9 Rivestimento protettivo Coperchio slot opzionale Porta...

Страница 276: ...ff per attivare disattivare l alimentazione NOTA Entro 2 secondi dopo aver interrotto l alimentazione tramite il pulsante POWER sul telecomando wireless o sul monitor o tramite un comando di comunicazione non spegnere l interruttore principale di alimentazione non scollegare il cavo di alimentazione e non spegnere l interruttore Se l alimentazione CA viene interrotta immediatamente dopo l operazio...

Страница 277: ...erminali IN IN OUT IN OUT 9 Connettore LAN Consente il collegamento di un cavo LAN 10 VIDEO IN OUT connettore S BNC Consente il collegamento all apparecchio video S VIDEO IN Connettore di ingresso S Video mini DIN 4 pin VIDEO IN Connettore BNC VIDEO OUT Connettore BNC 11 AUDIO ANALOG IN Per immettere il segnale audio da apparecchiature esterne come ad esempio un computer un lettore VCR o DVD 12 AU...

Страница 278: ...lità PIP o POP Pulsante INPUT Consente di selezionare il video da visualizzare nell immagine secondaria Pulsante CHANGE Consente di sostituire l immagine secondaria all immagine principale Descrizione PIP Picture In Picture L immagine secondaria viene visualizzata all interno dell immagine principale POP Picture Outside Picture L immagine secondaria viene visualizzata in basso a destra rispetto al...

Страница 279: ...tato dalle batterie AAA 1 5 V Installazione delle batterie 1 Sbloccare e tirare il coperchio nella direzione della freccia 2 Allineare le batterie in base alle indicazioni e all interno del telecomando 3 Rimettere il coperchio Rimozione delle batterie 1 Sbloccare e tirare il coperchio nella direzione della freccia 2 Rimuovere le batterie ATTENZIONE L uso non corretto delle batterie può dar luogo a...

Страница 280: ...zione hub USB Installazione del monitor Installazione e rimozione del supporto I supporti sono disponibili come optional Montaggio a parete o al soffitto Impedire che le maniglie entrino in contatto con la parete Rimozione dei telai guida del supporto Utilizzo del distanziatore per montaggio a parete Installazione in posizione verticale o a faccia in su Installazione dei para angoli Uso del monito...

Страница 281: ... probabilità di lesioni o danni l efficacia di tale prevenzione non è garantita in caso di terremoti o catastrofi Non dormire in punti in cui il monitor può cadere in caso di terremoto o altra calamità Prima di spostare il monitor rimuovere il cavo che lo fissa In caso contrario possono verificarsi infortuni o il monitor potrebbe rompersi Determinare la posizione di installazione ATTENZIONE NON TE...

Страница 282: ...ti più lunghe vengono in avanti 200 200 624 624 200 200 307 5 411 5 52 ATTENZIONE Per evitare che il monitor cada Installare il monitor con supporti metallici per l installazione a parete o a soffitto disponibile in commercio a proprio rischio e pericolo Per informazioni dettagliate sull installazione fare riferimento alle istruzioni dei supporti di metallo Per ridurre il rischio di infortuni o da...

Страница 283: ...rcio 1 Posizionare i distanziatori per montaggio a parete 9 pezzi tra la staffa di metallo e i fori delle viti per montaggio a parete del monitor e fissarle con le viti a a Per il montaggio utilizzare viti di ferro M6 con una rondella elastica di blocco e sufficientemente lunga per adattarsi allo spessore della staffa di metalli e a quella del distanziatore per montaggio a parete 17 mm e penetrare...

Страница 284: ...curarsi di aver impostato VENTILATORE su ACCESO tramite SALVA SCHERMO nel menu CONFIGURAZIONE 1 della funzione della schermata OSD Installazione in posizione verticale Il logo MITSUBISHI deve essere rivolto a SINISTRO quando visto dalla parte anteriore del monitor NOTA Questo monitor non dispone di una funzione per la rotazione delle immagini visualizzate Per visualizzare immagini nell orientament...

Страница 285: ...tettivo fornito attenendosi alla seguente procedura 2 Allentare le viti a che fissano la cornice per rimuovere la cornice dal monitor ATTENZIONE Se si rimuovono altre viti rispetto alle viti a la lunetta non è più sostenuta In questo caso la lunetta potrebbe cadere causando lesioni personali o danni al monitor a a 3 Rimuovere i separatori dal rivestimento protettivo b assemblato al punto 1 quindi ...

Страница 286: ... Far corrispondere la polarità dei cavi dei diffusori con quella dei terminali rosso nero Una mancata corrispondenza delle polarità può causare problemi con l uscita audio P 3 Installazione dei diffusori opzionali Eseguire secondo necessità NOTA Dopo aver accesso il monitor passare dalla modalità diffusori integrati alla modalità diffusori opzionale Per ulteriori informazioni vedere la sezione Mod...

Страница 287: ... cosa spegnere tutte le apparecchiature collegate ed effettuare i collegamenti Vedere il manuale utente fornito con ogni singolo componente dell apparecchiatura NOTA Utilizzare il cavo audio senza resistenza se il terminale di uscita audio del dispositivo audio e del PC è un mini spinotto stereo Se viene utilizzato un cavo audio con resistenza il livello dell audio potrebbe non aumentare oppure l ...

Страница 288: ...rio e un cinturino accessorio Rimuovere la vite dal monitor Fissare la fascetta sul monitor con la vite rimossa al punto Fissare il cavo HDMI e la fascetta con il cinturino NOTA Il cinturino non è riutilizzabile Il monitor viene fornito con 2 cinturini di ricambio Per sostituire il cinturino tagliare e rimuovere il cinturino esistente e posizionarne uno della stessa forma disponibile in commercio ...

Страница 289: ...mente i tempi mostrati nella tabella seguente e imposta le informazioni relative allo schermo Quando viene collegato un PC o un altro dispositivo le immagini vengono automaticamente visualizzate in modo corretto Vedere la pagina di descrizione di SETUP AUTOMATICO REGOLAZIONE AUTOM Tempi preimpostati in fabbrica Risoluzione Frequenza Commenti Risoluzione Frequenza Commenti Orizzontale Verticale Ori...

Страница 290: ...cipatamente il numero di monitor che è possibile collegare nel proprio ambiente di installazione Impostare RGB di RISPARMIO ENERGIA nel menu CONFIGURAZIONE 1 su SPENTO quando si utilizza DVI D in modalità a cascata Collegamento audio Collegare un cavo audio ø3 5 mm stereo mini disponibile in commercio al connettore AUDIO ANALOG IN Quando si collega un cavo HDMI selezionare HDMI1 o HDMI2 in base al...

Страница 291: ...NPUT sul monitor o il pulsante YPbPr sul telecomando wireless In fase di selezione l audio viene automaticamente commutato su ANALOG Per effettuare il collegamento audio collegare un cavo audio ø3 5 mm stereo mini RCA al connettore AUDIO ANALOG IN Poiché l audio viene commutato automaticamente su ANALOG quando è selezionato YPbPr è possibile riprodurre l audio semplicemente collegando il cavo Per ...

Страница 292: ...à di un cavo BNC al connettore VIDEO OUT del primo monitor e l altra estremità al connettore VIDEO IN del secondo monitor NOTA Nel collegamento a cascata è possibile collegare fino a 5 monitor se si utilizzano cavi da 5 metri Il numero massimo di monitor che è possibile collegare potrebbe tuttavia essere limitato a seconda dei dispositivi collegati che si desiderano utilizzare È consigliabile veri...

Страница 293: ...o da Belden P 5 Installazione del modulo di ampliamento Eseguire secondo necessità Installazione del modulo di ampliamento Installare il modulo di ampliamento sullo slot opzionale di questo monitor attenendosi alle precauzioni e alle procedure descritte nel manuale fornito insieme al modulo Esempi di moduli di ampliamento supportati SDI BOX DP 1SDI 3G PC conforme OPS disponibile in commercio PC co...

Страница 294: ...il catalogo o il manuale d uso dell SDI BOX Rimozione della SDI BOX Per la rimozione afferrare la maniglia sulla SDI BOX ATTENZIONE Usare solo la maniglia per estrarre l SDI BOX Se si tira il cavo SDI BNC o si utilizzano altri mezzi si potrebbero causare danni 3 Installare il coperchio dello slot opzionale accessorio con le 5 viti b rimosse al punto 2 b 4 Inserire un PC conforme OPS disponibile in...

Страница 295: ...bile in commercio Inoltre quando si collegano due o più monitor come illustrato nella seguente figura collegare il connettore RS 232C OUT del primo monitor e il connettore RS 232C IN del secondo monitor con un cavo RS 232C di tipo invertito disponibile in commercio Ripetendo il collegamento in modo simile è possibile collegare i monitor in cascata NOTA Sebbene sia possibile collegare fino a 26 mon...

Страница 296: ...tor e l hub LAN con un cavo LAN di tipo dritto disponibile in commercio Quando si collegano due o più monitor è possibile collegare il monitor e l hub LAN con un cavo LAN di tipo dritto disponibile in commercio come descritto di seguito P 7 Connessione LAN Eseguire secondo necessità NOTA Se si utilizza un cavo LAN di tipo incrociato disponibile in commercio è possibile collegare il monitor e il co...

Страница 297: ...d B sul monitor usando un cavo USB disponibile in commercio Quando si usa un PC conforme OPS Installare un PC conforme OPS collegato internamente 2 Collegare un dispositivo USB alla porta downstream del monitor NOTA La funzione hub USB non può controllare il monitor È possibile collegare a cascata fino a 5 hub grazie alla funzione hub del monitor Verificarne preventivamente il funzionamento anche ...

Страница 298: ...e venga scollegato accidentalmente 1 Inserire completamente e saldamente il connettore di alimentazione del cavo di alimentazione nel connettore AC IN del monitor 2 Fissare il connettore di alimentazione tramite il portacavo accessorio ATTENZIONE Non inserire il portacavo nella presa di alimentazione Potrebbe causare scosse elettriche Adattare entrambe le estremità del portacavo al monitor Inserir...

Страница 299: ...agine da 42 a 44 Pagina 45 Accensione di tutti i dispositivi collegati Selezione dell ingresso video Controllo dei dispositivi esterni Solo D SUB Configurazione automatica Selezione della modalità dell immagine Selezione lingua OSD Regolazione dello schermo Regolazione dell immagine Controllo del volume del bilanciamento e del tono Impostazione dei diffusori Impostazione della pianificazione Telec...

Страница 300: ...ione è spento Per utilizzarli assicurarsi che l interruttore di alimentazione principale sia nella posizione ON e l indicatore di alimentazione sia acceso Interruttore principale di alimentazione 3 Se l indicatore di accensione è rosso premere il pulsante POWER sul monitor L indicatore di accensione si illumina in verde Telecomando Pulsante di alimentazione Pulsante di alimentazione oppure NOTA En...

Страница 301: ...o viene interrotto il segnale di sincronizzazione dell ingresso video YPbPr S VIDEO o VIDEO il monitor entra nella modalità di sospensione in circa 10 minuti Descrizione DPM acronimo di Display Power Management NOTA Le impostazioni di risparmio energia predefinite per RGB e VIDEO sono attive Se nello slot opzionale è presente un modulo di ampliamento il monitor non entra nella modalità di sospensi...

Страница 302: ... menu OSD dell ingresso video ed è possibile selezionare l ingresso utilizzando i pulsanti e Gli ingressi video selezionabili sono HDMI1 HDMI2 DVI D D SUB OPTION DISPLAYPORT YPbPr S VIDEO e VIDEO Se si preme nuovamente il pulsanti INPUT viene visualizzato l ingresso video selezionato Se sullo slot opzionale è montato un modulo di ampliamento è possibile utilizzare OPTION NOTA La selezione effettua...

Страница 303: ... OSD Visualizzare il menu OSD premendo il pulsante MENU sul telecomando wireless o il pulsante EXIT sulla parte posteriore del monitor Utilizzando LINGUA nel menu CONFIGURAZIONE 1 della funzione OSD è possibile selezionare la lingua OSD Vedere a pagina 53 U 3 Controllo dei dispositivi esterni Lettore DVD ecc Personal computer ...

Страница 304: ...are il menu SETUP AUTOMATICO selezionando SETUP AUTOMATICO nel menu CONFIGURAZIONE 1 Premere il pulsante SET per regolare automaticamente e correttamente le dimensioni dello schermo la posizione orizzontale verticale il clock la fase di clock e il livello del segnale in ingresso NOTA La configurazione automatica è utilizzabile solo per D SUB Visualizzazione del menu OSD Visualizzazione diretta del...

Страница 305: ...e orizzontale verticale per ottenere le corrette condizioni dello schermo NOTA La regolazione della posizione è utilizzabile solo per D SUB YPbPr S VIDEO e VIDEO La regolazione del clock e della risoluzione sono utilizzabili solo per D SUB La regolazione dello zoom è utilizzabile per tutti gli ingressi video U 6 Selezione della modalità dell immagine HIGHBRIGHT La luminosità viene impostata sul va...

Страница 306: ...per ottenere la qualità dell immagine desiderata U 9 Impostazione dei diffusori Eseguire secondo necessità Selezionare i diffusori integrati o gli speciali diffusori stereo esterni opzionale nell impostazione dei diffusori del menu OSD Visualizzare il menu OSD premendo il pulsante MENU sul telecomando wireless o il pulsante EXIT sulla parte posteriore del monitor Usando ALTOPARLANTE nel menu AUDIO...

Страница 307: ...si e gli acuti dei diffusori Per effettuare la regolazione visualizzare il menu OSD premendo il pulsante MENU sul telecomando wireless o il pulsante EXIT sulla parte posteriore del monitor NOTA Se non viene riprodotto alcun audio quando è in uso un PC conforme OPS verificare che il monitor sia selezionato come sorgente dell uscita audio da parte del sistema operativo del computer Per informazioni ...

Страница 308: ...do wireless o il pulsante EXIT sulla parte posteriore del monitor Utilizzando PROGRAMMA nel menu CONFIGURAZIONE 2 della funzione OSD è possibile programmare lo spegnimento accensione e la selezione dell ingresso U 11 Impostazione della pianificazione Eseguire secondo necessità ...

Страница 309: ...re il programma ogni giorno Se si seleziona OGNI GIORNO non è possibile selezionare i giorni della settimana ed OGNI SETT LUN DOM Selezionare i giorni della settimana in cui eseguire il programma Se non si seleziona anche OGNI SETT la selezione dei giorni della settimana viene cancellata dopo la prima esecuzione del programma OGNI SETT Selezionare questa opzione per eseguire il programma ogni sett...

Страница 310: ...omandi avanzati Per inviare i comandi tramite una tastiera utilizzando il software del terminale selezionare 2s o 30s per CONTROL TIME OUT in CONFIGURAZIONE 2 nel menu OSD seguire la stessa procedura per il controllo LAN Codice indirizzo Codice funzione Codice fine Codice fine ESADECIMALE 30h 30h Funzione Dati 0Dh ASCII 0 0 Funzione Dati Codice indirizzo 30h 30h codice ASCII 0 0 fisso Codice funzi...

Страница 311: ...4 secondi prima dell invio del comando successivo Dopo aver inviato un comando di selezione dell ingresso video attendere almeno 5 secondi prima dell invio del comando successivo In caso contrario il monitor potrebbe non rispondere entro 600 ms Impostare il valore di timeout del dispositivo di controllo sul lato host su 30 secondi o più Nella modalità di spegnimento funzionano solo il comando oper...

Страница 312: ... 20 33 31 Se sullo slot opzionale è montato un modulo di ampliamento è possibile utilizzare OPTION NOTA Anche se il monitor risponde al comando di controllo per l accensione spegnimento inviato dal PC conforme OPS non si accende spegne Si tratta di un anomalia Per il funzionamento automatico usare PROGRAMMA nel menu CONFIGURAZIONE 2 della funzione OSD U 12 Telecomando continua Eseguire secondo nec...

Страница 313: ...e 2 Verificare che l hub USB venga riconosciuto L hub USB di questo monitor viene rilevato dal computer e il driver del dispositivo con sistema operativo standard viene installato automaticamente Alcuni computer potrebbero non riconoscere l hub USB anche se è collegato In questo caso installare il driver del dispositivo dell hub USB attenendosi alle istruzioni sul manuale dell utente del computer ...

Страница 314: ...enu secondario Quando si seleziona un menu secondario viene visualizzata una schermata OSD I menu secondari contengono schermate informative schermate del menu di regolazione e schermate del menu di selezione come riportato di seguito Schermata del menu secondario Reimpostazione immagine esempio Pagina 48 Pagina 50 Pagina 51 Pagina 52 Pagina 53 Pagina 54 Pagina 56 Configurazione della schermata OS...

Страница 315: ...ulsante EXIT per visualizzare lo schermo OSD quindi premere il pulsante per selezionare il menu principale Quando si preme il pulsante SET per accettare il menu principale selezionato viene selezionato il menu secondario visualizzato nella parte superiore Quando si preme il pulsante INPUT per accettare il menu principale selezionato viene selezionato il menu secondario visualizzato nella parte sup...

Страница 316: ...ibile sui segnali di ingresso RGB Regola il livello di riduzione del rumore Premere il pulsante per aumentare livello di riduzione NOTA La modalità immagine sRGB è standard e non può essere cambiata TINTA TINT TINTA È possibile regolare tutti i colori contemporaneamente Premere il pulsante PIÙ per aggiungere una tinta verde Premere il pulsante MENO per aggiungere una tinta viola RED MAGENTA BLUE C...

Страница 317: ...AUTO è possibile regolare individualmente solo la voce CONTROL LOCALE La funzione LUMINOSITÀ AUTOM è attivata ed è possibile regolare individualmente la voce CONTROL e le voci successive REMOTO La funzione di regolazione LUMINOSITÀ AUTOM è abilitata Inoltre se sono controllati più monitor collettivamente il monitor passa alla modalità di intercomunicazione Consultare pagina 60 SPENTO Questa funzio...

Страница 318: ... immagine viene stirata per riempire lo schermo con differenti livelli di ingrandimento al centro e ai bordi dello schermo UTENTE È possibile stirare l immagine orizzontalmente e verticalmente come desiderato utilizzando l impostazione ZOOM UTENTE REALE L immagine viene visualizzata senza essere stirata o ridotta NOTA La modalità DYNAMIC visualizza le immagini in formato 16 9 ad esempio quelle con...

Страница 319: ...pulsante per diminuire il suono ALTO BASSI BASS Per accentuare o ridurre i suoni a bassa frequenza Premere il pulsante per aumentare il suono BASSO Premere il pulsante per diminuire il suono BASSO ALTOPARLANTE SPEAKER È possibile passare dai diffusori integrati ai diffusori stereo esterni optional e viceversa INTERNO l audio viene riprodotto dai diffusori integrati potenza massima 10 W 10 W ESTERN...

Страница 320: ... la posizione orizzontale della schermata secondaria Premere il pulsante PIÙ per spostare la schermata secondaria a destra Premere il pulsante MENO per spostare la schermata secondaria a sinistra PIP POSIZIONE VERTICALE PIP V POSITION È possibile regolare la posizione verticale della schermata secondaria Premere il pulsante PIÙ per spostare la schermata secondaria in alto Premere il pulsante MENO ...

Страница 321: ...ntegrata viene avviata automaticamente in base alla temperatura di funzionamento LUMINOSITÀ Selezionando ACCESO la luminosità diminuisce MOVIMENTO Lo schermo si sposta leggermente in orizzontale e verticale a intervalli regolari per ridurre l effetto di persistenza dell immagine NOTA Se la funzione TILING nel menu OPZIONE AVANZATA è attiva non è possibile impostare l opzione MOVIMENTO su ACCESO Qu...

Страница 322: ...o il numero di porta 63007 e 3007 del monitor RESET Consente di reimpostare le impostazioni LAN CONTROLLER SETTING CONTROLLER SETTING Quando si controlla il monitor tramite una rete usando un processore di controllo serie 2 prodotto da Crestron impostare i parametri di comunicazione IP CONTROLLER Impostare l indirizzo IP del processore di controllo NUMERO PORTA Impostare il numero di porta usata p...

Страница 323: ...le frecce su giu per spostare il numero da 1 a 7 del programma Usare i tasti e per spostare il cursore orizzontalmente in un determinato programma Utilizzare i tasti e per incrementare il tempo e selezionare la porta di ingresso Il tasto SET viene utilizzato per effettuare una selezione Se un programma è stato creato ma non si desidera assegnare un ora di attivazione selezionare nella finestra tem...

Страница 324: ...B NOTA È possibile selezionare solo gli ingressi DVI D OPTION e D SUB Se è montato un modulo di ampliamento il monitor non entra nella modalità di sospensione VIDEO DETECT Gli ingressi video di destinazione sono HDMI1 YPbPr S VIDEO VIDEO e D SUB Se viene rilevato l ingresso HDMI1 YPbPr S VIDEO o VIDEO viene selezionato automaticamente l ingresso rilevato Se il segnale video visualizzato viene pers...

Страница 325: ...accensione in base all orario di ripristino dalla modalità di sospensione o di accensione Il tempo può essere selezionato tra OFF e 2 4 6 8 10 20 30 40 e 50 secondi IMPOSTAZIONI TERMINAL TERMINAL SETTING È possibile selezionare la modalità di visualizzazione del segnale HDMI1 HDMI2 o DVI D in base al formato del segnale proveniente dal dispositivo sorgente SEGNALE HDMI Selezionare questa impostazi...

Страница 326: ...remere e mantenere premuti i pulsanti e contemporaneamente per almeno 3 secondi un altra volta NORMALE DYNAMIC NORMALE segnale compresso NORMALE NORMALE INTERO Dimensione normale di ogni segnale Dimensione consigliata per l immagine Informazioni OSD OPTION SDI 3G 1920 x 1080 67kHz 60Hz AUDIO SDI SIZE FULL YPbPr AUDIO ANALOG SIZE FULL S VIDEO NTSC AUDIO ANALOG SIZE FULL DVI D 1024 x 768 48kHz 60Hz ...

Страница 327: ... Selezione dell ingresso del segnale video Operazione HDMI1 o HDMI2 ANALOG HDMI DVI D Solo ANALOG D SUB Solo ANALOG OPTION PC PC conforme OPS ANALOG OPS ANALOG OPS DIGITAL SDI SDI BOX ANALOG SDI DISPLAYPORT ANALOG DISPLAYPORT YPbPr Solo ANALOG S VIDEO Solo ANALOG VIDEO Solo ANALOG L audio dell ingresso HDMI1 o HDMI2 in fase di selezione viene riprodotto come audio HDMI Se sullo slot opzionale è mo...

Страница 328: ... sulla schermata OSD IMMAGINE come segue LUMINOSITÀ AUTOM CONTROL Monitor Master LOCAL PRIMO Monitor Slave REMOTO SECONDO Per usare un computer per controllare i monitor Quando si utilizza un computer per controllare i monitor si deve predisporre un programma applicativo software per eseguire il controllo personalmente La luminosità di tutti i monitor può essere controllata a livello centrale medi...

Страница 329: ...ile utilizzare OPTION Premere i pulsanti PIP ON OFF sul telecomando per commutare tra le modalità PIP POP e SBS come indicato nella figura riportata di seguito In alternativa è possibile modificare le modalità usando l impostazione PIP MODE in PIP nel menu principale OSD Vedere a pagina 52 Risoluzione modalità PIP e POP SBS COMPLETO FORMATO PIP PICCOLO 450 pixel X 338 pixel MEDIO 675 pixel X 450 p...

Страница 330: ...do verso l apposito sensore dei segnali del monitor PRIMO Sul monitor viene visualizzato l OSD con il numero ID selezionato NOTA Quando l OSD di selezione ID è visualizzato sul monitor PRIMO premere nuovamente il tasto DISPLAY sul telecomando per annullare l OSD di selezione ID e controllare il monitor selezionato Se la modalità telecomando viene impostata in modo errato e non è possibile utilizza...

Страница 331: ...o il modo di visualizzazione può essere necessario regolare nuovamente le impostazioni di regolazione immagine OSD Controllare se il monitor e la scheda video sono compatibili e rispettano le impostazioni raccomandate Se il testo è confuso cambiare il modo video a non interlacciato ed utilizzare 60 Hz come frequenza di rinfresco L immagine del segnale del componente è verdina Controllare che il co...

Страница 332: ...posite BNC Digitale SDI opzionale Risoluzione supportata Composite S terminal NTSC PAL SECAM 4 43NTSC PAL 60 Component 480i 480p 576i 576p 1080i 720p 1080p SDI 480i 576i SD SDI 720p 1080i HD SDI 1080p 3G SDI Ingresso uscita audio Connettore di ingresso analogico Mini spinotto stereo ø3 5 mm digitale HDMI x 2 audio digitale DISPLAYPORT SDI opzionale Connettore di uscita analogico Mini spinotto ster...

Страница 333: ...ura 12 TMDS Clock 19 Rilevazione Hot Plug 6 TMDS Data1 13 CEC 7 TMDS Data0 14 Riservato N C sui dispositivi 3 Input RGB digitale DVI D Pin Assegnazione del connettore DVI D 1 TMDS Data2 9 TMDS Data1 17 TMDS Data0 2 TMDS Data2 10 TMDS Data1 18 TMDS Data0 3 TMDS Data 2 schermatura 11 TMDS Data 1 schermatura 19 TMDS Data 0 schermatura 4 NC 12 NC 20 NC 5 NC 13 NC 21 NC 6 DDC Clock 14 Alimentazione 5 V...

Страница 334: ...MINI DIN 4 pin N Pin Nome 1 GND 2 GND 3 Y Luminanza 4 C Cromaticità 6 RS 232C input output N Pin Nome 1 NC 2 RXD 3 TXD 4 NC 5 GND 6 NC 7 NC 8 NC 9 NC 7 LAN Modulare a 8 pin N pin di RJ45 Segnale Coppia 1 Striscia arancione bianca 2 Arancione 3 Striscia verde bianca 4 Blu 5 Striscia blu bianca 6 Verde 7 Striscia marrone bianca 8 Marrone ...

Страница 335: ...и для подключения нескольких мониторов Русский 25 Подключение OPS с открытой спецификацией подключений компьютер Русский 26 P 6 Подключение кабеля RS 232C Русский 27 Управление монитором с помощью кабеля RS 232C Русский 27 P 7 Подключение сетевого кабеля Русский 28 Подключение монитора с помощью сетевого кабеля Русский 28 P 8 Подсоединение устройства USB Русский 29 Подсоединение нескольких устройс...

Страница 336: ...и его использовании для показа видеорекламы данное устройство оснащено четырьмя функциями заставок ГАММА ВЕНТИЛЯТОР ЯРКОСТЬ ДВИЖЕНИЕ Время задержки включения Стр 57 Если несколько мониторов связаны в одну систему данная функция позволяет включать их по очереди время задержки включения может быть настроено в интервале от 2 до 50 секунд после подачи питания Использование этой функции может предотвра...

Страница 337: ...й связи Эксплуатация данного оборудования в жилых районах вероятно может причинить критические помехи которые если пользователь требует исправление помех осуществляется его собственный счет 3 Вы предостережены что изменения или модификации категорически не одобрены частичной ответственностью за соответствие что может освободить вас от полномочий эксплуатации оборудования Windows является зарегистр...

Страница 338: ...ТАНИЕ УСТРОЙСТВА ВЫКЛЮЧИТЕ КАБЕЛЬ ПИТАНИЯ ИЗ РОЗЕТКИ ПЕРЕМЕННОГО ТОКА НЕ СНИМАЙТЕ КРЫШКУ ИЛИ ЗАДНЮЮ ПАНЕЛЬ ВНУТРИ АППАРАТА НЕТ ДЕТАЛЕЙ ОБСЛУЖИВАНИЕ КОТОРЫХ МОЖЕТ ВЫПОЛНЯТЬ ПОЛЬЗОВАТЕЛЬ ПО ВОПРОСАМ ОБСЛУЖИВАНИЯ ОБРАТИТЕСЬ К КВАЛИФИЦИРОВАННОМУ СПЕЦИАЛИСТУ Этот знак предупреждает пользователей о том что внутри устройства находятся неизолированные детали под высоким напряжением которые могут стать при...

Страница 339: ...000 3 2 EN 61000 3 3 EN 55024 и содержит отметку Mitsubishi Electric Corporation 2 7 3 Marunouchi Chiyoda Ku Tokyo 100 8310 Japan Заявление изготовителя Заявление изготовителя Предупреждение Данное изделие относится к классу А При установке в жилых помещениях данное изделие может стать причиной радиопомех в результате чего пользователю может потребоваться предпринять соответствующие меры АЯ46 ...

Страница 340: ...кристалическая жидкость протекла не вдыхайне и не заглатывайте её Обеспечьте необходимое свободное пространство вокруг монитора для вентиляции и правильного рассеивания тепла Не закрывайте вентиляционные отверстия и не размещайте монитор в непосредственной близости от батарей отопления и других источников тепла Не кладите ничего на монитор Кабель питания является основным средством для отключения ...

Страница 341: ...ект поставки как дополнительные Внешний громкоговоритель Подставки SDI BOX Фиксатор x 3 Для стягивания кабелей Распорка для настенного крепления x 9 Фиксатор кабеля для удерживания кабеля питания Защитное покрытие Крышка дополнительного слота Наклейка на маркировку UL Этикетка закрывающая логотип Используйте ее в случае необходимости ЖКД монитор Шнур питания Для Северной Америки Снабженный шнур пи...

Страница 342: ...я питания от сети ПРИМЕЧАНИЕ В течение 2 секунд после отключения питания с помощью кнопки POWER на беспроводном пульте дистанционного управления или на мониторе а также посредством команды связи не отключайте основной выключатель питания не отсоединяйте кабель питания и не отключайте прерыватель цепи Если отключить источник переменного тока непосредственно после отключения питания то все настройки...

Страница 343: ...2S Разъёмы и клеммы IN IN OUT IN OUT 9 Сетевой разъем Подключение с помощью сетевого кабеля 10 VIDEO IN OUT разъем S BNC Служит для подключения видеооборудования S VIDEO IN Входной разъем S video мини DIN 4 штырьковый VIDEO IN Pазъем BNC VIDEO OUT Pазъем BNC 11 AUDIO ANALOG IN Вход аудиосигнала от внешнего оборудования например компьютера видеомагнитофона или DVD проигрывателя 12 AUDIO ANALOG OUT ...

Страница 344: ...тве вспомогательного изображения Кнопка CHANGE Смена местами основного и вспомогательного изображений Описание PIP Picture In Picture Картинка в картинке Вспомогательное изображение выводится на экран внутри основного изображения POP Picture Outside Picture Картинка вне картинки Вспомогательное изображение выводится на экран справа внизу от основного изображения SBS Side By Side Бок О Бок Основное...

Страница 345: ...ионного управления используются батарейки 1 5 В размера AAA Как установить батарейки 1 Откройте и оттяните крышку в направлении указанном стрелкой 2 Установите батарейки в соответствии с метками и внутри отделения 3 Установите крышку на место Как удалить батарейки 1 Откройте и оттяните крышку в направлении указанном стрелкой 2 Удалите батарейки ВНИМАНИЕ В случае неправильного использования батарей...

Страница 346: ...абеля HDMI Соединение с компьютером аналоговое подключение Соединение с компьютером цифровое подключение Подключение видеоустройства устройство HDMI с компонентным видеосигналом Подключение видеоустройства с композитным видеосигналом сигналом S video стереоусилителя Подсоединение кабеля питания к монитору Подключение к источнику питания Монитор готов к использованию Использование монитора Подготов...

Страница 347: ... всех видов землетрясений или бедствий Не спите там где монитор может перевернуться или упасть при землетрясении или другом стихийном бедствии Перед перемещением монитора удалите трос который закрепляет монитор Не выполнение этого может привести к повреждению или поломке монитора Определите место установки ВНИМАНИЕ НЕ ПЫТАЙТЕСЬ УСТАНАВЛИВАТЬ ЖКД МОНИТОР САМОСТОЯТЕЛЬНО Установка ЖКД дисплея должна ...

Страница 348: ...яющая рамка 200 200 624 624 200 200 307 5 411 5 52 ВНИМАНИЕ Для предохранения монитора от падения Особенно тщательно соблюдайте следующие рекомендации Установите монитор на металлических кронштейнах на стене или креплениях на потолке коммерчески допустимый под вашу ответственность Для подробных процедур установки обратитесь к инструкциям по установке металлических кронштейнов Для уменьшения вероят...

Страница 349: ... винтов для настенного крепления монитора и прикрепите их с помощью винтов a a Для монтажа используйте железные винты M6 с пружинными шайбами препятствующими их раскручиванию достаточной длины чтобы покрыть толщину металлического кронштейна и распорки для настенного крепления 17 мм а также проникнуть в монитор на глубину 10 мм эти винты следует надежно затянуть 10 мм 17 мм 339 276 Распорка для нас...

Страница 350: ...жении ландшафт Когда монитор установлен лицевой стороной вверх задайте для параметра COOLING FAN значение ON для этого перейдите к пункту SCREEN SAVER в меню CONFIGURATION1 функции экрана OSD Установка в вертикальном положении Логотип MITSUBISHI должен быть на СЛЕВА стороне если смотреть с передней стороны монитора ПРИМЕЧАНИЕ Монитор не имеет функцию поворота отображаемого изображения Для отображе...

Страница 351: ...рытие 1 Соберите прилагаемое защитное покрытие как показано ниже 2 Чтобы снять лицевую панель выверните винты a которыми она крепится к монитору ВНИМАНИЕ Если помимо винтов а Вы выкрутите другие винты панель отсоединится В этом случае панель может упасть и это приведет к получению травмы или к повреждению монитора a a 3 Отклейте разделители от защитного покрытия b собранного в ходе выполнения шага...

Страница 352: ...ь кабелей динамиков и разъемов должна совпадать красный черный Несоблюдение полярности может привести к возникновению проблем с воспроизведением звукового сигнала P 3 Установка дополнительных динамиков Выполните надлежащим образом ПРИМЕЧАНИЕ После включения монитора переключитесь с режима работы встроенных динамиков на режим работы дополнительных динамиков Для получения дополнительной информации с...

Страница 353: ... чем выполнять подключение отключите питание всего подключаемого оборудования Прочитайте руководство пользователя поставляемое с каждым отдельным устройством ПРИМЕЧАНИЕ Пожалуйста используйте аудиокабель без сопротивления когда выходной аудиоразъем звукового устройства и компьютера является стерео мини разъемом Если используется кабель с сопротивлением то уровень звука может не увеличиваться или з...

Страница 354: ...Прикрепите фиксатор к монитору с помощью винта который Вы выкрутили в шаге Прикрепите кабель HDMI к фиксатору с помощью ремешка ПРИМЕЧАНИЕ Ремешок не предназначен для повторного использования К монитору прилагается 2 запасных ремешка Чтобы заменить ремешок разрежьте и снимите его а затем установите новый ремешок той же формы коммерчески допустимый ширина 2 5 мм длина приблизительно 100 мм 3 Закреп...

Страница 355: ...ючения продолжение Монитор автоматически различает частоты приведенные в таблице и задает информацию об экране При наличии подключения к компьютеру или другому устройству изображения выводятся на экран автоматически См страницу с описанием параметров AUTO SETUP и AUTO ADJUST Заводские настройки частоты Разрешение Частота Примечания Разрешение Частота Примечания По горизонтали По вертикали По гориз...

Страница 356: ...ов заранее в соответствующих условиях установки При использовании DVI D в режиме последовательного подключения задайте для функции RGB режима POWER SAVE в меню CONFIGURATION1 значение OFF Подключение аудиосигнала Подсоедините аудиокабель ø3 5 мм стерео мини коммерчески допустимый к разъему AUDIO ANALOG IN При подключении кабеля HDMI выберите HDMI1 или HDMI2 в соответствии с подключенным разъемом н...

Страница 357: ...и INPUT на мониторе или кнопки YPbPr на беспроводном пульте дистанционного управления Во время выбора аудиосигнал автоматически переключается на ANALOG Для получения аудиосигнала подключите аудиокабель ø3 5 мм стерео мини RCA к разъему AUDIO ANALOG IN Поскольку аудиосигнал автоматически переключается на ANALOG при выборе YPbPr аудиосигнал выводится сразу же после подключения кабеля Чтобы подключит...

Страница 358: ...е дистанционного управления Чтобы подсоединить два монитора подсоедините один конец кабеля BNC к разъему VIDEO OUT первого монитора а второй конец кабеля к разъему VIDEO IN второго монитора ПРИМЕЧАНИЕ При последовательном подключении Вы можете подключить до 5 мониторов используя кабели длиной 5 метров Однако максимальное количество подключаемых мониторов может быть ограничено в зависимости от испо...

Страница 359: ...трический удар 2 Выкрутите 2 винта a и снимите рукоятку Выкрутите 7 винтов b и снимите дополнительную крышку b b b b a a ВНИМАНИЕ Сохраните снятую дополнительную крышку поскольку ее следует установить на место после отсоединения SDI BOX 3 Установите крышку дополнительного слота принадлежность и закрепите ее с помощью 5 винтов b которые Вы выкрутили в шаге 2 b 4 Вставьте SDI BOX опция в дополнитель...

Страница 360: ...луатации SDI BOX Снятие SDI BOX Чтобы снять SDI BOX удерживайте его за ручку ВНИМАНИЕ Чтобы извлечь SDI BOX используйте только ручку Попытки тянуть за кабель SDI BNC или иные действия могут вызвать повреждение 3 Установите крышку дополнительного слота принадлежность и закрепите ее с помощью 5 винтов b которые Вы выкрутили в шаге 2 b 4 Вставьте OPS с открытой спецификацией подключений компьютер ком...

Страница 361: ... обратного типа коммерчески допустимый Кроме того если Вы хотите подключить два монитора и более как показано на рисунке ниже подключите разъем RS 232C OUT первого монитора к разъему RS 232C IN второго монитора используя кабель RS 232C обратного типа коммерчески допустимый Устанавливая подключение таким образом Вы можете последовательно подключить мониторы ПРИМЕЧАНИЕ Вы можете подключить до 26 мон...

Страница 362: ...ор к компьютеру с помощью сетевого кабеля прямого типа коммерчески допустимый Подключите этот монитор к сетевому концентратору с помощью сетевого кабеля прямого типа коммерчески допустимый При подключении двух мониторов и более к сетевому концентратору используйте сетевой кабель прямого типа коммерчески допустимый как показано выше ПРИМЕЧАНИЕ При использовании сетевого кабеля крестового типа комме...

Страница 363: ...и OPS с открытой спецификацией подключений компьютера Установите OPS с открытой спецификацией подключений компьютер с внутренним подключением 2 Подсоедините устройство USB к нисходящему порту на данном мониторе ПРИМЕЧАНИЕ Функция USB концентратора не может управлять монитором На этом мониторе можно последовательно подключить до 5 концентраторов с помощью функции концентратора Всегда проводите пред...

Страница 364: ...питания закрепите его с помощью фиксатора 1 Надежно и до упора вставьте штекер кабеля питания в разъем AC IN на мониторе 2 Закрепите штекер кабеля питания с помощью фиксатора кабеля принадлежность ВНИМАНИЕ Не вставляйте фиксатор кабеля в розетку электропитания Иначе это может привести к поражению электрическим током Прикрепите оба конца фиксатора кабеля к монитору Зацепите фиксатор кабеля в местах...

Страница 365: ...8 Стр 40 41 Стр 42 44 Стр 45 Включение подключенных устройств Выбор видеовхода Управление внешними устройствами Выбор языка OSD Только D SUB Автоматическая установка Выбор режима изображения Настройка экрана Настройка изображения Регулировка громкости баланса и тембра Настройка динамиков Настройка расписания работы Пульт дистанционного управления Настройка USB концентратора Использование монитора ...

Страница 366: ...ючен При их использовании проверьте что основной выключатель питания включен индикатор питания включен Основной выключатель питания 3 Если индикатор питания горит красным цветом нажмите на кнопку POWER на мониторе Индикатор питания загорится зеленым цветом Беспроводной пульт дистанционного управления Кнопка питания Кнопка питания или ПРИМЕЧАНИЕ В течение 2 секунд после отключения питания с помощью...

Страница 367: ...ал синхронизации видеовхода YPbPr S VIDEO или VIDEO монитор перейдет в спящий режим приблизительно через 10 минут Описание DPM Аббревиатура для Display Power Management Управление питанием дисплея ПРИМЕЧАНИЕ По умолчанию управление питанием режим экономии энергии для RGB и VIDEO включено Если модуль расширения находится в дополнительном слоте монитор не переходит в спящий режим даже в том случае е...

Страница 368: ...тии на кнопку INPUT на мониторе отображается меню OSD видеовхода и Вы можете выбрать видеовход с помощью кнопок и Доступные видеовходы HDMI1 HDMI2 DVI D D SUB OPTION DISPLAYPORT YPbPr S VIDEO и VIDEO При повторном нажатии на кнопку INPUT отображается выбранный видеовход OPTION может быть использован только когда модуль расширения будет установлен в дополнительный слот ПРИМЕЧАНИЕ Выбранный Вами пар...

Страница 369: ... на экране нажав на кнопку MENU на беспроводном пульте дистанционного управления или на кнопку EXIT на задней панели монитора С помощью пункта LANGUAGE в отображаемом на экране меню CONFIGURATION1 Вы можете выбрать язык отображаемого на экране меню См стр 53 U 3 Управление внешними устройствами DVD проигрыватель и т д Персональный компьютер ...

Страница 370: ...задней панели монитора после чего отобразить меню AUTO SETUP выбрав AUTO SETUP в меню CONFIGURATION1 Нажав кнопку SET Вы можете автоматически надлежащим образом отрегулировать размер экрана положение по горизонтали и вертикали тактовую частоту фазу синхронизации и уровень входного сигнала ПРИМЕЧАНИЕ Автоматическая установка работает только на D SUB Отображение непосредственно меню AUTO SETUP Отобр...

Страница 371: ...я пользовательское увеличение и разрешение по горизонтали и вертикали чтобы получить соответствующие параметры экрана ПРИМЕЧАНИЕ Настройка положения доступна только для D SUB YPbPr S VIDEO и VIDEO Настройка тактовой частоты и разрешения доступна только для D SUB Настройка увеличения доступна для всех видеовходов U 6 Выбор режима изображения HIGHBRIGHT Максимальная яркость STANDARD Заводская настро...

Страница 372: ...онтраст и резкость чтобы получить желаемое качество изображения U 9 Настройка динамиков Выполните надлежащим образом В настройках динамиков в меню OSD выберите встроенные динамики или внешние стереодинамики опция Отобразите меню на экране нажав на кнопку MENU на беспроводном пульте дистанционного управления или на кнопку EXIT на задней панели монитора С помощью пункта SPEAKER в отображаемом на экр...

Страница 373: ...о на экране OSD Для выполнения настройки отобразите меню OSD нажав кнопку MENU на беспроводном пульте дистанционного управления или на кнопку EXIT на задней панели монитора ПРИМЕЧАНИЕ Если аудиосигнал не выводится во время использования OPS с открытой спецификацией подключений компьютер убедитесь в том что монитор выбран операционной системой компьютера в качестве источника аудиовыхода О способах ...

Страница 374: ...ьте дистанционного управления или на кнопку EXIT на задней панели монитора С помощью пункта SCHEDULE в отображаемом на экране меню CONFIGURATION2 Вы можете запрограммировать включение выключение питания и выбор входа U 11 Настройка расписания работы Выполните надлежащим образом ...

Страница 375: ...можете выбрать дни недели и параметр EVERY WEEK MON SUN Выберите дни недели по которым должно выполняться расписание Если Вы также не выберите параметр EVERY WEEK то выбор дней недели будет отменен после одного выполнения программы расписания EVERY WEEK Выберите данный параметр для выполнения программы расписания по выбранным дням недели каждую неделю Подтверждение расписания Чтобы выйти из меню S...

Страница 376: ... Для отправки команд с помощью клавиатуры с использованием программного обеспечения для общего доступа в сеть выберите 2s или 30s для CONTROL TIME OUT в CONFIGURATION2 в меню OSD следуйте той же процедуре для управления LAN Код адреса Код функции Код данных Код окончания HEX 30h 30h Функция Данные 0Dh ASCII 0 0 Функция Данные Код адреса 30h 30h код ASCII 0 0 фиксированный Код функции Код каждого у...

Страница 377: ... дополнительный слот После отправки команды POWER ON Питание вкл или POWER OFF Питание выкл подождите не менее 14 секунд прежде чем отправлять следующую команду После отправки команды выбора видеовхода подождите не менее 5 секунд прежде чем отправлять следующую команду Иначе монитор может не ответить в течение 600 мс Задайте в качестве времени задержки на главном устройстве управления значение 30 ...

Страница 378: ... слот ПРИМЕЧАНИЕ Хотя монитор отвечает на команду управления на включение и выключение питания отправленную с OPS с открытой спецификацией подключений компьютер он не включается и не выключается Это не является неисправностью Для автоматической работы используйте пункт SCHEDULE в отображаемом на экране меню CONFIGURATION2 U 12 Пульт дистанционного управления продолжение Выполните надлежащим образо...

Страница 379: ...верьте что USB концентратор распознается USB концентратор данного монитора определяется компьютером и автоматически устанавливается драйвер устройства совместимый с ОС Некоторые компьютеры могут не определить USB концентратор даже если он подсоединен к компьютеру В таком случае используя руководство пользователя компьютера установите драйвер USB концентратора ПРИМЕЧАНИЕ Распознавание монитора комп...

Страница 380: ... показано ниже Экран подменю Сброс изображения например Стр 48 Стр 50 Стр 51 Стр 52 Стр 53 Стр 54 Стр 56 Подменю Элементы настройки Показаны элементы настройки Статус настройки Отображаются значения настраиваемые с помощью беспроводного пульта дистанционного управления и кнопок PLUS и MINUS расположенных на мониторе Конфигурация меню экрана OSD Данный монитор оснащен функцией OSD On Screen Display...

Страница 381: ...е кнопку чтобы выбрать подменю Нажмите кнопку чтобы выбрать подменю Нажмите кнопку SET чтобы принять выбранное подменю Для выбора настройки нажмите кнопку затем нажмите кнопку SET чтобы принять ее Нажмите кнопку INPUT чтобы принять выбранное подменю Для выбора настройки нажмите кнопку затем нажмите кнопку INPUT чтобы принять ее Беспроводной пульт дистанционного управления Шаг 1 2 3 4 5 Кнопка на м...

Страница 382: ...ления ПРИМЕЧАНИЕ Режим изображения sRGB является стандартным и не может быть изменен TINT ОТТЕНОК TINT Вы можете настроить все цвета одновременно Нажмите на кнопку чтобы усилить оттенки зеленого Нажмите на кнопку чтобы усилить оттенки фиолетового RED MAGENTA BLUE CYAN GREEN или YELLOW Вы можете настраивать каждый цвет отдельно Нажмите на кнопку чтобы сдвинуть выбранный цвет вправо по цветовому кру...

Страница 383: ...РКОСТЬ AUTO Настройки параметра AUTO BRIGHTNESS задаются автоматически ПРИМЕЧАНИЕ Если Вы выберете AUTO Вы не сможете настраивать другие элементы за исключением CONTROL в индивидуальном порядке LOCAL Активируется функция AUTO BRIGHTNESS и Вы сможете индивидуально настроить параметры CONTROL и последующие пункты REMOTE Функция AUTO BRIGHTNESS действует Кроме того входы монитора в режиме внутренней ...

Страница 384: ...аполняет экран с различным увеличением в центре экрана и по его краям CUSTOM Вы можете растянуть изображение горизонтально и вертикально по своему усмотрению используя настройку CUSTOM ZOOM REAL Изображение выводится на экран без растягивания или уменьшения ПРИМЕЧАНИЕ Режим DYNAMIC предназначен для передачи изображений в формате 16 9 например с разрешением 1920 x 1080 таким же образом как и в режи...

Страница 385: ...ния содержания высоких TREBLE частот в звуке BASS БАСЫ Увеличение или сокращение содержания низких частот в звуке Нажмите кнопку для увеличения содержания низких BASS частот в звуке Нажмите кнопку для сокращения содержания низких BASS частот в звуке SPEAKER ДИНАМИК Вы можете включить встроенные динамики и внешние стереодинамики опция INTERNAL Для вывода из встроенных динамиков максимальный вывод 1...

Страница 386: ...могательное изображение вправо Нажмите на кнопку чтобы переместить вспомогательное изображение влево PIP V POSITION ПОЛОЖЕНИЕ PIP ПО ВЕРТИКАЛИ Вы можете настроить положение вспомогательного изображения по вертикали Нажмите на кнопку чтобы переместить вспомогательное изображение вверх Нажмите на кнопку чтобы переместить вспомогательное изображение вниз SUB INPUT ВХОДНОЙ РАЗЪЕМ ДОПОЛНИТЕЛЬНОГО ИЗОБР...

Страница 387: ...льно и горизонтально через регулярные интервалы чтобы снизить эффект остаточного изображения ПРИМЕЧАНИЕ Когда функция TILING в меню ADVANCED OPTION активна Вы не можете задать для параметра MOTION значение ON Если Вы выберете период времени в параметре MOTION монитор увеличит изображение и будет перемещать его горизонтально и вертикально Части изображения находящиеся за пределами экрана будут неви...

Страница 388: ...нное сервером DHCP PORT НОМЕР ПОРТА Отображается номер порта 63007 и 3007 монитора RESET СБРОС Сброс настроек сети CONTROLLER SETTING НАСТРОЙКА КОНТРОЛЛЕРА Если Вы осуществляете управление монитором через сеть с помощью управляющего процессора 2 Series производства компании Crestron задайте параметры соединения CONTROLLER IP IP КОНТРОЛЛЕРА Задайте IP адрес управляющего процессора PORT NUMBER НОМЕР...

Страница 389: ...ользуйте кнопки и для горизонтального передвижения курсора в пределах выбранного расписания Используйте кнопки и для увеличения времени и выберите порт ввода Выбор совершается при помощи кнопки SET Если вы создали расписание но не хотите использовать время включения монитора выберите в пункте выбора времени включения ON Если вы создали расписание но не хотите использовать время выключения монитора...

Страница 390: ...лов следующий DVI D D SUB ПРИМЕЧАНИЕ Вы не можете выбрать другие входы кроме DVI D OPTION и D SUB Когда модуль расширения установлен монитор не переходит в спящий режим VIDEO DETECT ОПРЕДЕЛЕНИЕ ВИДЕОСИГНАЛА Целевые видеовходы HDMI1 YPbPr S VIDEO VIDEO и D SUB При определении входа HDMI1 YPbPr S VIDEO или VIDEO соответствующий вход выбирается автоматически В случае потери отображаемого видеосигнала...

Страница 391: ... включения при выходе из спящего режима или при включении питания Можно выбрать различные значения этого интервала от OFF до 2 4 6 8 10 20 30 40 и 50 секунд TERMINAL SETTING НАСТРОЙКА РАЗЪЕМА Вы можете выбрать режим для отображения сигналов HDMI1 HDMI2 или DVI D согласно их формату в зависимости от исходного устройства HDMI SIGNAL Выберите данную настройку при отображении HDMI1 HDMI2 или OPTION ес...

Страница 392: ...те как минимум 3 секунды Для активирования кнопок нажмите и держите нажатыми кнопки и вместе как минимум 3 секунды снова NORMAL DYNAMIC NORMAL Сжатие сигнала NORMAL NORMAL FULL Нормальный размер каждого сигнала Рекомендуемый размер изображения Информационное меню OSD OPTION SDI 3G 1920 x 1080 67kHz 60Hz AUDIO SDI SIZE FULL YPbPr AUDIO ANALOG SIZE FULL S VIDEO NTSC AUDIO ANALOG SIZE FULL DVI D 1024...

Страница 393: ...видеосигнала Работа HDMI1 или HDMI2 ANALOG HDMI DVI D Только ANALOG D SUB Только ANALOG OPTION PC OPS с открытой спецификацией подключений компьютер ANALOG OPS ANALOG OPS DIGITAL SDI SDI BOX ANALOG SDI DISPLAYPORT ANALOG DISPLAYPORT YPbPr Только ANALOG S VIDEO Только ANALOG VIDEO Только ANALOG Выбранный аудиосигнал HDMI1 или HDMI2 выводится как аудиосигнал HDMI OPTION может быть использован только...

Страница 394: ... 1 2 3 и т д 3 Установите AUTO BRIGHTNESS на экране OSD PICTURE так как ниже приведено AUTO BRIGHTNESS CONTROL Главный монитор LOCAL PRIMARY Подчиненные мониторы REMOTE SECONDARY Использование компьютера для управления мониторами При использовании компьютера для управления мониторами должно быть подготовлено прикладное прогрммное обеспечение вами Яркостью всех мониторов можно управлять централизов...

Страница 395: ...ите на кнопку PIP ON OFF КАРТИНКА В КАРТИНКЕ ВКЛ ВЫКЛ на ПДУ для перехода между режимами PIP POP и SBS как показано на схеме ниже Вы можете изменить режимы альтернативным образом используя настройку PIP MODE режима PIP в главном меню OSD См стр 52 Разрешение в режимах PIP и SBS FULL РАЗМЕР PIP SMALL МАЛЕНЬКИЙ 450 пикселей X 338 пикселей MIDDLE СРЕДНИЙ 675 пикселей X 450 пикселей LARGE БОЛЬШОЙ 900 ...

Страница 396: ...танционного сигнала PRIMARY монитора OSD появиться на мониторе имеющем выбранный вами номер ID ПРИМЕЧАНИЕ При выборе ID OSD будет показано на PRIMARY мониторе нажмите кнопку DISPLAY на пульте дистанционного управления снова для отмены выборе ID OSD и далее управление монитором который вы выбрали Если вы устанавливаете пульт дистанционного управления в ошибочный режим и управление пультом становитс...

Страница 397: ...ge Adjust Настройка изображения Проверьте совместимость монитора и платы видеоадаптера и пригодность рекомендованных параметров синхронизации Если текст искажается измените режим видео на режим с прогрессивной разверткой и используйте частоту регенерации 60 Гц Изображение комбинированного сигнала имеет зеленоватый оттенок Проверьте выбран ли входной разъем YPbPr Светодиод на мониторе не горит не в...

Страница 398: ...тный BNC цифровой SDI опция Поддерживаемое разрешение Композитный Разъем S NTSC PAL SECAM 4 43NTSC PAL 60 Компонентный 480i 480p 576i 576p 1080i 720p 1080p SDI 480i 576i SD SDI 720p 1080i HD SDI 1080p 3G SDI Аудиовход выход Входной разъем аналоговый ш3 5 мм стерео мини разъем цифровой HDMI x 2 цифровой аудиосигнал DISPLAYPORT SDI опция Выходной разъем аналоговый ш3 5 мм стерео мини разъем цифровой...

Страница 399: ...тройстве 19 Определение Горячего Соединения 3 Цифровой вход RGB DVI D Распределение штырьев разъёма DVI D 1 TMDS Данные 2 9 TMDS Данные 1 17 TMDS Данные 0 2 TMDS Данные 2 10 TMDS Данные 1 18 TMDS Данные 0 3 TMDS Данные 2 Экр 11 TMDS Данные 1 Экр 19 TMDS Данные 0 Экр 4 Отсутствие соединения 12 Отсутствие соединения 20 Отсутствие соединения 5 Отсутствие соединения 13 Отсутствие соединения 21 Отсутст...

Страница 400: ...D 3 Y сигнал яркости 4 C сигнал цветности 6 Вход Выход RS 232C Номер штырька Наименование 1 NC 2 RXD 3 TXD 4 NC 5 GND 6 NC 7 NC 8 NC 9 NC 7 Сетевой разъем 8 штырьковый модульный штыря RJ45 Сигнал Пара 1 С оранжевой белой полосой 2 Оранжевый 3 С зеленой белой полосой 4 Синий 5 С синей белой полосой 6 Зеленый 7 С коричневой белой полосой 8 Коричневый Назначение штырьков продолжение ...

Страница 401: ......

Страница 402: ......

Страница 403: ......

Страница 404: ...Ltd http www mitsubishielectric com tw 11th Floor 88 Sec 6 Chung Shan N Road Taipei 111 Taiwan Sales Phone 886 2 28328255 Fax 886 2 28339813 Technical Phone 886 2 28328255 ext 3456 Fax 886 2 28339813 India Mitsubishi Electric India Pvt Ltd http www mitsubishielectric in Building No 9B dlf Cyber City Phase3 Gurgaon Delhi India Sales Phone 91 0124 4630300 Fax 91 0124 4630399 E mail hitesh bhardwaj a...

Отзывы: