background image

SB203

ORIGINAL INSTRUCTIONS

6

Replacing the VFD Memory Module

The VFD must have a new program for the intended changes to take place.

1. Remove the VFD cover. Depending on the VFD model, it can be removed in one 

of two ways:
• Insert a screwdriver into the notch at the bottom-center of the cover, OR
• Remove the screws securing the cover. 

2. With power locked out, remove the old VFD memory module and return it using 

these steps:
a) Place latch in Unlock position and pull out gently on the memory module.
b) Follow the instructions on page 2 to return the memory module to MiTek.
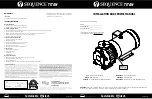
c) On the new memory module, push the tab as shown in Figure 3 to extend the 

points out, and place the memory module into its slot.

3. Place the latch in Lock position.

Figure 3: Replacing the VFD Memory Module

Unlock

position

for removal.

Lock position

for securing

in place.

Push tab down

to extend points

 for connection

to occur.

Содержание RoofTracker III

Страница 1: ...fected machinery RoofTracker III roller press Document SB203 rev B Title Electrical Software Updates for Reset Button Deceleration Changes Distribution All customers Part and Rev SB203 rev B Print Date 1 July 2020 Effectivity Frame s 333 335 337 451 Revision Date 29 June 2020 Revised By A McIntire Orig Release Date 5 December 2019 Created By R Tucker Approved By M Kanjee ...

Страница 2: ...r kit to return the two memory devices Please package them in a way that they will not be damaged during shipment Thank you Overview The parts included in the kits are shown below Please make sure all parts are present before starting this procedure Figure 1 Parts in SB203KITs Contact MiTek Automation Solution Customer Service immediately upon completing this procedure and we will arrange for Fede...

Страница 3: ...ther the supplies listed here If you have any questions call MiTek Machinery Division Customer Service at 1 800 523 3380 Wire strippers cutters Slotted screwdriver Marker Lockout tagout device Phillips screwdriver T 20 Torx tool Wooden T for safety test see page 12 ...

Страница 4: ... enclosure s door 4 Shut the power to the machine off at the machine s power source which is usually an electrical service entry panel on the facility wall One example of a locked out power source panel is shown in Figure 2 5 Attach a lock and tag that meets OSHA requirements for lockout tagout to the electrical service entry panel 6 Wait 20 seconds for the VFD to discharge any remaining power 7 O...

Страница 5: ...MOVING PARTS CAN CRUSH AND CUT Always verify that power to the machine has been turned off and follow approved lockout tagout procedures WARNING HIGH PRESSURE HAZARD Bleed pneumatic lines before performing any maintenance on the system Working on pressurized lines may cause injury ...

Страница 6: ...locked out remove the old VFD memory module and return it using these steps a Place latch in Unlock position and pull out gently on the memory module b Follow the instructions on page 2 to return the memory module to MiTek c On the new memory module push the tab as shown in Figure 3 to extend the points out and place the memory module into its slot 3 Place the latch in Lock position Figure 3 Repla...

Страница 7: ...d out locate the safety controller shown in Figure 4 and verify that the DIP switch 4 is in the off left position 2 Remove the old memory cassette from the safety controller and follow the instructions on page 2 to return it to MiTek 3 Insert the new memory cassette into the safety controller VFD Screen VFD Main Relays Extension Module FIO 01 DIP switch 4 in left position Safety Controller memory ...

Страница 8: ...n sequence cycle power at the machine s disconnect switch After you cycle power you may proceed after The MS indicator light turns green The LOCK indicator light turns yellow Figure 6 Do NOT Continue if Indicators Look Like This WARNING ELECTROCUTION HAZARD All components have electrical power during these next steps All electrical work must be performed by a qualified electrician If it is absolut...

Страница 9: ...lock connecting the wires then putting the terminal block back in place TIP 16 gauge wires are larger in diameter than 18 gauge wires JUMPER A Wire 18 AWG cut as needed Label T1 Connect Ext Relay LT terminal 2 to Ext Relay RT terminal 2 shares terminals with existing wires Jumper A Jumper B Main Relays R13 JUMPER B Wire 18 AWG cut as needed Label T1 Connect Ext Relay RT terminal 2 to Main Relay R1...

Страница 10: ...SB203 ORIGINAL INSTRUCTIONS 10 Termination Points for Signal Wires Wire Routing 460 volt enclosure shown 230 volt enclosure may vary slightly VFD Figure 8 Routing the Wires to the Safety Controller ...

Страница 11: ...ct Parameter c Arrow to 95 and select it d Arrow to 01 and select it e Arrow to the appropriate voltage according to Table 1 and select it f Press Back until you reach Exit and select it 4 Close all enclosure doors WARNING ELECTROCUTION HAZARD All components have electrical power during these next steps All electrical work must be performed by a qualified electrician If it is absolutely necessary ...

Страница 12: ...irection it is traveling it will slow down then stop before reaching the obstruction Movement in the opposite direction from the obstacle is unaffected With the obstacle detected you can move the gantry head in the opposite direction without pressing the Reset button to allow you to safely remove the obstacle Beacon Light The light blinks yellow amber when the machine is running NEW The light turn...

Отзывы: