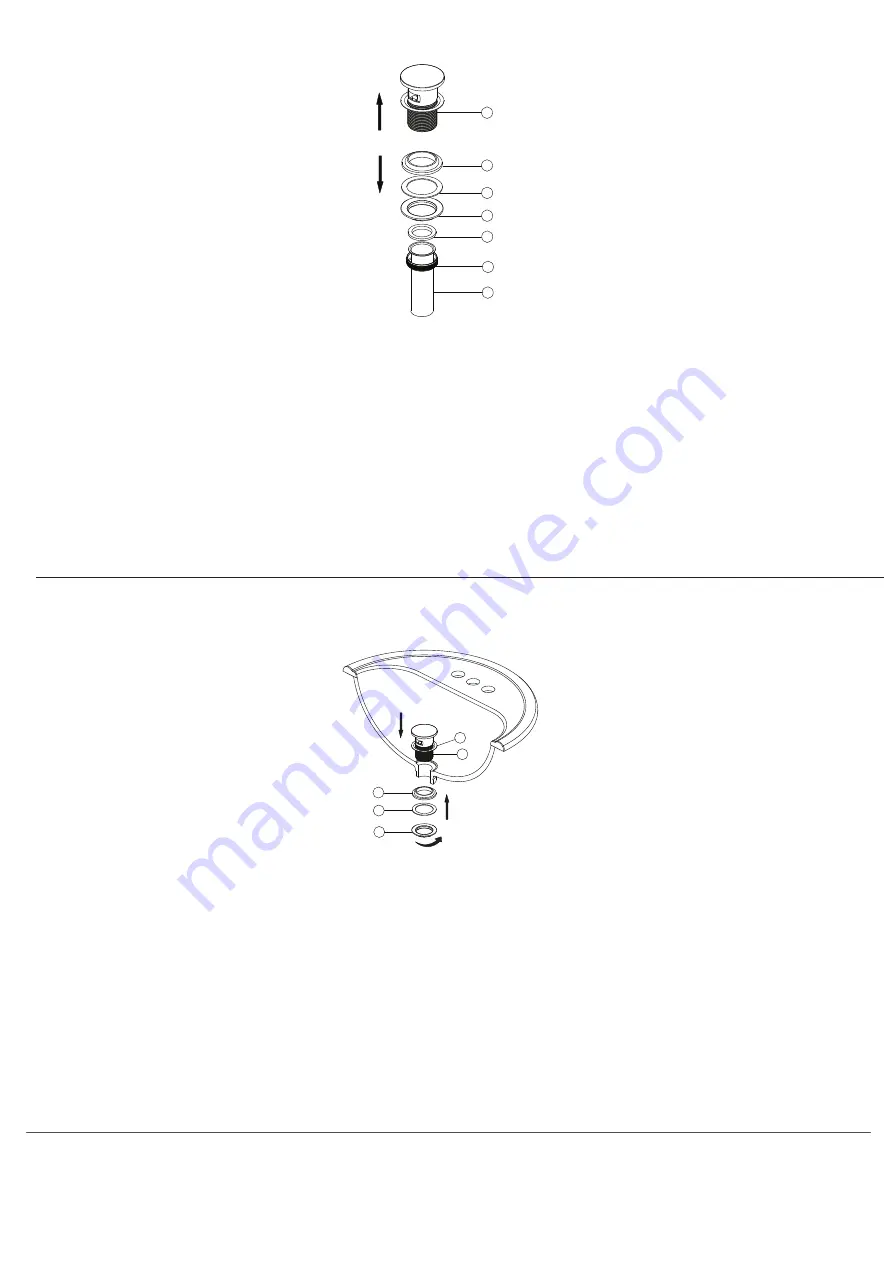
4. Remove the old pop-up drain and clear
up the hole in preparation for the new
pop-up drain installation. Unscrew the
nut (7) from the pop-up body (1), move
over the tail pipe (6) and washer (5),
then unscrew the coupling nut (4) and
remove the washers (2 & 3).
4. Quita el drenaje emergente viejo y limpia
el orificio para prepararlo para instalar el
drenaje emergente nuevo. Desenrosca la
tuerca (7) del cuerpo emergente (1), aparta
los tubos extensores (6) y la arandela (5),
luego desenrosca la tuerca de acoplamiento
(4) y retira las arandelas (2 y 3).
4. Retirez l’ancienne évacuation mécanique
et nettoyez l’orifice en préparation de
l’installation de la nouvelle évacuation
mécanique. Dévissez l’écrou (7) du corps
d’évacuation mécanique (1), déplacez le
tuyau d’évacuation (6) et la rondelle (5),
puis dévissez l’écrou d’accouplement (4)
et retirez les rondelles (2 et 3).
1
2
3
4
5
7
6
5. Place the washer (2) underneath the flange
of the pop-up body (1). Slide the pop-up
body (1) down through the drain hole on
the vessel or basin. From underside, slide
the washer (3 & 4) against the bottom of
the vessel or basin, thread on the coupling
nut (5) and tighten. Do not over tighten.
5. Coloca la arandela (2) debajo de la brida del
cuerpo emergente (1). Desliza el cuerpo
emergente (1) hacia abajo por el orificio del
drenaje del recipiente o lavamanos.Desde
la parte inferior, desliza la arandela (3 y 4)
contra el fondo del recipiente o lavamanos,
enróscala en la tuerca de acoplamiento (5)
y aprieta. No aprietes demasiado.
5. Placez la rondelle (2) en dessous de la
bride du corps d’évacuation mécanique (1).
Faites glisser le corps d’évacuation
mécanique (1) vers le bas à travers l’orifice
d’évacuation de la vasque ou du bassin.
À partir du dessous, faites glisser la
rondelle (3 et 4) contre le fond de la
vasque ou du bassin, vissez l’écrou
d’accouplement (5) et serrez. Ne serrez
pas trop.
2
1
3
4
5
www.mirabelleproducts.com
© 2017 Ferguson Enterprises, Inc. 253537 10/09
4
(FIG.4)
(FIG.5)


