background image

35

FAULT DIAGNOSIS

Symptom

Cause / Rectification

1.

  Only hot or cold 

water from the 

mixer outlet.

a.

  Inlets reversed (hot supply to cold supply). Refer to 

section:

 ‘Reversed Inlet Supplies’

.

b.

  No hot water reaching the mixer.

c.

  Check the filters for any blockage.

d.

  Installation conditions outside operating 

parameters: refer to sections: 

‘Specifications’

 and 

‘Commissioning’

.

e.

  If you have a combination type boiler it may not be 

producing sufficiently hot water at desired flow rate 

(refer to ‘Specifications’). Fit flow regulator (supplied) 

to shower valve outlet. For more information contact 

Mira Showers or visit the website. 

2. 

F l u c t u a t i n g   o r 

reduced flow rate.

a.

  Check the showerhead, hose and filters for any 

blockage.

b.

  Make sure the maintained inlet pressures are 

nominally  balanced  and  sufficient,  refer  to  section: 

‘Specifications’

.

c.

  Make sure the inlet temperature differentials are 

sufficient, refer to section: 

‘Specifications’

.

d.

  Flow regulator fitted incorrectly.

e.

  Airlock or partial blockage in pipework.

3.

  No flow from the 

mixer outlet.

a.

  Check the showerhead, hose and filters for any 

blockage.

b.

  Hot or cold supply failure.

4.

  Blend temperature 

drift.

a.

  Refer to symptom 

2.

 above.

b.

  Significant supply temperature fluctuation.

c.

  Significant supply pressure fluctuation.

d.

  Faulty thermostatic cartridge, renew.

5.

  Maximum blend 

temperature setting 

too hot or too cold.

a.


Indicates incorrect maximum temperature setting; refer 

to section: 

‘Commissioning’

.

b.

  Refer to symptom 

4.

 above.

6.

  Water leaking from 

the Showerhead.

a.

  Normal for a short period after shut off.

b.

  Check that the pressures are not in excess of the 

specifications for product.

c.

  Cartridge inlet seals damaged, renew.

d.

  Renew the thermostatic Cartridge.

7.

  Flow rate too low or 

too high.

a.

  (low) Insufficient supply pressures.

b.

  (high) Supply pressure too high. Install flow reg.

c.

  Refer to symptom 

2.

 above.

Содержание DISCOVERY

Страница 1: ...1 These instructions are to be left with the user Installation and User Guide THERMOSTATIC MIXER MIRA DISCOVERY ...

Страница 2: ...ng or Falling Supplies 17 Built in Shower Control 19 1 Solid Wall or Stud Partition Using Securing Brackets Mounting off Front Face 19 2 Solid Wall or Stud Partition Using Rear Fixing Points on Shower Control 22 3 Laminated Panels Using Securing Brackets Mounting off Rear Face 24 Control Assembly 26 Reversed Inlet Supplies 28 Operation 30 Commissioning 31 Type 2 Valves 32 Fault Diagnosis 35 Mainte...

Страница 3: ...wax capsule temperature sensing unit which provides an almost immediate response to changes in pressures or temperature of the incoming water supplies to maintain the selected temperature An adjustable maximum temperature stop is provided which limits the temperature to a safe level Inlet Filters are fitted to protect the thermostatic cartridge Mira Discovery Exposed Thermostatic Mixer for connect...

Страница 4: ...se shower fittings for one year For non domestic installations Mira Showers guarantee the Mira Discovery against any defect in materials or workmanship for a period of one year from the date of purchase For terms and conditions refer to the back cover of this guide Recommended Usage Application Valve Only Valve with Fittings Domestic Light Commercial Heavy Commercial Healthcare ...

Страница 5: ...nstallation site 4 Make sure that you fully understand how to operate this shower and make sure that it is properly maintained in accordance with the instructions given in this manual 5 Follow all warnings cautions and instructions contained in this guide 6 Do not install the product in a position in which service access is restricted 7 Anyone who may have difficulty understanding or operating the...

Страница 6: ...ol levers may result in momentary changes in blend temperature 11 When this product has reached the end of its serviceable life it should be disposed of in a safe manner in accordance with current local authority recycling or waste disposal policy 12 Type 2 Valves are only used for applications covered by their approved designations refer to section Type 2 Valves ...

Страница 7: ...l Plugs 2 x Securing Screws 2 x Concealing Cap Seals 1 x Guarantee Registration Document 1 x Installation Template 1 x 24 mm Spanner PACK CONTENTS Tick the appropriate boxes to familiarise yourself with the part names and to confirm that the parts are included Exposed Discovery Thermostatic Mixer 1 x 12 L Min Flow Regulator Note see section Type 2 Valves Application ...

Страница 8: ...m Olives 1 x 2 5 mm Hexagon Key 1 x O Key 2 x Wall Plugs 2 x Securing Screws 1 x Mira Discovery Thermostatic Mixer attached to the Building in Shroud 1 x Guarantee Registration Document 2 x Securing Brackets 2 x M5 x 40 Screws 1 x 12 L Min Flow Regulator Note see section Type 2 Valves Application ...

Страница 9: ...force and flow rate Reduce noise through the mixer due to high or unequal pressures Stabilise incoming supply temperatures Important The fitting of flow regulators will invalidate any TMV2 compliance due to minimum flow rate requirements Do not fit the flow regulator in TMV2 applications Temperatures Factory Pre set Blend Shower 43 C Optimum Thermostatic Control Range 35 C to 43 C achieved with su...

Страница 10: ... with Adjustable Fittings or Rigid Head Thermostatic Shut down For safety and comfort the thermostat will shut off the mixing valve within 2 Seconds if either supply fails achieved only if the blend temperature has a minimum differential of 12 C from either supply temperature Connections Inlets 15 mm Compression Outlet BSP Flat Face 15 mm Compression Standard connections are hot left cold right ou...

Страница 11: ...11 Dimensions Built in Discovery Shower Control 153 106 131 35 70 Ø56 Exposed Discovery Shower Control Dimensions in mm 67 67 85 30 Ø183 Building in Depth ...

Страница 12: ... instructions and must be conducted by designated qualified and competent personnel The installation must comply with the requirements of UK Water Regulations Bye laws Scotland Building or any particular regulations and practices specified by the local water company or water undertakers Note Make sure that all site requirements correspond to the information given in the section Specifications For ...

Страница 13: ...ure there are no leaks 10 Decide on a suitable position for the mixer The position of the mixer and the Shower Fittings must provide a minimum gap of 25 mm between the spill over level of the shower tray bath and the handset refer to illustration This is to prevent back siphonage For further information on the installation of your Shower Fittings refer to the Fittings Installation and User Guide N...

Страница 14: ...of a Solid Wall or Stud Partition or on the Rear Face of a Laminated Panel For installation into a Solid Wall or Stud Partition using the Securing Brackets go to section Built in Shower Control 1 Solid Wall or Stud Partition Using Securing Brackets Mounting off Front Face For installation into a Solid Wall or Stud Partition using the Rear Fixing Points go to section Built in Shower Control 2 Solid...

Страница 15: ... fixings not supplied may be required 1 3 Drill the supply pipe holes at 153 mm centres 1 4 Recess the wall to allow for the concealing plates 32 mm diameter x 10 mm deep 1 5 Fit the supply pipework Hot Left Cold Right The pipework must project 18 mm from the finished wall surface at 153 mm centres use the installation template as a guide Note If the connections are reversed complete the installat...

Страница 16: ...Align the Shower Control with the pipework and fit onto the Backplate 1 12 Tighten the Compression Nuts onto the Shower Control with the Spanner supplied Caution Take care not to damage the chrome surfaces 1 13 Tighten the Grubscrew to secure the Shower Control to the Backplate 1 14 Fit the Shower Fittings refer to your Fittings Installation and User Guide for instructions 1 15 Turn on the hot and...

Страница 17: ...o not overtighten 2 3 Use the Installation Template to mark the positions of the fixing holes for the Backplate Note Allow a minimum of 150 mm either side of the Shower Control to allow the hot and cold inlet Compression Nuts to be tightened with the Spanner supplied 2 4 For solid walls drill the Backplate holes with a 6 mm drill and fit the Wall Plugs supplied For other types of wall structure al...

Страница 18: ... 2 10 Align the Shower Control with the pipework and fit onto the Backplate 2 11 Tighten the Compression Nuts onto the Shower Control with the Spanner supplied Caution Take care not to damage the chrome surfaces 2 12 Tighten the Grubscrew to secure the Shower Control to the Backplate 2 13 Fit the Shower Fittings refer to your Fittings Installation and User Guide for Instructions 2 14 Turn on the h...

Страница 19: ...1 4 Mark the routes for the hot and cold supply pipework at 135 mm centres Falling Supplies For falling supplies loosen the grubscrew on each Elbow using the 2 5 mm Hexagon Key supplied Remove the Elbows and install on opposite sides Secure the Elbows with the Grubscrews Caution Do not overtighten Note Make sure that the Filter Plugs are positioned to the front i e Hexagonal Key facing forward 1 5...

Страница 20: ...rol to the wall with the Securing Screws provided Note For stud partition installations alternative fixings may be required not supplied 1 11 Connect the hot and cold supply pipes and tighten the Compression Nuts Caution Make sure that the Olives are fitted and all pipework is flushed through before connecting to the Shower Control 1 12 Fit the outlet pipework leaving enough pipe through the wall ...

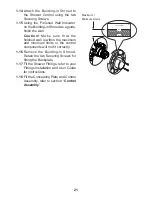
Страница 21: ...wall is within the maximum and minimum limits or the control components will not fit correctly 1 16 Remove the Building in Shroud Retain the two Securing Screws for fitting the Backplate 1 17 Fit the Shower Fittings refer to your Fittings Installation and User Guide for instructions 1 18 Fit the Concealing Plate and Control Assembly refer to section Control Assembly Finished Wall F9802 Min Max Max...

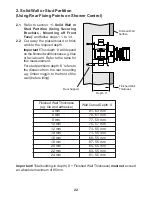
Страница 22: ... the distance from the rear mounting e g timber noggin to the front of the wall before tiling 2 Solid Wall or Stud Partition Using Rear Fixing Points on Shower Control Depth X Finished Wall Thickness Finished Wall Surface Rear Support Finished Wall Thickness e g tile and adhesive Wall Cutout Depth X 81 63 mm 79 61 mm 77 59 mm 75 57 mm 73 55 mm 71 55 mm 69 55 mm 67 55 mm 65 55 mm 63 55 mm 61 55 mm ...

Страница 23: ... Insert the Wall Plugs supplied and attach the Shower Control to the wall with the Securing Screws provided Note For stud partition installations alternative fixings may be required not supplied to fix the shower control to the rear face of the wall cavity or to a timber noggin 2 6 Refer to section 1 Solid Wall or Stud Partition Using Securing Brackets Mounting off Front Face and follow steps 1 10...

Страница 24: ...in Shroud as a guide 3 3 Carefully cut out the laminated panel 3 4 Fit the Securing Brackets to the Shower Control Important The brackets must be fixed vertically as illustrated Important Make sure that the correct holes are used otherwise the Backplate cannot be fitted 3 5 Position the Shower Control on the front of the panel and mark the position of the M5 fixing holes Important Make sure that t...

Страница 25: ...itioned to the front i e Hexagonal Key facing forward Caution Make sure that the olives are fitted and all pipework is flushed through before connecting to the Shower Control 3 9 Fit the outlet pipework leaving enough pipe through the wall to temporarily cap off 3 10 Turn on the water supplies and check for leaks 3 11 Fit the Shower Fittings refer to your Fittings Installation and User Guide for i...

Страница 26: ...sist separation 6 Fit the Backplate to the Shower Control and secure with the two Securing Screws removed from the Building in Shroud Make sure that the Foam Seal is fully compressed Do not overtighten 7 With the cutout at the bottom locate the Concealing Plate over the Shower Control engage the crosses in the Concealing Plate with the square recesses in the Backplate and push firmly until the Con...

Страница 27: ...Adapter over the Cartridge and onto the yellow lugs on the Flow Control exactly as illustrated 10 Push the Flow Lever onto the Flow Lever Adapter align lugs as illustrated 11 Push the Grey Control Bearing over the Lever Retainer Note Align the Grey Control Bearing with the Lever Retainer Clips and not the Flow Control Lever 12 Refer to section Commissioning for maximum temperature setting and temp...

Страница 28: ...he Grey Control Bearing 5 Pull off the Flow Lever 6 Remove the Flow Lever Adapter 7 Exposed Models only illustrated a Carefully remove the Locking Ring b Rotate the Lever Retainer clockwise to disengage and remove 8 Built in Models only a Carefully unclip the Concealing Plate from the Backplate Important The Lever Retainer must not be removed Note Use a screwdriver in the cutout to assist separati...

Страница 29: ...rotate them until the O Key can be removed Note The Flow Control Lugs on pre 2006 models are Black Caution Make sure that the Yellow Lugs are returned to the fully clockwise position before restoring the water supplies 15 Restore the hot and cold water supplies and check for leaks 16 Exposed Models Only a Fit the Lever Retainer with the clips horizontal make sure both sides locate under the lip an...

Страница 30: ...onditions can increase your sensitivity to hot water Make sure that you set the shower to a cooler temperature Caution Do not force the Temperature Control Knob If the desired temperature cannot be achieved refer to the section Commissioning ON OPERATION Shower Control Exposed and Built in Controls Note The shower performance may be effected if other water appliances are operated whilst the shower...

Страница 31: ...due to the minimum flow rate requirements Do not fit flow regulators in TMV2 applications Setting the Maximum Temperature 1 Rotate the Temperature Control Knob fully clockwise full cold position and carefully pull it off Note If the knob does not come off rotate it fully anticlockwise pull on the Temperature Knob while slowly rotating it clockwise until it disengages 2 Turn the Green Temperature H...

Страница 32: ...perating outside these conditions cannot be guaranteed to operate as Type 2 Valves Recommended Outlet Temperatures The BuildCert TMV scheme recommends the following set maximum mixed water outlet temperatures for use in all premises 44 C for bath fill but see notes below 41 C for showers 41 C for washbasins 38 C for bidets The mixed water temperatures must never exceed 46 C The maximum mixed water...

Страница 33: ... all of these conditions are met proceed to set the temperature as specified in section Commissioning Important The mixed water temperature at the discharge point must never exceed 46 C It is a requirement that all TMV2 approved valves shall be verified against the original set temperature results once a year When commissioning testing is due the following performance checks shall be carried out M...

Страница 34: ...lise The sensing part of the thermometer probe must be fully submerged in the water that is to be tested Any TMV that has been adjusted or serviced must be re commissioned and re tested in accordance with the instructions given in this guide The installation of thermostatic mixing valves must comply with the requirements of the Water Supply Water Fittings Regulations 1999 ...

Страница 35: ...tions c Make sure the inlet temperature differentials are sufficient refer to section Specifications d Flow regulator fitted incorrectly e Airlock or partial blockage in pipework 3 No flow from the mixer outlet a Check the showerhead hose and filters for any blockage b Hot or cold supply failure 4 Blend temperature drift a Refer to symptom 2 above b Significant supply temperature fluctuation c Sig...

Страница 36: ...replaced to maintain optimum shower performance Refer to the section Maintenance Filters If you require a Mira trained engineer or agent refer to the section Customer Service Lubricants Silicone only based lubricants can be used to assist in refitting Caution Oil based or other lubricant types may cause rapid deterioration of seals Cleaning Warning Many household cleaners contain abrasives and che...

Страница 37: ...ning Clip Elbow Retaining Clip O Key 5 Remove the Elbow Retaining Clips 6 Carefully pull out the Inlet Filters 7 Clean each filter in turn under a jet of water to remove any lodged particles 8 Refit the Inlet Filters 9 Refit the Elbow Retaining Clips and tighten the Filter Caps Caution Make sure that the Elbow Retaining Clips are fitted vertically as illustrated otherwise the Elbow Shrouds will no...

Страница 38: ... in the cutout to assist in the separation 8 Unscrew the two Securing Screws and carefully remove the Backplate from the Shower Control 9 Unscrew the Filter Caps with the O Key supplied or a 12 mm hexagonal key 10 Using pliers carefully pull out the Inlet Filters 11 Clean each Filter in turn under a jet of water to remove any lodged particles 12 Refit the Filters 13 Refit and tighten the Filter Ca...

Страница 39: ...5 040 Body Trim 1595 041 Elbow Shroud Pack Identified A 1595 042 Elbow Pack Assembly Identified B 1595 043 Mounting Assembly Pack 1595 045 Outlet Nipple Pack 1595 047 Seal Pack Identified C 1595 048 Component Pack 1595 065 Filter 2 off 1595 231 O Key 1595 232 24 mm Spanner 1595 036 1595 037 1595 038 1595 040 1595 039 1595 040 A A A A B B D B D B B B 1595 043 B C C 1595 045 1595 048 1595 065 1595 0...

Страница 40: ...mbly Pack 1595 044 Concealing Plate Assembly 1595 046 Seal Pack Identified A 1595 066 Filter Pack 1595 067 Screw Pack Identified B 1595 070 Component Pack 1595 149 Outlet Nipple Pack 1595 150 Elbow Pack 1595 231 O Key 1595 036 1595 044 1595 037 1595 038 1595 039 1595 039 A A A A 1595 066 1595 066 B B B 1595 070 1595 149 1595 231 1595 150 1595 150 ...

Страница 41: ...1536 129 For use in or out of the showering area Folds up when not in use Maximum User Weight 127 kg 20 stone Note Must be installed onto a solid wall Premium Shower Seat White Chrome 2 1731 001 Grey Chrome 2 1731 002 Stylish slim line and robust shower seat for use in or outside of the shower area Folds up when not in use Maximum User Weight 150 kg 23 5 stone Note Must be installed onto a solid w...

Страница 42: ...42 NOTES ...

Страница 43: ...43 NOTES ...

Страница 44: ...uct declines check in this manual to see if simple home maintenance is required If you require further assistance call our Customer Services Team Extended Guarantees A selection of protection plans are available that enable you to cover repair bills for the life of your policy excludes Eire Ring 01922 471763 for more details Helpdesk Service Our dedicated Customer Services Team is comprehensively ...

Отзывы: