3. Product presentation
MiR Charge 24V Operating Guide (en) 06/2020 - v.3.1 ©Copyright 2017-2020: Mobile Industrial Robots A/S.
11
Label
Description
Label
Description
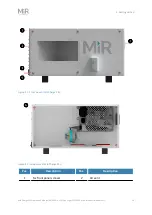
1
VL-marker: the V-shaped recess
combined with the front plate to
the right forms a VL-marker that
the robot's front safety scanner
uses to detect the charging
station
2
Charging pins
Before the charger may deliver power to the robot's battery, the robot must press in both
charging pins and thereafter send a small electrical current to the charger. This ensures that
the robot is correctly docked before the charger begins charging with up to 25 A.
The standard MiR100 and MiR200 comes with embedded charging hardware
in the front charging plate and is ready to use with the charging station. In
previous models of the MiR100, the front charging plate is not included and
needs to be retrofitted if the automatic charging functionality is required. In
this case, please consult [email protected] where we will assist you
with the relevant documentation.
If the robot's battery is completely discharged, you must connect an external
cable charger. For information on how to do this, see the user guide or quick
start of the robot.
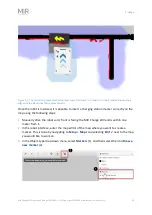
3.2 Guide to light indicator
An LED light indicator is fixed on the top of MiR Charge 24V. The light indicator provides
information regarding the charging status of the docked robot. Around the light indicator a
sticker is placed to describe the main light operations.


