background image

6

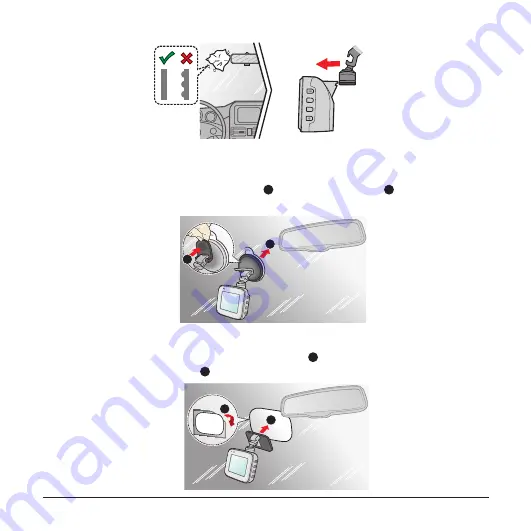
2. The provided mount may vary by models:

l

  Suction cup mount

  Attach the mount to the windscreen (

1

), and press the tab (

2

) to lock the 

suction cup in place.

1

2

l


Adhesive tape mount

  Attach the static cling film to the windscreen (

1

), and then install the mount 

over the static cling film (

2

).

1

2

Содержание MiVue C540 Series

Страница 1: ...User Manual MiVue C540 Series...

Страница 2: ...C does not warrant this document is error free MiTAC assumes no liability for damage incurred directly or indirectly from errors omissions or discrepancies between the device and the documents Note No...

Страница 3: ...matting a card 9 Turning the dash cam on 9 Shutting down the dash cam 9 System icons 10 Function keys 10 Switching screens 11 Setting the date and time 11 Recording in driving mode 11 Continuous recor...

Страница 4: ...17 MiVue Manager 17 Installing MiVue Manager 17 Playing the recording files 17 For more information 20 Caring for your device 20 Safety precautions 21 About charging 21 About the charger 21 About the...

Страница 5: ...shown in this manual may differ from the ones generated by the actual product 1 Device mount socket 2 Mini USB connector 3 Memory card slot 4 Microphone 5 System indicator 6 LCD screen 7 Camera lens 8...

Страница 6: ...e lens clean l If the car s windscreen is tinted with a coating it may impact the recording quality l To ensure the highest quality recordings you are advised to place the dash cam near the rear view...

Страница 7: ...Suction cup mount Attach the mount to the windscreen 1 and press the tab 2 to lock the suction cup in place 1 2 l Adhesive tape mount Attach the static cling film to the windscreen 1 and then install...

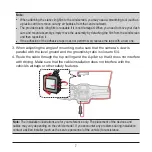
Страница 8: ...pe with a new one 3 When adjusting the angle of mounting make sure that the camera s view is parallel with the level ground and the ground sky ratio is close to 6 4 4 Route the cable through the top c...

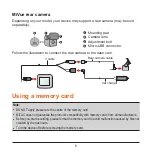
Страница 9: ...rear camera to the dash cam Y cable Rear camera cable Car charger Using a memory card Note l DO NOT apply pressure to the centre of the memory card l MiTAC does not guarantee the product s compatibil...

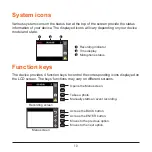
Страница 10: ...e dash cam on Complete the installation according to the instructions in the Using your dash cam in a vehicle section Once the vehicle engine is started the dash cam automatically turns on Note Press...

Страница 11: ...ng indicator 2 Time display 3 Microphone status Function keys The device provides 4 function keys to control the corresponding icons displayed on the LCD screen The keys functions may vary on differen...

Страница 12: ...ous recording The system will automatically begin continuous recording in few seconds after start up The System indicator flashes in green and amber alternately while the recording is in progress When...

Страница 13: ...can be found in the Event category for file playback Parking mode Your dash cam supports the parking recording function You must use an additional power source to record the video during the Parking m...

Страница 14: ...u can change the configuration by selecting Parking mode Motion Detection and G Sensor Sensitivity l The rear camera optional does not support motion detection To exit the Parking mode and resume cont...

Страница 15: ...icon displayed on the thumbnail on the playlist indicates that the video comes with a corresponding rear video While playing the video you can use this option to switch between the front and rear vide...

Страница 16: ...Detection When enabled the dash cam will automatically enters the Parking mode when the car stops moving for about 5 minutes l Detection Method Sets the parking detection method to Only G Sensor Only...

Страница 17: ...rding l Text stamp Displays customisable text information System l Date Time Sets the system date and time l System Sound Enables or disables system notification sounds l Welcome Sound Enables or disa...

Страница 18: ...ng system Playing the recording files 1 Remove the memory card from the dash cam and access the card on the computer via a card reader You are advised to copy the recording files to your computer for...

Страница 19: ...ectly to a different location for the playback 5 During playback you can view more driving information from the dashboard panel and the G sensor chart that are displayed below the video playback scree...

Страница 20: ...s if there is any new version of MiVue Manager Internet access is required for this feature l About Displays the version and copyright information of MiVue Manager 6 Exports the GPS information of the...

Страница 21: ...surface can easily be scratched Avoid touching it with sharp objects Non adhesive generic screen protectors designed specifically for use on portable devices with LCD panels may be used to help prote...

Страница 22: ...nnect the charger to a proper power source The voltage requirements are found on the product case and or packaging l Do not use the charger if the cord becomes damaged l Do not attempt to service the...

Страница 23: ...with these directives implies conformity to the following European Standards IEC 60950 1 2005 IEC 60950 1 2005 AMD1 2009 IEC 60950 1 2005 AMD2 2013 EN 60950 1 2006 A11 2009 A1 2010 A12 2011 A2 2013 E...

Страница 24: ...ity Hereby MiTAC declares that this N578D is in compliance with the essential requirements and other relevant provisions of Directive 2014 53 EU WEEE This product must not be disposed of as normal hou...

Отзывы: