background image

Introduction

22

Introduction

This chapter provides information on handling, selecting, loading, and storing
media.

All media is fed short edge first, face up.

There is a 0.157” (4 mm) non-print border for all edges on all media types.
Any paper longer than 13.76” (349.6 mm) has a nonguaranteed area of
0.39” (10 mm) on the bottom of each page.

See your application documentation for specific information on formatting
data and printing.

Try printing your data on a plain sheet of paper first to check placement.

Only plain paper 16-24 lb bond (60-90 g/m

2

) can be autoduplexed. See

Media Specifications for supported sizes.

Attention

Use only MINOLTA-QMS-approved media. Using unsupported media
such as inkjet paper will result in damaging the printer and in voiding
your warranty.

Getting Started

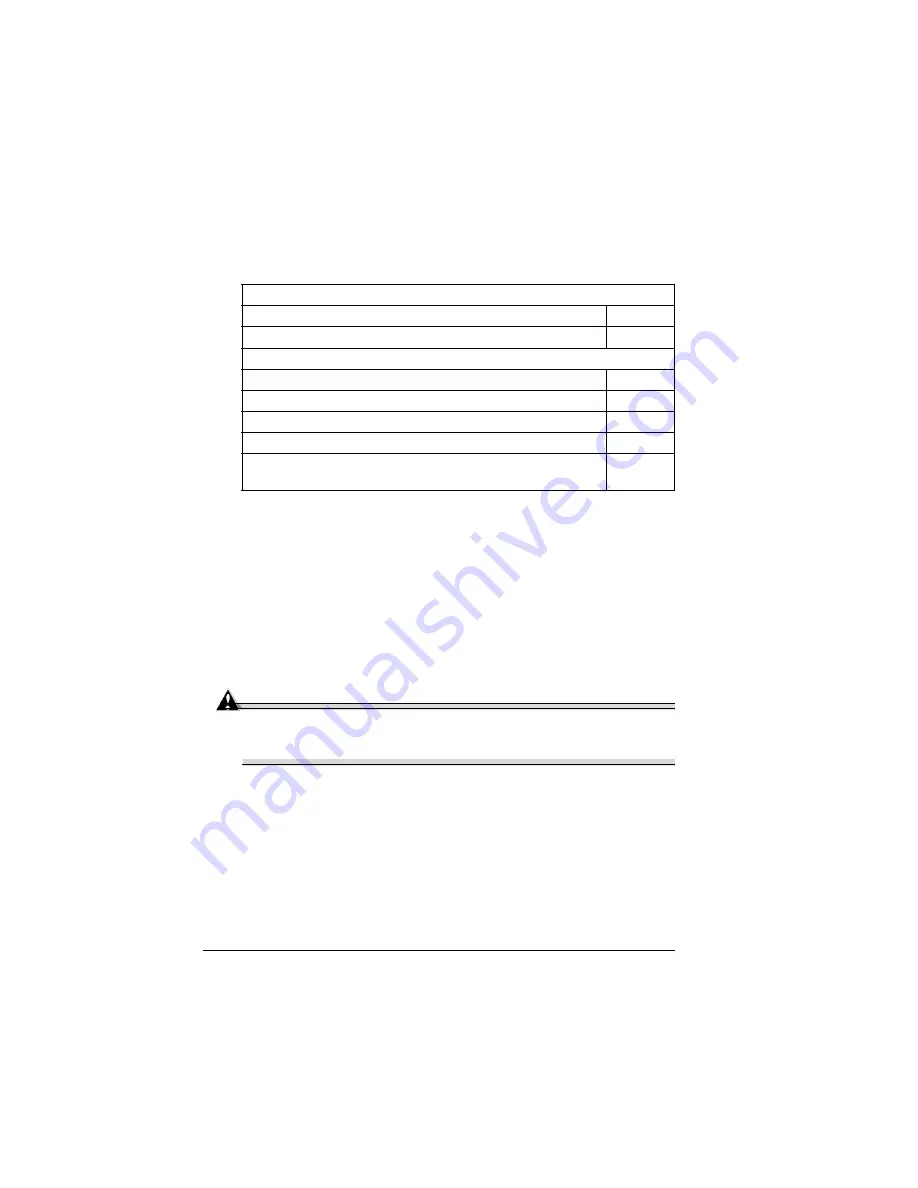
What types and sizes of media can I load?

page 23

What Is the guaranteed imageable (printable) area?

page 30

Other Information

How do I load media?

page 32

How do I use custom-size media?

page 37

How do I duplex?

page 38

How do I store media?

page 41

Where can I order MINOLTA-QMS-approved media or get more
information?

page 43

EDNord - Istedgade 37A - 9000 Aalborg - Telefon 9633 3500

Содержание MAGICOLOR 2350

Страница 1: ...magicolor 2350 User s Guide 1800683 001B EDNord Istedgade 37A 9000 Aalborg Telefon 9633 3500...

Страница 2: ...MS Inc Copyright Notice This guide is Copyrighted 2003 by MINOLTA QMS Inc One Magnum Pass Mobile AL 36618 All Rights Reserved This document may not be copied in whole or part nor transferred to any ot...

Страница 3: ...Utilities Windows Environments Manual Installation 13 Installing Printer Drivers and Utilities Macintosh Environments 14 Some Notes to Consider 14 Macintosh OS 8 9 PPDs and Utilities Installation 14 M...

Страница 4: ...2 Form Printing 42 Proof then Print Printing 42 Additional Assistance 43 3 Working with the Printer 45 About the Control Panel 46 Control Panel Indicators and Keys 46 Cancelling Print Jobs 47 Printer...

Страница 5: ...RGB Gray Treatment 79 Troubleshooting Color Problems 79 6 Working with the Status Monitor 83 Introduction 84 Environment 84 Recognizing Status Monitor Alerts 84 Recovering from a Status Monitor Alert...

Страница 6: ...edia Jams 125 Solving Other Problems 129 Solving Problems with Printing Quality 134 Status Error and Service Messages 140 Standard Status Messages 140 Error Messages 141 Service Messages 145 Additiona...

Страница 7: ...pace Requirements 178 Location Requirements 180 Interface Panel 181 Power Requirements 182 ENERGY STAR Compliance 183 Engine and Controller Specifications 184 Engine 184 Print Speed Simplex 184 Print...

Страница 8: ...EDNord Istedgade 37A 9000 Aalborg Telefon 9633 3500...

Страница 9: ...1 Software Installation EDNord Istedgade 37A 9000 Aalborg Telefon 9633 3500...

Страница 10: ...ers and PPDs Manual installation instructions and additional information are included in the magicolor 2350 Reference Guide in case you need them Windows Me Windows 98 Windows XP Windows 2000 Windows...

Страница 11: ...s an error message displays at the end of the process Macintosh PPDs PostScript Printer Description PPD files allow you to configure options such as memory and informs the computer what options and fe...

Страница 12: ...Readme on the Software Utilities CD ROM Pantone Tables These tables allow you to match printed colors to screen colors Provided for use with PostScript High resolution printing 600 x 600 dpi with con...

Страница 13: ...s allows for the customization of UNIX based queues and filters for the specific features of the Crown printer Readme on the Software Utilities CD ROM magicolor 2350 Reference Guide on the Documentati...

Страница 14: ...Insert the Software Utilities CD ROM in your CD ROM drive If the CD ROM does not start automatically double click setup exe in the root directory 2 In the first window click Printer Setup 3 Choose the...

Страница 15: ...r Firm ware box It s very important to update the printer firmware the first time you install the printer 6 On the last screen choose Finish This returns you to the Main Menu screen where you can regi...

Страница 16: ...ion of Macintosh OS X has limited support for PPD PostScript Printer Description files Although MINOLTA QMS printers can be used with Macintosh OS X not all advanced printing features are available Ad...

Страница 17: ...ace OS 8 9 Step 2 Creating a Desktop Printer USB Connection a Plug one end of the USB cable into the Macintosh and the other into the printer s USB port b Locate the Desktop Printer Utility If you can...

Страница 18: ...entered in each of the two menus You cannot use these two menus to identify two zones Trailing spaces are not considered part of the zone name All standard printable ASCII characters are valid except...

Страница 19: ...S X Alternate Step 1 Software Installation Manual Manual installation instructions are included in the magicolor 2350 Reference Guide Refer to Section 2 Installing Printer Software Drivers and PPDs fo...

Страница 20: ...the Use Default Queue on Server box is checked click it to unselect it Type in the IP Address again for the Queue name e Choose the Printer Model popup menu to select the magicolor 2350 PPD and choos...

Страница 21: ...as well as instruction for installation For information about connecting using earlier versions of NetWare check the Answer Base at www minolta qms com Linux For Linux PPD and PDQ installation refer t...

Страница 22: ...EDNord Istedgade 37A 9000 Aalborg Telefon 9633 3500...

Страница 23: ...2 Using Media EDNord Istedgade 37A 9000 Aalborg Telefon 9633 3500...

Страница 24: ...st to check placement Only plain paper 16 24 lb bond 60 90 g m2 can be autoduplexed See Media Specifications for supported sizes Attention Use only MINOLTA QMS approved media Using unsupported media s...

Страница 25: ...K Quarto 8 0 x 10 0 203 2 x 254 0 1 No A4 Transparency 8 2 x 11 7 210 0 x 297 0 1 No Trans parency Use only approved media Letter Transparency 8 5 x 11 0 215 9 x 279 4 1 No Japanese Postcard 3 9 x 5 8...

Страница 26: ...th a processed surface such as carbon paper digitally gloss coated media colored paper that has been treated Carbon backed Iron on transfer media heat sensitive paper heat pressure paper heat press tr...

Страница 27: ...he envelope consist of three layers of paper the front back and flap Anything printed in these layered regions may be lost or faded Capacity Tray 1 multipurpose tray 200 sheets of 22 lb bond 80 g m2 p...

Страница 28: ...us fumes Been presealed Labels A sheet of labels consists of a face sheet the printing surface adhesive and a carrier sheet The face sheet must follow the plain paper specification The face sheet surf...

Страница 29: ...cking sheets that have peeled away or have exposed adhesive Labels may stick to the fuser unit causing them to peel off and media jams to occur Are perforated Capacity Tray 1 Up to 50 label sheets dep...

Страница 30: ...2 Up to 500 sheets of 22 lb bond 80 g m2 paper letter A4 only Orientation Face up Type Check www minolta qms com support click on Answer Base for currently approved media To order approved media go t...

Страница 31: ...approved media To order approved media go to www q shop com Do not fan large quantities of transparency media before loading it Resulting static electricity may cause printing errors Handle transparen...

Страница 32: ...rge number of transparencies at a time may cause static buildup thus causing feeding problems Use transparencies that Are approved by MINOLTA QMS Have as little static electricity as possible What Is...

Страница 33: ...Envelopes Envelopes have a nonguaranteed flap area that varies with envelope type Envelope print orientation is determined by your application Page Margins Margins are set through your application Som...

Страница 34: ...rinter was designed for printing on a wide range of media types it is not intended to print exclusively on a single media type except plain paper Continuous printing on media other than plain paper su...

Страница 35: ...se Tray All supported media sizes and types can be printed from Tray 1 Letter or A4 plain paper can be printed from Tray 1 or Tray 2 See Media Specifications for more information about media Plain Pap...

Страница 36: ...the appropriate media type and size 7 Print the job Other Media When loading media other than Plain Paper set the media mode for example Thick Stock Label Stock or Transparency in the driver For opti...

Страница 37: ...djust the media guides to the width of the envelopes Make sure the guides are snug enough to keep the envelopes straight but not so tight that they buckle the envelopes 6 In the printer driver set the...

Страница 38: ...label indicates the printing side of the media Do not overfill the tray A fill limit mark is provided on the inside of the tray Tray 2 holds 500 sheets of 22 lb bond 80 g m paper Make sure that the p...

Страница 39: ...nge the printer s default settings at the control panel or in PageScope Light and also in the MINOLTA QMS printer driver Default page sizes are set in inches on 110V printers and in millimeters on 220...

Страница 40: ...r the printer through the control panel or PageScope Light Duplexing How do I print on both sides of the paper duplex Select paper that is opaque enough to block out what s printed on one side from be...

Страница 41: ...are ready to print open the print dialog box by choosing the Print option within the application you are using 2 Find the even odd page selection For example in Quark XPress use the Document Page Seq...

Страница 42: ...memory installed and with the duplex option selected in the printer Most print jobs will print with 128 MB of RAM but may not print at the desired resolution You will need at least 192 MB of RAM to p...

Страница 43: ...tic buildup Remove transparencies as soon as possible from the output tray to avoid static buildup Media Storage How do I store media Keep media on a flat level surface in its original wrapper until i...

Страница 44: ...er 3 and instructions for using the printer driver are in Chapter 4 PageScope Light instructions are included in the Reference Guide Print Resolution Your printer offers a choice of three print resolu...

Страница 45: ...er Proof then Print features are available only when there is an optional hard disk installed on the printer Refer to the printer driver s on line help for more information about using proof then prin...

Страница 46: ...EDNord Istedgade 37A 9000 Aalborg Telefon 9633 3500...

Страница 47: ...3 Working with the Printer EDNord Istedgade 37A 9000 Aalborg Telefon 9633 3500...

Страница 48: ...In addition it displays the current status of the printer including any condition that needs your attention Two indicators LEDs provide printer status information The message window displays status an...

Страница 49: ...ystem and on a selectable item selects the displayed choice no matter what position the cursor is in 5 Moves up in the menu structure If menu choices with character by character selections scrolls upw...

Страница 50: ...bs the control panel message window shows Main Menu The main menu provides access to all the printer s submenus Each submenu is briefly described in the following sections of this manual The Proof Pri...

Страница 51: ...PE includes choices such as Private Job Stored Job and Proof and Hold The Proof Print menu appears only when there is a proof and hold job a stored job or a secured job on the optional hard disk Selec...

Страница 52: ...ob The Default Chain and Map submenus appear only if an optional lower feeder unit is installed The Duplex submenu appears only if a duplex option is installed The Collate submenu appears only if an o...

Страница 53: ...r cartridge Instructions are included in chapter 7 Replacing Consumables MAP LOGICAL TRAY 0 LOGICAL TRAY 1 LOGICAL TRAY 2 LOGICAL TRAY 3 LOGICAL TRAY 4 LOGICAL TRAY 5 LOGICAL TRAY 6 LOGICAL TRAY 7 LOG...

Страница 54: ...adjustments are complete the printer will automatically calibrate to the settings you have specified Quality Menu OPC Action Submenu The OPC Action submenu lets you choose whether the printer will st...

Страница 55: ...nu Ethernet Submenus Ethernet TCP IP Submenu Ethernet IPX SPX Submenu INTERFACE MENU ETHERNET USB PARALLEL INTERFACE MENU ETHERNET TCPIP ENABLE AUTO IP DHCP IP ADDRESS DEFAULT ROUTER SUBNET MASK BOOTP...

Страница 56: ...e Menu USB Submenu Interface Menu Parallel Submenu INTERFACE MENU ETHERNET ETHERTALK NAME NAME2 NETZONE NETZONE2 INTERFACE MENU USB ENABLE JOB TIMEOUT YES NO INTERFACE MENU PARALLEL ENABLE JOB TIMEOUT...

Страница 57: ...hard disk is installed Energy Saver Management appears only on 110V printers If it is turned Off the Energy Saver menu disappears If you select Restore Factory or Restore Custom the printer will turn...

Страница 58: ...ptions are shown below SYSTEM DEFAULT EMULATION DEFAULT AUTO DEFAULT POST SCRIPT PCL LINE PRINTER POST SCRIPT PCL LINE PRINTER AUTO MATIC POST SCRIPT PCL PCL XL LINE PRINTER HEXDUMP PDF SYSTEM DEFAULT...

Страница 59: ...PRINTER FONT LAYOUT MAP FONT SIZE FONT NAME ASCII EBCDIC SPACING ORIENTATION LINE NUMBERING LINE TERMINATION MARGINS TABS LINES PER PAGE CRISCR LFISLF CRISCRLF LFISLF CRISCR LFISCRLF CRISCRLF LFISCRLF...

Страница 60: ...inters System Default Autocontinue Submenu The Autocontinue submenu allows you to continue printing if the media tray has a different size or media type than what the print job requests System Default...

Страница 61: ...al hard disk is installed System Default Energy Saver Management Submenu The Energy Saver Management submenu is available only on 110V printers Service Menu The Service Menu is password protected It a...

Страница 62: ...EDNord Istedgade 37A 9000 Aalborg Telefon 9633 3500...

Страница 63: ...4 Working with the Printer Driver EDNord Istedgade 37A 9000 Aalborg Telefon 9633 3500...

Страница 64: ...are controlled by PPDs The PPDs are integrated seamlessly into the operating system s own printer driver Feature settings are accessed in the same manner no matter what printer you use This manual inc...

Страница 65: ...elects printer settings for the specific job you are sending Choose Print and then choose Properties Through the printer driver dialog box This changes printer settings for all subsequent print jobs u...

Страница 66: ...Select the paper source if you have the optional lower feeder unit installed Select the type of media Select color or black and white printing The Paper Quality Tab also includes the Advanced button d...

Страница 67: ...any page or pages Access the MQI Download Manager Using PostScript Drivers in Windows NT Displaying the Tabs 1 From the Start menu choose Settings and then Printers to display the Printers directory...

Страница 68: ...tings for the specific job you are sending Choose Print and then choose Properties Through the printer driver dialog box This changes printer settings for all subsequent print jobs until you change th...

Страница 69: ...et header and trailer pages and automatic tray switching Features Tab This tab allows you to Select print resolution Configure color controls Set PostScript options Check a proof before printing multi...

Страница 70: ...Start menu choose Settings and then Printers to display the Printers directory 2 Click the MINOLTA QMS magicolor 2350 printer icon 3 To display the printer driver settings from the File menu choose Pr...

Страница 71: ...pecialized print setting tabs Through your application This selects printer settings for the specific job you are sending Choose Print and then choose Properties Through the printer driver dialog box...

Страница 72: ...options Set graphics options such as rotation and halftone handling Set PostScript Select collated or uncollated output on multiple multi page jobs Set the number of copies Scale your print job to a s...

Страница 73: ...s tab allows you to Indicate which printer options are installed Selecting installed options makes the related features available in the printer driver Set accounting information About Tab This tab al...

Страница 74: ...aserWriter driver or configured within the application you are using In addition to those standard choices the Minolta QMS PPDs also allow you to configure Paper sources Proof and print options Duplex...

Страница 75: ...5 Working with Color EDNord Istedgade 37A 9000 Aalborg Telefon 9633 3500...

Страница 76: ...to printed colors and tells you how to download specialized color profiles if you need them Printer Resolutions Your printer offers a choice of three print resolutions depending on which driver you se...

Страница 77: ...utput and automatically readjusts itself to optimum settings that account for the age of toner cartridges and changes to the printer s environment such as increases or decreases in humidity or tempera...

Страница 78: ...print jobs are more complicated Color Options is the best choice Color Options lets you apply one color matching standard to graphics and another to images The first step in managing color is a choic...

Страница 79: ...Source to indicate the source in which the job was created Choices are Apple RGB This setting is widely used because it has been the default setting for Adobe Illustrator and Photoshop Its range of co...

Страница 80: ...Utilities CD ROM that came with your printer mc2350s icm for standard quality mc2350h icm for high or enhanced quality The readme files on the CD ROM include directions on how to use and where to load...

Страница 81: ...e any adjustments to the default color settings to achieve the best results If you have trouble with color however there are several things to check 1 Mechanical problems Print quality problems that a...

Страница 82: ...it to find the best setting for your print job 6 RGB Source This setting which is accessible on the on the Features Color Options or Advanced Color Options Configure tab of the printer driver or in C...

Страница 83: ...in SWOP CMYK make sure the simulation profile is set to SWOP If you are not trying to simulate SWOP make sure the simulation pro file is set to None or to whichever of the other choices is appropriat...

Страница 84: ...EDNord Istedgade 37A 9000 Aalborg Telefon 9633 3500...

Страница 85: ...6 Working with the Status Monitor EDNord Istedgade 37A 9000 Aalborg Telefon 9633 3500...

Страница 86: ...ts When the Status Monitor detects a printing problem several actions occur at once depending on your settings First the icon changes from green to yellow orange or red depending on the severity of th...

Страница 87: ...ed the actions necessary to correct the printer problem the icon turns green again Select Close from the Status or Consumable menu The Status Monitor window closes but the Status Monitor continues to...

Страница 88: ...EDNord Istedgade 37A 9000 Aalborg Telefon 9633 3500...

Страница 89: ...7 Replacing Consumables EDNord Istedgade 37A 9000 Aalborg Telefon 9633 3500...

Страница 90: ...DC cycle This process is provided to ensure reliable printer operation with optimum output quality Item Message Display This item needs replacing after Comment REPLACE OPC DRUM Up to 45 000 continuous...

Страница 91: ...rtridge contains enough toner to print a maximum of 1 500 at normal 5 page coverage simplex letter A4 size plain paper pages of continuous print With heavier coverages the approximate maximum capaciti...

Страница 92: ...nta and cyan Handle the toner cartridges carefully to avoid spilling toner inside the printer or on yourself The toner is nontoxic If you get toner on your hands wash them in cool water or a neutral d...

Страница 93: ...rinter prompts you to replace the cartridge 1 Check the message window to see which color toner is low or out 2 Select the toner color and size When you replace a cyan yellow or magenta cartridge the...

Страница 94: ...then pull the cartridge straight out about 6 152 mm 5 Support the middle of the cartridge with your left hand and then pull out the cartridge WARNING Contact toner_recycle minolta qms com for toner re...

Страница 95: ...ge into the printer 10 Close the printer s front door The printer must complete a 305 second calibration cycle after any consumable has been replaced If you open the door before the dis play reads MAG...

Страница 96: ...R TONER REPLACE REPLACE BLACK REPLACE YELLOW YELLOW STANDARD YELLOW HIGH CAPACITY Use the right and left arrow keys to select Standard or High Capacity whichever matches your cartridge Once the approp...

Страница 97: ...djusts to a high capacity toner 3 The control panel display reads OPEN DOOR AND REPLACE X TONER where X represents the toner color Open the door 4 Remove the old cartridge and store it in a plastic ba...

Страница 98: ...s not spill 3 Remove the two blue caps by turning them counterclockwise 4 Secure the two caps onto the two holes by turning them clockwise 5 Dispose of the used waste toner bottle WARNING Dispose of t...

Страница 99: ...and repeats the calibration cycle Replacing the OPC Drum Cartridge When the OPC drum is worn out the message REPLACE OPC DRUM appears Printing can continue even after this message appears however sin...

Страница 100: ...ion The OPC drum is extremely sensitive to bright light and direct sunlight Always leave it in its protective bag until you are ready to install it Any exposure to light should be avoided or permanent...

Страница 101: ...into the installation rail 3 Carefully push the OPC drum cartridge in When installing the OPC drum cartridge be sure not to press on the release lever If the lever is pressed during installation the...

Страница 102: ...the printer stops and repeats the calibration cycle Ordering Consumables Choosing the right consumables for your printer not only increases its reliability and performance but also minimizes the risk...

Страница 103: ...8 Maintaining the Printer EDNord Istedgade 37A 9000 Aalborg Telefon 9633 3500...

Страница 104: ...pened the fuser unit temperature drops gradually one hour wait time Be careful when cleaning the inside or removing paper jams as the fuser unit and other internal parts may become very hot Do not pla...

Страница 105: ...e bottom of the duplex unit if it is installed Even if an optional media tray is installed be sure to lift the printer as described above Do not grasp the grip of Tray 2 or the cover on its right side...

Страница 106: ...ol panel As needed A soft dry cloth Sharp or rough implements such as wire or plastic cleaning pads Exhaust duct A cotton swab Any liquid Printer exterior A soft damp cloth mild detergent Sharp or rou...

Страница 107: ...he printout is dirty A damp cloth that has been wrung out well Abrasives or detergents Tray 2 media rollers Tray 1 interior feed rollers Every 30 000 single sided pages every 12 months or as needed wh...

Страница 108: ...de the right door can also be cleaned While press ing the paper guide down with one hand clean the paper feed roller by wiping it with a soft dry cloth 4 Close the media guide 5 Close the right cover...

Страница 109: ...ional Lower Feeder Unit Media Rollers 1 Turn off and unplug the printer and disconnect the interface cable 2 Remove paper from Tray 2 3 Remove the brackets two at the front and one at the back used to...

Страница 110: ...e printer off of the lower feeder unit The printer must be lifted by two people grasping the handles 6 Wipe the paper feed rollers with a soft damp cloth 7 Wipe the paper feed rollers inside the right...

Страница 111: ...l the waste toner bottle if you removed it and close the front door if you opened it 10 Slide the tray back in 11 Plug in the printer reconnect the interface cable and turn the printer on In complianc...

Страница 112: ...ly plug the two openings with the caps Place the removed waste toner bottle with the openings facing up on a stable surface not the printer 4 Pull out the laser lens cover The laser lens cover cannot...

Страница 113: ...o caps from the openings Mount the removed caps onto the cap holders and then turn the caps clockwise to secure them 9 Insert the bottom of the waste toner bottle into its compartment in the printer a...

Страница 114: ...EDNord Istedgade 37A 9000 Aalborg Telefon 9633 3500...

Страница 115: ...9 Troubleshooting EDNord Istedgade 37A 9000 Aalborg Telefon 9633 3500...

Страница 116: ...ly when you turn on the printer If you don t want a startup page to print each time you turn on the printer you can turn it off in the System Default Startup Options Start Page menu Using PageScope Li...

Страница 117: ...iately after printing to avoid static buildup You load the media for single sided pages printing side up in Tray 1 or 2 Many manufacturers place an arrow on the end of the wrapper to indicate the prin...

Страница 118: ...ated at the left of the printer The media is picked up from Tray 1 passed through the registration rollers between the OPC drum and the transfer roller through the fuser unit and delivered via the med...

Страница 119: ...ly pulled back into the duplex option where the media undergoes a change in direction cycled through the OPC transfer and fuser units again and delivered via the media exit unit to the output tray whi...

Страница 120: ...can dirty your hands clothes or anything else it gets on If you accidentally get toner on your clothes lightly dust them off as much as possible If some toner remains on your clothes use cool not hot...

Страница 121: ...he media printing face up Make sure the media is lying flat and doesn t exceed the media limit mark Check to see if the media width guides are correct 5 Open the right side door then close it After th...

Страница 122: ...o not reinsert media that has jammed 4 Fan the removed media to prevent static buildup and even up the front edges 5 Reinsert the media printing face up Make sure the media is lying flat is under the...

Страница 123: ...t door opens at the same time that the right door is opened Attention Do not pull jammed media from the top of the printer through the fuser unit otherwise unfused toner may dirty the fuser rollers If...

Страница 124: ...ose the inner media guide Fuser Unit Jams WARNING The fuser unit is hot Do not remove a jam in this area until the fuser unit cools 1 Lift up the two fuser unit levers When removing the jammed media b...

Страница 125: ...ention Be sure to lower the two fuser unit levers before closing the right door If the levers are not lowered the right door cannot be closed 5 Close the right side door If the optional lower feeder u...

Страница 126: ...s installed close the lower right door Output Tray Remove jammed media from the output tray by gently pulling it to the left away from the media exit area Sometimes media that jams in the output tray...

Страница 127: ...e media is moist from humidity Remove the moist media and replace it with new dry media Too much static electricity is present If you are using paper fan it before putting it in the printer If you are...

Страница 128: ...ex thick stock envelopes labels or transparencies For custom sized media see Media Specifications on page 23 to make sure the size you are using can be duplexed Media may still be jammed Recheck the m...

Страница 129: ...edia separating tabs Warped or wrinkled media is loaded in the tray Remove the media smooth it out and reload it If it still jams do not use that media The media is moist from humidity Remove the mois...

Страница 130: ...ollers on page 105 Symptom Cause Solution Printer power is not on The power cord is not correctly plugged into the outlet Turn the power switch off O position then remove the power cord from the outle...

Страница 131: ...ors aren t closed securely Make sure the doors are closed securely Close all doors gently to avoid jarring the printer Make sure the waste toner bottle in installed correctly There is a media jam Chec...

Страница 132: ...non magicolor 2350 driver Print the overlay file using a magicolor 2350 driver from the magicolor 2350 Software Utilities CD ROM Only one copy of a multicopy collated job prints The printer doesn t ha...

Страница 133: ...p tab depending on your operating system choose whether to print duplex documents so they flip as on a clipboard or as in a loose leaf notebook For N up on duplexed pages choose Collate only in the pr...

Страница 134: ...a continuous print run Wait approximately 215 seconds when the printer is waking up from ENERGY SAVER and 1 000 or more pages have been printed since the last AIDC cycle Wait approximately 305 second...

Страница 135: ...pilled on the paper supply Remove the moist media and replace it with new dry media The transfer roller or fuser unit may be defective Check them for damage If necessary contact Technical Support with...

Страница 136: ...he moist media and replace it with new dry media The power source does not match the printer specifications Use a power source with the proper specifications Several sheets are being feed at the same...

Страница 137: ...envelopes labels and transparencies specify the appropriate media type in the printer driver and at the control panel Image is too dark One or more of the toner cartridges is defective Remove the ton...

Страница 138: ...e Support Drivers select your printer and then choose Media Recommendations One or more of the toner cartridges is defective Remove the toner cartridge Quality Toner Replace and check for damage If ne...

Страница 139: ...t www minolta qms com The media path is dirty with toner Print several blank sheets and the excess toner should disappear One or more of the toner cartridges is defective Remove the toner cartridge Qu...

Страница 140: ...disappear One or more of the toner cartridges are defective Remove the toner cartridge Quality Toner Replace and check for damage If necessary replace it The OPC drum surface is scratched or damaged...

Страница 141: ...the moist media and replace it with new dry media The color reproduction or color density is poor The paper image transfer is defective Check the OPC drum cartridge If necessary replace the drum cart...

Страница 142: ...mage Density Control AIDC cycle The cycle lasts 170 seconds after a 200 page print run and 215 or 305 seconds in other circumstances This process ensures reliable printer operation with optimum output...

Страница 143: ...NG UP The printer is warming up This message means do this AIDC ERROR AIDC sensor error Open and close the front cover to clean the AIDC parts CANNOT ROTATE CARTRIDGE The toner cartridge carousel cann...

Страница 144: ...other specific error Try the download process again EMAIL NOTIFY ERROR JOB END Failure to send email because the server is down there is a configuration or network connection error or the email addre...

Страница 145: ...jammed in the transfer area Locate and remove the jam PAPER JAM TRAY 1 Media has jammed while being pulled from the multipurpose tray Locate and remove the jam PAPER JAM TRAY 2 Media has jammed while...

Страница 146: ...cartridge is empty Install X color toner cartridge press the right arrow to enter the toner replacement sequence X EMPTY REPLACE The X specified color toner cartridge is empty Install X color toner c...

Страница 147: ...e message means do this SERVICE CALL 0B XFER FAN The transfer fan is malfunctioning Contact your vendor with the error information If you cannot get service from your vendor see the Service Support Gu...

Страница 148: ...ICE CALL 10 LASER UNIT The polygon motor requires service SERVICE CALL 12 LASER UNIT The laser unit requires service SERVICE CALL 14 XFER ROLLER The transfer roller requires service SERVICE CALL 15 XF...

Страница 149: ...10 Installing Accessories EDNord Istedgade 37A 9000 Aalborg Telefon 9633 3500...

Страница 150: ...qms com for information about additional accessories Attention Installing accessories always requires that the printer and accessories are turned off and unplugged during installation Dual In Line Me...

Страница 151: ...f Dual In Line Memory Module DIMM Dual in line memory modules or DIMMs are compact circuit boards with surface mount memory chips Your printer comes with 128 MB SDRAM printer memory However you can up...

Страница 152: ...0 x 600 dpi PCL Enhanced 1200 x 1200 dpi PostScript High 600 x 600 with contone Standard 600 x 600 dpi PCL Enhanced 1200 x 1200 dpi PostScript High 600 x 600 with contone Monochrome Letter A4 128 MB 1...

Страница 153: ...the panel but do not remove them from the printer 3 Remove the two screws shown in the illustration Slide the panel slightly to the right and lift it off the printer 4 If there is no DIMM installed in...

Страница 154: ...e panel and tighten the nine screws that you loosened in Step 2 Then replace the two screws removed in Step 3 7 Reconnect all interface cables 8 Reconnect the power cord and turn on the printer In com...

Страница 155: ...0 Kit Contents Duplex option Two thumbscrews Installing the Duplex Option 1 Turn off the printer and unplug the power cord and interface cable 2 Remove the cover from the right side of the printer Use...

Страница 156: ...to the notches on the right side of the printer b Push the duplex option towards the printer until it clicks on top c While still supporting the duplex unit carefully open the right side door and chec...

Страница 157: ...x option to the printer a Pull the right side door release lever and open the right side door If you have a lower feeder unit attached you will first need to open the lower right side door b Pull the...

Страница 158: ...nstallation 10 On the Settings tab of your printer driver move the Optional Duplexer to the Installed Features area See Chapter 4 Optional Lower Feeder Unit and Tray 2 The optional lower feeder unit f...

Страница 159: ...ord and interface cable 2 Remove the media support from Tray 1 Lift the support slightly and snap it gently out of the printer 3 Remove the lower feeder unit from the shipping carton and place it on a...

Страница 160: ...e to have help when lifting and moving it 7 Align the positioning pins on the lower feeder unit with the holes in the bottom of the printer to stack them correctly If the left and back sides of the pr...

Страница 161: ...kets 10 Close the right side doors Attention If the lower feeder unit is installed the right side door of the printer opens at the same time that the right door of the lower feeder unit is opened Be s...

Страница 162: ...al internal IDE hard disk to enable features including proof and hold secure printing collation MOPY PDF direct printing font storage and other tasks You have a choice of two internal hard disk option...

Страница 163: ...to the daughter board 5 Attach the ribbon cable to the hard disk aligning Pin 1 on the cable to pin 1 on the hard disk 6 With the cable connected set the hard disk flat on the daughterboard Then usin...

Страница 164: ...and turn on the printer In compliance with UL guidelines The appliance inlet is consid ered to be the main disconnect device 11 On the Settings tab of your printer driver move the Optional Hard Disk...

Страница 165: ...11 Repacking the Printer EDNord Istedgade 37A 9000 Aalborg Telefon 9633 3500...

Страница 166: ...ctions for repacking the printer See Repacking the Printer on page 165 4 Relocate the printer WARNING Your printer weighs approximately 62 lbs 28 kg with consumables installed Be sure to have help whe...

Страница 167: ...lso request a MINOLTA QMS 2300 Series Repacking Kit 2600733 100 These supplies must be replaced prior to shipping the printer If you need replacement packaging in the Americas call MINOLTA QMS Spares...

Страница 168: ...he Printer for Shipment A Turn off the printer unplug the power cord and remove the interface cables page 166 B Remove the media and the tray 1 media support page 167 C Remove the duplex option and lo...

Страница 169: ...bove 95 F 35 C and dust 2 Lift the media support from the three holes in Tray 1 and remove the media support C Remove the Options if Attached Duplex Option If you don t have a duplex option installed...

Страница 170: ...e original right side cover that came with the printer with two screws 8 Repack the duplex option in its original shipping carton for storage or shipment If you re returning the printer for service yo...

Страница 171: ...rinter by its carrying grips and place it on a flat surface WARNING Your printer weighs approximately 62 lbs 28 kg Be sure to have help when lifting and moving it 5 Repack the lower feeder unit in its...

Страница 172: ...e removed waste toner bottle with the openings facing up on a stable surface not the printer 4 Remove the two caps by turning them counterclockwise 5 Secure the two caps onto the two openings by turni...

Страница 173: ...C drum will void the warranty of the OPC drum Also handle the cartridge carefully by its sides so you don t touch the surface the green part of the drum The drum is also extremely sensitive to hand oi...

Страница 174: ...n the two thumbscrews 2 Grasp the transfer belt and pull it straight out and then lift it up 3 Place the transfer belt and thumbscrews in the protective bag supplied in the repacking kit MINOLTA QMS 2...

Страница 175: ...r 173 G Repack the Printer for Shipment Use your own original packaging or order MINOLTA QMS 2350 Replacement Packaging Kit 2600723 200 1 Replace the tape and packaging EDNord Istedgade 37A 9000 Aalbo...

Страница 176: ...turning the printer for service 6 Securely tape the top flaps of the shipping carton closed 7 Ship the printer If you return the printer for service in the Americas be sure to write the RMA Return Mer...

Страница 177: ...ck the printer carton Refer to the magicolor 2350 Installation and User s Guides B Reinstall the transfer belt unit See Reinstalling a Transfer Belt Unit on page 176 C Install the OPC drum and return...

Страница 178: ...t door open remove the transfer belt unit from its protective bag and reinsert it 2 Tighten the two thumbscrews 3 Rotate the transfer belt release lever counterclockwise to its correct 7 o clock posit...

Страница 179: ...A Technical Specifications EDNord Istedgade 37A 9000 Aalborg Telefon 9633 3500...

Страница 180: ...pplies and removing media jams Allow enough space around the printer to provide adequate ventilation and easy servicing For best output quality and longest consumables life install the printer on a ha...

Страница 181: ...w If you have added optional media feed unit the printer s height will increase by approximately 5 inches 125 5 mm 16 7 424 mm 23 2 590 mm 13 4 340 mm 27 8 705 mm 21 5 546 mm 28 0 712 mm 27 8 705 mm 1...

Страница 182: ...wind and dust Open flames items that burn easily Close to an easily accessible grounded power supply on an exclusively dedicated power outlet that meets printer specifications Near your computer At th...

Страница 183: ...s in the water may be released into the air where they can accumulate inside the printer and cause degraded printer output Attention For products installed outside North America do not connect the gro...

Страница 184: ...er North America 120 VAC 50 60 Hz 3 Europe 220 240 VAC 50 60 Hz 3 Latin America 115 120 VAC 50 60 Hz 3 220 240 VAC 50 60 Hz 3 Notes Amperage capacity at least 1 2 times that used by the printer Voltag...

Страница 185: ...nmental Protection Agency EPA ENERGY STAR regulations After a user configurable period of inactivity the printer changes to a low power state the engine remains on but the fuser unit turns off When a...

Страница 186: ...cycle Simplex letter A4 pages per month 1 000 average prints and up to 35 000 maximum prints per month Notes The duty cycle is affected by the media type and percent coverage Continued usage at this...

Страница 187: ...ging User replaceable toner cartridges Warm up time Maximum 100 V 120 V 220 to 240 V 180 seconds Input sources Standard 200 sheet multipurpose tray Optional 500 sheet media feed unit Output 200 sheet...

Страница 188: ...se system RAM 128 MB Total RAM Upgradable to 384 MB Optional RAM 128 and 256 MB DIMMs For information about DIMMs recommended for your printer see the magicolor 2350 Answer Base through the Internet a...

Страница 189: ...z 3 Hz Phase Single Power consumption Mode Average Maximum Black monochrome printing Color printing Standby Power saver 600 W or less 450 W or less 250 W or less 30 W or less 1100 W or less Certificat...

Страница 190: ...ing Humidity Gradient 20 per hour or less Temperature range Operating 50 95 F 10 35 C Transportation Storage 32 95 F 0 35 C Temperature Gradient 50 F 10 C per hour or less Altitude Operating 0 8 202 f...

Страница 191: ...t Main Body with Lower Feeder Unit and Duplex Option Dimensions W 14 02 in 356 mm H 15 43 in 392 mm D 19 69 in 500 mm W 14 17 in 360 mm H 20 20 in 513 mm D 19 69 in 500 mm W 15 98 in 406 mm H 20 20 in...

Страница 192: ...umable life or intermittent for example one page jobs printing ambient temperature and humidity Use of consumables not manufactured by MINOLTA QMS or use of nonsupported print media may cause damage t...

Страница 193: ...continuous or intermittent color pages based on the standard mode with 5 toner coverage of letter A4 media Consumable This item needs replacing by user after OPC Drum Cartridge Up to 15 000 continuous...

Страница 194: ...ise must be used with shielded interface cables The use of non shielded cable is likely to result in interference with radio communications and is prohibited under ICES 003 cTick Mark ACA Australia AS...

Страница 195: ...f this equipment does cause harmful interference to radio or television reception which can be determined by turning the equipment off and on the user is encouraged to try to correct the interference...

Страница 196: ...nter which operates by means of a laser There is no possibility of danger from the laser provided the printer is operated according to the instructions in this manual Since radiation emitted by the la...

Страница 197: ...inter is certified as a Class I laser product under the Regulation Performance Standard according to the Food Drug and Cosmetic Act of 1990 Compliance is mandatory for laser products marketed in the U...

Страница 198: ...n kym tt m lle lasers teilylle T m on puolijohdelaser Laserdiodin suurin teho on 5 mW ja aallonpituus on 770 795 nm VARNING Om apparaten anv nds p annat s tt n i denna bruksanvisning specificerats ka...

Страница 199: ...section may not correspond with the purchased product Warning and Precaution Symbols Meaning of Symbols Ignoring this warning could cause serious injury or even death Ignoring this caution could cause...

Страница 200: ...wer outlet and then call your authorized service representative In principle do not use an extension cord Use of an extension cord could cause a fire or electrical shock Contact your authorized servic...

Страница 201: ...ct has areas subject to high temperature which may cause burns When checking the inside of the unit for malfunctions such as a paper misfeed do not touch the locations around the fuser unit etc which...

Страница 202: ...at cord The result could be a fire or improper functioning of the unit in question Removed from the socket if the machine will not be in use for an extended period of time Use only extension cords tha...

Страница 203: ...bjects near the machine Coffee cups drinks bottles or other containers with liquids in them on the machine If liquid enters the machine the result could be an electric shock or a fire If liquid does g...

Страница 204: ...EDNord Istedgade 37A 9000 Aalborg Telefon 9633 3500...

Страница 205: ...104 Color Calibration 88 Color profiles 77 Color rendering dictionaries 76 ICC profiles 77 K Preserve 78 Matching 76 Troubleshooting 79 Configuration Checking 152 Configuration page 114 Using Control...

Страница 206: ...140 Ethernet interface 181 F Forms 42 H Hard disk 160 I Imageable area Margins 31 Installation DIMMs 149 Drivers and Utilities for Macintosh 14 Drivers and Utilities for NDPS 19 Drivers and Utilities...

Страница 207: ...e 25 Parallel interface 181 Path media 116 PCL Drivers 9 Physical specifications 189 PostScript Drivers 9 Printer definitions 9 Power Saving 183 Power requirements 182 Energy Star compliance 183 Speci...

Страница 208: ...em software Installing 8 Specifications 186 T Temperature requirements 188 Toner 185 Capacity 89 Cartridge Life 89 Cartridges 190 Replacing 89 90 Transparencies Continuous printing 30 Troubleshooting...

Отзывы: