13
12
L
OADING THE FILM HOLDERS
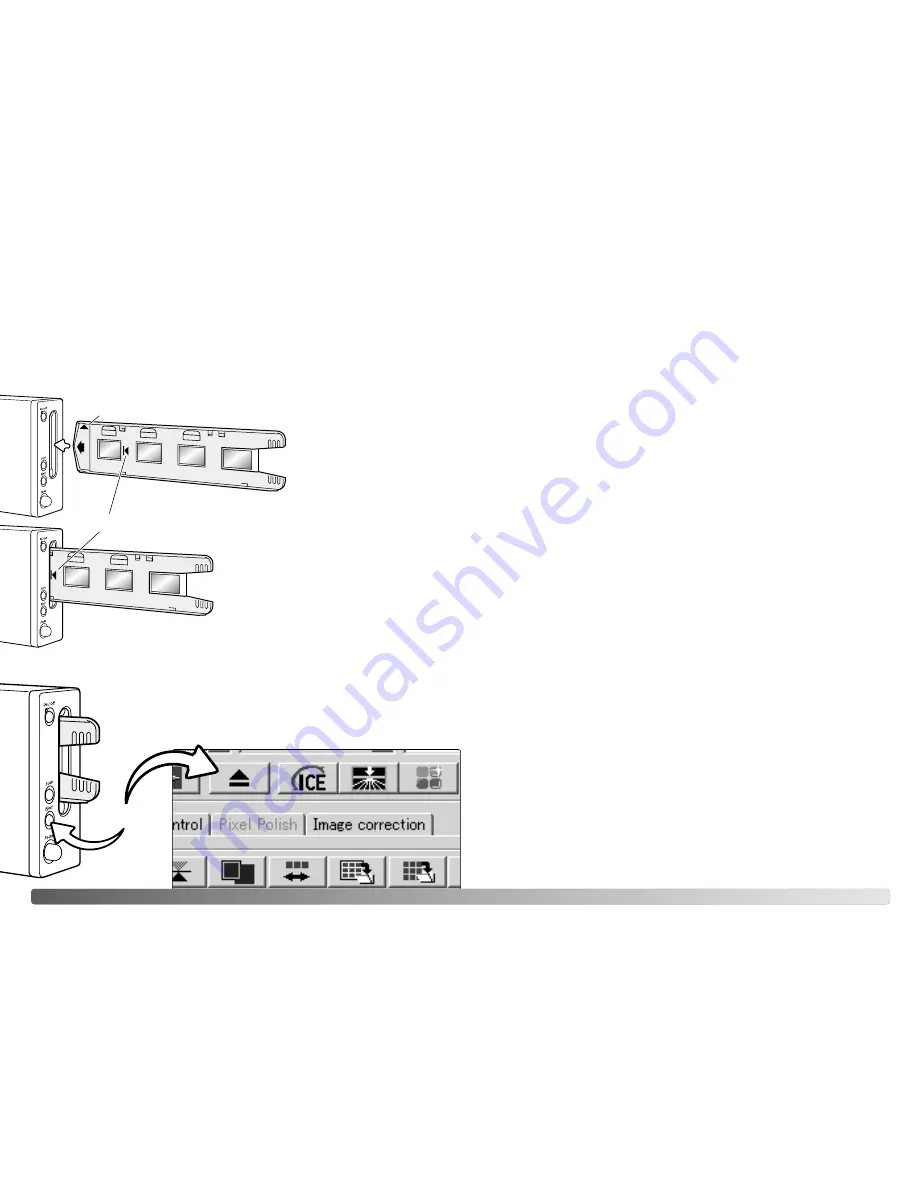
Ejecting a film holder
1
2
3
4
When the indicator lamp
glows steadily, insert the film
holder into the scanner in the
direction indicated by the
arrow. Hold the holder
straight and level with the
orientation indicator up (1).
Carefully push the holder into the scanner
until the arrow mark (2) is aligned with the
scanner door; the holder will be
automatically fed into the scanner from that
point. Never touch or hinder the holder
when it is in the scanner.
Loading a film holder into the scanner
Before using the scanner, install the DiMAGE Scan Utility; see the software instruction
manual. Turn on the scanner and then start the computer. Launch the DiMAGE Scan
Utility before inserting the film holder. Do not insert the film holder into the scanner
while the utility software is launching or the scanner is initializing; the indicator lamp
blinks during this period.
2
3
4
1
2
SCANNER NOTES
Eject button
Use the eject button on the scanner body or in the DiMAGE Scan
Utility window to remove the holder; the scanner automatically ejects
the holder to its initial insertion position. Do not touch or hinder the
holder while it is moving. If the scanner is turned off before the holder
is ejected, turn on the scanner; the holder is automatically ejected.
Film format and type settings
When scanning, the film type must be selected in the main window of the DiMAGE
Scan Utility. This scanner does not use glass holders and so the holder-type drop-
down menu is deselected and the film format cannot be changed. See scanner setup
in the basic-scanning section of the software manual.
Film type can be selected between color and black and white, positive and negative
film. Film for prints is negative film. Slide film is positive film.
Compatibility with the DiMAGE Scan Utility
The DiMAGE Scan software is compatible with many of Minolta’s high-end film
scanners. This means only one scanner driver needs to be installed on a computer
with multiple scanner models connected.
Because of the differences in specifications between scanners, some of the DiMAGE
Scan functions cannot be used with this scanner model. The following functions in
described in the DiMAGE Scan software manual are not available:
Digital ROC
Digital GEM
Scanner resolution
The maximum resolution for this scanner is 5400 dpi. The input resolution that can be
entered in the DiMAGE Scan Utility is from 337 dpi to the maximum resolution of 5400
dpi.
When the DiMAGE Scan Utility is installed, the scanner profiles listed below are
automatically installed for this model scanner, see the software manual for location.
These profiles have been included for advanced color matching with profile-to-profile
conversions in sophisticated image-processing or DTP applications. When using
these profiles, the color reproduced may not be the same as the color matching
system in the utility software. See the color matching section in the DiMAGE Scan
software manual for the profile location.
MLTF5400.icc - used with positive film at any color depth other than 16-bit linear.
MLTF5400p.icc - used with positive film with 16-bit linear color depth.
Scanner color profiles
Содержание DIMAGE SCAN ELITE 5400
Страница 1: ...HARDWARE MANUAL E ...


