background image

114

115

D

ATA

-

TRANSFER MODE

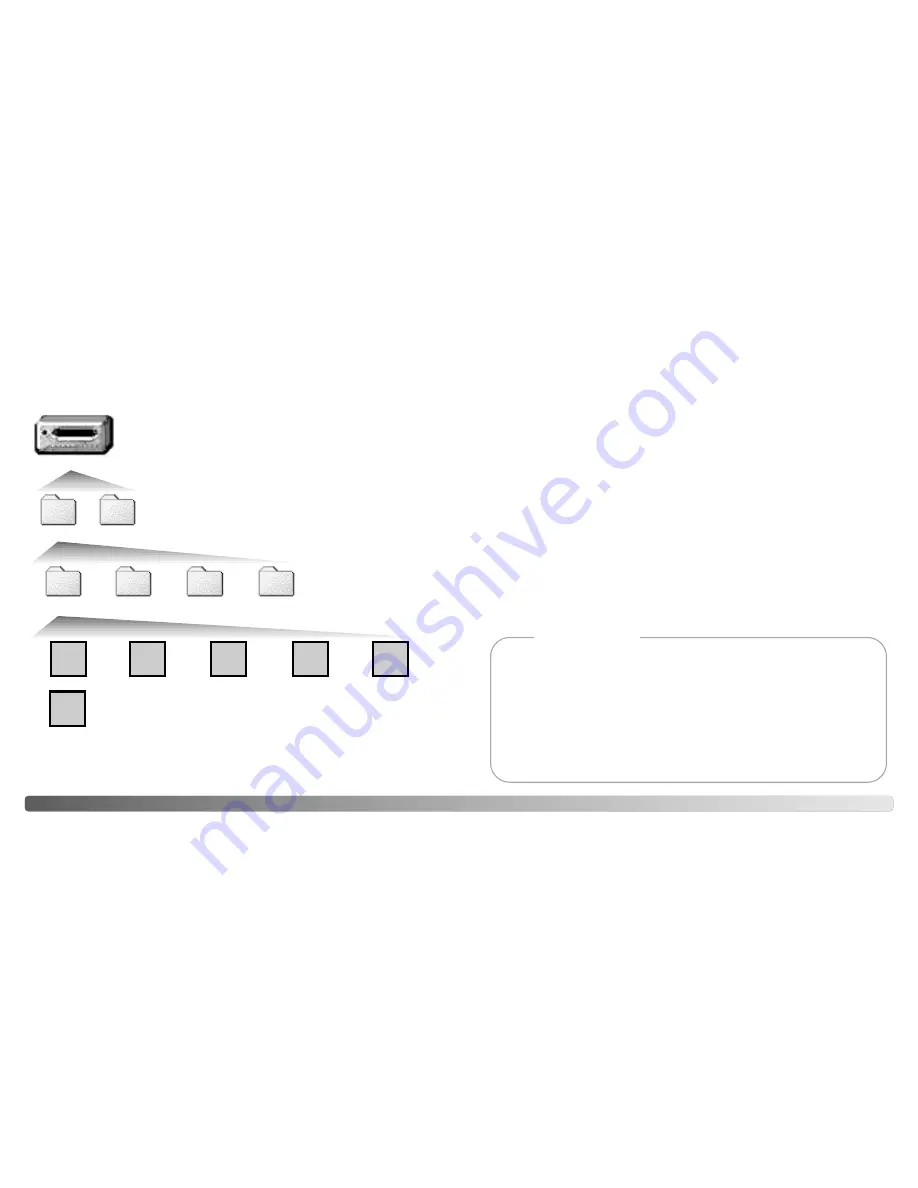
Once the camera is connected to the computer, image and audio
files can be accessed by double clicking on icons. Image folders are
located in the DCIM folder. To copying images and audio
recordings, simply drag and drop the file icon into a location in the
computer. Files and folders on the memory card can be deleted

using the computer. Never format the
memory card from the computer; always
use the camera to format the card. Only
files recorded by the camera should be
stored on the memory card.

Image and audio file names begin with “PICT” followed by a four-digit file number and a
tif, jpg, mov, or thm extension. Voice-memo and audio caption files have a wav extension
and the file name corresponds to their image file. Audio recordings also use the wav
extension. The thumbnail images (thm) are produced with TIFF images and are only
used in camera and DiMAGE Viewer operation.

Copy images (p. 94) are placed in a folder with a name ending in “CP.” E-mail Copy
images are placed in a folder ending in “EM.” When a new folder is created, the first three
digits in the folder name will be one greater than the largest folder number on the card.
When the index number in the image file name exceeds 9,999, a new folder will be
created with a number one greater than the greatest folder number on the memory card:
e.g. from 100MLT20 to 101MLT20. 

The number in the image file name may not correspond to the frame number of the
image. As images are deleted in the camera, the frame counter will adjust itself to show
the number of images on the card and reassign the frame numbers accordingly. The
serial numbers used with image files will not change when an image is deleted. When a
new image is recorded, it will be assigned a number one greater than the largest serial
number in the folder. File serial numbers can be controlled with the file-number-memory
function in the custom 1 section of the setup menu (p. 98).

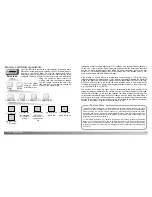
Memory card folder organization

Image files contain exif tag data. This data includes the time and date the image was recorded

as well as the camera settings used. This data can be viewed with the camera or the DiMAGE
Viewer software. If a camera image is opened in a photo-retouching application like Adobe
Photoshop, and then the image is saved overwriting the original data, the exif tag information is
erased. When using software other than the DiMAGE Viewer, always make a backup copy of the
image files to protect the exif tag data.

To view images correctly on your computer, the monitor’s color space may need to be adjusted.
Refer to your computer manual on how to calibrate the display to the following requirements:
sRGB, with a color temperature of 6500K, and a gamma of 2.2. Changes made to the captured
image with the camera’s contrast and color-saturation controls will affect any color-matching soft-

ware in use.

Camera Notes

PICT0001.THM

Drive Icon

Dcim

PICT0001.TIF

PICT0002.JPG

PICT0003.MOV

Audio recording

Fine, standard,

or economy

image

Movie clip

Misc

The misc. folder
contains DPOF
print files (p. 92).

PICT0002.WAV

PICT0002’s

voice-memo or

audio-caption

file

PICT0004.WAV

100MLT20 10130801

TIFF image

102MLTCP 103MLTEM

Содержание DiMAGE F200

Страница 1: ...INSTRUCTION MANUAL E...

Страница 2: ...eye with plenty of fresh water and contact a doctor If fluid from the batteries makes contact with your skin or clothing wash the area thoroughly with water Tape over battery contacts to avoid short...

Страница 3: ...heat or smoke discontinue use Immediately remove the batteries taking care not to burn yourself as the batteries become hot with use The continued use of a damaged product or part may cause injuries...

Страница 4: ...deleting images 35 Display button playback mode 36 Display button Quick View 36 Enlarged playback 37 Auto recording mode advanced operation 38 Drive modes 38 Self timer 39 Remote control sold separat...

Страница 5: ...and E mail Copy 94 Viewing images on a television 96 Setup mode controlling the camera s operation 97 Navigating the setup menu 98 LCD monitor brightness 100 Formatting memory cards 100 Auto power sav...

Страница 6: ...behind the terminal cover Self timer Remote control lamp p 39 40 Flash p 32 Strap eyelet p 15 Viewfinder p 12 LCD monitor Flash mode Information button p 32 34 Power Access lamp p 22 The tripod socke...

Страница 7: ...arated the image seen through one is not exactly the same as the other this is called parallax Parallax can cause errors in framing at close distances and is more pronounced at longer focal lengths Wh...

Страница 8: ...ra is accidentally dropped An optional metal chain neck strap NS DG100 and leather neck strap NS DG200 are also available from your Minolta dealer Availability varies with region Pass the other end of...

Страница 9: ...during periods of heavy use Always turn off the camera before changing between power supplies Connecting the AC adapter sold separately Auto power save To conserve battery power the camera will turn o...

Страница 10: ...d three dashes will be displayed on the data panel frame counter Open the card slot door by sliding the door toward the bottom of the camera to release the safety catch 1 the door can then be opened I...

Страница 11: ...e to be set To change the language see the camera notes on the following page Turn the mode dial on the top of the camera to the setup position The camera will turn on and the setup menu will be displ...

Страница 12: ...g vertical pictures hold the camera so that the flash is above the lens with the grip to the top Take care not to cover the lens with your fingers or the strap Handling the camera This section covers...

Страница 13: ...The auto recording mode uses advanced technology to make photography as effortless as possible Automatic Digital Subject Program Selection optimizes exposure color and image processing settings for e...

Страница 14: ...ing If the subject lock is lost the monitor icon will change from white to red but the focus lamp will continue to glow steadily For more about Subject Tracking AF see page 65 When the AF system canno...

Страница 15: ...ect programs cannot be used in the multi function recording mode For information on individual subject programs see page 30 Digital subject program button 1 Press the shutter release button partway do...

Страница 16: ...round LANDSCAPE optimized to produce sharp colorful landscapes With bright outdoor scenery Automatic Digital Subject Program Selection activates this mode with distant subjects a wide angle lens setti...

Страница 17: ...odes The orange flash lamp next to the viewfinder indicates the status of the flash When the lamp blinks quickly the flash is charging and the shutter will not release The lamp glows steadily when the...

Страница 18: ...togram Mode indicator To switch between the single frame playback and histogram display press the information button The histogram shows the luminance distribution of the image from black left to whit...

Страница 19: ...ll display and the image only Full display Index playback In index playback the four way keys of the controller will move the yellow border When the image is highlighted with the border the date of re...

Страница 20: ...p 53 The self timer is set with the drive mode button p 38 With the camera on a tripod compose the picture so the subject is within the focus frames Press the shutter release button partway down to l...

Страница 21: ...ontinuous advance acts like a motor drive on a film camera The number of images that can be captured at one time and the rate of capture depend on the image quality and image size setting The maximum...

Страница 22: ...ncrement is set the left right controller keys are used for exposure compensation p 51 1 2 0 3 Ev bracket 0 5 Ev bracket 1 0 Ev bracket Normal Under Over 43 Compose the picture as described in the bas...

Страница 23: ...setting Use the up down keys of the controller 2 to scroll through the menu options Highlight the option whose setting needs to be changed With the menu option to be changed highlighted press the rig...

Страница 24: ...tandard and economy files can be recorded as color or monochrome images p 70 in the multi function recording mode Image size and quality must be set before the picture is taken Changes are displayed o...

Страница 25: ...ting is activated with auto recording mode menu p 44 and with the custom 2 section of the multi function recording menu p 56 Date imprinting indicator Digital zoom The digital zoom is activated on the...

Страница 26: ...shutter speed and aperture displays will indicate the actual exposure Because the exposure can be adjusted in fine steps the shutter speed or aperture value displayed may not change When set to any v...

Страница 27: ...s the shutter release button partway down The focus frames will disappear and a red AF sensor will indicate the point of focus Without lifting your finger from the shutter release button recompose the...

Страница 28: ...recording mode Thoroughly familiarize yourself with the previous sections before moving on The multi function recording mode allows greater control over image making This recording mode gives more co...

Страница 29: ...press the left key Use the up down keys to highlight the new setting Refer to the auto recording mode section for details on image size p 44 image quality p 44 digital zoom p 48 date imprinting p 49 a...

Страница 30: ...ot without having to worry about the technical details of exposure settings The shutter speed and aperture values of the exposure are displayed on the monitor If shutter speed and aperture displays tu...

Страница 31: ...sing the shutter button will end the exposure Noise reduction processing is applied to the image after the exposure Noise reduction can be canceled in the custom 2 section of the setup menu p 98 Bulb...

Страница 32: ...pinkish or blueish cast with the fluorescent and tungsten settings The flash is daylight balanced and will produce acceptable results with the daylight and cloudy settings To apply a preset white bal...

Страница 33: ...e monitor is turned off p 31 ISO setting AUTO 100 0 5m 3 4m 1 6 ft 11 1 ft Flash range telephoto 0 5m 2 0m 1 6 ft 6 6 ft 0 5m 2 4m 1 6 ft 7 9 ft 0 5m 1 4m 1 6 ft 4 6 ft The flash range is measured fro...

Страница 34: ...ra is set to manual focus full time AF is disabled Turning the full time AF function off can help conserve battery power Full time AF is always used with the macro subject program as well as the sport...

Страница 35: ...u Use the up down keys to adjust the degree of compensation 1 Press the central controller button to set this value 2 If any value other than 0 0 is set an icon will be displayed on the monitor and da...

Страница 36: ...still image is color or black and white This must be set before the image is recorded The color mode is set in the custom 2 section of the multi function recording mode menu p 56 The live image on the...

Страница 37: ...ckground Depth of field also changes with focal length The wide angle position of the lens has a large depth of field the telephoto position has a shallow depth of field 72 73 A SHORT GUIDE TO PHOTOGR...

Страница 38: ...HY No compensation Negative compensation Using exposure and flash compensation MOVIE AND AUDIO RECORDING Recording audio Audio can be recorded without an image About 30 minutes of audio can be stored...

Страница 39: ...event an entire movie clip from being recorded The RC 3 remote control sold separately can be used to record movie clips and audio tracks p 75 from up to 5m 16ft away Simply point the remote control t...

Страница 40: ...ll Preset Basic In auto recording mode the menu button 1 turns the menu on and off The left right and up down keys of the controller 2 are used to move the cursor in the menu Pressing the central butt...

Страница 41: ...microphone directly to the deck Refer to the deck s and microphone s instruction manual for the connection procedure Shooting tips If recording PAL video the monitor will turn off when the cable is at...

Страница 42: ...ks is attached to a still image the audio track indicator will be displayed at the bottom of the monitor Stop Press the central button of the controller to start the audio playback Press the menu butt...

Страница 43: ...menu button The basic tab at the top of the menu will be highlighted Use the left right keys of the controller to highlight the appropriate menu tab the menu will change as the tabs are highlighted In...

Страница 44: ...displayed or highlighted in playback mode will be deleted The delete function will only erase unlocked files Locked files must be unlocked before they can be deleted This frame All frames Marked frame...

Страница 45: ...ys of the controller to highlight the file to be locked Pressing the up key will mark the file with the key icon To unlock a file highlight it with the yellow border and press the down key the key ico...

Страница 46: ...lide show presentation When this setting is chosen the frame selec tion screen will be displayed Use the left right keys of the controller to highlight the image to be included in the pre sentation Pr...

Страница 47: ...ring an Index Print To create an index print of all the images on the card select Yes To cancel an index print simply change the setting to No If an index print order is created any additional images...

Страница 48: ...ller button to return to the menu When the image s to be copied are selected a screen with four messages is displayed The messages are highlighted during the copying procedure Copy Enter 1 2 3 4 Copyi...

Страница 49: ...zoom lens giv ing twenty 12 X 17mm images on a roll of 16mm film The shutter release button and battery chamber are located in the grip Only a few prototypes were built making it one of Minolta s rar...

Страница 50: ...Off Standard form 1 Audio signals Date form 2 Off 1 Shutter FX 2 Off Reset default Date Time set Custom 2 Enter Enter MM DD YYYY Date format YYYY MM DD DD MM YYYY NTSC Video output 1 Low 3 High Volum...

Страница 51: ...sed in another camera may also have to be formatted before being used If the unable to use card message appears the card is not compatible with the camera and cannot be formatted Auto power save To co...

Страница 52: ...ive a positive confirmation of the operation The audio signals can be turn off in the custom 1 section of the setup menu p 98 The tone of the signal can also be changed signal 1 is mechanical and sign...

Страница 53: ...n recording mode p 58 p 65 Exposure mode Focus mode Multi function rec Digital zoom Program Area AF with single shot AF Off p 48 p 38 p 32 p 44 p 62 Movie mode Metering mode Voice memo Standard Multi...

Страница 54: ...as a mass storage device the computer must be equipped with a USB port as a standard interface Both the computer and the operating system must be guaranteed by their manufacturers to support USB inte...

Страница 55: ...the plug is firmly attached The USB port cover is attached to the body to prevent loss 2 1 2 3 Attach the other end of the USB cable to the computer s USB port Make sure the plug is firmly attached Th...

Страница 56: ...systems Before connecting the camera to the computer place the DiMAGE Viewer CD ROM in the CD ROM drive The DiMAGE installer menu should automatically activate To automatically install the Windows 98...

Страница 57: ...r mode If the camera does not receive a read or write command within ten minutes it will shut down to save power When the camera shuts down an unsafe removal of device warning may appear on the comput...

Страница 58: ...a the frame counter will adjust itself to show the number of images on the card and reassign the frame numbers accordingly The serial numbers used with image files will not change when an image is del...

Страница 59: ...ug or eject hardware routine Click on the small window to stop the device The safe to remove hardware window will open Close the window turn the camera off and then disconnect the USB cable The hardwa...

Страница 60: ...connection using the unplug or eject hardware routine p 116 2 Turn off the camera 3 Change the memory card 4 Turn on the camera to remake the USB connection 1 Stop the USB connection by dragging the...

Страница 61: ...n the routine The number of prints in the print run are displayed on the LCD monitor index prints are counted as one Use the left right keys to highlight Yes and press the center of the controller to...

Страница 62: ...he image quali ty or image size setting p 44 No card warn ing appears on the monitors No memory card in the camera Insert a memory card p 18 APPENDIX Troubleshooting Pictures are not sharp Subject is...

Страница 63: ...been fully discharged Completely exhaust the Ni MH batteries using the camera before charging About Ni MH batteries 1 Insert a memory card in the camera and connect it to the computer with the USB ca...

Страница 64: ...provide years of service Camera care Do not subject the camera to shock or impact Turn off the camera when transporting This camera is neither waterproof nor splashproof Inserting or removing batteri...

Страница 65: ...commend keeping spare batteries in a warm place such as the inside of a coat Batteries can recover their power when they warm up If batteries have been exhausted when used in the camera do not reload...

Страница 66: ...Operating temperature 0 40 C 32 104 F Operating humidity 5 85 noncondensing Specifications are based on the latest information available at the time of printing and are subject to change without notic...

Страница 67: ...h Prins Boudewijnlaan 1 B 2550 Kontich Belgium Minolta Schweiz AG Riedstrasse 6 CH 8953 Dietikon Switzerland Minolta Svenska AB Albygatan 114 S 171 54 Solna Sweden Finnish Branch Niittykatu 6 PL 37 SF...

Отзывы: