


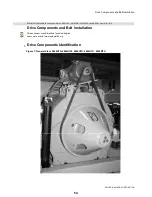


Drive Components and Belt Installation
PELLERIN MILNOR CORPORATION
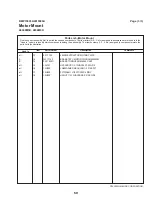
Table 1: Parts List—Drive Components and Belt Installation
Find the assembly for your machine and the letter shown in the "Item" column. The components for your
machine will show this letter or the word "all" in the "Used In" column. The numbers shown in the "Item"
column are those shown in the illustrations.
Used In
Item
Part Number
Description/Nomenclature
Comments
Assemblies
A
GDB48002
Installation Group; Drive chart; 4840H7N,
4840H7W
4840H7W, 4840H7N,
4840H7R, 4840H7K,4840M7K
Components
all
1
X2 21925
Pulley; Cylinder
all
2
X2 21923
Pull-up plate
all
3
56Q1RSD
Bushing; 1+7/8"
all
4
56044B4SD
V-pulley
all
5
56VB147XB4
V-belt
all
6
15K232A
Bolt; Hex head; 3/4-10X2
all
7
15U321H
Washer; Flat; 3/4
2.
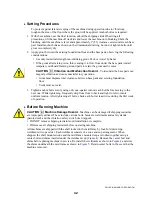
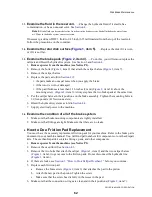
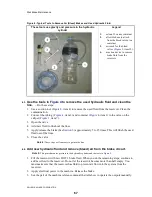
Belt Installation and Tension Procedure
When you install a new drive belt, the belt will increase in length when it first operates. Do this
procedure again after 24, 80, and 160 hours of operation to get the correct tension.
1. Remove electrical power from the machine. Refer to applicable safety codes.
2. Install the belt loose on the pulleys, or make the belt loose, if it is tight.
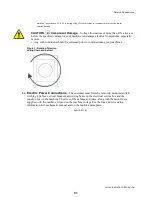
3. Measure the outer diameter of the belt accurately. If this is not the first time that you did this
procedure, the belt will be longer this time.
4. Calculate the correct length of the belt when it is tight, as follows:
• If you installed a new belt this day, multiply the length by 1.003. This gives the necessary
length when you make a new belt tight.
Example: 152 inches (3861 millimeters) X 1.003 = 152.46 inches
(3872 millimeters)
• If the belt is not new (operated), multiply the length by 1.005. This gives the necessary
length when you make an operated belt tight.
Example: 152.2 inches (3866 millimeters) X 1.005 = 152.96 inches
(3885 millimeters)
5. Make a loop of the correct length with flexible wire. Attach the ends together tightly.
6. Put the wire loop around the belt.
7. Make the belt tight until there is no play in the wire loop.
— End of BIIFLM05 —
56
Содержание 48040M7K
Страница 2: ......
Страница 8: ......
Страница 9: ...Safety 1 5 ...
Страница 43: ...Installation 2 39 ...
Страница 56: ......
Страница 57: ...Drive 3 53 ...
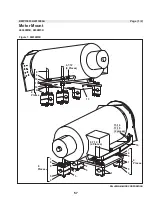
Страница 59: ...Drive Components and Belt Installation PELLERIN MILNOR CORPORATION Figure 2 Detailed views 55 ...
Страница 93: ...Frame and Tilt 4 89 ...
Страница 101: ...Hydraulic Assemblies 5 97 ...
Страница 110: ......
Страница 111: ...Door Assemblies 6 107 ...
Страница 125: ...Water and Steam 7 121 ...
Страница 137: ...Chemical 8 133 ...
Страница 142: ......
Страница 143: ...Control and Sensing Assemblies 9 139 ...
Страница 149: ...Dimensional 10 145 ...
Страница 150: ......
Страница 151: ...147 ...