


47
Important:
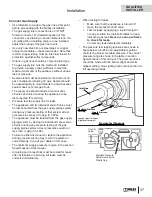
The fret retainer brackets are designed to
maintain the required space in front of the screen to
allow the window to move and relieve during a hard
start.
It is very important to ensure this area in
front of the screen is kept clear at all times.
Drop fret with
bolt into slotted
bracket (fret
adjusts up or
down to suit)
Slip fret brackets
over thumbscrews
and tighten screws
Fit thumscrews
to retainer tab
Fit retainer tab
to leg
Installation
Install Bottom Cover or Cast Iron Fret
Bottom Cover Installation
Important:
When the bottom cover is used instead of a
fret, a space is required in front of the window to allow
the window to move and relieve during a hard start.
It
is therefore very important to ensure that an area of
3/4 inch (19 mm) in front of the window is kept clear
at all times.
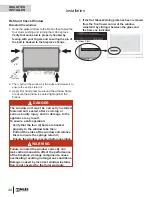
Slide the top fl ange of the bottom cover into slots
located at the bottom corners of the window frame.
Top
Front
Rear
Top flange
Bottom flange
(bends here)
Bottom
(end plates longer
than front plate
at bottom)
Rear View
Side View
Top
Bottom
DO NOT use
this hole
An area of 3/4 inch (19 mm) in front of the
window MUST be kept clear at all times!
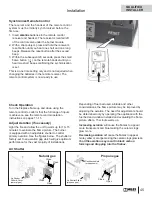
Fret Installation
Fret Brackets Installation RA24FK
1. Screw 2 thumbscrews into each retainer tab.
2. Fit the retainer tabs to each leg (1 screw per side).
3. Fit the slotted holes in the fret brackets over the
thumbscrews, push fret brackets downwards and
tighten the screws.
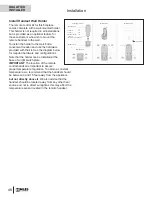
Cast Iron Fret Installation
1. Adjust the screw heads on the back of fret to
the thickness of the fret bracket.
2. Drop the fret into place while guiding the screw
heads into the slots in the bracket.
3. Clip the ash pan cover onto the fret.
QUALIFIED
INSTALLER


