background image

5

Top of finished 

hearth or floor

Wall Finish

26-1/4”

31-1/2”

to header &

wall finish

(includes 

plinth - 

reduce by

7/8” if not

using plinth)

7-1/2”

minimum

This part of wall 

must be 

non-combustible

(cement board or

similar)

Minimum 

12”

(Allow extra for rear vent elbows)

Top of finished

hearth or floor

Wall Finish

Note: Header

is raised to

accomodate top

vent clearances

39”

to header

(includes

plinth; 

reduce by

7/8” if not

using plinth)

31-1/2

to header

(includes

plinth; 

reduce by

7/8” if not

using plinth)

7-1/2”

 minimum

This part of

wall must be

non-combustible

(cement board

or similar)

Minimum 

12”

26-1/4”

Rear vent framing

Top vent framing

Содержание 541BPC

Страница 1: ...WING INSTRUCTIONS FOR 530 ENGINE CONFIGURATIONS AND VENTING REFER TO MAIN INSTALLATION BOOKLET SUPPLIED WITH THE ENGINE PORTRAIT Bolero Cast Front 541BPC Approved for use with Valor heater model 530 only Installation and Owner s Manual 2013 Miles Industries Ltd INSTALLER Leave this manual with the appliance CONSUMER Retain this manual for future reference HOT GLASS WILL CAUSE BURNS DO NOT TOUCH GL...

Страница 2: ...ter up so the bottom of the heater sits at the finished floor hearth height otherwise the cast front will not sit at the proper height A non combustible hearth is not required in front of this appliance Kit Contents 1 Cast Frame Assembly fitted with Barrier Screen 1 Top Baffle 2 Mounting Hooks 1 Framing Plate 1 Plinth 1 Rear Base Support 1 ZC Stand off LH 1 ZC Stand off RH 1 Insulation Layer 1 Pac...

Страница 3: ...6 to combustible materials 1 Y Insul 31 1 4 25 1 4 21 5 8 5 1 2 to knob 7 8 High Raised Plinth 26 1 4 20 29 cast front 31 1 4 framing plate 23 1 4 framing plate cast front 26 Dimensions Clearances Mantel depth X Min clearance Y 1 6 33 7 8 34 9 12 38 12 38 1 for every inch beyond 12 Mantel leg projection D Min clearance from appliance side E Up to 8 0 More than 8 6 ...

Страница 4: ...ble finish and backing required Tighten screws after wall finish to pull brackets tight Cast Front Framing Plate Cover brackets Cover Framing Plate up to holes Wall Finish note any material covering framing plate or within 7 1 2 at top must be non combust non combustible finish backing required Mount Brackets to Heater Install Framing Plate flush with framing or butt drywall to plate and run finis...

Страница 5: ...lar Minimum 12 Allow extra for rear vent elbows Top of finished hearth or floor Wall Finish Note Header is raised to accomodate top vent clearances 39 to header includes plinth reduce by 7 8 if not using plinth 31 1 2 to header includes plinth reduce by 7 8 if not using plinth 7 1 2 minimum This part of wall must be non combustible cement board or similar Minimum 12 26 1 4 Rear vent framing Top ve...

Страница 6: ...screws just removed Install top baffle offsetting downwards Heater 3 Mount the framing plate to the appliance 4 Secure the framing plate and brackets to the sides of the appliance case with 4 thread cutting screws supplied Screw from the outside through the access holes in the framing plate Note There are alternate methods of finishing around the framing plate either leaving it exposed or recessin...

Страница 7: ... the center of the insulation layer for the vent collar Place the insulation layer on top of the appliance case inboard of the stand off spacers Warning Failure to install the insulation layer may cause a fire hazard and voids warranty 7 If the hooks have been shipped loose with the cast front fix them to the front at its top corners 8 Install the barrier screen by pushing in the bottom first to h...

Страница 8: ... then unhooking the bottom 2 Unhook the cast front Lift it up by holding the louvres DO NOT lift by holding the top Always securely replace the window the front and the barrier screen before lighting WARNING FOR YOUR SAFETY ensure the barrier FOR YOUR SAFETY ensure the barrier screen is reinstalled on the fireplace screen is reinstalled on the fireplace after maintenance after maintenance WARNING ...

Страница 9: ...67 10 Framing Plate 4000469 4000469 11 Heater Mounting Bracket 2 4000488 4000488 12 ZC Stand off LH 569039 340B235 13 ZC Stand off RH 569029 340B234 14 Insulation Layer 569049 620B987 15 Barrier Screen 4003289 4003289 1 2 3 4 5 6 15 7 10 8 9 13 14 12 11 Designed and Manufactured by for Miles Industries Ltd 190 2255 Dollarton Highway North Vancouver B C CANADA V7H 3B1 Tel 604 984 3496 Fax 604 984 0...

Страница 10: ...ion pourraient résulter et causer des dommages matériels des blessures ou la mort PORTRAIT Devanture de fonte Bolero 541BPC Homologuée par la CSA pour utilisation exclusive avec les foyer Valor 530 Guide d installation et du consommateur LE PREMIER FOYER À GAZ RADIANT MC INSTALLATEUR Laissez cette notice avec l appareil CONSOMMATEUR Conservez cette notice pour consultation ultérieure UNE SURFACE V...

Страница 11: ... pour être égal à la surface de la finition du plancher ou de la base de foyer Autrement la devanture ne pourra être installée à la bonne hauteur Une base de foyer non combustible n est pas nécessaire devant le foyer Contenu du kit 1 Devanture en fonte avec Grille de protection 1 Déflecteur d air 2 Crochets 1 Plaque d encadrement 1 Plinthe 1 Support de base arrière 1 Écarteur gauche 1 Écarteur dro...

Страница 12: ...10 5 3 D E 26 X 12 10 3 1 Y 31 1 4 25 1 4 21 5 8 5 1 2 du bouton 26 1 4 20 29 31 1 4 23 1 4 26 plaque d encadrement Plinthe de 7 8 de hauteur Plinthe de 7 8 de hauteur Plaque d encadrement plaque d encadrement devanture de fonte devanture de fonte Manteau Isolant Écarteurs pour dégagement zéro Évacuation sur le dessus Plinthe facultative 1 2 min 1 max Diamètre 6 5 8 Patte du manteau voir table Min...

Страница 13: ...t à l encadrement lorsque le mur est fini Devanture de fonte Encadrement couvre les supports Encadrement couvert jusqu aux trous de fixation Finition du mur Le matériau couvrant l encadrement ou en dedans de 7 1 2 du dessus de l encadrement doit être non combustible Finition et soutien non combustible seulement Fixez les supports à l appareil Installez l encadrement égal à la charpente ou aboutez ...

Страница 14: ...cher fini ou de la base de foyer Finition du mur Note La poutre de tête est plus haute pour accomoder les dégagements pour l évacuation par dessus 39 à la poutre de tête plinthe incluse réduisez de 7 8 si vous n utilisez pas la plinthe 31 1 2 à la poutre de tête plinthe incluse réduisez de 7 8 si vous n utilisez pas la plinthe 7 1 2 minimum Cette partie du mur doit être fabriquée de matériau non c...

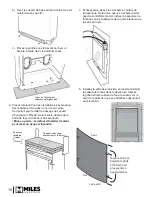
Страница 15: ...es ailerons des écarteurs et alignez les 2 trous avec les trous des côtés de la boîte de foyer Fixez les écarteurs avec les vis retirées précédemment 3 Placez la plaque d encadrement sur l appareil 4 Fixez la plaque d encadrement aux côtés de la boîte de foyer avec 4 vis auto taraudeuses fournies Vissez la plaque de l extérieur à travers les fentes de ses côtés de la plaque Note Il y a 2 méthodes ...

Страница 16: ...n cercle au centre de l isolant pour faciliter le passage du conduit d évacuation Placez l isolant sur le dessus de la boîte de foyer à l intérieur des écarteurs Mise en garde Le défaut d installer l isolant peut créer un risque d incendie 7 Si nécessaire vissez les crochets à l arrière de la devanture Notez bien que les crochets droit et gauche sont différents Accrochez la devanture de fonte aux ...

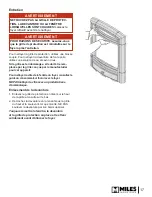
Страница 17: ... en la tenant sous la grille du haut et la soulevant tel que montré NE PAS soulever la devanture par son bord supérieur Toujours remettre la fenêtre la devanture et la grille de protection en place et les fixer solidement avant d allumer le foyer AVERTISSEMENT NE TOUCHEZ PAS LA GRILLE DE PROTEC NE TOUCHEZ PAS LA GRILLE DE PROTEC TION LA DEVANTURE OU LA FENÊTRE TION LA DEVANTURE OU LA FENÊTRE LORSQ...

Страница 18: ...9 350K967 10 Plaque d encadrement 4000469 4000469 11 Support de montage 2 4000488 4000488 12 Écarteur de dégagement gauche 569039 340B235 13 Écarteur de dégagement droit 569029 340B234 14 Isolant 569049 620B987 15 Grille de protection 4003289 4003289 Conçue et fabriquée par pour Miles Industries Ltd 190 2255 Dollarton Highway North Vancouver BC CANADA V7H 3B1 Tél 604 984 3496 Téléc 604 984 0246 ww...

Отзывы: