E a s y M x
P R O
v 7 a
U s e r M a n u a l
P A G E 21
USB-UART B
Enabling USB-UART B
D
AT
A BUS
1
2
3
4
5
6
7
8
9
10
11
12
13
14
15
16
17
18
19
20
21
22
23
24
25
26
27
28
TXD
DTR#
RTS#
VCCIO
RXD
RI#
GND
NC
DSR#
DCD#
CTS#
CBUS4
CBUS2
CBUS3
CBUS0
CBUS1
OSCO
OSCI
TEST
AGND
NC
GND
GND
VCC
RESET#
3V3OUT
USBDM
USBDP
FT232RL
U4
FT232RL
VCC-3.3V
VCC-5V
C26
100nF
LD73
LD74
RX-LED2
TX-LED2
R30
4K7
R29
2K2
VCC-3.3V VCC-3.3V
R37
4K7
R38
10K
FTDI2-D_P
FTDI2-D_N
RX
TX
1
2
3
4
5
6
7
8
O
N
SW12
TX-FTDI2
RX-FTDI2
PD5
PD6
SH
IE
LD
0
GND
B1A12
VBUS
B4A9
CC2
B5
DP2
B6
DN2
B7
SBU2
B8
SBU1
A8
DN1
A7
DP1
A6
GND
A1B12
VBUS
A4B9
CC1
A5
CN23
USB TYPE-C
D-
D+
R86
5.1k
R87
5.1k
R88 27
R89 27
USB-VBUS
1
2
3
5
4
6
I/O1
GND
I/O2
I/O2
VBUS
I/O1
D9
USBLC6-2P6
D-
D+
D-
D+
USB-VBUS
GND
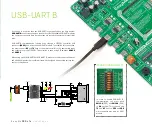
In order to enable USB-UART B
communication, you must push
SW12.3
(PD5) and
SW12.4
(PD6)
to
ON
position. This connects the
TX
and
RX
lines to
PD5
and
PD6
microcontroller pins and its UART
module.
If you need to use more than one USB-UART in your application, you have another
USB-UART B
connector available on the board too. Both available USB-UART modules
can operate at the same time, because they are routed to separate microcontroller
pins.
USB-UART B communication is being done through a FT232RL controller, USB
connector
(CN23)
, and microcontroller UART module. To establish this connection,
you must connect
RX
and
TX
lines of the microcontroller to the appropriate input
and output pins of the FT232RL. This selection is done using DIP switches
SW12.3
and
SW12.4
.
When using either USB-UART A or USB-UART B, make sure to disconnect all devices
and additional boards that could interfere with the signals and possibly corrupt the
sent or received data.

