Manual
The New Generation - ©Mikado Modellhubschrauber - Page 3
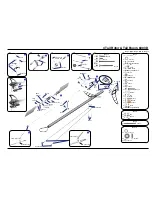
18x
M2,5x10
4x
M2,5x16
14x
M2,5
4x
M2,5
3x
SW5x59
1x
M2,5x60
4x
3x7x3
2x
10x19x5
2x
3x17
4x
3x5x2,5
2x
M2,5x8
2x
M2,5
M2,5x8
10x19x5
M2,5x16 (4x)
3x7x3
3x17
4
5
Using the rod M2.5x60, position all 14 nylon nuts
in the right side frame.
Before you combine the two sides of the main
frame, attach the two belt tensioners (#4089,
bag 6).
You may install the four servos into the main
frame either now or later. If you wish to install
the servos now, please go to page 10, before
you continue here.
1 Mainframe
Bag 1 • Bag 6 • Bag 10 • Bag 12
Bag 1
Bag 6
Bag 10
Bag 12
All parts shown in the boxes are displayed in real size.
Spacers for 25 mm tail boom (LOGO 600 3D).
Содержание LOGO 500 3D
Страница 25: ...Manual The New Generation Mikado Modellhubschrauber Page 25 23 Overview Tail Rotor LOGO 500 600 DX ...
Страница 26: ...Manual The New Generation Mikado Modellhubschrauber Page 26 24 Overview Tail Rotor LOGO 500 3D ...
Страница 27: ...Manual The New Generation Mikado Modellhubschrauber Page 27 25 Overview Tail Rotor LOGO 600 3D ...
Страница 28: ...Manual The New Generation Mikado Modellhubschrauber Page 28 26 Overview Rotor Head LOGO 500 ...
Страница 29: ...Manual The New Generation Mikado Modellhubschrauber Page 29 27 Overview Rotor Head LOGO 600 ...
Страница 30: ...Manual The New Generation Mikado Modellhubschrauber Page 30 28 Overview V Bar Head LOGO 500 ...
Страница 31: ...Manual The New Generation Mikado Modellhubschrauber Page 31 29 Overview V Bar Head LOGO 600 ...
Страница 32: ...Construction Rendering Mehran Mahinpour Tirooni Layout Realisation CDT Berlin www mikado heli de ...


