Manual
The New Generation - ©Mikado Modellhubschrauber - Page 10
12x
2,9x13
2x
M2x14
4x
M2,5x10
4x
M2x10
1x
M2x12
4x
9x
M2
3x
M3x30
LOGO 500 3D & DX
LOGO 600 3D
M2x14
2,9x13 (4x)
45 mm
39 mm
15 mm
(4x)
2x
3x5x7
1x
M3x65
2x
3x5x1
1x
M3x55
2,9x13
(4x)
M2,5x10 (4x)
4
5
7
9
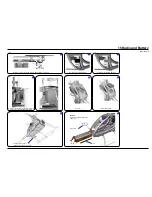
8 Servo Installation
Bag 1 • Bag 9 • Bag 12
Bag 9
Bag 1
Bag 12
LOGO Rotor Head (with flybar)
Apply a small amount
of oil to the rotor shaft.
If you are installing Futaba servos, add the
distance plate for the two aileron servos.
Aileron left
Aileron right
Elevator
Rudder
LOGO Rotor Head (V-Stabi, flybarless head)
Bag 1 LOGO 500 DX / 3D
Bag 1 LOGO 600 3D
Use M2x14
16 mm
16 mm
16 mm
14 mm
20 mm
20 mm
20 mm
14 mm
Содержание LOGO 500 3D
Страница 25: ...Manual The New Generation Mikado Modellhubschrauber Page 25 23 Overview Tail Rotor LOGO 500 600 DX ...
Страница 26: ...Manual The New Generation Mikado Modellhubschrauber Page 26 24 Overview Tail Rotor LOGO 500 3D ...
Страница 27: ...Manual The New Generation Mikado Modellhubschrauber Page 27 25 Overview Tail Rotor LOGO 600 3D ...
Страница 28: ...Manual The New Generation Mikado Modellhubschrauber Page 28 26 Overview Rotor Head LOGO 500 ...
Страница 29: ...Manual The New Generation Mikado Modellhubschrauber Page 29 27 Overview Rotor Head LOGO 600 ...
Страница 30: ...Manual The New Generation Mikado Modellhubschrauber Page 30 28 Overview V Bar Head LOGO 500 ...
Страница 31: ...Manual The New Generation Mikado Modellhubschrauber Page 31 29 Overview V Bar Head LOGO 600 ...
Страница 32: ...Construction Rendering Mehran Mahinpour Tirooni Layout Realisation CDT Berlin www mikado heli de ...


