background image

Cleaning the spray arms

Waste particles can lodge in the spray
arm jets.
It is therefore important to inspect the
spray arms regularly.

^

Use a sharp pointed object to push
particles into the spray arm jets and
rinse well under running water.

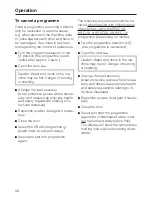
Remove the spray arms as follows:

^

Unscrew the

upper

spray arm.

^

Remove the

middle

spray arm by un-

screwing the nut which secures it to
the upper basket.

Important: The nut has a left hand
thread and has to be turned clock-
wise to unscrew it.

^

Loosen the knurled thumb nut to un-
screw the

lower

spray arm.

You will first need to take the bottom
basket out of the machine.

Important:
After replacing the spray arms, check
that they rotate freely.

Cleaning and care

48

Содержание G 7882

Страница 1: ...ons G 7882 Washer Disinfector To avoid the risk of accidents or damage to the machine it is essential to read these operating instructions before it is installed commissioned and used for the first time WG 05 800 640 M Nr ...

Страница 2: ...tralising agent 22 Setting the dosage and venting the dispensing system 22 Adding chemical disinfecting agent optional 23 Setting the dosage 23 Adding cleaning agent 24 Loading the machine 26 Adjusting the top basket 30 Programme selection 31 Programme chart 32 Operation 36 Switching on 36 Starting a programme 36 Changing a programme 37 Selecting an additional function 37 Programme sequence displa...

Страница 3: ...Installation 53 Electrical connection 55 Plumbing 57 Technical data 60 Contents 3 ...

Страница 4: ...laced directly in the machine without pre treatment no soaking required In Germany the parameters for disin fection of a temperature of 93 C with a holding time of 10 minutes correspond ing to effective areas A and B have been adopted into the official list for disinfection of instruments in disinfectors and decontamination units according to section 3 2 4 18 IfSG by the Robert Koch Institute RKI ...

Страница 5: ...ed time and active washing block displays j Add liquid cleaning agent indica tor light Optical interface Service kAdd rinsing agent chemical disin fecting agent indicator light lAdd neutralising agent indicator light mAdd salt indicator light nWater inlet Drain indicator light oProgramme sequence display pProgramme selector only applies to machine fitted with optional external DOS Module Guide to ...

Страница 6: ...liquid cleaning agent and chemical disin fecting agents at the back of the machine bFilter combination cSalt reservoir for the water softener dDispenser for powder cleaning agent eRinsing agent reservoir with dosage selector fLevel indicator Guide to the machine 6 ...

Страница 7: ...s such as caravans aircraft etc However it may be suitable for such usage subject to a risk assess ment of the installation being carried out by a suitably qualified engineer This machine should be commis sioned and then maintained only by a Miele authorised and trained ser vice technician Repairs and other work by unqualified persons could be dan gerous To ensure compliance with the Medical Devic...

Страница 8: ...ot to scald or burn yourself when opening the door Bas kets inserts and utensils must be al lowed to cool down before they are un loaded Any water remaining in contain ers could still be very hot Empty them into the wash cabinet before taking them out Do not touch the heating elements if you open the door during or di rectly after the end of a programme you could burn yourself They remain hot for ...

Страница 9: ...tion is based on claims made by the producer of the disinfecting agent Their instructions on handling use and effectiveness much be observed The use of chemo thermal disinfection pro cedures is the responsibility of the op erator The standard of disinfection must be routinely checked Only use Miele approved cleaning agents formulated for use in washer disinfectors in this machine Using unsuitable ...

Страница 10: ...void any materials with a corrosive effect The presence in compounds of any sol vents should be minimal especially those in hazard class A1 Ensure that solutions or steam con taining hydrochloric acid do not come into contact with the steel outer casing of the machine to avoid any corrosion damage Please follow the advice on instal lation in these instructions and the separate Installation Instruc...

Страница 11: ...n Danger of suffocation Rather than just throwing these materi als away please ensure that they are recycled Disposal of your old machine Old machines contain materials which can be reclaimed or recycled Please contact your dealer your waste collec tion centre or scrap merchant about po tential recycling schemes Ensure that the machine presents no danger to children while being stored for disposal...

Страница 12: ...use serious damage to the reservoir Only use cleaning agents suitable for use in washer disinfectors Do not use cleaning agents formulated for use in domestic dishwashers Load the machine carefully Arrange the load so that water will come into contact with all surfaces Concealed surfaces will not be cleaned The spray arms must not be blocked by any items Adding cleaning agent Follow the cleaning a...

Страница 13: ...shutting the door After the first intake of water it is no lon ger possible to open the door except in the D PRE RINSE and 6 DRAIN programmes The machine can be pro grammed to open during drying addi tional programme The door remains locked and cannot be opened until the end of the programme To cancel a programme If a programme has to be cancelled in an emergency e g when articles in the machine j...

Страница 14: ...ntial to follow procedures par ticularly with regard to regulations on preventing the spread of epidemics as described in Operation cancelling a programme Turn the programme selector to f Press I 0 to switch the machine off The emergency release cable is lo cated at the bottom of the machine behind the service panel Pull it downwards to open the door Opening and closing the door 14 ...

Страница 15: ...is set at the factory for a water hardness level of 3 4 mmol l 19 d If the water supply is harder or softer than this including below 0 7 mmol l or 4 d the factory setting will need to be changed following the instruc tions in Setting the water softener See chart on the next page for set tings Your local water authority will advise you on the water hardness in your area For fluctuating levels e g ...

Страница 16: ... 7 7 9 8 1 2 4 5 7 9 11 13 14 16 18 20 22 23 25 27 29 31 32 34 36 38 40 41 43 45 47 49 50 52 54 56 58 59 61 63 65 67 68 70 72 74 76 77 79 81 1 2 3 4 5 6 7 8 9 10 11 12 13 14 15 16 17 18 19 20 21 22 23 24 25 26 27 28 29 30 31 32 33 34 35 36 37 38 39 40 41 42 43 44 45 d German scale mmol l f Setting 46 47 48 49 50 51 52 53 54 55 56 57 58 59 60 8 3 8 5 8 6 8 8 9 0 9 2 9 4 9 5 9 7 9 9 10 1 10 3 10 4 1...

Страница 17: ...o clock position The number 19 appears in the dis play the factory water hardness set ting in d equivalent to 3 4 mmol l Press ß as many times as is neces sary or hold it in until the required value hardness level in d appears in the display Once the number 60 has been reached the counter will begin again at 0 Press the 6 button SP will appear in the display Press 6 again The setting will now be s...

Страница 18: ...voir make sure that you have picked up the right packet of reactivation salt Remove the bottom basket from the machine Unscrew the salt reservoir cap Before filling the salt reservoir with reactivation salt for the first time fill it with approx 2 5 litres of water Place the funnel provided in place Fill carefully with salt as it is filled displaced water will run out Wipe any residual salt off th...

Страница 19: ...oir is empty the k indicator light b comes on to remind you to fill the reservoir Reactivation takes place automatically during a programme The programme sequence indicator light k a lights up whilst this is hap pening Water softener 19 ...

Страница 20: ... the reservoir Make sure you use a rinsing agent which is suitable for use in washer disinfectors The reservoir must be filled with rins ing agent when the H CHEM indi cator light comes on There is also a level indicator for the rinsing agent reservoir on the inside of the door see illustration on the right Important The H CHEM indicator light will light up if the container for chemical disinfecti...

Страница 21: ...ight H CHEM on the control panel lights up again before adding any more rinsing agent Setting the dosage The dosage adjuster see arrow in the opening has settings from 1 to 6 1 6 ml It is set to 3 3 ml at the fac tory Use a higher setting if spots are left after drying If the surface becomes cloudy and streaky use a lower setting Rinsing agent 21 ...

Страница 22: ... ising agent on the floor next to the machine or in an adjoining cupboard When the Add neutralising agent indi cator light won the control panel lights up Fill the container red with neutralis ing agent or change it for a new con tainer and then Insert the siphon tube into the con tainer observe the colour code Please remember to fill the container in good time it should not be allowed to empty co...

Страница 23: ... when the H CHEM indicator light on the control panel lights up Important The H CHEM indicator light will also light up if the rinsing agent container is empty Fill the container green with disin fecting agent or change for a new one and then Insert the siphon tube into the con tainer observe the colour code Please remember to fill the container in good time it should not be allowed to empty compl...

Страница 24: ...r be fore every programme except with D PRE RINSE and 6 DRAIN For the SPECIAL 93 C 10 programme see the notes in the Programme chart Press the opening catch on the con tainer see arrow forwards The flap will spring open The flap is always open at the end of a programme Add powder cleaning agent to the compartment Dosage Approx 3 g l or 30 g per batch Approx 10 5 litres of water are used in the was...

Страница 25: ...u Note As a chargeable optional extra this ma chine can also be fitted with a dis penser pump for liquid cleaning agent DOS Module G 60 This is connected externally See Programming special functions for venting the dispensing system and setting the dosage The optional DOS Module is supplied with its own installation and connection instructions Maintenance of the dispensing system To ensure trouble...

Страница 26: ... will be properly cleaned Do not place items to be cleaned in side other pieces where they may be concealed Hollow items should be inverted and placed in the correct inserts The wa ter must be able to access them un hindered Deep based items should be placed at an angle to ensure good coverage of water Tall narrow pieces should be placed in the centre of the baskets to ensure better water coverage...

Страница 27: ...chine e g in the O 176 upper basket Fibre optics and light cables must only be processed in this machine if the manufacturer has stated that they are suitable for thermal processing They should be processed according to manufacturer s instructions using the varioTD NR programme with the final rinse in fully demineralised wa ter ENT The thin chome plating on ear funnels can be very sensitive to neu...

Страница 28: ...in silicone holders E 416 Insert for gyn speculae Load as shown in the illustration E 337 Insert for holding instruments upright E 417 Insert for diverse nasal and ear speculae Load as illustrated to ensure that the speculae are open for cleaning Loading the machine 28 ...

Страница 29: ...z zles for parts of rigid endoscopes up to 50 cm long For catheters etc there are 10 jets and clamps Mesh basket E 379 fitted loose on the left hand side E 373 Mesh tray for ear funnels or E 417 for ear funnels N B only suitable for use in the upper basket Loading the machine 29 ...

Страница 30: ...op basket O 177 and bot tom basket U 874 Top basket position Top basket height cm Bottom basket height cm Top max 21 max 20 Middle max 23 max 18 Bottom max 25 max 16 in Insert E 417 To adjust the top basket Pull out the top basket until a resis tance is felt lift from the runners and remove Unscrew the knurled nuts roller bear ings on both sides of the basket with a suitable spanner reposition as ...

Страница 31: ...ur programme according to the type of instruments or utensils being cleaned and the degree of soiling The different programmes and their uses are described overleaf in the Programme chart Programme selection 31 ...

Страница 32: ... prevent soiling drying on to dishes when a complete programme does not yet need to be run 6 DRAIN For draining water out of the machine e g when a programme has been interrupted Turn the programme selector to the STOP position f first If applicable observe regulations on containing the spread of epidemics see Cancelling a programme CHEM 60 C 5 For cleaning and disinfecting heat sensitive material...

Страница 33: ...incorrect use of the machine This equipment is not designed for maritime use or for use in mobile instal lations such as caravans aircraft etc How ever it may be suitable for such usage sub ject to a risk assessment of the installation being carried out by a suitably qualified en gineer This machine should be commissioned and then maintained only by a Miele authorised and trained service technicia...

Страница 34: ...wn before they are un loaded Any water remaining in containers could still be very hot Empty them into the wash cabinet before taking them out Do not touch the heating elements if you open the door during or directly af ter the end of a programme you could burn yourself They remain hot for some time after the end of the programme Never clean the machine or near vicin ity with a water hose or a hig...

Страница 35: ... effectiveness much be ob served The use of chemo thermal disinfec tion procedures is the responsibility of the operator The standard of disinfection must be routinely checked Only use Miele approved cleaning agents formulated for use in washer disinfectors in this machine Using unsuit able cleaning agents could adversely affect items being cleaned as well as the compo nents of the machine Pre tre...

Страница 36: ...void any materials with a corrosive effect The presence in compounds of any solvents should be mini mal especially those in hazard class A1 Ensure that solutions or steam contain ing hydrochloric acid do not come into contact with the steel outer casing of the machine to avoid any corrosion damage Please follow the advice on installation in these instructions and the separate Installation Instruct...

Страница 37: ...X 60 C 3 AD DOS 2 X X X 55 C 3 without drain X 60 C 5 DOS 4 X X 60 C 3 AD DOS 2 X X Sections included in a programme with temperature temperature holding time 1 To change a temperature or temperature holding time see Programming special functions DOS 2 For dispensing rinsing agent DOS 4 For dispensing chemical cleaning agent AD Aqua destillata Fully demineralised water VE pure H2O demineralised wa...

Страница 38: ...ctericidal and virucidal disinfection according to 18 IfSG German Institute for the pre vention of the spread of epidemics 30 grammes on the right hand side door interior varioTD For general hygiene requirements particularly suit able for sensitive and heavily blood soiled instru ments and for processing aluminium cassettes This programme meets the requirements of prEN ISO 15883 1 90 C 5 C 0 C wit...

Страница 39: ...DOS 2 X X X 45 C 3 X DOS 3 X X 83 C 10 AD DOS 2 X X Sections included in a programme with temperature temperature holding time 1 To change a temperature or temperature holding time see Programming special functions DOS 2 Rinsing agent dosage DOS 3 For dispensing neutralising agent DOS 4 For dispensing chemical cleaning agent AD Aqua destillata Fully demineralised water VE pure H2O demineralised wa...

Страница 40: ... button 6 The actual temperature will appear in the dis play The indicator light next to the Start button lights up constantly Once the programme has started all other programmes are blocked If the programme selector is then turned to another programme the values shown in the display go out The values can be seen again if the programme selector is turned back to the position of the programme curre...

Страница 41: ... lights up during the programme k Reactivation I Pre wash l Wash and disinfection if applicable H Interim rinse Final rinse and disinfection if applicable c Drying additional function r End of programme Programme parameters have been reached At the end of a programme The programme has ended when r lights up constantly in the programme sequence display and the Start indica tor light 6 has gone out ...

Страница 42: ...sary Close the door Select the DRAIN programme 6 wash liquor is pumped away Select and start the programme again The following procedure should be fol lowed when dealing with official cases of epidemics using the SPECIAL 93 C 10 or SPECIAL AN 93 C 10 programme depending on model Turn the programme selector to f the programme is cancelled Open the door a Caution Water and items in the ma chine may ...

Страница 43: ...mme status P will appear in the display and the p 6 indicator light will come on Press 0 twice E02 programming level 2 will appear in the display 1 1 DOS 1 liquid cleaning agent via the optional DOS Module G 60 or C 60 1 1 1 Setting the dosage concentra tion Set the dosage selector on the DOS Module to position 10 applies to DOS Module C 60 only Set the dosage concentration accord ing to the clean...

Страница 44: ...y venting is required e g be cause the dispensing system has been allowed to empty by mistake Select programming level 2 see 1 Then proceed as follows Turn the programme selector to the A position do1 appears in the display Press ß The dispensing system will be vented automatically 0 will appear in the dis play when venting is finished Switch the machine off with the I 0 button Every time the disp...

Страница 45: ...o the 6 position do3 appears in the dis play Press ß The dispensing system will be vented automatically 0 will appear in the dis play when venting is finished Having changed a value or all values Press the 6 button SP appears Press 6 again The change has been recorded b If only venting is required e g be cause the dispensing system has been allowed to empty by mistake Select programming level 2 se...

Страница 46: ... dosage concentra tion Turn the programme selector to the combiCHEM 60 C 5 position do4 appears in the display Press ß The dispensing system will be vented automatically 0 will appear in the dis play when venting is finished Having changed a value or all values Press the 6 button SP appears Press 6 again The change has been recorded b If only venting is required e g be cause the dispensing system ...

Страница 47: ...in the display and the p 6 indicator light will come on Main wash temperature Main wash 1 Press 0 as often as necessary or hold it pressed in until E09 pro gramming level 9 appears in the dis play Main wash 2 programme B only Press 0 as often as necessary or hold it pressed in until E12 pro gramming level 12 appears in the display Turn the programme selector to the programme which needs to be chan...

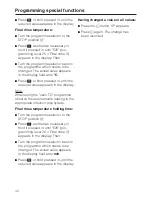
Страница 48: ...ay Note When using the vario TD programme observe the requirements relating to the appropriate infection prophylaxis Final rinse temperature holding time Turn the programme selector to the STOP position f Press 0 as often as necessary or hold it pressed in until E26 pro gramming level 26 Final rinse 2 appears in the display Then Turn the programme selector back to the programme which needs to be c...

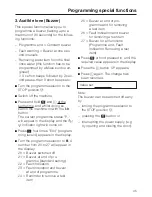
Страница 49: ...times E04 program ming level 4 appears in the display Turn the programme selector to B A number from 20 to 27 will appear in the display 20 Buzzer switched off 21 Buzzer at end of pro gramme standard setting 22 Fault indication 23 Fault indication and buzzer at end of programme 24 Reminder to remove a test item 25 Buzzer at end of pro gramme and for removing a test item 26 Fault indication and buz...

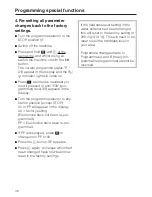
Страница 50: ...tor to any switch position except STOP 00 or PP will appear in the display 00 factory setting Electronics have not been re pro grammed PP Electronics have been re pro grammed If PP is displayed press ß to change from PP to 00 Press the 6 button SP appears Press 6 again All values which had been changed have now been now reset to the factory settings If the hardness level setting in the water softe...

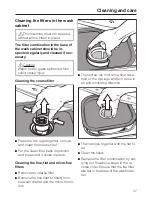
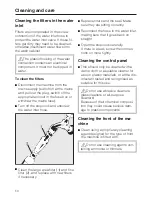
Страница 51: ...Put the clean filter back in position and press until it clicks in place Cleaning the fine flat and micro fine filters Remove the coarse filter Remove the fine filter if fitted from between the flat and the micro fine fil ters To unscrew the micro fine filter take hold of the two lugs and turn twice in an anti clockwise direction Then remove together with the flat fil ter Clean the filters Replace...

Страница 52: ...the spray arms as follows Unscrew the upper spray arm Remove the middle spray arm by un screwing the nut which secures it to the upper basket Important The nut has a left hand thread and has to be turned clock wise to unscrew it Loosen the knurled thumb nut to un screw the lower spray arm You will first need to take the bottom basket out of the machine Important After replacing the spray arms chec...

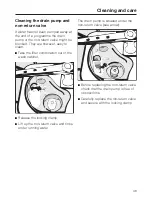
Страница 53: ...clean Take the filter combination out of the wash cabinet Release the locking clamp Lift up the non return valve and rinse under running water The drain pump is situated under the non return valve see arrow Before replacing the non return valve check that the drain pump is free of obstructions Carefully replace the ron return valve and secure with the locking clamp Cleaning and care 49 ...

Страница 54: ...lter 2 and replace with new filters if necessary Replace filters and the seal Make sure they are sitting correctly Reconnect the hose to the water inlet making sure that it goes back on straight Open the stopcock carefully If there is a leak screw the connec tions on more tightly Cleaning the control panel This should only be cleaned with a damp cloth or a suitable cleaner for use on plastic mater...

Страница 55: ...achine on again and reselect the programme The wash cycle finishes too early and the p 6 indicator light flashes fault code F A appears in the dis play The drain hose is kinked The drain pump is blocked Turn the programme selector to the STOP position f the fault code goes out Switch the machine off press I 0 Straighten the hose and check clean the drain pump Switch the machine on again drain the ...

Страница 56: ...out Switch the machine off press I 0 Switch the machine on again and reselect the programme If you still have difficulties or if a fault code F appears in the display please contact your authorised Service Dealer or the Miele Service Depart ment See back cover for addresses Please quote the fault code as well as the model type and number of your ma chine which is given on the data plate inside the...

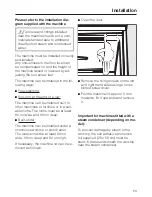
Страница 57: ...her machines or furniture or in a suit able niche The niche must be at least 60 cm wide and 60 cm deep Built under The machine can be installed under a continuous worktop or sink drainer The recess must be at least 60 cm wide 60 cm deep and 82 cm high If necessary the machine lid can be re moved as follows Open the door Remove the fixing screws on the left and right hand sides using a cross slotte...

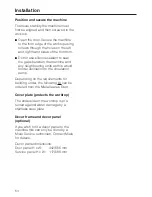
Страница 58: ...nits as this would hinder ventilation to the circulation pump Depending on the requirements for building under the following kit can be ordered from the Miele Spares Dept Cover plate protects the worktop The underside of the worktop is pro tected against water damage by a stainless steel plate Decor frame and decor panel optional If you wish to fit a decor panel to the machine this can only be don...

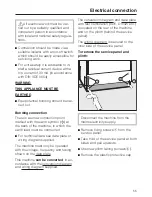
Страница 59: ...he earth lead must be connected For technical data see data plate or wiring diagram supplied The machine must only be operated with the voltage frequency and fusing shown on the data plate This machine can be converted in ac cordance with the conversion diagram and wiring diagram supplied The conversion diagram and data plate with test certification VDE DVGW etc is located on the rear of the machi...

Страница 60: ...To re assemble Refit the plastic protective cap plinth facing and service panel in the re verse order to which they were re moved See also the installation diagram sup plied Electrical connection 56 ...

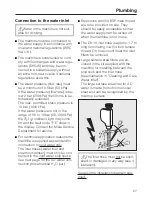
Страница 61: ...or technical application reasons the machine is supplied as standard for connection to cold water only The inlet hoses water inlet and steam condenser must only be con nected to the cold water stopcocks See next page for the AD water con nection hose marked H2O pur Stopcocks with 3 4 BSP male thread are to be provided on site They should be easily accessible so that the water supply can be turned ...

Страница 62: ... bar 150 1000 kPa The AD pressure tested hose marked H2O pur with a 3 4 threaded union must be connected to the on site AD stopcock for purified water If the AD water connection is not go ing to be used the electronics will need to be reprogrammed by a Miele Service Technician The inlet hose will remain on the rear of the ma chine Plumbing 58 ...

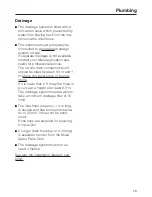
Страница 63: ...sited between 0 3 m and 1 m above the lower edge of the ma chine If it is lower than 0 3 m lay the hose in a curve at a height of at least 0 3 m The drainage system must be able to take a minimum drainage flow of 16 l min The inlet hose is approx 1 4 m long is flexible and has an internal diame ter of 22 mm It must not be short ened Hose clips are supplied for securing it in position A longer drai...

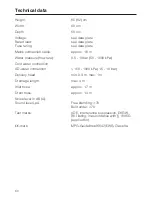
Страница 64: ...kPa Cold water connection AD water connection ü 150 1000 kPa 1 5 10 bar Delivery head min 0 3 m max 1 m Drainage length max 4 m Inlet hose approx 1 7 m Drain hose approx 1 4 m Noise level in dB A Sound level LpA Free standing 70 Built under 70 Test marks VDE interference suppression DVGW RKI listing in accordance with 18 IfSG applied for mark MPG Guidelines 93 42 EWG Class IIa Technical data 60 ...

Страница 65: ...61 ...

Страница 66: ...62 ...

Страница 67: ...63 ...

Страница 68: ...M Nr 05 800 640 V Alteration rights reserved 4902 This paper consists of cellulose which has been bleached without the use of chlorine 00 ...

Отзывы: