background image

8

EN

BT Rush Guest

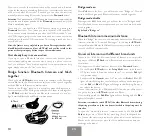
In addition to the 10 people talking in a Mesh Conference group, or the 6 

people talking in a Dynamic Repeat group, it is possible to add an unlimi-

ted number of 

BT Rush

 users only in listening mode (Guest user).

You can follow the same procedure explained in the “

BT Rush

 ID number 

Setup” and instead of choosing one of the available numbers, you must 

choose “Mesh guest”. The voice “Mesh guest” is available either at the end 

or at the beginning of the number list.

Create a “secure” Mesh communication with 

Dynamic Repeat

If you want to be sure that nobody else will be able to enter your Mesh 

Dynamic Repeat group communication, you need to follow a specific 

pairing procedure to exchange a “secure key” to all units in the Dynamic 

Repeat group. 

As first step you need to define one unit as “Master”. This is the unit that 

will generate the “key” and distribute it to all other users of the group.

It is not important which is the master unit , it can be any unit in the group.

After the pairing procedure is done, all units will share the same “key”.

1.  Turn off all units of the group.

2. Take the unit one by one and press and hold down the Control button 

about 7 sec., until the 

Red

 light is on permanently in all the units.

3. On the unit you choose as  “Master” press for 6 seconds the 

Control


button, the 

Green

 lights will flash SLOWLY.

4. Now take all the other units of the group, press for 3 seconds the 

Con-

trol

 button, the 

Green

 and 

Blue

 lights will flash FAST.

5. The Master unit and all other units in range (10m distance) will now 

exchange the “key”. When the procedure is finished, the user unit will 

exit the pairing mode and go back to 

Red

 light. If you have no other 

pairing to do (like phone or GPS) you can make a double click on the 

Control

 button to exit and go to working mode (

Blue

 LED flashing).

6. The master unit will keep blinking 

Green

, in case other units need to 

be paired.

7.  If no more unit needs the pairing, just make a double click on 

Control


button of the Master unit to exit the pairing procedure, the 

Red

 light 

will be on permanently. Make a double click again on the 

Control

 but-

ton to exit and go to working mode (

Blue

 LED flashing).

When the pairing procedure is finished and the “Secure” group is crea-

ted, there is no need of the “Master” unit anymore, so it can be part of 

the group or missing (turned off) and the Dynamic Repeat group can still 

work.

Only the units in the “Dynamic Repeat” mode that share the same “ se-

cure key” can talk together.

Other units “out of the box” can NOT be part of this “Secure” group any-

more, unless you pair that unit with a “Master” unit as explained below.

How to add a new unit to an existing Dynamic Repeat 

secure Mesh group

If you have a new unit which needs to be part of an existing “Dynamic Re-

peat” secure group, just take one unit from the existing secure group (any 

unit is good), consider it as a “Master” unit and perform the same pairing 

procedure explained above only with the new unit. No need to make the 

pairing procedure again with all units in the group.

Attention: the “secure key” is not used (ignored) when you are in Conference 

mode.

Reset the “secure” key

If you want to delete the Secure key, for example because you have se-

veral units and you are not sure which key they have, you must perform a 

reset and clean up the secure key stored in the unit:

1.  Turn off the unit

2. Press and hold down the Control button about 7 sec., until the 

Red


light is on permanently.

3. Now press the 

Upward

 and 

Downward

 buttons together for 3 seconds, 

the 

Green

 lights will turn on steady and then go back to 

Red

 light.

4. Now the “Secure” key is deleted.

5. Make a double click on the 

Control

 button to exit and go to working 

mode (

Blue

 LED flashing).

6. Now you are back to factory default and you don’t have a “secure key” 

anymore. All units in Dynamic Repeat mode can now talk each other.

Содержание BT RUSH

Страница 1: ...HIGH DEFINITION SOUND BY BTRUSH MESH BLUETOOTH CONFERENCE SYSTEM 2 INSTRUCTION GUIDE ENGLISH ...

Страница 2: ...crophones 5 Lock unlock 5 Using your Midland BT Rush 6 Switching the unit on 6 Switching the unit off 6 Operative mode 6 Volume 6 BT Rush group communication mode 7 Midland BT Rush ID number Setup Mode 7 How to open the Mesh communication 7 How to close the Mesh communication 7 BT Rush Guest 8 Create a secure Mesh communication with Dynamic Repeat 8 Bluetooth Intercom compatibility 9 Bridge functi...

Страница 3: ... Rush to a Phone 11 How to use a Phone 12 Using the MP3 player feature of the Smart phone 13 Music Share 13 GPS Navigator 14 How to listen to the FM Radio 14 Setup and special configurations 15 Resetting all paired devices 15 Back to factory setting 15 Adjusting Disabling the VOX feature Intercom and telephone 16 Setup and Firmware update 16 Use at your own risk 16 Warranty 16 European CE Notice C...

Страница 4: ...mono and stereo A2DP audio protocol and is best indicated for the phone or motorbike dash board system The pairing on Vol supports only mono protocol HFP and is indica ted for the GPS Firmware update via USB type C connection to PC and Mac All the main configuration of the unit is done using the app BTSetAPP for iOS and Android Midland BT Rush is available in two versions Single Midland BT Rush In...

Страница 5: ...one that best suits the helmet you are using Fixing the RCF HiFi stereo speakers The two stereo speakers have a Velcro adhesive strip that aids their fixing into your helmet Beware not to keep the volume too high you must always be able to listen to the traffic sound Fixing the microphone Boom Microphone Place the section with the Velcro adhesive strip between the padding and the rigid cover of th...

Страница 6: ...onds How to change the mounting kit system Remove the Adhesive plate from the Magnetic mount by pressing the two levers with a small tool and slide it out upward Clip Clamp Place the clip clamp on the back of the Magnetic mount insert the 4 fixing point in the appropriate holes and slide downward Insert the Clip Clamp between the helmet and the inner padding on the left side of the helmet Speakers...

Страница 7: ... full face helmets place the microphone in front of your mouth Boom microphone for modular jet helmets fix the mike on the left side and keep the sponge as closely as possible to your mouth white symbol in front of your mouth A A Lock unlock To fix MIDLAND BT RUSH to the MAGic LOCK mount Insert at first the rear side of BT RUSH into the mount by tilting the unit of 45 and then bring nearer the for...

Страница 8: ...uence is the following Intercom mode FM Radio Phone mode if a phone has been paired Every time you turn on the unit the default mode is the latest used If you need to know in which mode the unit currently is just short press the Vol and Vol button together A voice announcement will tell you the current mode Volume Adjusting the volume The volume setting is indipendent for each audio source interco...

Страница 9: ...can start the Mesh communication How to open the Mesh communication To use the Mesh feature be sure that all units have a different ID number and you are in Intercom mode then you need to press shortly the Control button and you will hear the voice Mesh on Now you can talk with all other units in range that have the Mesh active as well When the Mesh is active in Conference mode the LED light will ...

Страница 10: ...The master unit will keep blinking Green in case other units need to be paired 7 If no more unit needs the pairing just make a double click on Control button of the Master unit to exit the pairing procedure the Red light will be on permanently Make a double click again on the Control but ton to exit and go to working mode Blue LED flashing When the pairing procedure is finished and the Secure grou...

Страница 11: ... back to the Setup Mode mode Red light always on 6 Now the unit is ready for another pairing procedure and you can pair another Midland BT unit following the same procedure but using a dif ferent button If you don t have more devices to be paired you must exit the Setup Mode mode before you can use the units Double click on the Control button the Red light will turn off and the Blue light will sta...

Страница 12: ...ation Passenger Midland Intercom no BT Rush BT Rush Bridge mode on Press Vol button for 3 sec you will hear the voice Bridge on Now all units in the Mesh group and Bluetooth Intercom can talk together Bridge mode disable Press again the Vol button and you will hear the voice Bridge disable Now Mesh and Intercom are separate and you can not have both audio active together By default is Bridge on Bl...

Страница 13: ...io on Bluetooth intercom communication When the Bluetooth Intercom communication is active only the audio souce paired to the Vol can be in background to the Bluetooth Intercom conversation All devices paired to Vol button have higher priority over the Bluetooth Intercom communication and will interrupt all other audio communica tions including FM Radio and Music Background setting for Vol audio o...

Страница 14: ...ile phone ring or press the Upward or Downward button for 3 seconds you will hear one audio confirmation tone Making a call There are several ways to make a phone call To redial the latest number Go to Phone Mode Phone on Vol Press Upward button for 3 seconds in order to redial the latest number you will hear one audio confirmation tone Phone on Vol Press Downward button for 3 seconds in order to ...

Страница 15: ...ill listening to A2DP music but you don t have all the controls buttons available Music Share Music Share feature allows to share the same music from Driver to Pas senger For example the driver can play the music from his phone and share the same music to the passenger Share the music when both units are connected in Mesh If the Driver and Passenger are both BT Rush units and are connected only wi...

Страница 16: ...only on Vol connection When con nected on Vol button the GPS street voice announcements are always active in background during the Mesh communication and FM Radio How to pair the Midland BT Rush to a GPS In general it is possible to pair the Midland BT Rush to all GPS for motor bike that support Bluetooth headset connection To pair the Midland BT Rush to a GPS you must first enter the Setup Mode m...

Страница 17: ... double click on the Upward or Downward button or someone will open the Intercom to you the FM will be available together with the Intercom In case you need while the Intercom is open you can always turn off the FM radio with one click on the Control button Attention Any active audio coming from the Vol or Vol connection will always pause temporary the FM radio Setup and special configurations Res...

Страница 18: ...risk The use of the device will impair your ability to hear other sounds and others around you Listening to music or speaking on a telephone may prevent you from hearing others around you and distract you from riding safely The use of such device while riding may endanger you and others and its use in some areas could not be allowed Using this device at a high volume may result in permanent hearin...

Страница 19: ......

Страница 20: ...ento Europeu A Declaração de Conformidade está disponível no sitio na Internet em http www midlandeurope com it pagina 10090 certifications EL Με το παρών η Midland Europe Srl δηλώνει οτι το όνομα του μοντέλου συμμορφώνεται ως προς τις βασικές απαιτήσεις και άλλες σχετικές διατάξεις του Κανονισμού 2014 53 EU Η δήλωση συμμόρφωσης είναι διαθέσιμη στην ιστοσελίδα http www midlandeurope com it pagina ...

Страница 21: ...vi 2014 53 EU Vastavusdeklaratsioon on kättesaadav veebilehel http www midlandeurope com it pagina 10090 certifications LT CTE International patvirtina kad šis modelis atitinka visus esminius Direktyvos 2014 53 EU Atitikties deklaracija yra pateikiama internetinėje svetainėje http www midlandeurope com it pagina 10090 certifications LV Midland Europe Srl deklarē ka produkts atbilst pamatprasībām u...

Страница 22: ...rticles displaying this symbol on the body packaging or instruction manual of same must not be thrown away into normal disposal bins but brought to specialised waste disposal centres Here the various materials will be divided by characteristics and recycles thus making an important contribution to environmental protection Alle Artikel die auf der Verpackung oder der Gebrauchanweisung dieses Symbol...

Страница 23: ...g D 63303 Dreieich Deutschland Vor Benutzung Bedienungsanleitung beachten Importado por Midland Iberia SA C Cobalt 48 08940 Cornellà de Llobregat Barcelona España Antes de utilizar lea atentamente el manual de uso Distributed by Motodirect Limited Company Euro House The Nursery 1 Wincobank Way South Normanton Derbyshire DE55 2FX UK Read the instructions carefully before installation and use Distri...

Страница 24: ...IT www midlandeurope com ...

Отзывы: