


Switch on the power supply and the LED will light up. If the heater is not working,
the light in both the and icons will turn off after 15 seconds. Rotate the
knob clockwise to switch on the unit and the will display the set temperature.
When the temperature is between 30° and 37°C, the light in the icon will be
green; orange if between 38° and 44°C; and red if more than 45°C. If the EARTH
orange indictor light is off, there is an abnormality in the grounding.
If the light in the icon flickrs, it means that the heater is working at its maximum
power but the outlet water temperature is still below the set temperature.
10
4.1 Operating the unit
4.2 Leakage Testing
4.3 To Adjust Water Flow
4. USAGE
Rotate the handle of water flow adjusting valve.
4.4 Electricity Leakage Protection
4.5 To Adjust Water Temperature
4.7 Use After Overheating Protection
4.6 To Activate Pump Function (FP-67WTR380WMTH-B1)
When the water heater is working normally, press TEST button. If the leakage
test circuit has no problem, the ELCB green indicator light will be off, and the
unit will not heat. Press RESET, testing will be canceled, and the ELCB green
indicator light will be on. The unit will then be back to the working state set
before. If the circuit leaks, pressing the RESET button won’t cancel leakage
testing. The ELCB & POWER indicator lights will flicker, meaning the water
heater has problems and cannot be used. All buttons won’t work, there will be
no heating and the pump will not function.
The pump will be on as the default setting when the product is used the first time and can be turned off by
pressing the PUMP button which turns this function on and off.
When the electricity leakage testing circuit is working normally and if the leakage current is bigger
than a value between 7.5mA and 15mA, the red POWER and green ELCB indicator light will be off
with no heating; it can only be used after the failure is solved.
Rotate the handle of water flow adjusting valve to adjust to proper water flow. Adjust power by rotating
the knob clockwise or counter clockwise and the water temperature will increase or decrease
accordingly.
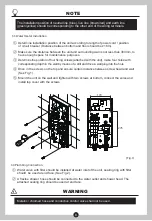
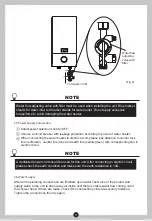
NOTE
For first time use, ensure that the power is turned on only after the unit is filled fully with
water and there is stable water flow coming out of the shower head.
The electric water heater may be damaged if the water hardness is too high. To guaran-
tee the normal service life, please install where water hardness is less than 450mg/L
(CaCO3).
If the water flow is low and power is high while using the unit, outlet water temperature will be high and
the unit will stop heating automatically. At this time, please lower the power and increase the water
flow in order to avoid inconsistency of water temperature.


