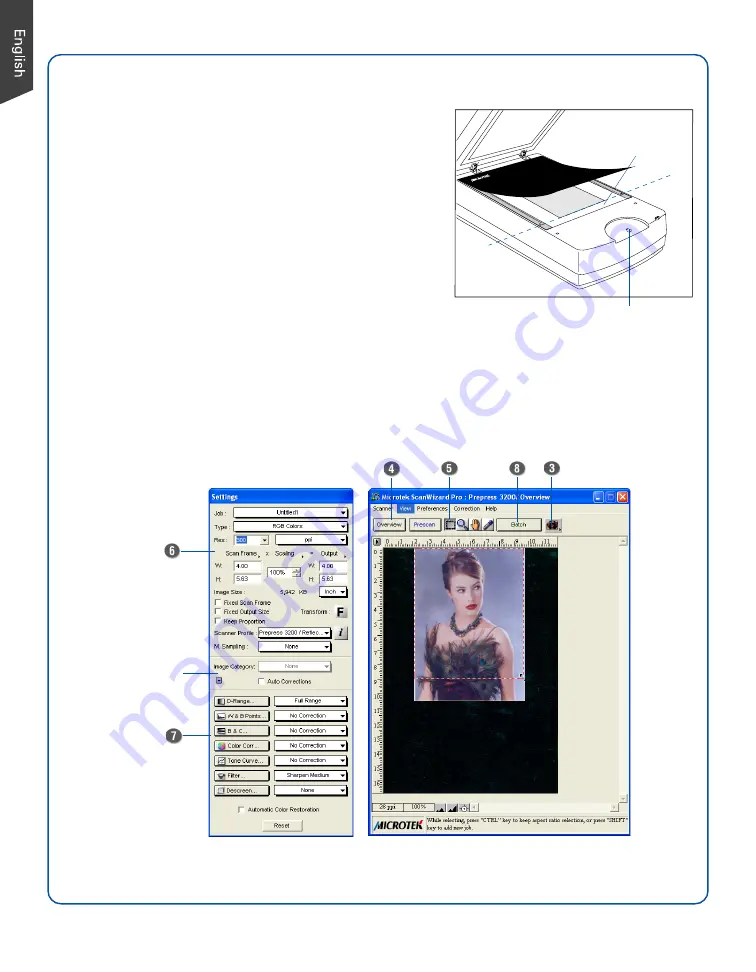
background image

 8

Smart-Touch button (Scan)

Scanning Photos

Window

Expansion button

Preview window

Settings window

Calibration strip

(Keep clear and

unobstructed)

1.

Position the photo face down on the scanner glass surface

toward the front of the scanner, as detailed in the

“Positioning Reflectives” section in this guide.

2.

Launch 

ScanWizard Pro

.

3.

In the Preview window of ScanWizard Pro, choose

Reflective

 from the Scan Material menu.

4.

Click the 

Overview

 button in the Preview window to see a

preliminary scan of the image.

5.

Select the 

Scan Frame

 tool, and choose the area to be

scanned by sizing the marquee around the targeted area.

6.

Specify your scanning requirements in the Settings

window. Choose the desired image type and resolution,

and adjust the scan frame settings if necessary.

7.

Adjust image quality if necessary, using the Advanced Image Correction tools.

8.

Click the 

Scan

 (or “Batch”) button in the Preview window or on the scanner unit to start scanning.

Содержание ArtixScan 3200XL

Страница 1: ...t connected the scanner simply ignore the message that appears and proceed to the next step Step 1 Unpack Contents Copyright 2013 Microtek International Inc http www microtek com I49 004647 C Septembe...

Страница 2: ...r s 15 pin accessory port Refer to the next section Using the TMA III for the details about the connection of the TMA NOTE To lock the scanner for shipping and other reasons refer to ArtixScan 3200XL...

Страница 3: ...the TMA 1600 III into the scanner s 15 pin accessory port II Unlocking theTMA 1600 III 1 Remove the yellow Step 3 sticker from the TMA 1600 III 2 Look for the locking knob at the base of the TMA 1600...

Страница 4: ...es of the scanner s upper front surface making sure that it has been oriented correctly 2 Align the template s front corners firmly against the top corners left and right of the U shaped Ruler located...

Страница 5: ...the vertical rulers of both sides as an alignment guide line for film placement then place the film on the scanner glass surface U shaped Ruler Calibration Ruler B Positioning Reflectives To scan ref...

Страница 6: ...en showing the running status of the scanner 5 When the calibration is done completely a window will appear on the screen to notify you Now you may use the ScanWizard Pro as usual Click the OK button...

Страница 7: ...on the scanner glass surface toward the front of the scanner as detailed in the Positioning Reflectives section of this guide 3 In the Preview window of ScanWizard Pro choose Reflective from the Scan...

Страница 8: ...ose Reflective from the Scan Material menu 4 Click the Overview button in the Preview window to see a preliminary scan of the image 5 Select the Scan Frame tool and choose the area to be scanned by si...

Страница 9: ...procedures detailed in Scanning Photos If scanning negatives a Go to the Preview window of ScanWizard Pro and from the Scan Material menu choose Negative Negative Film The Negative Scan Settings wind...

Страница 10: ...atives or slides Make sure that you have properly inserted the templates as indicated in the Using the TMA 1600 III Positioning the Scan Material section of this guide The templates should be placed c...

Страница 11: ...Software Upgrades After you finish the installation of software if you found that the installed drivers and software cannot run your product or your computer system properly later please go to the Mi...

Страница 12: ...12...

Отзывы: