

Scanny 7 Manual
Portable Auto Feeder Scanner
1. Key Features
Scan automatically when feeding in a document
JPEG, PDF-A4 or PDF-Letter scan-format selection.
Color or Mono scan-color selection.
300 (Lo) /600 (Mi) /1200 (Hi) DPI scan quality selection.
Directly save JPG (JPEG)/PDF files to the microSD card.
Support the microSD & micro-SDHC memory card up to 32GB.
Color display to playback the scanned images
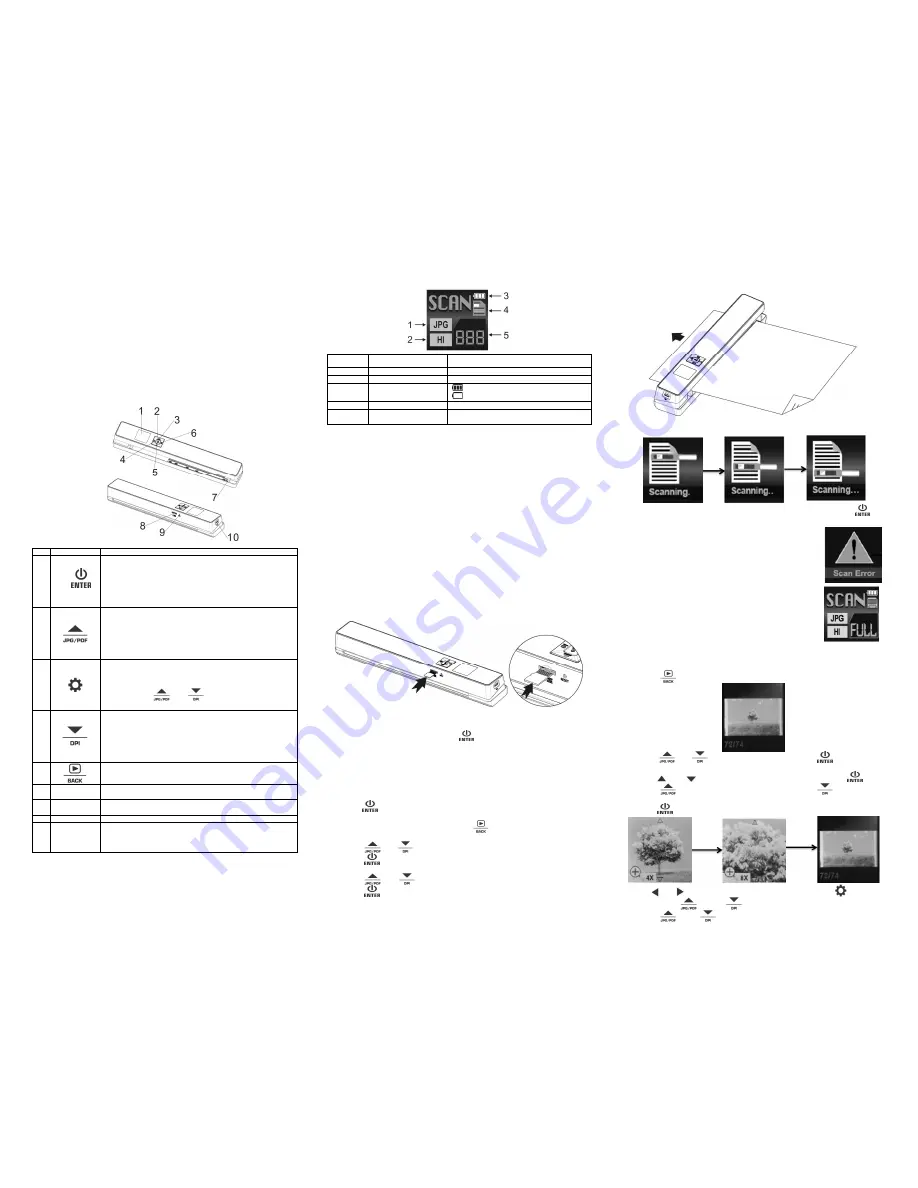
2. Functional Parts
1
LCD screen
Display scanning status, scanned image and scanner settings.
2
Power On/ Off: Press and hold this key for 3 seconds to turn
power on or off.
In power on mode with PC connection, press this button shortly to
switch between Standby mode and USB mode.
In Setup mode, press this button to confirm changes.
In Playback mode, press this button to change the zoom times
between 4x, 8x and normal
3
Press this button to select JPG (JPEG), PDF-A (PDF-A4) or PDF-
L (PDF-Letter) file format. The icon of the selected mode will be
displayed on the LCD screen.
In Setup mode: Press this button to move up the selection bar.
In Playback mode: Press this button to preview the former image.
When zooming in under Playback mode: press it to move to the
upper/left portion of the image.
4
Press this button to enter Setup mode.
In Playback mode: Press this button to enter the single file delete
mode.
When zooming in under Playback mode: press this button to shift
the functions of
and
between UP/DOWN and
LEFT/RIGHT.
5
Press this button to select LO (300dpi), MI (600dpi) or HI
(1200dpi) scan quality in DPI. The icon of the selected quality will
be displayed on the LCD screen.
In Setup mode: Press this button to move down the selection bar.
In Playback mode: Press this button to preview the latter image.
When zooming in under Playback mode: press it to move to the
lower/right portion of the image.
6
Press this button to enter Playback mode;
Press this button to return to the previous screen
In Setup mode: Press this button to exit Setup mode.
7
Width
controller
Adjust to scan documents of different sizes
8
microSD card
slot
The microSD card storage location.
9
Reset
Press to reset the scanner (Hardware reset)
10
USB
interface
Connect to a computer with the USB cable provided to view
and transfer files
To charge up the built-in battery with an optional AC/DC power
adapter
3. Explanation of the Status Icons
Item
Function
Description
1
Scan Format
JPG/PDF-A/PDF-L
2
Scan Resolution
LO: 300 DPI /MI: 600 DPI / HI: 1200 DPI
3
Battery Power Indicator
Fully charged
Low battery. Recharge needed
4
Scan Color
COLOR/MONO
5
File Counter
Shows the number of scanned files in the
microSD card
4. Using the Scanner
4.1.
Charging up the Battery
Charge the built-in battery before starting to use your scanner. When the scanner is at power off
condition, the charging time from empty to full is about 2 hours.
The battery can be charged up in either of the following ways:
1.
By connecting to an AC/DC power adapter via the USB interface (Not included).
2.
By connecting to a computer with the included USB cable.
Note:
When charging is completed during scanner power off, the fully charged battery indicator will be
displayed on the LCD screen for a short time and will turn off automatically.
4.2.
Inserting a microSD Memory Card (not included)
You must insert a microSD Card (not supplied) to record and store your pictures. To insert the
microSD memory card:
1.
Turn OFF the scanner.
2.
Insert the microSD card into the microSD card slot, and gently press in until the card is
latched.
Notes:
1.
Do not force the microSD card into the slot as this may damage both the scanner and the
microSD memory card. If the card cannot be inserted successfully, align the microSD
card position (as marked) and try again.
2.
The microSD memory card must be formatted before scanning. Refer to section 4.7 for
details.
4.3.
Turning on/off the Scanner
Turn on/off the scanner by pressing and holding
for 3 seconds.
Notes:
1.
If the Auto off is set at "3 Min" (refer to section 4.7), the scanner will turn off automatically
if no scanning action is detected within 3 minutes.
2.
If the scanner is turned on by the first time or the scanner has been reset, it will enter a
Date & Time/Language setup mode.
Only after you have completed the settings for Date & Time/Language can the scanner
enter into standby mode.
To set Date & Time/Language:
1.
Press
to jump to next setting option: YEAR
MONTH
DATE
HOUR
MINUTE.
When setting up the value for MINUTE, press
to return to the previous setting
option until going back to YEAR.
2.
Press
or
to set the figure corresponding to each setting.
3.
Press
to confirm and move to next setting.
4.
After completing the setting for MINUTE, it will enter language setup screen.
5.
Press
or
to select your desired language.
6.
Press
to confirm and enter standby status.
4.4.
How to Scan
1.
Adjust the Width Controller to an appropriate gear in accordance with the size of the
document.
2.
Smooth the edge of the document before scanning.
3.
Aim the edge of the document at the slot of the scanner. (Align to the Left side of the
slot.)
4.
Softly insert the paper into the slot and gently push it, scanning will start automatically.
During scanning, the scanning status icon will be displayed on the LCD screen to indicate
scanning is under progress.
5.
If the scanner is connected to the computer via the USB interface, press the
once
to enter the USB mode, then you can view the scanned files on your computer screen.
Notes:
1.
When conducting scanning with connection to an external
power supply, the scanner will enter the battery charging mode
if no scanning action is detected within 1 minute subsequent to
each scanning.
2.
If “Scan Error" icon pops up on the LCD screen, you need to
replace the original memory card with another higher class
MicroSD card. (Class 6 or above is recommended).The error
image will still be saved after the scanning stops.
3.
If the instant preview is set to "on", no matter the scan result is
normal or abnormal, the scanned image will be shortly
displayed on the LCD screen before the scanner returns to
standby mode.
4.
When the memory card is full, the scanner is unable to scan
more images. If you feed the document into the slot under such
situation, “Full” will flash rapidly on the File Counter of the LCD
screen for 2 seconds.
4.5.
How to Playback Image
1.
Press
to enter Playback mode. The last scanned image will be displayed.
2.
Press
or
to select your desired image. Press
to zoom in the
image.
3.
The
and
indicators will appear on the screen when pressing
at step 2,
press
to view the upper portion of the image, press
to view the lower
portion of the image.
4.
Press
to change the zoom times between 4x, 8x and normal.
5.
The
and
indicators will appear on the screen when pressing
again. The
functions of
and
will be shifted to LEFT and RIGHT and you can
press
or
button to view the left or right portion of the image.


