MicroNet SP659A Скачать руководство пользователя страница 7


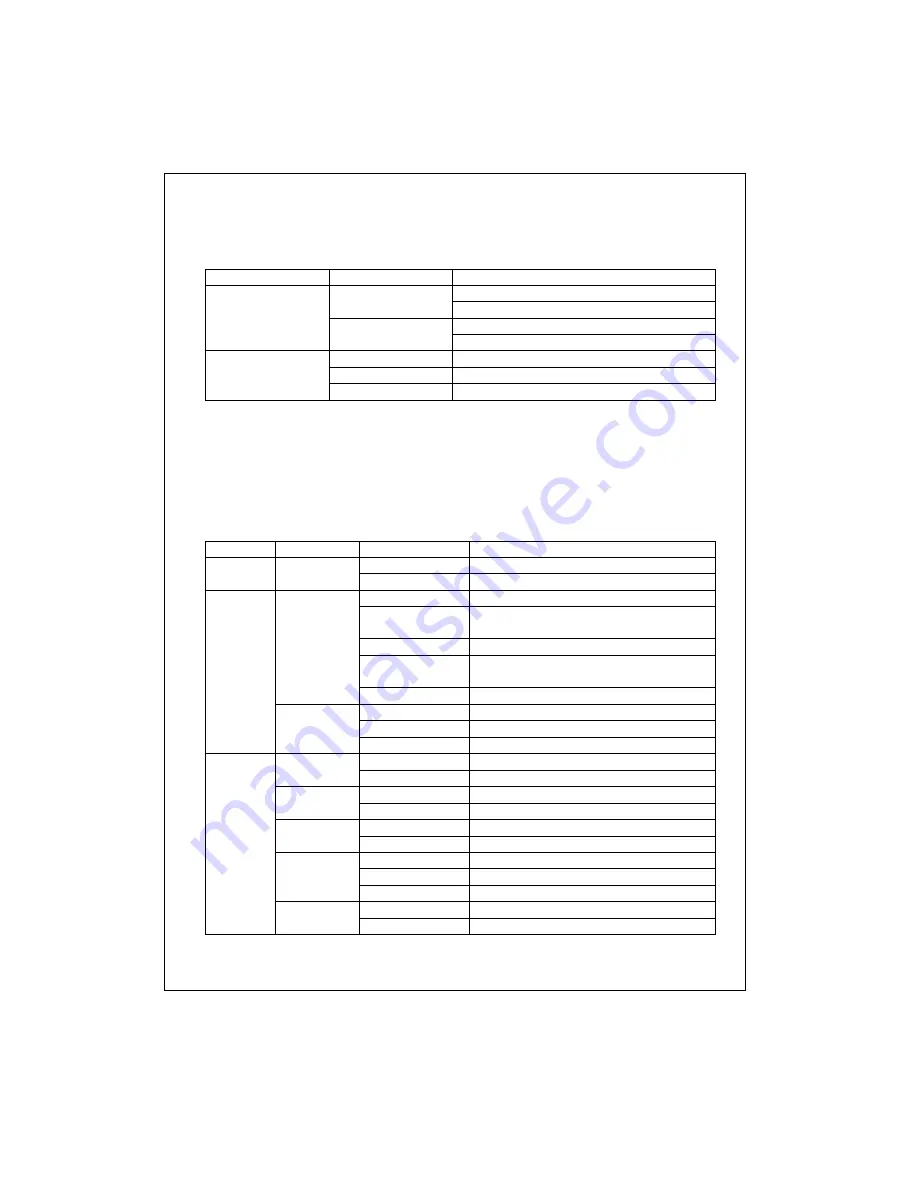
The auto-negotiation feature of the switch allows each port of the device 

running at one of the following four operation modes: 
 

Port Speed 

Duplex 

Mode 

Full-duplex 

100 Mbps 

Half-duplex 
Full-duplex 

10/100M 

10 Mbps 

Half-duplex 

1000 Mbps 

Full-duplex 

100 Mbps 

Full-duplex 

Gigabit 

10 Mbps 

Full-duplex 


Each port supports auto MDI-X capability that is the port could connect 

either the PC or hub without any cable adjustment. 

 
The rich diagnostic LEDs on the front-panel can provide the operating 

status of individual port and whole system. The following table is a summary 
for LEDs definition. 


Type LED 

  Status 

Operation 

Steady Green 

Power is on 

System Power 

Off 

Power is off 

Steady Green 

Connected as 100Mbps 

Blinking Green 

There is traffic transverses the port at 
100Mbps 

Steady Amber 

Connected as 10Mbps 

Blinking Amber 

There is traffic transverses the port at 
10Mbps 

Speed/Link/
Act 

Off No 

connection 

Steady Amber 

Full-duplex mode 

Blinking Amber 

There is a collision 

10/100M 
Ports 

FDX/COL 

Off Half-duplex 

mode 

Steady Green 

Connected as 1000Mbps 

1000M 

Off 

Not connected as 1000Mbps 

Steady Green 

Connected as 100Mbps 

100M 

Off 

Not connected as 100Mbps 

Steady Green 

Connected as 10Mbps 

10M 

Off 

Not connected as 10Mbps 

Steady Green 

The port is connected 

Blinking Green 

There is traffic transverses the port 

Link/Act 

Off No 

connection 

Steady Green 

Full-duplex mode 

1000M 
Ports 

FDX 

Off 

No connection or link error 


Содержание SP659A

Страница 1: ...1 User s Manual SP659A 10 100 1000 Mbps Gigabit Smart Switch Website http www micronet com tw...

Страница 2: ...e of the following measures Reorient or relocate the receiving antenna Increase the separation between the equipment and receiver Connect the equipment into a different outlet from that the receiver i...

Страница 3: ...nnecting 2 4 2 Console Port 3 Installing And Using SP659A 10 100 1000M Smart Switch 3 1 Installing The SP659A 10 100 1000M Smart Switch 3 1 1 Desktop Installation 3 1 2 Rack Mount Installation 3 1 3 I...

Страница 4: ...itch Before you start please check all the contents of this package The product package should include the following 1 SP659A 10 100 1000Mbps Gigabit Smart Switch 2 Console Cable 2 Power Cord 3 Screws...

Страница 5: ...imaging applications The Gigabit ports also provide the fat pipe to the servers or backbone connection for boosting the total system performance The switch also supports more value added function incl...

Страница 6: ...0Base TX and 10Base T connectivity Two RJ 45 ports for 10Base T 100Base TX and 1000Base T connectivity Supports NWay protocol for speed 10 100Mbps and duplex mode Half Full auto detection on twenty fo...

Страница 7: ...Operation Steady Green Power is on System Power Off Power is off Steady Green Connected as 100Mbps Blinking Green There is traffic transverses the port at 100Mbps Steady Amber Connected as 10Mbps Bli...

Страница 8: ...t is connected but the Speed Link Activity LED is dark check the following items 1 The switching hub and the connected device s power are on or not 2 The port s cable is firmly seated in its connector...

Страница 9: ...eceptacle on the rear panel of the switching hub Plug the other end of the power cord into an electric service outlet then the power will be ready 2 4 2 Console Port Through the console port it provid...

Страница 10: ...the case is not restricted company recommend that you provide a minimum of 25mm inch clearance To prolong the operational life of your units Never stack units more than eight sets high if freestanding...

Страница 11: ...connector into a front panel port of the switch and plug the other RJ 45 connector into the station s network adapter 3 1 3 2 Switch to Switch Connections with Twisted Pair Cable In making a switch to...

Страница 12: ...arning The switch will look up the address table for the destination address If not found this packet will be forwarded to all the other ports except the port in which this packet comes If found and t...

Страница 13: ...uest To Send 8 CTS Clear To Send 9 N A RS 232 DB 9 DCE female connector When connecting a terminal directly to the switch use a serial RS232 straight through cable Main Menu After power on the Switch...

Страница 14: ...6 and the group overlap is allowed From this item you could view current VLAN setting and make modification 3 Trunk Status Configuration This item is used to review and setup the port trunk function...

Страница 15: ...any numeric key but Enter Select an item Numeric key Enter The following sections are detail content of each sub screen of Main Menu console page Port Status Configuration Screen This screen indicates...

Страница 16: ...will auto negotiate the speed and duplex mode with the connected partner Note If you press Enter key without selecting any number of function in advance the system will return to the previous screen V...

Страница 17: ...the VLAN If you want to return the previous screen or abort the setting please press 3 key Trunk Status Configuration Screen This screen indicates the trunk status of all ports You could select 1 7 t...

Страница 18: ...ng port number you can set trunk group function enable disable of each port Select 1 key to disable port trunk function or select 2 key to enable the function If you want to return to the previous scr...

Страница 19: ...19 Factory Default Screen Warm Start Screen...

Страница 20: ...erred Network Data Rate Auto negotiation 10Mbps 100Mbps Gigabit Ethernet 10 100 1000Mbps Transmission Mode Auto negotiation Full duplex Half duplex LED indications System Power 10 100Mbps Port Speed L...

Отзывы: