background image

micro

HAM © 

2022


All rights reserved


2 - ARXC - HARDWARE SETUP 


Installation of ARXC consists of hardware and software parts. Mechanical part of setup is to 
insert rubber sealing into the slot in the module case lid. Trim its  length as necessary. Sealing 
might be installed by factory, in this case skip to next.

ARXC.REL can be mounted anywhere with cable grommets facing down to avoid water ingress. 
Although not necessary, it is advisable to mouth box on place protected against rain, snow or 
direct sunlight.

ARXC.LoRa is good to mount on place where antenna is not close to metal structures, best 
when cable entry grommet is facing down and module is protected against rain, snow or direct 
sunlight.

ARXC.MAG sensor has to be mounted on bottom side of antenna boom in any orientation, as 
far as possible from tower and fixed by zip tights included in the package. Keep alligator clamp 
screws and nuts in case you are removing it, they made of nickel plated brass, steel screws 
would influence magnetic sensor functionality.

Before proceeding to software setup it is necessary to set ARXC module address (only on 
ARXC.REL) and connect it to ARCO. 


ARXC.REL addressing 

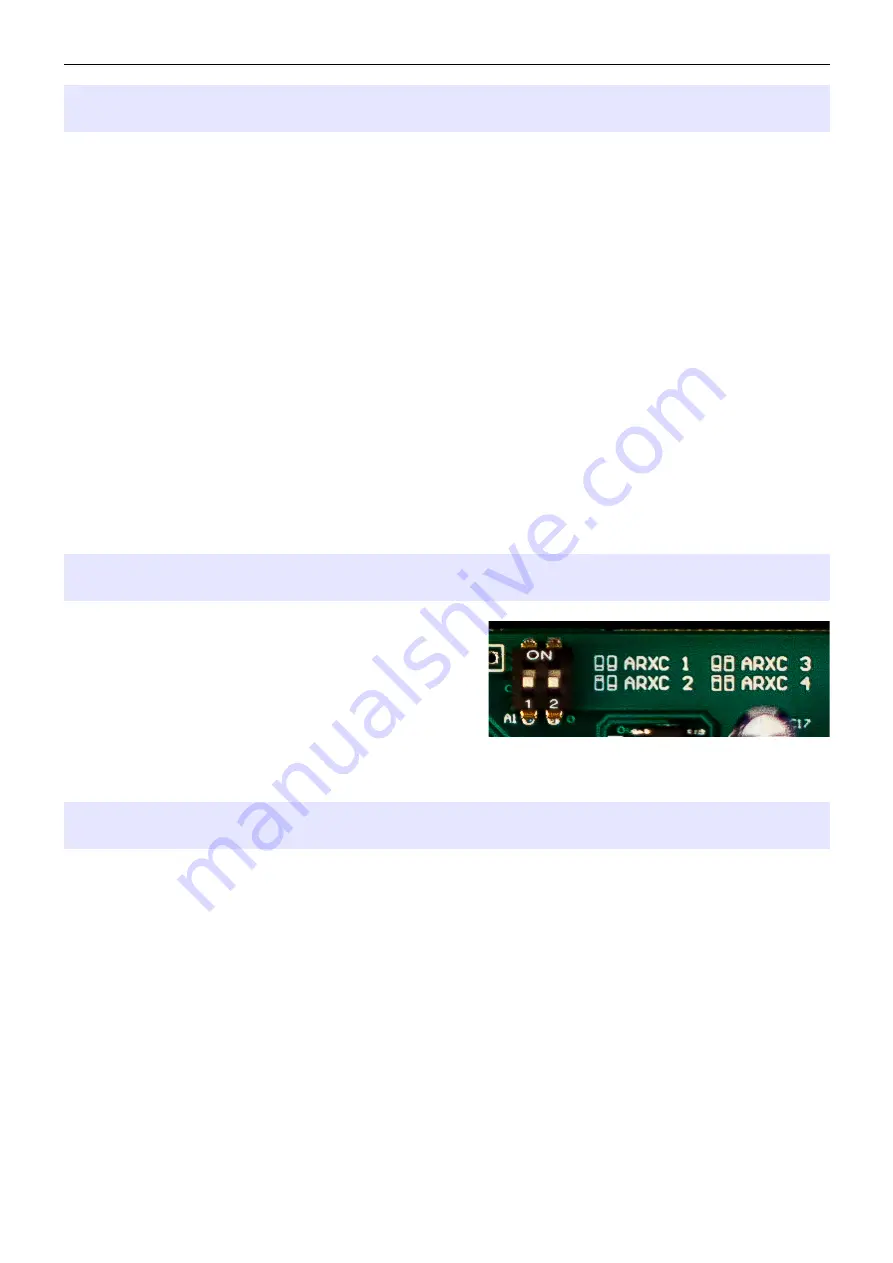
To recognize and properly control particular 
ARXC.REL module, each module needs to have a 
unique address. Address is set by combination of 
two DIP switches according to drawing on PC board 
next to DIP switch. It is possible to set up to 4 
different addresses: 1 (shown on picture), 2, 3, 4. 
Each ARXC.REL module has then its own setup in ARCO System menu on respective tabs 
ARXC 1 – ARXC 4. ARXC.MAG has its address set internally and ARXC.LoRa has no address. 


ARXC wiring 

In order to control ARXC module, it must be connected to ARCO first.  On ARCO, the 
connection port is located at D-SENSOR connector. Communication layer is RS-485 requiring 
twisted pair of wires connected to port Z (ZA and ZB pins) and two additional wires for module 
power. 12VDC power is provided by ARCO at D-SENSOR port on +12V and GND pins.

If control cable between ARCO and ARXC module; or between different ARXC modules for any 
reason cannot be installed, communication can be established by RF link using pair of ARXC 
LoRa modules. In this case, external 12V supply must be provided on ARXC side of RF link. 

Each ARXC module has a 4 pole terminal for connecting wires of the communication cable. 
ZA and ZB poles serve for communication wires, +12V and GND poles serve for power. On 
ARXC.REL there are two sets of terminals for simpler daisy-chain connection to additional 
modules. Both terminals are connected in parallel, it is not important which one is used if you 
are connecting a single module.

4

Содержание ARXC.LoRa

Страница 1: ...microHAM 2022 All rights reserved ARXC ARCO External Control Accessories ARXC REL ARXC MAG ARXC LoRa microHAM www microham com microHAM s r o Maticna 28 92401 Galanta Slovakia v1 1 2022 1...

Страница 2: ...Ra 3 2 ARXC HARDWARE SETUP 4 ARXC REL addressing 4 ARXC wiring 4 3 ARXC SOFTWARE SETUP 9 ARXC MAG Settings 9 Using ARXC MAG Sensor 10 ARXC REL Settings and Use 13 DECLARATION OF CONFORMITY 17 TRADEMAR...

Страница 3: ...switches mast preamplifiers or anything what is suitable to be controlled from the ARCO user interface touch screen or VNC for Internet remote control ARCO uses preset buttons for relays control and...

Страница 4: ...L module each module needs to have a unique address Address is set by combination of two DIP switches according to drawing on PC board next to DIP switch It is possible to set up to 4 different addres...

Страница 5: ...l consumption including powered device is 500mA limited internally by ARCO It is ample power for ARXC devices alone but if provided power reserve is not enough for powering controlled devices use D SE...

Страница 6: ...microHAM 2022 All rights reserved 6 ARCO connection to single ARXC REL and ARXC MAG ARCO connection to ARXC MAG...

Страница 7: ...microHAM 2022 All rights reserved 7 ARCO connection to three ARXC REL and ARXC MAG...

Страница 8: ...microHAM 2022 All rights reserved 8 Wireless ARCO connection to single ARXC REL and ARXC MAG using pair of ARXC LoRa...

Страница 9: ...re continuously sampled and ARCO improves magnetic curve of the sensor ARXC MAG AZI Shows azimuth determined by ARXC MAG sensor SLIP CONTROL Enables or disables background checking if azimuth of main...

Страница 10: ...licking on RESUME LEARNING button Note that disabling ARXC MAG at this point deletes the ARXC MAG calibration After transition to ACTIVE state it is recommended to store ARCO configuration to one of t...

Страница 11: ...ck prerequisite Now in Menu Heading Calibration turn the rotator to at least 4 evenly spaced points by 90 i e North South East West and enter azimuth for these calibration points using CUSTOM button Y...

Страница 12: ...ords LED is on if the general direction of terminal block of ARXC MAG is towards North Besides that LED indicates also presence or absence of communication from ARCO if ARCO communicates with ARXC MAG...

Страница 13: ...n Menu System ARXCx In 1 of N there is always exactly one relay switched on This rule is enforced even when controlling relays in the ARXC Control window and in Menu System ARXCx Individual relays can...

Страница 14: ...ditable name again used as reference to this group B one of applications of BCD N group is control of Four Square type of antenna arrays so if azimuth control is enabled for BCD N the primary directio...

Страница 15: ...NTENNA 2 an ARXC group with the name 1OF3 1 is selected for ANTENNA 3 the pull down is opened and displays the list of available options If ARXC group is selected instead of ANTENNA x its name is give...

Страница 16: ...nsequently in this window the individual or the common set of Presets is edited B exit from this window without changing the given Preset All other buttons in this window represent possible options to...

Страница 17: ...orward backward buttons instead of individual relays control and in between them the current value or if azimuth control is enabled for given group the current primary direction is displayed DECLARATI...

Отзывы: