background image

                     MF Digital 5907-VL 

                                                                         Revised 10-21-05 


16 


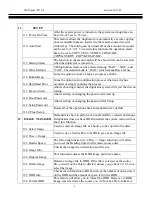
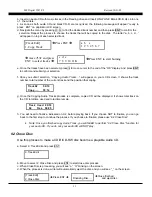
There are a total of 6 positions for the password. To enable the password, set all 6 positions. 
An empty space is also ENT.  


Press ESC to cancel the process. 
 
The duplicating system will ask for password when the unit is restarted. 


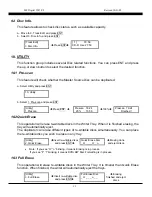
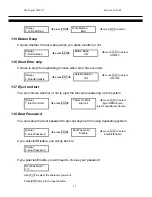
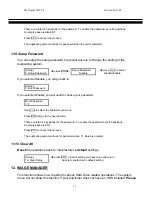
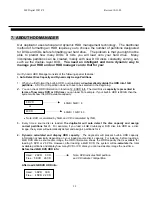
11.9 Setup Password 


You can setup the setup password to prevent anyone to change the setting of the 
duplicating system.  


[Setup] Setup 

Password 

8. Setup Password 

Î

 press ENT

Î


Disable 

Î

 move 

i

,

j

 to select  

Disable/Enable 


If you selected Disable, you will go back to: 


[Setup] 
5. Boot Password 


If you selected Enable, you will need to choose your password: 


Boot Password 
==> _ 


Use 

i

,

j

 to select the character you want.  

 
Press ENT will go to the next position.  
 
There are total of 6 positions for the password. To enable the password set all 6 positions. 
An empty space is ENT.  
 
Press ESC to cancel the process. 
 
The duplicating system will ask for password when 11. Setup is entered.  


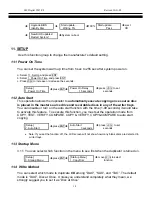
11.10 Clear All 


Reset 

the operations back to manufacturer’

s default

 settings.  


[Setup] 
10. Clear Setup 

Î

 press ENT , clear all setting you have done and return 

back to manufacturer’s default setting 


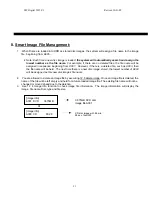
12.  IMAGE MANAGER  


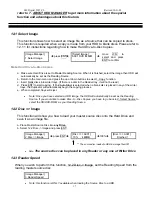
This function shows how to perform various Hard Drive related operations. The system 
menu will not show this function if your duplicator does not have an HDD installed. 

Please 

Содержание 5907-VL

Страница 1: ...5907 VL CD DVD Tower Operator s Guide ...

Страница 2: ...UFKLYLQJ HJLQV 3URJUHVV DQG LOH LQIRUPDWLRQ LV GLVSOD HG GHIDXOW LPDJH QDPH LV RU PRUH GHWDLOHG LQIRUPDWLRQ RQ UHQDPLQJ DQG GHOHWLQJ LPDJHV SOHDVH UHIHU WR VHFWLRQ LQ WKLV PDQXDO URP 0HQX 6HOHFWLRQ PDJH 0DQDJHU 3UHVV 2 3UHVV WKH 6FUROO RZQ XWWRQ 2QFH LVF PDJH 3UHVV 2 3UHVV DQFHO WR H LW EDFN WR PDJH 0DQDJHU 3UHVV WKH 6FUROO RZQ XWWRQ 2QFH 3UHVV 4XLFN RS 5HIHUHQFH XLGH ...

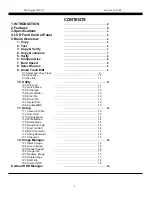
Страница 3: ... 10 2 Quick Erase 11 10 3 Full Erase 12 10 4 Eject All Disc 12 10 5 Disc Info 12 10 6 Drive Info 12 10 7 System Info 12 10 8 Update BIOS 12 11 Setup 13 11 1 Power On Time 13 11 2 Auto Start 13 11 3 Startup Menu 13 11 4 Write Method 14 11 5 Button Beep 14 11 6 Read Error skip 14 11 7 Eject on Start 14 11 8 Boot Password 14 11 9 Setup Password 15 11 10 Clear All 15 12 Image Manager 16 12 1 Select Im...

Страница 4: ...hat result from heavy duplicating jobs A unique HDD management system dynamically assigns HDD partitions to each CD DVD disc image loaded onto the HDD accordingly This ideal HDD manager ensures a flexible and efficient HDD management 2 FEATURE 2x16 LCD display and 4 control buttons 48x CD duplication 16x DVD duplication Flexible Speed Select allows setting of different duplication speeds Select an...

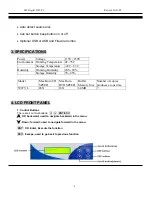
Страница 5: ...85 C Humidity Working Humidity 20 80 Storage Humidity 5 95 Model Max Burn CD SPEED Max Burn DVD SPEED Buffer Memory Size Number of copies produces at one time 5907 VL 48X 16X 64 MB 7 4 LCD FRONT PANEL 1 Control Buttons There are 4 control buttons i j ENT ESC i UP backward used to navigate backward in the menu j Down forward used to navigate forward in the menu ENT OK Enter Execute the function ESC...

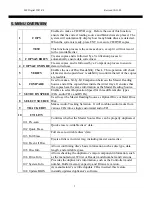
Страница 6: ...e the same information as the Master Reading Source 7 SET BURN SPEED Enables to select Duplication Speed for three different disc types CDs audio CDs and DVDs 8 SELECT SOURCE Used to set the Master Reading Source as Optical Drive or Hard Drive Disk 9 TRACK EDIT Makes Audio Tracking Selection It will combine audio tracks from various CDs into a single customized audio CD UTILITY 10 1 Pre scan Confi...

Страница 7: ...ssword Allows setting or changing the password at start up 11 9 Setup Password Allows setting or changing the password for Setup 11 11 10 Clear Setup Resets all of the operations back to manufacturer s default IMAGE MANAGER Demonstrates how to perform various Hard Drive related operations If duplicator does not have HDD installed the system menu will not show this function 12 1 Select Image Used t...

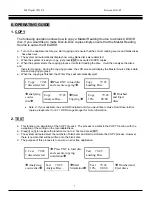
Страница 8: ...py 79 45 7 discs detected ÎPress ENT to load disc and execute copying Î Copy 79 45 Loading Disc Îanalyzing source discÎ Copy 79 45 Analyze Disc ÎStart Copying Î Copy 79 45 10 08 00 Î Finished and Eject discs Note 2 If your duplicator has an HDD installed and if you would like to make Hard Drive to Disc copies please refer to 12 1 1 HDD Image Manger for more information 2 TEST a This function is a ...

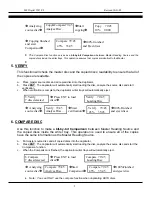
Страница 9: ...py 79 45 10 08 00 Verify 79 45 ÎCopying finished and start verificationÎ 45 35 45 Î100 finished and Eject discs Use verification make a Disc Readability Check This operation will check the master disc and the copied discs readability to make sure all of the copies are readable 4 COPY COMPARE This operation will start the copying process and then it will continue with a Comparison process to ensure...

Страница 10: ...ly eject Verify 79 45 5 Verify 7 disc detected Î Press ENT to load discsÎ Loading Disc Verify 79 45 Î Analyzing source discÎ Verify 79 45 Analyze Disc ÎStart verificationÎ 45 35 45 Î100 Finished and eject discs 6 COMPARE DISC Use this function to make a bit by bit Comparison between Master Reading Source and the copied discs inside the writer tray This operation is used to ensure all of the copies...

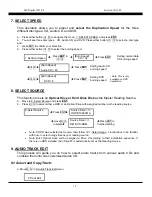
Страница 11: ...ators 8 SELECT SOURCE This function to sets an Optical Drive or Hard Drive Disk as the Master Reading Source a Move to 8 Select Source and press ENT b Press i j to select either a HDD or an Optical Drive with assigned number as the reading source Source Drive 8 Select Source Î Press ENTÎ HDD ST380021A Source Drive Îmovei j to selectÎ D 1 DVD ROM ÎPress ENT to finished setting Note If HDD was selec...

Страница 12: ... shows the track number total number of the current track and the position that coping Track 02 06 14 Copy 03 14 g Once the Copying Audio Tracks process is complete copied CD will be displayed It shows total track on the CD total time used and total time remain Track Used 20 53 04 Free 59 25 h You will need to finalize indicated on 9 2 before playing back If you choose NOT to finalize you can go b...

Страница 13: ...ed 10 2Quick Erase This operation will erase re writable discs in the Writer Tray When it is finished erasing the tray will automatically eject The duplicator can erase different types of re writable discs simultaneously You can place the re writable disc you wish to erase in any tray Utility 2 Quick Erase Îinsert re writable discs and press ENTÎ Quick Erase Disc _ O _ _ _ O _ o ÎErasing done and ...

Страница 14: ...om 1to 8 1 is Reader 2 8 are writers Utility 1 Port8 0 3 38 6 Drive Info ÎPress ENTÎ CD ROM Max 52X Îpress i jto select different Drives 10 7System Info This feature provides information about the duplicator such as the controller model number RAM capacity and Firmware version Setup P727DVD 64MB 7 System Info Îpress ENTÎ Ver 1 00 10 8Update BIOS When manufacturer s certified update CD is inserted ...

Страница 15: ... recordable discs in any of the writer trays You can disable or turn on the auto start function with the time 1 99 seconds it would take to activate this feature To execute this function you must set the operation mode from COPY TEST VERIFY COMPARE COPY VERIFY COPY COMPARE to auto start copying Setup Auto Start 2 Auto Start Îpress ENTÎ 3 seconds Î press i j to set seconds Note If you set the funct...

Страница 16: ...7 Eject on Start You can choose whether or not to eject the disc when powering up the system Setup 7 Eject On Start 7 Eject On Start Î press ENTÎ Eject All Î move i j to select Eject All No Eject Eject Target Eject Source 11 8 Boot Password You can setup the boot password to prevent anyone from using duplicating system Setup Boot Password 8 Boot Password Î press ENTÎ Disable Î move i j to select D...

Страница 17: ...u selected Enable you will need to choose your password Boot Password _ Use i j to select the character you want Press ENT will go to the next position There are total of 6 positions for the password To enable the password set all 6 positions An empty space is ENT Press ESC to cancel the process The duplicating system will ask for password when 11 Setup is entered 11 10 Clear All Reset the operati...

Страница 18: ...ead d Press ENT to start copying If 11 2 Auto Start is selected when a blank disc is placed in any of the writer trays the duplicator will automatically begin the copying process e When completed trays will eject Note Once you have selected a HDD Image the HDD will automatically be set as the Reading Source If you would like to make Disc to Disc Copies you have to go back to 8 Select Source to sel...

Страница 19: ... to renameÎ Edit Image Name Î press ENTÎ A001 Use i j to select the character you want Press ENT to go to the next position There are total of 8 characters for the image name Empty Space will confirm the name change Edit Name Change A001 NewName OK Î press ENTÎ NewName Press ESC to cancel the whole process 12 6 Delete Image This function allows you to delete an image file in HDD If the file is sel...

Страница 20: ...DD such as how many discs are stored and the HDD s available space Image Manager Used 0CD 7DVD 6 HDD Info Î press ENTÎ Free 41CD 8DVD 12 8 Format HDD This feature allows formatting the HDD However you will be unable to format the HDD if the HDD image was selected as Reading Source You must go to 8 Select Source to select the Optical Drive as Reading Source Image Manager Caution 7 Format HDD Î pres...

Страница 21: ...ity is presented in terms of how many DVD or CD discs you can load For example if your built in HDD is 80GB then the system will show the HDD available capacity 40GB 5GB 8 or 40GB 1 GB 40 Note DVD is calculated by 5GB and CD is calculated by 1GB 3 Every time a source disc is loaded the duplicator will auto detect the disc capacity and assign correct partitions for it For example if you load a 4GB ...

Страница 22: ...he file name will be held The next time there is a new disc image stored the lowest number of A003 will be assigned as this new disc image s file name 2 You are allowed to delete an image file by executing 12 5 delete image Once an image file is deleted the name of the file will be left empty and held for a future loaded image file The existing file name will not be changed or moved ahead due to t...

Страница 23: ...MF Digital 5907 VL Revised 10 21 05 22 MF Digital 155 Sherwood Avenue Farmingdale NY 11735 Tel 001 631 249 9393 Fax 001 631 249 9273 http www mfdigital com ...

Отзывы: