background image

M3


Page 21 


4.3.  CONFIGURATION WINDOWS 


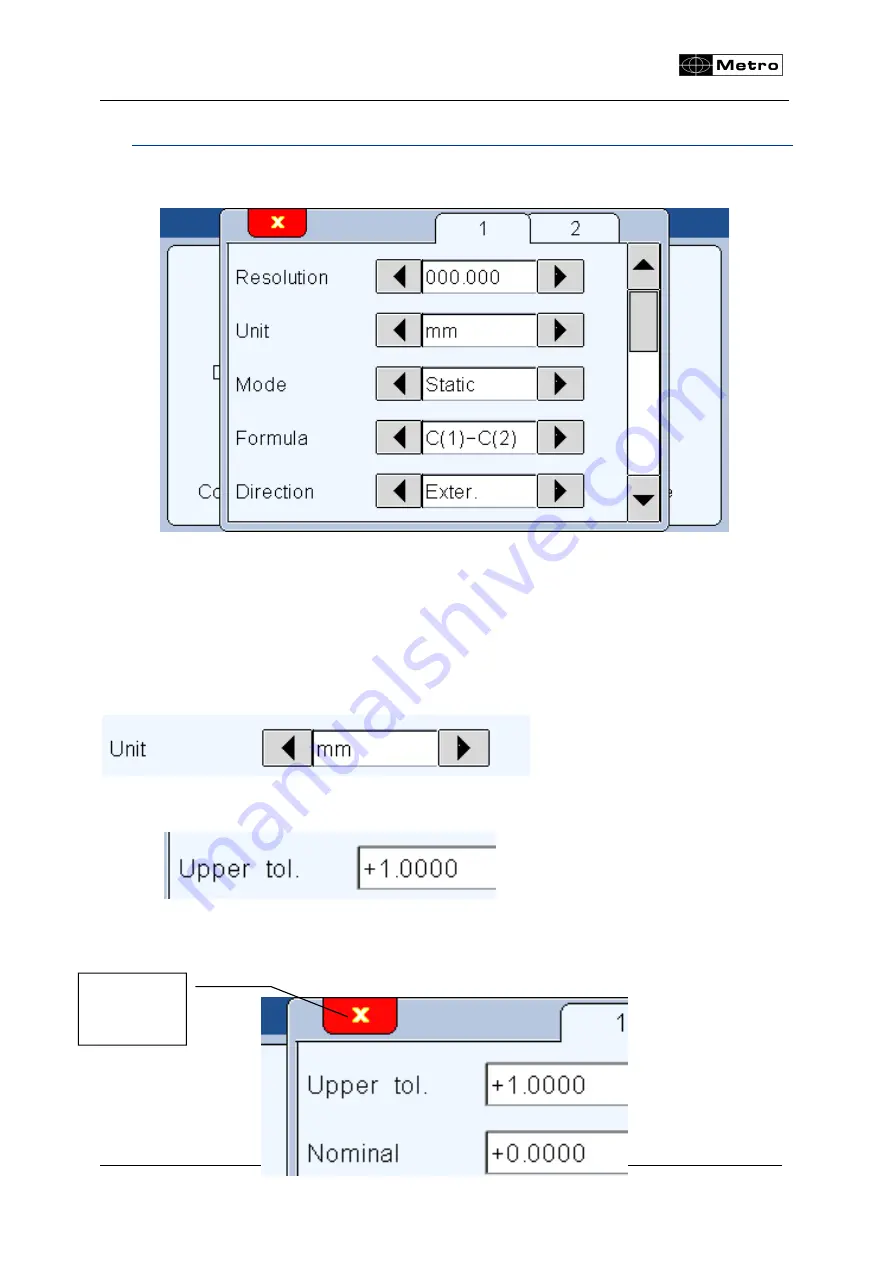
Configuration windows opens after pressing on the icons of the icon desktop 


Example of configuration windows 


Data are typed by different ways and 

are saved after validating while quitting the 

window

Here after are the different ways to input data:   


  Multiple  selection  box.  Press  on  the  black  arrows  to  change  the  pre-defined 

value. 


  Edit box. A virtual keyboard appears after clicking on the edit box.  


  Closing a window: All the windows can be closed by clicking on the white cross 

on a red background on the top left corner on each window.  


Closing a 
window 
 

Содержание M3

Страница 1: ...3 80 impasse des chapotines web www metro fr com ZAE Chez Merlin F 74420 St André de Boëge France E mail info metro fr com M M3 3 F Fo or r i in nd du uc ct ti iv ve e 1 1V Vp pp p a an nd d T TT TL L p pr ro ob be es s USER S MANUAL Firmware 3 0 ...

Страница 2: ...CH CONNECTOR 16 4 GRAPHICAL INTERFACE ________________________________________ 17 4 1 2 MAIN PARTS 17 4 2 GENERALITIES 19 4 3 CONFIGURATION WINDOWS 21 4 4 VIRTUAL KEYBOARD 22 5 CONFIGURATION OF THE DEVICE AND THE MEASURE ______________ 23 5 1 DEFINITION 24 5 1 1 PART 1 25 5 1 2 PART 2 29 5 1 3 PART 3 CLASS 30 5 1 4 PART 4 CONTROL LIMIT 32 5 2 DISPLAY 33 5 3 SETUP 35 5 3 1 GENERALITIES 36 5 3 2 IND...

Страница 3: ...ATION OF THE UNIT WITH QR CODES ___________________ 69 11 RTU MODBUS protocol __________________________________________ 70 12 OPTIONAL M BUS MODULES____________________________________ 73 12 1 MB IO MODULE SEE ALSO CHAP 5 3 5 73 12 2 MB RL MODULE 76 12 3 MB TP MODULE FOR TEMPERATURE COMPENSATION 79 13 FACTORY RESET ______________________________________________ 84 14 FIRMWARE UPDATE _____________...

Страница 4: ...d by the use of non supplied products components or accessories It also does not cover products modified without any written approval from the manufacturer including electrical or mechanical modification removal of serial numbers or of the manufacturer s trademarks or of any other identification THE SOLE RECOURSE UNDER THIS GUARANTEE SHALL BE THE REPAIR OR THE REPLACEMENT OF DEFECTIVE PARTS AS IND...

Страница 5: ...TION 3 1 PRODUCT PRESENTATION The M3 display unit allows making dimensional control using 1 or 2 probes It is possible to make simple measurement with one probe or combined measurement with 2 probes sums or differences It is possible to display 1 or 2 characteristics on the screen and can make static measurement or dynamic Max Min Max Min The M3 can be connected to a PC thanks to its RS232 or USB ...

Страница 6: ...a probe or by pressing a key Relative or absolute display by pressing a key Display resolution from 1 to 5 decimals Metric mm or µm or Imperial Inches measurement RS232 port for communication with a PC USB port for communication and or power supply Optional connection of I O module Measurement transfer by pressing a key footswitch input or retro command on the RS232 port Operating temperature 15 C...

Страница 7: ...lowing to attach it To access to these thread it is necessary to remove the 4 antiskid plastic parts It is also possible to panel mount the display with the accessory ref ACS AFF 001 Be careful not to use longer screw than M4 16 Remove the antiskid parts to attach it on the table ...

Страница 8: ...preset measurement transmission start dynamic measurement etc 18022 Handswitch This footswitch with a robust construction can be configured in different ways preset measurement transmission start dynamic measurement etc ACS AFF 001 Accessory for panel mounting To be installed instead of the stand MB IO This M Bus module is fitted with 8 input outputs isolated with opto couplers allowing to get add...

Страница 9: ...icate the position of the measure according to the part tolerances The module is also fitted with 6 inputs allowing to remote control the display This MB RL module is wired exactly like the 24136 optional board for Monocote displays It allows then to replace a Monocote by a M3 without changing the machine plc wiring ...

Страница 10: ...lay side 81210 2 5 or 10 M Bus cable for M3 inductive version This cable allows to connect the compatible M Bus modules on a M3 display unit Length 1 5m The cable is fitted with a SUBD9 on the display side 24062 Magnescale probe adapter for M3 TTL This cable allows to connect 1 Magnescale probe on a M3 ref 13000 display It integrates an electronic board that manages the error signal form the Magne...

Страница 11: ...to connect 1 Heidenhain probe like MT12 or MT25 with the round M23 connector on a M3 ref 13020 display 45160 RS232 cable This cable allows to connect a M3 display to a computer 18193 This cable allows to connect a M3 display to a Multiplexer Mux from Metro and to the DP1 printer from Mitutoyo ...

Страница 12: ...nect 1 Mitutoyo LG probe on a M3 ref 13000 display ACS AFF 002 45179 Ticket printer Print the displayed values from the M1 M3 Require a cable ref 45179 for connecting to the M1 M3 ACS AFF 003 QR code reader for Metro displays 2 main functions Allow to send a configuration on the display part definition tolerance display type etc Send a Manufacturing order number The export file will take the name ...

Страница 13: ... this point To connect M BUS modules optional On Off switch press 2s for shutting down Disabled if the unit is powered by the 24VDC connector 2 inputs for inductive probes Be careful to use a compatible probe depending on your product reference RS232 connector for connection to a PC or PLC Multi function footswitch connector Mini USB connector for power supply and measurement transfer to a PC 24 V...

Страница 14: ...ferent brands You can contact Metro for any question about this subject To connect M Bus modules optional On Off switch press 2s for shutting down 2 inputs for incremental probes with the Heidenhain pinout For Mitutoyo LG or Magnescale DK please use an adapter RS232 connector for connection to a PC Multi function footswitch connector Mini USB connector for power supply and measurement transfer to ...

Страница 15: ...put Do no use Only for firmware update 8 9 Not used 3 3 7 MINI USB connector The mini USB connector has 2 functions 1 Power supply through a wall mounted transformer This transformer supplies a regulated 5V 1A DC voltage 2 Measurement transmission If you connect your M3 to a PC the PC will detect and install automatically the M3 as a standard USB keyboard with the standard drivers of your operatin...

Страница 16: ...e In this case the display must be set the following way Configuration Transfer USB key Then once the user either press on the PRINT button of the measuring screen or on the footswitch one line will be added on the CSV file a output csv file is created when the operator transfers the data for the first time When the USB stick has been correctly detected a USB logo will appear on top bar If the USB...

Страница 17: ...becomes yellow Screenshot require to have a footswitch connected a USB stick inserted It creates a BMP file screenshot in the USB stick 4 GRAPHICAL INTERFACE The graphical interface of your M3 has been designed to be easy to use and intuitive This section gives you a preview of the different screens and commands available 4 1 2 MAIN PARTS The graphical interface of your M3 is divided in 2 main par...

Страница 18: ...reen is called by pressing the button 2 This part allows to see the measurement result and to use them The M3 starts on this screen For reaching the configuration screens press on the button Example of measuring screen Press on this icon to reach the main icon desktop to configure your device ...

Страница 19: ...cteristic name either with an RS232 command or by scanning a QR code After this the characteristic name is written instead of P1 C 1 Name of the active part reference and formula Here Part 1 with Channel 1 Static or dynamic Max Min etc Unit mm µm inch or decimal degree Inside or outside measurement Characteristic name entered with RS232 or QR code ...

Страница 20: ...code Note When either a characteristic name or a manufacturing order name has been entered only 1 information appear on the blue bar However the information display can be changed by touching the area Manufacturing order number entered with RS232 or QR code USB logo appear when a USB stick or a QR code reader has been plugged ...

Страница 21: ...d after validating while quitting the window Here after are the different ways to input data Multiple selection box Press on the black arrows to change the pre defined value Edit box A virtual keyboard appears after clicking on the edit box Closing a window All the windows can be closed by clicking on the white cross on a red background on the top left corner on each window Closing a window ...

Страница 22: ...M3 Page 22 4 4 VIRTUAL KEYBOARD Erase Quit without taking into account the modification Quit and save the modification ...

Страница 23: ...from this window The measure tolerances characteristics etc is also configured from this window The 6 following sections describe the 6 icons of this screen Configuration of the device language footswitch function etc Allows to lock selected functions by password Go to the measuring screen Display mode selection 1 or 2 bargraph needle without tolerance Characteristic edition tolerances master part...

Страница 24: ...sibility to define the tolerances the master and the nominal value of the characteristic the resolution of each of the 2 available measurement configurations This window is divided in 2 parts for the configuration of the 2 measurement configurations Go to the screen 1 2 or 3 Choice the part 1 or 2 ...

Страница 25: ...C 1 C 2 3 points C 1 or C 2 for a special 3 points measuring table contact Metro for further info C means Channel It is possible to give a coefficient for each probe from the menu Static direct reading or dynamic Max Min Max Min Average or Median For measuring internal or external diameters ...

Страница 26: ...ding The display is refreshed together with the probe is moving Dynamic The following mode starts after pressing on the clear button of the measuring screen or through a I O or footswitch command Max Min Max Min Average Median max min 2 Calcul formula Calcul formula 3 points only on the Heidenhain This mode allows to measure internal or external diameter of a cylindrical part The part is blocked o...

Страница 27: ...formula Cone This mode is used to calculate an angle of a cone On this table 3 points 2 points are fixes and the third one moves to constrain the part and measure its diameter The size diameter of the tip must be written here in order to calculate correctly the diameters of the part ...

Страница 28: ... these two modes is that according to the part the part might still be rework For example the size of a bore in a part if the bore is too big there is no To measure the angle 2 probes are compulsory and must be placed to different diameter of the cone The distance between each diameter has to be entered on the parameters When the cone measure is used the choice of the unit of measurement disappear...

Страница 29: ...small so possible to rework and a red indicator if the part is too big rejected REWORK PASS REJECT Direction External diameter The opposite phenomena happens for the external diameter REJECT PASS REWORK 5 1 2 Part 2 This screen allows to set tolerances and the characteristics nominal and master Just press on the corresponding edit box to input the needed values The tolerances must be set relativel...

Страница 30: ...ion in the tolerance interval The top bar of the display which is normally blue is grey on the picture bellow because grey is the color which was defined for this interval of measurement Thanks to the color code the user can easily sort the parts according to the color of the display Choice of the number of class Choice of the color for each class The limit defined for each class are selected by d...

Страница 31: ...M3 Page 31 Grey color because of the class parameters ...

Страница 32: ...ngs and to define them Control limits are warnings that inform the user if the measure becomes too close to the tolerances limits Yellow colour on the bargraph This part is hidden if no has been selected Example of characteristic displayed with control limits Part OK Part OK with warning Part Not OK ...

Страница 33: ...re are displayed on the screen and on which format needle galva horiziontal bargraph or value only The auto switch function allows to call the corresponding program by a simple probe movement Example Move probe 1 part 1 is displayed Move probe 2 part 2 is displayed Left simple and double Galva Cursor None simple and double ...

Страница 34: ...ode Allows to remove the value of the measurement on the measuring screen only the bargraph appears Displays small indicators triangles on the measuring screen to show the maximum and minimum value measured Allows to move the needle like with the screw on an old analogue display ...

Страница 35: ...M3 Page 35 5 3 SETUP After clicking on this button the below window appears Version for inductive probes Version for Heidenhain 11µA or 1 Vpp probes ...

Страница 36: ... in order to adjust it on its fixture It is recommended to adjust the inductive probes close to their electrical zero Chanel 1 or 2 Each channel can display different information Possibility to connect an M Bus Allows to slow down the refresh frequency of the display running average It can be useful to limit the blinking of the last digit and for runout measurement on large parts The unit of measu...

Страница 37: ...ecommended to adjust the inductive probes close to their electrical zero Allow to affect a coefficient to the measured value of the probe Step see the description bellow Interpolation see the description bellow An indicator inside the probe allow to re calibrate by its own when this option is activated When you return to the measuring screen a message ask to move the probe waiting reference ...

Страница 38: ...lation defines the division rate of the glass scale and therefore the measurement precision Example for a probe type Heidenhain Specto ST12 The glass scale of this probe is engraved with a step of 20µm therefore if the interpolation is set at 200 you will have a resolution of 20 200 1 10 µm 5 3 4 TTL probe with Heindehain pinout The following information are focused on TTL probes or Magnescale or ...

Страница 39: ...ws to mix 2 different probes on the same display with the multiplexer modules or to use inside outside modules Multiplexer modules The same process is made to connect all the multiplexer modules Example M3 inductive with MB AG module for air gage on the channel 2 The probe associated with each channel can be chosen here ...

Страница 40: ...must be configured from the C1 or C2 pages of the setup menu according to the channel with witch the probe is linked Please refer to the example for each probe chapter 5 3 to 5 3 6 for air gage MB 2S module Heidenhain MB 2T module TTL MB AG Module Air Gage ...

Страница 41: ...M3 Page 41 MB 8I Module Inductif MB 4D Module Port Mitutoyo MB 1R Module Port RS232 ...

Страница 42: ...t output module is made with the same way than a multiplexer Example connection of a MB IO module on the inductive M3 The different options for the MB IO configuration are displayed bellow La configuration Du MB IO se fait depuis l écran qui est apparu en connectant celui ci ...

Страница 43: ... to 0 relative mode The number of the MB IO is written here and can be changed if more than one is connected These buttons are used to output a 24VDC signal on specific port of the MB IO to check the installation At the opposite if you input a 24VDC on a terminal the corresponding button becomes green The function of each port of the MB IO can be set with this 2 menus The first one is for the numb...

Страница 44: ...tolerance limit Class output output a signal if the part is in the selected class Hold Input freeze the screen to display the previous measure as long as the input signal stay Characteristic output changes the displayed screen in the measuring screen Touchscreen disconnect the touch screen function Useful when connected to a PLC so that no one can use the touch screen without the permission of the...

Страница 45: ...M3 Page 45 Air gage MB AG module Must be calibrated ...

Страница 46: ...M3 Page 46 7 98 8 02 Write here the 2 calibration value which will be used ...

Страница 47: ...M3 Page 47 After placing the min master push calibration The same manipulation is done here but with the max master and the final push on calibration The probe is now calibrated ...

Страница 48: ...asure When the button central is selected a third master point is asked The calibration process stay the same with one manipulation added When the Module is linked to the M3 a diode on the module lights itself in violet When the module probe is calibrated the diode becomes blue ...

Страница 49: ... the measurement to the RS232 or USB part change the active part part 1 part 2 Init Dyn start dynamic measurement min max zero Set the displayed value at zero hold freeze the measuring screen the clear button becomes yellow when the screen is frozen screenshot generate a BMP file on the USB stick when the footswitch is pressed When 2 functions are programed a pressure on the pedal makes them happe...

Страница 50: ...ell in the same way than you would have typed with your standard keyboard If you select transfer USB Stick a output csv file will be created on the connected USB stick and each time you press the Print button of the measuring screen a line will be added on the file If you use a QR code reader to input a manufacturing order number the OUTPUT CSV file takes the name becomes manufacturingordernumber ...

Страница 51: ... for the MODBUS RTU protocol Float or integer Time for the output CSV file Date for the output CSV file A buzzer generates a sound each time a button is pressed Ask a confirmation of preset when the preset is done from the measuring screen ...

Страница 52: ...f the M3 If locked a password will be asked to access to the icon desktop Modification of the password By default 0000 Allows to remove the corresponding buttons from the measuring screen It is recommended to remove the button to make the interface as easy as possible for the user Example of a measuring screen without all the buttons ...

Страница 53: ...M3 Page 53 Allows to remove the corresponding buttons from the measuring screen Allows to lock the measuring mode maxi mini maxi mini average ...

Страница 54: ...M3 Page 54 5 6 MEASURE After clicking on this button the measuring screen appears Please read the chapter 6 for the presentation of the measuring screen ...

Страница 55: ...lative mode allows to make a zéro at a defined position If the relative mode is selected the button become red To come back to the absolute mode press on the Preset button Start dynamic measurement Min Max clear the zero function This icon can become yellow in case of a hold function refer to 3 3 9 the footswitch connector Calibration Preset After pressing this button the displayed value will take...

Страница 56: ...used to set the current measured value to 0 it s the relative mode Clear This button allows to cancel the zero button and to switch again to absolute mode Preset This button allows to set the current measure value to the master value ...

Страница 57: ...M3 Page 57 Print The print function allows to transfer the measured value to a computer Part This function is used to change the displayed part ...

Страница 58: ...hap 5 2 it is possible to change manually the type of scale Automatic Manual The automatic needle scale adapts automatically with the part tolerances The manual needle has fixed scales and allows to use the option see chap 5 2 You can change the scale type by touching the area as on the picture bellow during 2 seconds ...

Страница 59: ... change temporarily to a dynamic mode directly from the measuring screen To change the measuring mode press on the icon as shown on the above picture Static Max Min Max Min Average only adapted on an automatic fixture Median The displayed value is calculated with the formula MAX MIN 2 When a dynamic mode has been selected press on the button or on the footswitch if configured as init dyn see chap ...

Страница 60: ...et value calibration directly from this screen Press on the value as shown on the below picture an input the new value with the keyboard If the double display mode is selected the 2 characteristics can move together but only 1 is active The lateral buttons have an effect only on the active characteristic For selecting the active characteristic press on it and the top of the box will become green T...

Страница 61: ...ansfer the measure with screen through IO or footswitch the displayed value will appear on your PC when your cursor is For example on an Excel cell in the same way than you would have typed with your standard keyboard The communication with an USB cable is made by selectioning KeyBoard communuication type The M3 will communicate with the computer as would a key board do Example of a table complete...

Страница 62: ...in order to write numbers the num lock key must be activated If your keyboard doesn t have the num lock key you can still find it by writing visual keyboard in the windows search bar and activate it If even there the num lock key doesn t appear the option key allows to access to a menu from which you can activate the num lock ...

Страница 63: ...or connecting the M3 to a PC or a PLC you must use a cable Metro ref 45160 sold separately 8 1 Commands 8 1 1 Generalities All the commands must be ended by a CR character ASCII code 13 0D The commands can be sent grouped by separating with a max 500 characters The display is refreshed only once after reception of the CR character ...

Страница 64: ...axi x 2 mini x 3 maxi mini x 4 average x 5 median Formula nFM nFM x x 0 C1 x 1 C2 x 2 C1 x 3 C2 x 4 C1 C2 x 5 C1 C2 x 6 C1 C2 x 7 C1 C2 Direction nDIR nDIR x x 0 sans x 1 internal x 2 external Upper tolerance nUT nUT seee ddddd Nominal nNM nNM seee ddddd Lower tolerance nLT nLT seee ddddd Master nMT nMT seee ddddd Activate control limits nLIMIT nLIMIT x x 0 inactive x 1 active Upper control limit ...

Страница 65: ...play DISPL DISPL x x 1 display 1 characteristic on the screen x 2 display 2 characteristics on the screen 8 1 2 3 Window CONFIGURATION Window Configuration Rubric Read command Write command Comment Transfert PRINT PRINT x x 0 USB x 1 RS232 Langue LANG LANG x x 0 French x 1 English x 2 German x 3 Spain x 4 Italian x 5 Hungarian x 6 Czech x 7 Swedish x 8 Portugaise Footswitch FOOT FOOT x x 0 Print x...

Страница 66: ...mmand Write command Comment Zero ZERO Zero relative Clear CLR Start dynamic measurement Preset PRESET Calibration Print Measurement transfert If 1 characteristic mode transfert the value with the format 000 00000 CR If double characteristic mode transfert the value with format 000 00000 000 00000 CR 1 Transfert the characteristic 1 format 000 00000 CR 2 Transfert the characteristic 2 format 000 00...

Страница 67: ...USB stick having a partition For saving the data on the USB key you must configure the menu CONFIGURATION COMMUNICATION USB Key Then when the transfert is triggered by footswitch touch of the PRINT button by an input action or Modbus a file will be created on the USB key 9 1 Standard mode As a standard a file named output csv is created on the USB key It look likes this Output csv Characteristic 1...

Страница 68: ...he output csv file will get the name of the scanned name Then each time you scan a new number after saving the first part a file is created on the USB key The command to encode the QR code is OFA xxxxxxxxxxxx Example Standard screen before scanning manufacturing number After scanning the following QR code corresponding to the command OFA ORDER 12345 The screens become like this Then when you press...

Страница 69: ... 8 RS232 communication can be encoded on a QR code The goal of the configuration by QR code is generally to save time and limit configuration errors when the display is used for several configuration Before sending a new configuration to the display it is recommended to start sending a reset command so that all the previous parameters will be reset the default because the QR code we only modify th...

Страница 70: ...des 3 by reading and 16 by written Data 1 to 256 register CRC16 verification code on 2 octets The following functionality are available Reading of the position of 2 probes Instant reading of the value of 2 characteristic Preset Reading programing of the tolerances of the master value the formula Register are compounded by one or a couple of 16 bits words Function Address Size word Value Preset W 0...

Страница 71: ...ss 109 1 1 à 16 Unit 110 1 0 mm 1 inch 2 µm Control limit activated 111 1 0 no 1 yes resolution 112 1 1 to 5 decimal State of the characteristic 113 1 0 good 1 Mini 2 Maxi 3 lower ctrl limit 4 upper ctrl limit Type of the characteristic 114 1 0 Static 1 Maxi 2 Mini 3 Maxi Mini 4 average 5 Median Nominal 115 2 Lower tolerance 117 2 Upper tolerance 119 2 Master value 121 2 Measure 123 2 Displayed va...

Страница 72: ...156 2 Maxi class 1 158 2 Maxi class 2 160 2 Maxi class 3 162 2 Maxi class 4 164 2 Maxi class 5 166 2 Maxi class 6 168 2 Maxi class 7 170 2 Maxi class 8 172 2 Maxi class 9 174 2 Maxi class 10 176 2 Maxi class 11 178 2 Maxi class 12 180 2 Maxi class 13 182 2 Maxi class 14 184 2 Maxi class 15 186 2 Maxi class 16 188 2 probe 1 7000 2 probe 2 7002 2 ...

Страница 73: ...o 4 M Bus modules with 8 inputs output isolated by opto coupler ref MB IO The 8 outputs are similar to the open collector PNP type They can be used with an external power supply 12 to 30 VDC maximum The maximal output current drained by each output is 50mA The 8 inputs represent a 2 2kOhms load connected to the 0 volt ...

Страница 74: ...control limit Output a signal if the part is in the upper control limit Out Tol Output a signal if the part is out lower tolerance Out Tol Output a signal if the part is out upper tolerance Part status Output a signal if the part is in the tolerances Class Output a signal on a defined port for each class Stop Hold the measure characteristic Change the displayed characteristic Touchscreen Disable t...

Страница 75: ... Connection example between a M3 and a PLC Output to the PLC 0V of the PLC E1 0 V IO module PLC 24V Output 24 V of the PLC 0 V IO module PLC 0 V 0 V 0V of the PLC PLC Output 24V E1 Input 24 V from te PLC 24V 24V ...

Страница 76: ...module The MB RL module has been designed for retrofitting old Monocote displays equipped with the optional relay board The external M bus module has the same pinout SUBD 15 than the relay board of the Monocote display so there is no need to change the wiring of the existing installation ...

Страница 77: ...t controls the initialisation of memories for the dynamic measurement It must be used every time the dynamic measurement starts when the part to be measured is already in place under the probes This command has the same function as the button CLEAR of the measuring screen STOP This input stops the measurement and freezes the screen as long as it is maintained at the logical level 1 ZERO This input...

Страница 78: ...ground 10 PRESET input External calibration command 11 MAXNC Maxi tolerance relay contact 1A 48V 12 MAXCOM Common of maxi tolerance contacts 13 MAXNO Maxi tolerance relay contact 1A 48V 14 INIDYN input Command for measurement initialisation 15 ZERO input Command for display reset to zero 12V STOP 2 2k Masse E gnd Monocote Commande STOP 2 2k E gnd Monocote Commande 24 V 0 V Command example with int...

Страница 79: ... sensor 2 functions are then available alarm or compensation A Identification and configuration of the Temperature module MB TP Input start a dynamic measure Output output a signal if the part is out of the tolerance max Input freeze the measurement screen and the displayed value Input Set the displayed value to zero Input Transfer the measured value need a USB or RS232 link Input Set the displaye...

Страница 80: ... page of the menu DEFINITION As a standard the temperature mode is deactivated You can now choose between a Alarm mode When selecting the Alarm mode it is required to define the temperature variation acceptability with a MIN and a MAX in the chosen unit The temperature is displayed Selection between type K or PT100 Unit Degree Celsius or Fahrenheit ...

Страница 81: ...ring starts Temperaure OK no alarm Temperaure increased alarm After validation with the OK button the Preset button becomes red until you made the preset The PRESET button become black again after preseting The new reference temperature has now been moved to the actual temperature b Temperature compensation mode Alarm mode Min and Max limits of temperature variation ...

Страница 82: ...m 9 Glass 8 5 Tungsten 4 5 The compensation is done assuming that the Master part has been measured at 20 C If it is not the case select the option advanced and a next page appear allowing to enter the temperature of the master during the measurement according to its certificate When the configuration has been done you can go to the measuring screen Compensation mode Expansion coefficient If valid...

Страница 83: ...ure of the certificate and the reference temperature For example if you enter a certificate temperature of 20 and a reference temperature of 30 when you PRESET the displayed value will represent the size of the master at 30 The temperature function is advanced functionality of M3 It is recommended to make trials and comparative measurements to validate the process before using it in production The...

Страница 84: ...3 will be reset tolerances masters formulas To Reset the M3 to its factory settings please follow the process bellow 1 Shut down the M3 2 Start the M3 3 When the splash screen appears press on the Metro logo 4 A desktop with 3 icons appear 4a Press on initialization 4b Confirm YES or cancel NO 5 Press Home to come back to the measuring screen 3 4a 4b ...

Страница 85: ...e a Metro cable ref 18060 you can make your own cable by following this schematic The firmware update requires to use the flash magic software that can be download free from this address www flashmagictools com After installation please configure the software on the following way M3 Sub D9 male 1 Rx 2 Red Tx 3 Blue DTR 4 Green GND 5 Yellow 6 RTS 7 White 8 9 PC Sub D 9 female 1 CD 2 Rx 3 Tx 4 DTR 5...

Страница 86: ... min depending on the Baud rate selected During the update the screen becomes blurred 5 The M3 restart automatically when it is finished 6 Reset the M3 by following the procedure on the chapter 11 The LPC4357 can be found on the ARM Cortex category after clicking on Select If you are connected directly on a serial port you can use the baud rate 115200bauds If you use a USB RS232 convertor use 3840...

Страница 87: ... SIMPLE MEASUREMENTS WITH ONE PROBE C 1 C 1 Thickness Flatness 15 2 COMBINED MEASUREMENTS WITH TWO PROBES C 1 C 2 C 1 C 2 Thickness or external diameter Width or internal diameter X1 C 1 X1 C 1 X2 C 2 X2 C 2 X C 1 C 2 X 0 5 C 1 0 5 C 2 Thrust Position ...

Страница 88: ...M3 Page 88 Parallelism X C 1 C 2 ...

Отзывы: