


NOTES:
1. It is recommended that the pipe on both sides of the
expansion joint is supported or guided to assure that
the expansion joint will not bind during operation.
2. Installation of an expansion joint adjacent to fittings,
such as elbows, tees or wyes, is not recommended.
However, it is not always possible to avoid these
fittings. If an expansion joint must be joined to one of
these fittings, the unflanged end of the tube should be
away from the fitting and fitted into a pipe length in the
manner described in the installation procedure above.
3. Expansion joint must be installed with a flange to flange
length of not more than 22”. The minimum length for
installation must take into account the amount of
expansion that may occur during operation. Minimum
length is calculated as follows:
Expansion = Length (feet)/100 x Temperature Rise (ºF)/100
Minimum Length = Exp 6” (152mm)
It is recommended that the temperature used in the
above formula be at least 300ºF higher than the expected
normal operating temperature.
4. If inner tube is too long, it may be cut to length. Tube
must be a minimum of 8” (203) longer than flange-to-
flange length. Prior to installation of cut pipe, remove all
burrs to ensure that interference does not occur.
5. Check gasket to ensure that it fits snugly without
binding on inner pipe.
6. Outer jacket must move during expansion or
contraction. Ensure that no screws are located where
the jacket overlaps the casing of the adjacent pipe and
that it is loose enough to move as needed. Alignment
of the bead on the jacket with the bead on the adjacent
pipe will ensure that the jacket stays in the proper
location.
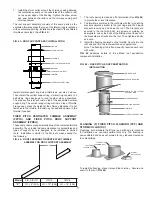
7. Note that the expansion joint will not support any
weight in the vertical position. It should not be used
unless both ends of run, where an expansion joint is
installed, are anchored as fixed points.
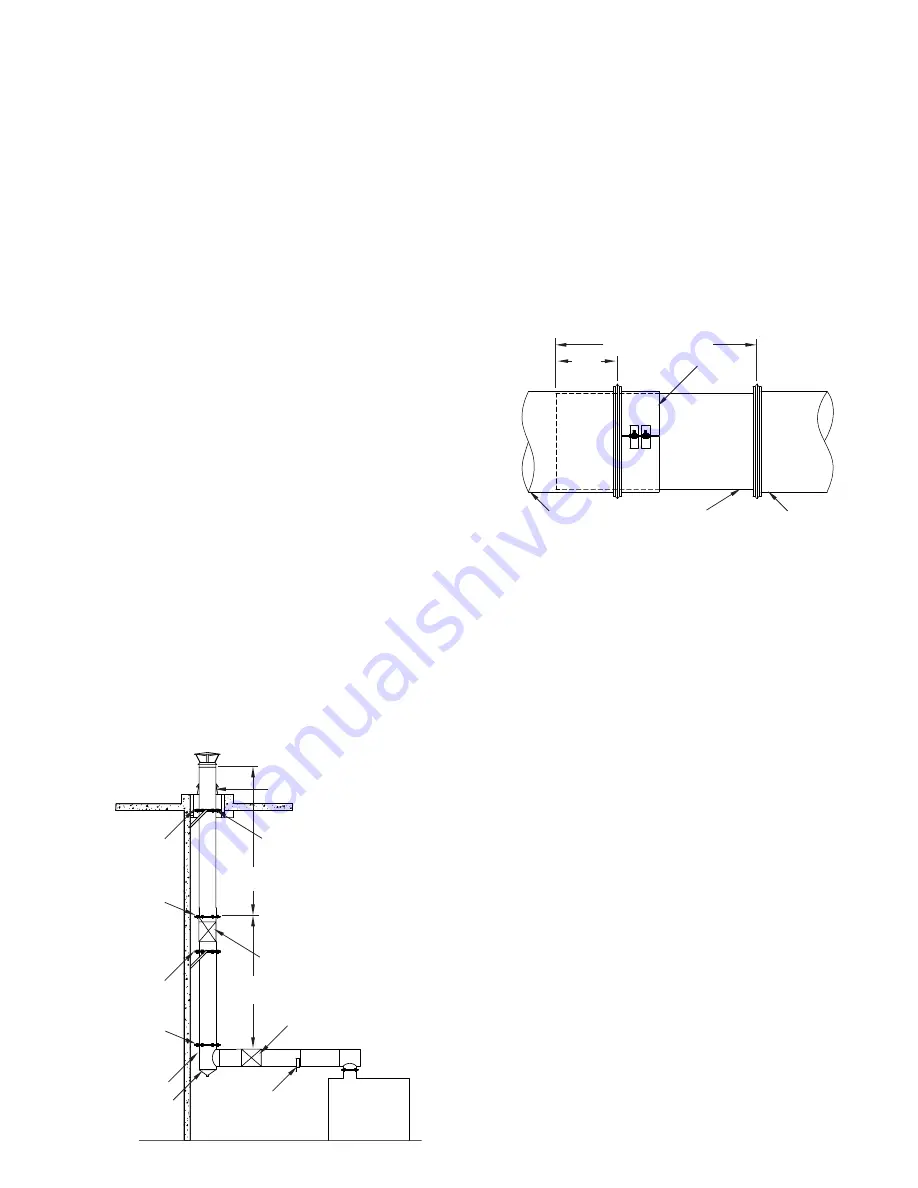
FIG. 22
indicates appropriate locations for expansion joints in
various orientations.
FIG. 22 – EXPANSION JOINT LOCATIONS
SEE TABLE 4 FOR
MAXIMUM DISTANCE
SEE TABLE 4 FOR
MAXIMUM DISTANCE
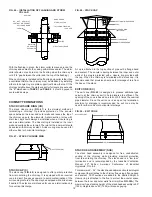
CHIMNEY EXPANSION UP THROUGH
ROOF. GUIDANCE IS REQUIRED
THROUGH FLASHING OR THIMBLE
EXPANSION JOINT
ABSORBS UPWARD MOVEMENT
FLASHING
EXPANSION JOINT
CAREFULLY ALIGNED
HALF OR FULL
ANGLE RING
WALL GUIDE
WALL GUIDE
WALL OR PLATE
SUPPORT
FIXED POINT
PLATE SUPPORT
90° TEE
DRAIN TEE CAP
11
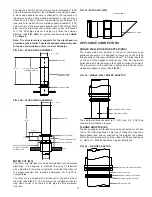
VARIABLE LENGTH (VL)
The function of the variable length is to make up odd lengths of
pipe, which are not to be used for expansion compensation. The
use of the variable length in engine exhaust applications is not
recommended. The variable length is comprised of the following
components: (1) a 3¼” (83) collar with a flange at one end used
to clamp the flange at the desired length; (2) a 30” (762) long
tube flanged at one end, which fits into the 3¼” (83) collar; (3)
an outer jacket consisting of two half jacket assemblies; and (4)
loose insulation blanket to fill space between the tube and casing.
A variable length can be installed at any flange to flange length
from 4”-26” (102-660). If the flue is too long to fit into the adjacent
section of pipe without interfering with the flow path, it should be
trimmed to the desired flange to flange length plus 4” (102).
Installation procedure is as follows:
1. Loosen draw screw at collar and slide collar toward flanged
end of tube. Do not remove collar from tube.
2. Slide unflanged end of tube into the upstream piece of pipe.
Pull flanged end of tube to the downstream piece of pipe
and make up joint as outlined under JOINT ASSEMBLY on
Page 4.
3. Apply a thin coat of sealant, about 1” (25) wide at the plain
end of the pipe where tube slides into mating pipe section.
Press sealant into any gap between the tube and the
mating pipe section. Apply sealant to flange of mating pipe
(See
FIG. 23
).
4. Slide collar into position against flange of mating pipe. Fill
flange band with sealant and install flange band.
5. Tighten bolts on clamp collar to complete installation. (For
more positive seal, apply sealant to clamp collar slot and
flared end of collar prior to tightening bolts).
6. For IPIC, cut insulation to desired length and wrap inner pipe
ensuring that it is covered completely before attaching half
jackets.
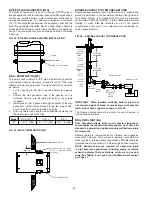
7. Wrap two half jackets around joint with bead at the
downstream end and punched edge that overlapping the
plain edge by approximately 3/4”. Note: For horizontal
installations, the seams must be located at the top and
bottom of the pipe. Coat unpunched edge of casing with
P077 sealant to waterproof the casing. Install self-drilling
screws (supplied with jacket) at punched holed through both
layers at overlap. Exercise care that half jacket edges do not
align with draw screws on flange bands, and that no screws
are installed in portion of jacket which is over casing of
adjacent pieces of pipe (See
FIG. 24
). The screws shipped
with the expansion joint are of the correct length to avoid
penetrating the inner wall (flue) of the pipe.
Do not use any other screws to attach the casing.
FIG. 23 VARIABLE LENGTH FLUE ASSEMBLY
TUBE
30” (762) OR TRIM TO FIT
4” MIN.
(102)
UNFLANGED END
COLLAR
ADJOINING PIPE
(DOWN STREAM)
ADJOINING PIPE
(UP STREAM)