background image


12 


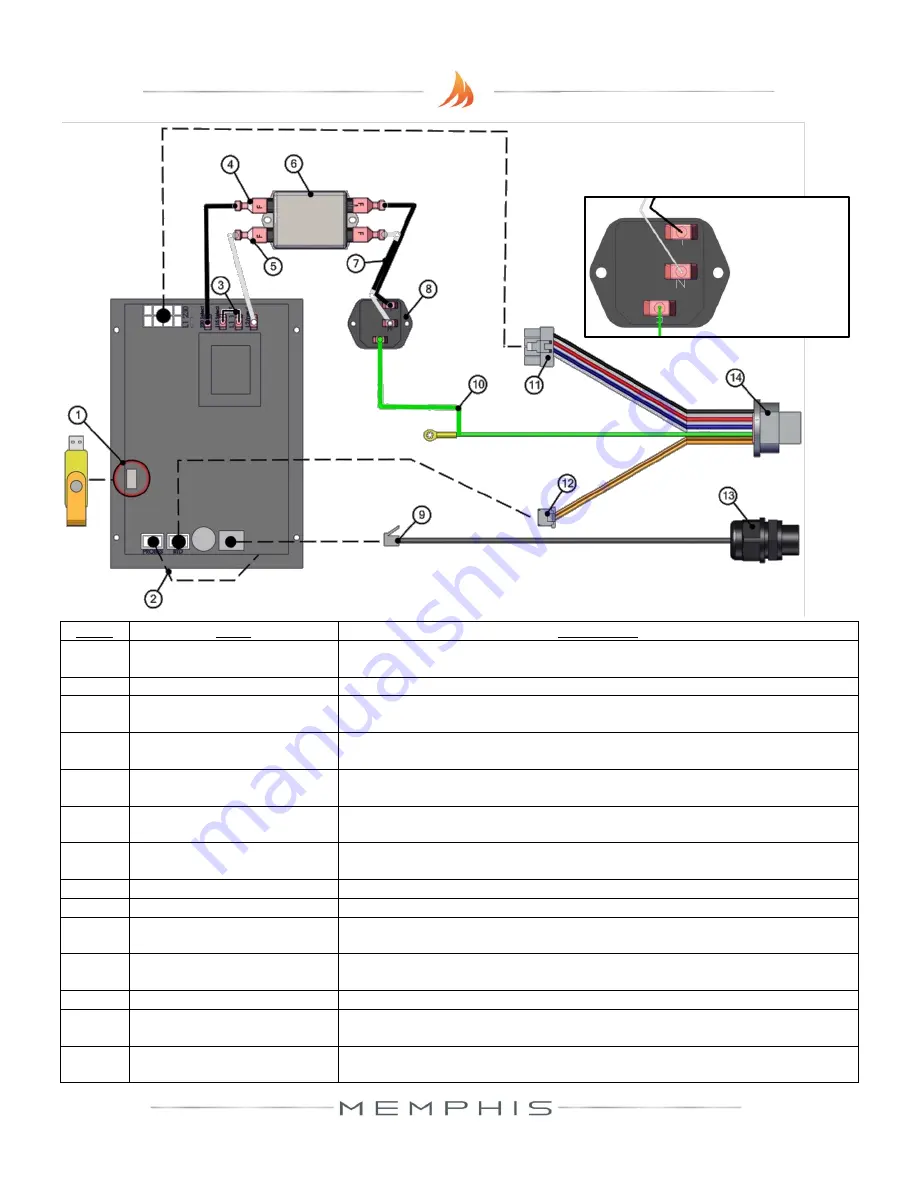
Item # 

NAME 

DESCRIPTION 

USB Port 

Used to update your grill, see the “Updating Controller Software” section of the 
main manual for information. 

Meat Probe Wiring 

This terminal is used to connect the meat probes to the controller. 

120/240 Select Jumper 

Used when changing the input voltage to the controller, see “120v to 240v 
Conversion” section of the main manual for information. 

AC Load Wire from Filter to 

Controller 

Carries AC voltage from the filter to the control board, load wire. 

AC Neutral Wire from Filter to 

Controller 

Carries AC voltage from the filter to the control board, neutral wire. 

Filter 

Reduces electrical feedback. Line = Outlet Side, Load = Grill Side. L1 = Load L2= 
Neutral 

AC Neutral and Load from IEC to 

Filter 

A two wire component which has a ferrite choke to eliminate input electrical 
disturbances from the grid. Load and Neutral wires. 

IEC Plug 

The same plug terminal used to attach your power cord to your grill. Top down view. 

Ethernet Cable 

Used to connect your grill controller to the Wi-Fi card in the back of the grill. 

10 

Grounding Wire 

In the event your grill experiences a short, the grounding wire will send the voltage 
to the 3

rd

 prong of a standard AC outlet. 

11 

AC Component Wiring 

This large plastic connector carries all voltage used for AC components in the grill. 
See “Component Wiring Diagram” for a description of all wires in this connector. 

12 

RTD Wiring (DC) 

This small plastic connector carries DC voltage to the RTD. 

13 

Controller Box Ethernet Cable 

Gland 

This gland is a weather tight pass-through for the Ethernet cable into the back of 
the controller box. 

14 

Controller Box Plug 

This plug is a weather tight quick disconnect for the main wiring harness which 
carries all AC,DC, and Ground wires to the grill’s components. 


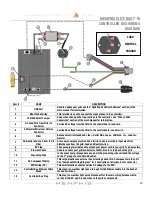
MEMPHIS ELITE BUILT-IN 

CONTROLLER BOX WIRING 

DIAGRAM


LOAD 


NEUTRAL 


GROUND


Содержание Pro VGB0001S-ITC3

Страница 1: ...ance to Combustible Materials 2 Grill Island Dimensions 3 Hardware Kit 4 Installation Step 1 6 5 10 WiFi Setup 11 Wiring Diagram 12 13 Memphis Elite Built In Model Number VGB0002S Appendixes and Model Specific Information ...

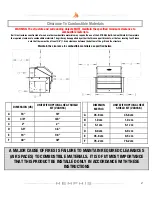
Страница 2: ...constructed of wood or other combustible materials may require the use of the OPTIONAL Built In Heat Shield Kit to maintain the required clearance to combustible materials The grill may be supported by either the three support brackets or the four leveling feet Please note that there must be at least 3 8 1 0cm clearance between the bottom of the grill and the structure Maintain the clearance to co...

Страница 3: ... builder are responsible for consulting local county and state building codes for securing any necessary building permits before construction NOTE Construction codes vary from locality to locality NOTE Dimensions are to the finished surfaces Grill cavity surfaces are to be plumb and level to ensure a proper fit ITC Control Location 110 120v AC supply required within 10 ft of the ITC NOTE The locat...

Страница 4: ...enie Tool VG1594 5 Bracket Bolt DS2311 6 Antenna VG9025 7 10 Screw SS DS2186 8 Power Cord VG0911 9 Meat Probe VG0956 10 Leveling Feet DS4668 11 Concrete Anchor DS2349 12 10 SS PH SCREW DS2350 PICTURE HARDWARE COMPONENTS CONT DESCRIPTION PART NO 13 Left Mounting Bracket VG0803 14 Right Mounting Bracket VG0802 15 Rear Mounting Bracket VGE0801 16 Prewired Controller Box VG1165 17 Controller Box Brack...

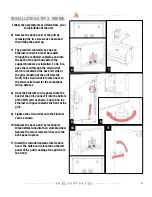
Страница 5: ...tes 1 from inside the grill hood To remove the Flavorizer cut the 4 zip ties holding it in place Set aside grates and Flavorizer until needed 2 Peel all plastic protective film from the grill Be diligent about inspection as the protective film will be hard to remove once a grill is installed and first burned 3 Detach the controller bracket 17 from the controller box 16 by pulling directly backward...

Страница 6: ...ill from the front This strain relief is located next to the strain relief used for the component wiring harness 8 Once the Ethernet cord is passed into the back of the grill connect it into the bottom of the WiFi card as shown The tab on the Ethernet cord goes towards the front of the grill 9 Tighten the strain relief onto the Ethernet cord as shown 10 Replace the back panel by locating its three...

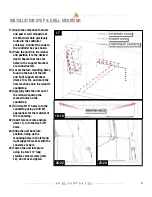
Страница 7: ...s item 5 14 Fasten the rear support bracket item 15 to the left and right support brackets items 13 and 14 with two 10 24 x long stainless steel screws item 7 15 This step is only to be done if the grill is going to be supported by the four leveling feet item 10 and not the support brackets Thread the four leveling feet item 10 into the bottom of the unit Optional 16 To reduce the clearance to com...

Страница 8: ... 14 and mark the hole locations onto the island s countertop 20 Carefully slide the unit out of the island exposing the marked holes on the countertop 21 Drill two 5 16 holes into the countertop using a drill bit appropriate for the material of the countertop 22 Insert two concrete anchors item 11 into the two 5 16 holes 23 Slide the unit back into position lining up the mounting holes in the left...

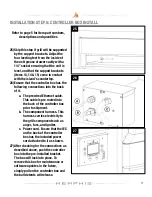
Страница 9: ... Ethernet cable This cable is pre routed into the back of the controller box prior to shipment b The component harness This harness carries electricity to the grills component such as auger fans and igniter c Power cord Ensure that the IEC on the back of the controller box has the included power cord attached to it as shown 27 After checking for the connections as described above push the controll...

Страница 10: ...nd right lower brackets found inside the unit 30 Place the three lower cook grates item 1 onto the front and rear supports Place the long cook grate item 1 onto the left and right upper brackets found inside the unit Vent holes on the mounting brackets must remain unobstructed Refer to the manual for first time use instructions INSTALLATION STEP 6 FINAL ASSEMBLY 28 30 ...

Страница 11: ...rs not wishing to use Wi Fi To turn Wi Fi on simply press the button TURN ON WIFI 3 Next press and hold SETUP and the grill will start searching for all nearby Wi Fi networks Once the status field displays CONNECTING the grill is ready to be connected to your network via any Wi Fi compatible device 4 Simply go to available Wi Fi networks on your phone or tablet and select the network Memphis Grill...

Страница 12: ...nces from the grid Load and Neutral wires 8 IEC Plug The same plug terminal used to attach your power cord to your grill Top down view 9 Ethernet Cable Used to connect your grill controller to the Wi Fi card in the back of the grill 10 Grounding Wire In the event your grill experiences a short the grounding wire will send the voltage to the 3rd prong of a standard AC outlet 11 AC Component Wiring ...

Страница 13: ...erminal on the Wi Fi card as shown Ensure that the wiring does not interfere with the auger motor s moving components 5 Igniter Wiring 1x Red Wire 1x White Wire Attach both spade connectors to the leads extending from the igniter These leads will extend from the airbox and can be located in between the two fans 6 Fan Wiring 1x Blue Wire w 2 spade ends 1x White Wire w 2 spade ends Attach BOTH blue ...

Отзывы: