background image

22

SETUP MENU (CONTINUED)

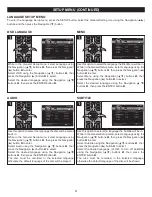
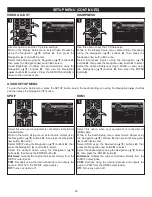
While in the General Setup menu, select Playback using the
Navigation (

π

,

) buttons 

1

, then press the Navigation (

®

)

button 

to enter. 

Select Closed Caption using the Navigation (

π

,

) buttons

1

, then press the Navigation (

®

) button 

to select.

Select ON to activate Closed Captions or OFF to deactivate
Closed Caption using the Navigation (

π

,

) buttons 

1

, then

press the ENTER button 

3

.

NOTE:

The  Caption  function  is  for  AV  connections  with 

CC1 only.

3

1

1

2

1

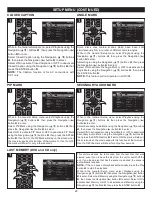
Some  discs  may  contain  scenes  which  have  been  shot
simultaneously from a number of different camera angles.
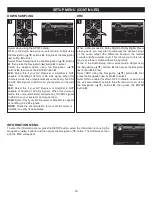
While  in  the  General  Setup  menu,  select  Playback  using  the
Navigation  (

π

,

)  buttons 

1

,  then  press  the  Navigation  (

®

)

button 

to enter. 

Select Angle using the Navigation (

π

,

) buttons 

1

, then press

the Navigation (

®

) button 

to select.

Select ON to activate the Angle Mark or OFF to deactivate the
Angle Mark using the Navigation (

π

,

) buttons 

1

, then press

the ENTER button 

3

.

NOTE: 

This feature will not operate on all DVDs.

3

1

1

2

1

CLOSED CAPTION

ANGLE MARK

SETUP

Exit

--- General Setting ---

Setup Menu

Use cursor keys to move focus, use
“ENTER” key to select

System
Language
Playback
Security
Network

Screen Saver
Disc Auto Playback
Load Default
Upgrade
Easy Setup

On
On
More...
More
More

SETUP

Exit

--- General Setting ---

Setup Menu

Use cursor keys to move focus, use
“ENTER” key to select

System
Language
Playback
Security
Network

OSD
Menu
Audio
Subtitle

ENGLISH
ENGLISH
ENGLISH
ENGLISH

SETUP

Exit

--- General Setting ---

Setup Menu

Use cursor keys to move focus, use
“ENTER” key to select

System
Language
Playback
Security
Network

Closed Caption
Angle Mark
PIP Mark
Secondary Audio
Last Memory

On
On
On
On
On

SETUP

Exit

--- General Setting ---

Setup Menu

Use cursor keys to move focus, use
“ENTER” key to select

System
Language
Playback
Security
Network

Change Password
Parental Control

SETUP

Exit

--- General Setting ---

Setup Menu

Use cursor keys to move focus, use
“ENTER” key to select

System
Language
Playback
Security
Network

Internet Connection
Information
Connection Test
IP Setting
Host Name Setting

Enable
More...
More...
Auto
Default

SETUP

Exit

--- General Setting ---

Setup Menu

Use cursor keys to move focus, use
“ENTER” key to select

System
Language
Playback
Security
Network

Screen Saver
Disc Auto Playback
Load Default
Upgrade
Easy Setup

On
On
More...
More
More

SETUP

Exit

--- General Setting ---

Setup Menu

Use cursor keys to move focus, use
“ENTER” key to select

System
Language
Playback
Security
Network

OSD
Menu
Audio
Subtitle

ENGLISH
ENGLISH
ENGLISH
ENGLISH

SETUP

Exit

--- General Setting ---

Setup Menu

Use cursor keys to move focus, use
“ENTER” key to select

System
Language
Playback
Security
Network

Closed Caption
Angle Mark
PIP Mark
Secondary Audio
Last Memory

On
On
On
On
On

SETUP

Exit

--- General Setting ---

Setup Menu

Use cursor keys to move focus, use
“ENTER” key to select

System
Language
Playback
Security
Network

Change Password
Parental Control

SETUP

Exit

--- General Setting ---

Setup Menu

Use cursor keys to move focus, use
“ENTER” key to select

System
Language
Playback
Security
Network

Internet Connection
Information
Connection Test
IP Setting
Host Name Setting

Enable
More...
More...
Auto
Default

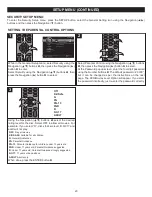
While  in  the  General  Setup  menu,  select  Playback  using  the
Navigation  (

π

,

)  buttons 

1

,  then  press  the  Navigation  (

®

)

button 

to enter. 

Select  PIP  Mark  using  the  Navigation  (

π

,

)  buttons 

1

,  then

press the Navigation (

®

) button 

to select.

Select ON to activate PIP Mark or OFF to deactivate PIP Mark
using the Navigation (

π

,

) buttons 

1

, then press the ENTER

button 

3

. If set to ON, the PIP Mark will stay on the screen when

the movie supports this function at that moment. If set to OFF,
the mark will show for only a few seconds.

3

1

1

2

1

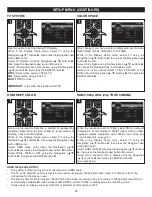
While  in  the  General  Setup  menu,  select  Playback  using  the
Navigation  (

π

,

)  buttons 

1

,  then  press  the  Navigation  (

®

)

button 

to enter. 

Select Secondary Audio Mark using the Navigation (

π

,

) buttons

1

, then press the Navigation (

®

) button 

to select.

Select ON to activate Secondary Audio Mark or OFF to deactivate
Secondary  Audio  Mark  using  the  Navigation  (

π

,

)  buttons 

1

,

then press the ENTER button 

3

. If set to ON, the mark will stay on

the screen when the movie supports this function at that moment.
If set to OFF, the mark will show for only a few seconds.

3

1

1

2

1

PIP MARK

SECONDARY AUDIO MARK

SETUP

Exit

--- General Setting ---

Setup Menu

Use cursor keys to move focus, use
“ENTER” key to select

System
Language
Playback
Security
Network

Screen Saver
Disc Auto Playback
Load Default
Upgrade
Easy Setup

On
On
More...
More
More

SETUP

Exit

--- General Setting ---

Setup Menu

Use cursor keys to move focus, use
“ENTER” key to select

System
Language
Playback
Security
Network

OSD
Menu
Audio
Subtitle

ENGLISH
ENGLISH
ENGLISH
ENGLISH

SETUP

Exit

--- General Setting ---

Setup Menu

Use cursor keys to move focus, use
“ENTER” key to select

System
Language
Playback
Security
Network

Closed Caption
Angle Mark
PIP Mark
Secondary Audio
Last Memory

On
On
On
On
On

SETUP

Exit

--- General Setting ---

Setup Menu

Use cursor keys to move focus, use
“ENTER” key to select

System
Language
Playback
Security
Network

Change Password
Parental Control

SETUP

Exit

--- General Setting ---

Setup Menu

Use cursor keys to move focus, use
“ENTER” key to select

System
Language
Playback
Security
Network

Internet Connection
Information
Connection Test
IP Setting
Host Name Setting

Enable
More...
More...
Auto
Default

SETUP

Exit

--- General Setting ---

Setup Menu

Use cursor keys to move focus, use
“ENTER” key to select

System
Language
Playback
Security
Network

Screen Saver
Disc Auto Playback
Load Default
Upgrade
Easy Setup

On
On
More...
More
More

SETUP

Exit

--- General Setting ---

Setup Menu

Use cursor keys to move focus, use
“ENTER” key to select

System
Language
Playback
Security
Network

OSD
Menu
Audio
Subtitle

ENGLISH
ENGLISH
ENGLISH
ENGLISH

SETUP

Exit

--- General Setting ---

Setup Menu

Use cursor keys to move focus, use
“ENTER” key to select

System
Language
Playback
Security
Network

Closed Caption
Angle Mark
PIP Mark
Secondary Audio
Last Memory

On
On
On
On
On

SETUP

Exit

--- General Setting ---

Setup Menu

Use cursor keys to move focus, use
“ENTER” key to select

System
Language
Playback
Security
Network

Change Password
Parental Control

SETUP

Exit

--- General Setting ---

Setup Menu

Use cursor keys to move focus, use
“ENTER” key to select

System
Language
Playback
Security
Network

Internet Connection
Information
Connection Test
IP Setting
Host Name Setting

Enable
More...
More...
Auto
Default

This  unit  memorizes  the  last  scene  from  the  last  disc  that  was
viewed, even if you remove the disc from the unit or switch off the
unit. If you load a disc that has the scene memorized, the scene is
automatically recalled.

NOTE:

If the unit does not playback automatically, press the Play

button 

1

to start the playback.

While  in  the  General  Setup  menu,  select  Playback  using  the
Navigation (

π

,

) buttons 

2

, then press the Navigation (

®

) button

to enter. Select Last Memory using the Navigation (

π

,

) buttons

2

, then press the Navigation (

®

) button 

to select. Select ON to

activate Last Memory or OFF to deactivate Last Memory using the
Navigation (

π

,

) buttons 

2

, then press the ENTER button 

4

.

4

1

3

2

2

1

LAST MEMORY (DVD and CD only)

SETUP

Exit

--- General Setting ---

Setup Menu

Use cursor keys to move focus, use
“ENTER” key to select

System
Language
Playback
Security
Network

Screen Saver
Disc Auto Playback
Load Default
Upgrade
Easy Setup

On
On
More...
More
More

SETUP

Exit

--- General Setting ---

Setup Menu

Use cursor keys to move focus, use
“ENTER” key to select

System
Language
Playback
Security
Network

OSD
Menu
Audio
Subtitle

ENGLISH
ENGLISH
ENGLISH
ENGLISH

SETUP

Exit

--- General Setting ---

Setup Menu

Use cursor keys to move focus, use
“ENTER” key to select

System
Language
Playback
Security
Network

Closed Caption
Angle Mark
PIP Mark
Secondary Audio
Last Memory

On
On
On
On
On

SETUP

Exit

--- General Setting ---

Setup Menu

Use cursor keys to move focus, use
“ENTER” key to select

System
Language
Playback
Security
Network

Change Password
Parental Control

SETUP

Exit

--- General Setting ---

Setup Menu

Use cursor keys to move focus, use
“ENTER” key to select

System
Language
Playback
Security
Network

Internet Connection
Information
Connection Test
IP Setting
Host Name Setting

Enable
More...
More...
Auto
Default

Содержание MVBD2520-R

Страница 1: ...MVBD2520 R Blu Ray Player User Manual...

Страница 2: ...3 Network Setup Menu 25 Display Setup Menu 27 Audio Setup Menu 29 Information Menu 30 Basic Operation General 31 HDMI Reset 31 Color Buttons 31 Mute 31 OSC On Screen Controls Button 31 BD DVD Operatio...

Страница 3: ...ore of the following measures Reorient or relocate the receiving antenna Increase the separation between the equipment and receiver Connect the equipment into an outlet on a circuit different from tha...

Страница 4: ...articularly at plugs convenience receptacles and the point where they exit from the apparatus 11 Only use attachments accessories specified by the manufacturer 12 Use only with the cart stand tripod b...

Страница 5: ...nit follow that product s instructions Warning Cleaning and adjustment of lenses and or other components of playback mechanism should be performed by a qualified service technician NOTES ON MOISTURE C...

Страница 6: ...ully reproducing the original cinema image BD J Application The BD ROM format supports Java for interactive functions BD J offers content providers almost unlimited functionality when creating interac...

Страница 7: ...n 9 Skip n Button 10 Play Pause P Button 11 USB SD Card Jack Inside Compartment 6 LOCATION OF CONTROLS FRONT 2 1 3 4 8 7 10 9 5 6 11 1 Power Switch 2 AC Power Cord 3 COAXIAL Output Jack 4 OPTICAL Outp...

Страница 8: ...TITLE Button 27 MUTE Button 28 Search Forward Button 29 Skip n Button 30 Slow Forward Button 31 Slow Reverse Button 32 RANDOM Button 33 2nd AUDIO Button 34 ZOOM Blue Button 35 DIGEST Yellow Button 36...

Страница 9: ...ng the batteries as indicated in the Battery Compartment A reversed battery may cause damage to the device 4 Do not mix different types of batteries together e g Alkaline Rechargeable and Carbon zinc...

Страница 10: ...as well as this manual When connecting the Player to the TV make sure the power is off and both units are unplugged before making any connections If your TV only has one audio input the use of a Y co...

Страница 11: ...ly If you connect the player through a VCR the playback picture will be distorted because video discs are copy protected If using a TV with a blue screen option turn the option off on the TV for best...

Страница 12: ...tions Connect the player to your TV directly If you connect the player through a VCR the playback picture will be distorted because video discs are copy protected When using HDMI as your source setup...

Страница 13: ...connecting the Player refer to the owner s manual of the TV and receiver as well as this manual When connecting the Player to the TV and receiver make sure the power is off and both units are unplugge...

Страница 14: ...ns Connect the player to your TV directly If you connect the player through a VCR the playback picture will be distorted because video discs are copy protected When using HDMI as your source setup the...

Страница 15: ...d all units are unplugged before making any connections Connect the player to your TV directly If you connect the player through a VCR the playback picture will be distorted because video discs are co...

Страница 16: ...teractive media and games that are associated with the movie title 1 Connect the LAN 100 terminal of the player to your internet source from the broadband router directly Refer to the instructions tha...

Страница 17: ...t such as previews trivia games exclusive special features and more The content will vary from disc to disc Q2 Do all Blu ray Discs have this feature A2 BD Live is still relatively new so make sure th...

Страница 18: ...every disc will playback AUDIO CD Data on an audio CD is divided into sections called tracks each of which is given a track number KODAK PICTURE CD Data on a Kodak picture CD is usually not divided i...

Страница 19: ...cted and any recordings made from these discs will be distorted This product incorporates copyright protection technology that is protected by method claims of certain U S patents and other intellectu...

Страница 20: ...Setup On On More More More SETUP Exit General Setting Setup Menu Use cursor keys to move focus use ENTER key to select System Language Playback Security Network OSD Menu Audio Subtitle ENGLISH ENGLIS...

Страница 21: ...e BD Java application data you should clear the Local Storage first before playback SETUP Exit General Setting Setup Menu Use cursor keys to move focus use ENTER key to select System Language Playback...

Страница 22: ...est IP Setting Host Name Setting Enable More More Auto Default Use this option to select the language the disc will be played back in While in the General Setup menu select Language using the Navigati...

Страница 23: ...s the ENTER button 3 If set to ON the mark will stay on the screen when the movie supports this function at that moment If set to OFF the mark will show for only a few seconds 3 1 1 2 1 PIP MARK SECON...

Страница 24: ...uidance PG 13 Parental Guidance for children under 13 years old PGR Under 17 years old Parental Guidance suggested R Under 17 years old Parental Guidance strongly suggested NC 17 17 years old and abov...

Страница 25: ...SETUP Exit General Setting Use cursor keys to move focus use ENTER key to select System Language Playback Security Network Closed Caption Angle Mark PIP Mark Secondary Audio Last Memory On On On On O...

Страница 26: ...ally set the IP settings or MANUAL to manually set the IP Settings as per your internet provider s instructions using the Navigation buttons 1 then press the ENTER button 4 Use the Number buttons 3 to...

Страница 27: ...if it is set to Enable 3 1 1 2 1 PROXY SETTING SETUP Exit General Setting Use cursor keys to move focus use ENTER key to select System Language Playback Security Network Screen Saver Disc Auto Playba...

Страница 28: ...lution While in the Display Setup menu select TV using the Navigation buttons 1 then press the Navigation button 2 to enter Select Resolution using the Navigation buttons 1 then press the Navigation b...

Страница 29: ...ation buttons 1 then press the Navigation button 2 to enter Select HDMI Deep Color using the Navigation buttons 1 then press the Navigation button 2 to select Select 30bits 36bits or OFF using the Nav...

Страница 30: ...he Audio Setting icon using the Navigation buttons and then press the Navigation button Select this when your equipment is connected via Optical or Coaxial cable While in the Audio Setup menu select A...

Страница 31: ...you to listen to a movie at a lower volume without losing clarity While in the Audio Setup menu select Audio Output using the Navigation buttons 1 then press the Navigation button 2 to enter Select D...

Страница 32: ...its proper position It is important that you read the manual that accompanies the disc as there are features that are on this player that cannot be used with certain discs There are also extra feature...

Страница 33: ...the Play button 2 to resume playback where you left off resuming playback If the Stop X button 1 is pressed again the unit will enter the Stop mode 1 2 4 NOTES If a Menu appears on the TV screen press...

Страница 34: ...3 1 SKIP N SKIP o SEARCH Press the Pause p button 1 to pause the picture Press the Pause p button 1 again or the Play button 2 to resume normal playback 2 1 1 Press the Slow Forward 1 button or Slow R...

Страница 35: ...Select the Time option using the Navigation buttons 2 Select the desired search TT Track Time or CH Chapter Time using the Navigation buttons 2 and then press the ENTER button 3 First set the 2 digit...

Страница 36: ...move the image on the TV screen Press the ZOOM button 1 once more to cancel the zoom function This feature is not available on all discs 2 1 1 While in the Playback mode press the ANGLE button the tot...

Страница 37: ...play the Current Chapter 2nd Press Randomly play the Current Title 3rd Press Randomly play the Whole DVD 4th Press Cancel the Random function This feature is not available on all discs 1 RANDOM DVD o...

Страница 38: ...desired bookmark using the Navigation buttons 2 and press the Enter button 3 to playback from the selected bookmark 1 2 3 2 1 2 BOOKMARK DVD only This unit allows you to bookmark up to 12 sections of...

Страница 39: ...start the program playback Playback will begin on the first chapter that you programmed and the player will continue to play all of the chapters titles that you programmed in the order in which you p...

Страница 40: ...button 1 Because the unit will remember where you stopped simply press the Play button 2 to resume playback where you left off resuming playback If the Stop X button 1 is pressed again the unit will e...

Страница 41: ...essing the Play button 3 2 1 3 1 Press the GOTO button 1 the Search options will appear Select the Time Search option TRACK or DISC using the Navigation buttons 2 then press the ENTER button 3 First s...

Страница 42: ...want the section to start Press the Repeat A B button again to define where you would like the section to end the unit will then play the selected area continuously Press the Repeat A B button again t...

Страница 43: ...acks have been programmed up to 15 Press the Play button to start the program playback Playback will begin on the first track that you programmed and the player will continue to play all of the tracks...

Страница 44: ...4 to enter 3 3 2 4 2 PLAYBACK OF A DATA PICTURE AUDIO DISC USB SD CARD 1 1 2 The media center will show a Show Photos folder and a Play Music folder Select the desired folder using the Navigation butt...

Страница 45: ...econds Press the OSC button again to return NOTE The GoTo Skip Search Pause Random Repeat Repeat One and Repeat Folder and Repeat A B buttons will operate as described previously TO RETURN TO THE MEDI...

Страница 46: ...button the OSC menu will appear You can set the following in this menu File Select a desired file to play Play Mode Select between Random or Normal Slideshow Speed Set the desired slideshow speed Slo...

Страница 47: ...in and selecting Add to Playlist will add all the check marked files to the playlist NOTE After selecting Add to Playlist the check mark next to each file will disappear 2 1 2 PLAYLISTS A playlist wil...

Страница 48: ...to update the firmware While in the General Setup menu select System using the Navigation buttons then press the Navigation button to enter Select Upgrade using the Navigation buttons then press the N...

Страница 49: ...me discs Select the correct TV Screen 16 9 Full 16 9 Normal 4 3 Pan Scan 4 3 Letterbox Install fresh batteries Install batteries according to the diagram Aim the remote at the sensor Operate within 20...

Страница 50: ...e on all discs If the audio or subtitle language does not appear on the disc then the initial setting will not be seen heard Subtitles appear only when the discs contain them Subtitles are not turned...

Страница 51: ...c to the outer edge of the disc Never wipe in circular motions Discs should be stored in their cases after each use to avoid damage Do not expose discs to direct sunlight high humidity high temperatur...

Страница 52: ...HD Dolby Digital Dolby Digital Plus Dolby True HD Linear PCM Video Output Composite 75 Load 1 channel 1 0 Vp p Blu ray 480i DVD 480i Component 75 Load Y 1 0Vp p Pr 0 70Vp p Pb 0 70Vp p Blu ray 1080i...

Отзывы: