background image

WLI-PCM User’s Manual

67

5

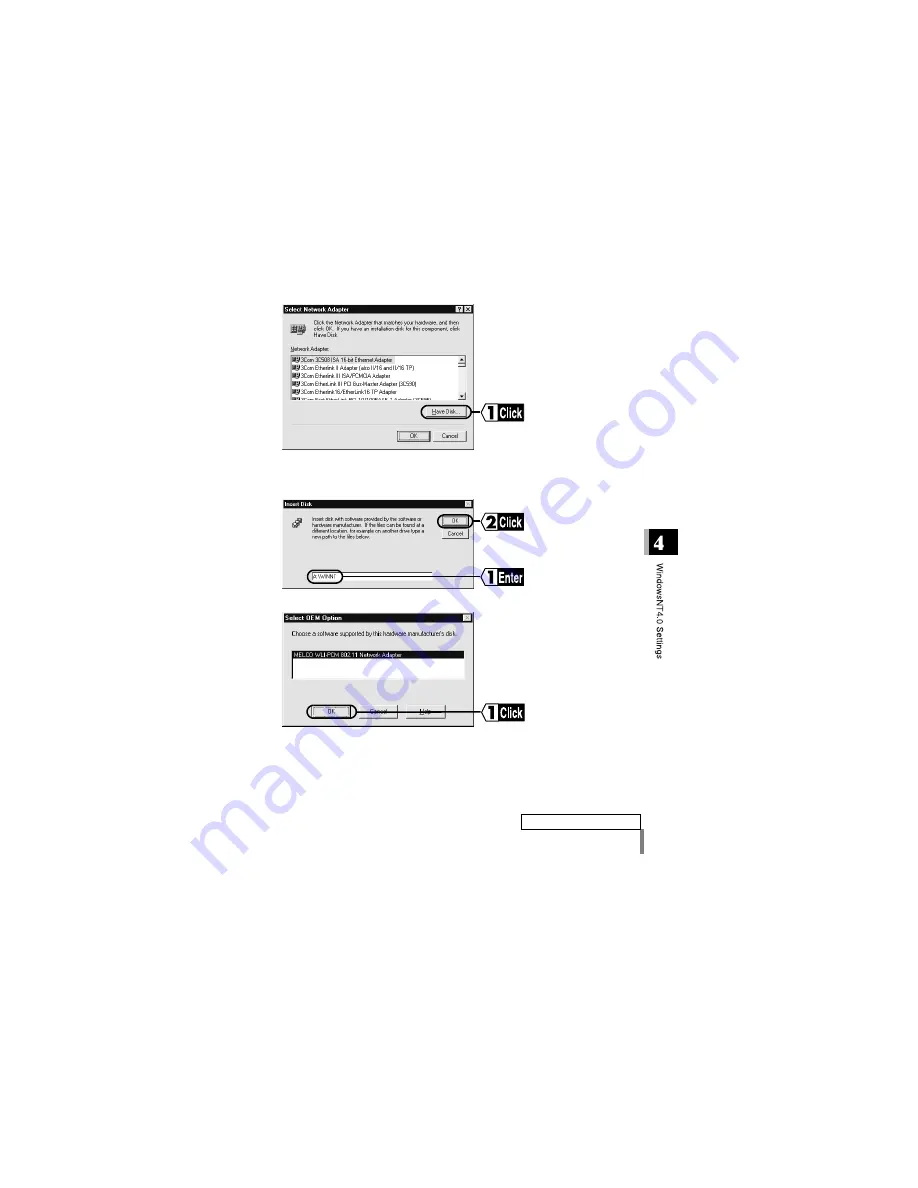
Click the Have Disk... button.

6

Insert the “LAN Card Utility for WLI-PCM” disk into the floppy disk drive.

7

Enter "A:\WINNT" (when the floppy disk drive is "A") and click the OK button.

8

Click the OK button.

Continued on next page

Содержание Buffalo RoamLAN WLI-PCM

Страница 1: ... Manager 5 Connection to Network 6 Troubleshooting 7 When You Want To 8 Appendix 9 Thank you for purchasing MELCO INC s wireless LAN card WLI PCM This manual describes precautions for handling of the wire less LAN card Read this carefully before using the wireless LAN card to ensure correct operation ...

Страница 2: ...el attached to the rear of the WLI PCM All rights for this manual are owned by MELCO INC No part of this manual may be transmitted reproduced or revised without permission from MELCO INC Product names of other companies used in this manual are trademarks or registered trademarks of the respective companies Trademark symbols etc are not indi cated in this manual Specifications design and other desc...

Страница 3: ...lures and problems of the computer any losses and failures of data or failures and problems of this product caused by misuse SIGNS AND SYMBOLS USED IN THIS MANUAL Warning signs Symbols Specific instructions are given in or around and WARNING Failure to follow the instructions shown with this sign may result in a hazard or the serious injury of the user CAUTION Failure to follow the instructions sh...

Страница 4: ...e to follow this instruction may cause fire electric shock and or mechanical damage Compulsory Adults knowledgeable about this product must attend and supervise children using the electrical appliances Compulsory Keep the internal components cables and connectors of the electrical appliances out of the reach of children Children may be injured if they touch them Compulsory Be sure to observe instr...

Страница 5: ...computers and peripheral devices are connected to the AC outlet If the plug is not connected mechanical failure may occur Compulsory Touch something made of metal a door knob or aluminum window frame for example and release static electricity before touching the product to avoid damage caused by static electricity Static electricity generated from the human body may damage the product Compulsory B...

Страница 6: ...he device is not used for a long time Hardware is damaged in a natural disaster Note that MELCO INC shall not be liable for any damages arising from loss or damage of digital data in any cases Prohibited Never turn off or reset the computer or other devices while accessing data storage devices such as the hard disk MO drive or floppy disk drive Doing so may delete or damage data Note that MELCO IN...

Страница 7: ...Unstable area The unit may fall or drop and cause an injury or failure Area where the temperature or humidity does not conform to the operation environment specified in the manual of the computer or area where con densation occurs It causes a failure Area where the product is in direct sunlight It causes a fail ure or deformation Area in the proximity of fire or which contains hot air It causes a ...

Страница 8: ...CM 16 Installing the WLI PCM 21 3 Windows98 95 Settings 24 Check before installation 24 Driver installation 26 Checking after installation 40 Removing the WLI PCM 47 Uninstalling the driver 48 Preparing for connection to network 49 4 WindowsNT4 0 Settings 60 Driver installation 60 Changing settings 70 Checking after installation 72 Installing the ESS ID Driver 73 Preparing for connection to networ...

Страница 9: ...k 83 Connection to network 83 Checking connection to network 91 Connection to other computers 97 7 Troubleshooting 99 8 When You Want To 112 Change target access point 112 Check connection using PING command 114 Assign IP address 115 Check MAC address 116 9 Appendix 118 Terminology 118 Product specifications 123 ...

Страница 10: ...erved injuries or mechanical damage may occur NOTE mark Describes supplementary information or items which should be under stood when handling the WLI PCM REFERENCE mark Indicates page s containing related information NEXT mark Indicates page s containing the next step is described COLUMN mark Provides convenient tips Terminology Descriptions enclosed by double quotation marks are software or dial...

Страница 11: ...ailures or problems of the computer or any failures and problems of the access point caused by misuse Wired LAN and wireless LAN The following terms are used in this manual to distinguish between a 10BASE T 100BASE TX LAN connected by cables and a LAN using no cables Wired LAN LAN connected by cables Wireless LAN LAN using wireless communication Note that these are not general terms and are used o...

Страница 12: ...ory default ESS ID for the WLI PCM is RoamLAN The factory default is effective when using the WLI PCM in a network consist ing of only wireless LAN PC s however this may allow unauthorized access by an external computer equipped with the same model LAN card We recom mend that you change the ESS ID to your own personal ID DS channel Select the DS channel from channels A B or C Selecting a channel s...

Страница 13: ...communication system certification not required Direct sequence spread spectrum DS SS technology ensures high noise resistance Diversity antenna 2 built in antennas with data received by the more sensitive of these IEEE802 11 compliant with a data rate of 2 Mbps even on a wireless LAN Effective range of 150 ft indoors or 450 ft outdoors may vary depending on operating environment ESS ID prevents u...

Страница 14: ...ne wireless LAN card is required for each computer All LAN cards must have the same ESS ID to enable communica tion The factory default ESS ID can be used however we recommend that you change the default to ensure secu rity Refer to ESS ID on page 10 for details Wired and wireless LAN network MELCO INC s access point WLA T1 provided separately is required to con nect a wireless LAN to a wired LAN ...

Страница 15: ... to read any additional information sheets provided in the pack age Contents of package and section names Name Function PCMCIA connector Terminal connected to the PCMCIA slot of the com puter Never touch the terminal with your bare hands Touching the terminal may cause a malfunc tion Lamp Lights green or red when sending or receiving data respectively Disk back up Be sure to back up the LAN Card U...

Страница 16: ...WLI PCM User s Manual 14 Follow the procedures below to connect the WLI PCM Read the entire operation flow carefully and understand it before starting setup Setup flow ...

Страница 17: ...uter before installing the driver When using Windows98 95 go to Before installing the WLI PCM on page 16 When using WindowsNT4 0 go to Installing the WLI PCM on page 21 1Double click the My Computer icon 2Select View Details Check the drive names listed in the window Note the drive names listed here These will be required in the following steps e g The drive configuration for the example screen sh...

Страница 18: ... WLI PCM driver Follow the procedure below to check that the 32 bit PC card driver is installed The procedure described below is for Windows98 Note that different windows appear for Windows95 Before installing the WLI PCM 1Click the Start button and select Settings Control Panel 2Double click the System icon 3Click the Device Manager tab and then the mark on the left of PCMCIA socket The device na...

Страница 19: ...s displayed go to Troubleshooting for PC card driver on page 18 If no error marks are displayed go to Installing the WLI PCM on page 21 4Check that no marks indicating a problem or X are displayed for any of the devices listed for PCMCIA socket ...

Страница 20: ...card driver 1If an error mark or X is displayed for any of the devices listed for PCM CIA socket in the System Properties dialog box double click the PC Card icon in the Control Panel window 2Select No and click the Next button Continued on next page ...

Страница 21: ... PCMCIA Wiz ard In this case follow the steps below Check the status of the sockets The Empty socket is available Go to Installing the WLI PCM on page 21 Sockets without an Empty mark cannot be used Refer to the instruction manual for your computer or consult the manufacturer 3Select No and click the Next button Continued on next page ...

Страница 22: ...installed after the com puter is restarted 6Check the PC card driver following the steps described in Checking 32 bit PC card driver on page 16 If the PC card driver cannot be installed refer to the instruction manual for your computer or consult the manufacturer Go to Installing the WLI PCM on page 21 ...

Страница 23: ...s on the power management function Precautions when installing the LAN card Be sure to follow the handling instructions in the manuals provided with your computer and peripheral equipment Remove dust from connectors Never touch the connectors of the WLI PCM Carefully check the direction of the connectors when installing the WLI PCM to your computer The connector may be damaged if it is forced Prec...

Страница 24: ...d on However be sure to turn the computer off when using WindowsNT4 0 When using Windows98 95 go to Windows98 95 Settings on page 24 When using WindowsNT4 0 go to WindowsNT4 0 Settings on page 60 When your computer is equipped with two card slots As the WLI PCM has a protruding section for the built in antenna the upper slot may be blocked when the lower one is occupied with the WLI PCM Place the ...

Страница 25: ...res for the PCMCIA ISA board When using Windows98 95 the WLI PCM can be installed and removed with the computer turned on However be sure to turn the computer off when using WindowsNT4 0 Refer to the illustration below to install the WLI PCM to a desktop computer Avoid any impact or force on the antenna section This may affect operation of the WLI PCM When using Windows98 95 go to Windows98 95 Set...

Страница 26: ...g window appears when the WLI PCM is inserted correctly Turn the computer on if it is off Windows98 The Add New Hardware Wizard appears on the screen Go to Windows98 on page 26 If the above wizard does not appear refer to Add New Hardware Wizard does not appear when the WLI PCM is inserted Windows98 95 Or an error mark appears next to MELCO WLI PCM 802 11 Network Adapter on page 100 Check before i...

Страница 27: ...oes not appear refer to Add New Hardware Wizard does not appear when the WLI PCM is inserted Windows98 95 Or an error mark appears next to MELCO WLI PCM 802 11 Network Adapter on page 100 When New Hardware Found window appears The above window appears for version 4 00 950 or 4 00 950a Go to When using Windows95 version 4 00 950 or 4 00 950a on page 36 If the above wizard does not appear refer to A...

Страница 28: ...dware Wizard page 24 to install the driver Windows98 Driver installation 1Click the Next button 2Select Search for the best driver for your device Recommended and click the Next button 3Insert the LAN Card Utility for WLI PCM disk into the floppy disk drive Continued on next page ...

Страница 29: ...WLI PCM User s Manual 27 4Select Floppy disk drives and click the Next button 5Click the Next button Continued on next page ...

Страница 30: ...not be found appears Change C WINDOWS CATROOT shown in the Copy files from field to A when the floppy disk drive is A and click the OK button A window prompting you to insert the Windows98 CD ROM may appear Follow the steps below before proceeding to step 6 Set the Windows98 CD ROM in the CD ROM drive and click the OK button Enter D WIN98 when CD ROM drive is D and click the OK button Continued on...

Страница 31: ... Card Utility for WLI PCM disk from the floppy disk drive 8Click the Yes button 9The computer restarts 10Enter your user name and password and click the OK button This completes driver installation Check that the WLI PCM is operating correctly Continued on next page ...

Страница 32: ...nsult the network administrator and set the IP address Go to When using Windows98 or Windows95 version 4 00 950 B 4 00 950 C on page 40 The Set Windows Password window may appear when you click the OK button on the Enter Windows Password window If it does enter the password again and click the OK button ...

Страница 33: ...er s Manual 31 When using Windows95 version 4 00 950 B or 4 00 950 C 1Insert the LAN Card Utility for WLI PCM disk into the floppy disk drive 2Click the Next button 3Click the Finish button Continued on next page ...

Страница 34: ...low the steps below before proceeding to step 4 Click the OK button Enter the Computer name Workgroup and Computer Description and click the Close button Refer to Identification window of Windows98 95 on page 121 for details of the computer name workgroup and computer description Continued on next page ...

Страница 35: ...CABS shown in the Copy files from field to A when the floppy disk drive is A and click the OK button A screen prompting you to insert the Windows95 CD ROM may appear Follow the steps below before proceeding to step 4 Set the Windows95 CD ROM in the CD ROM drive and click the OK button Change A shown in the Copy files from field to C WIN DOWS OPTIONS CABS when Windows95 is installed on C and click ...

Страница 36: ... Click the Yes button to use the existing file 5Eject the LAN Card Utility for WLI PCM disk from the floppy disk drive 6Click the Yes button 7Windows95 restarts 8Enter your user name and password and click the OK button This completes driver installation Check that the WLI PCM is operating correctly Continued on next page ...

Страница 37: ...nsult the network administrator and set the IP address Go to When using Windows98 or Windows95 version 4 00 950 B 4 00 950 C on page 40 The Set Windows Password window may appear when you click the OK button on the Enter Windows Password window If it does enter the password again and click the OK button ...

Страница 38: ...0 950 or 4 00 950a 1Select Driver from disk provided by hardware manufacturer and click the OK button 2Insert the LAN Card Utility for WLI PCM disk into the floppy disk driver 3Enter A when floppy disk drive is A and click the OK button Continued on next page ...

Страница 39: ...w the steps below before proceeding to step 4 Click the OK button Enter the Computer name Workgroup and Computer Description and click the Close button Refer to Identification window of Windows98 95 on page 121 for details of the computer name workgroup and computer description Continued on next page ...

Страница 40: ...disk drive and click the OK button Insert the appropriate floppy disk as instructed by each screen 5Change A shown in the Copy files from field to D WIN95 when the CD ROM drive is D and click the OK button If Windows95 is pre installed and the com puter does not have a CD ROM drive enter C WIN DOWS OPTIONS CABS when Windows95 is installed on the C drive 6Eject the LAN Card Utility for WLI PCM disk...

Страница 41: ...sion 4 00 950 or 4 00 950a on page 36 7Click the Yes button and restart Windows95 8Enter your user name and password and click the OK button This completes driver installation Check that the WLI PCM is operating correctly The Set Windows Password window may appear when you click the OK button on the Enter Windows Password window If it does enter the password again and click the OK button ...

Страница 42: ...tly Different screens may appear after installation depending on the ver sion of Windows95 When using Windows98 or Windows95 version 4 00 950 B 4 00 950 C Checking after installation 1Click the Start button and select Settings Control Panel 2Double click the System icon 3Click the Device Manager tab Continued on next page ...

Страница 43: ... devices however this does not imply any prob lem 5Check that the message This device is working properly is displayed for Device status If the above message is not displayed the WLI PCM is not operating correctly Uninstall and re install the driver referring to Add New Hardware Wizard does not appear when the WLI PCM is inserted Windows98 95 Or an error mark appears next to MELCO WLI PCM 802 11 N...

Страница 44: ...ing Windows95 the mes sage The driver file is not required or installed for this device appears However this does not imply any problem 7Click the Resource tab and check that No conflicts is displayed in the Con flicting device list Continued on next page ...

Страница 45: ...t to MELCO WLI PCM 802 11 Network Adapter on page 100 8Click the Start button and select Settings Control Panel 9Double click the PC Card PCMCIA icon 10Check that MELCO WLI PCM 802 11 Network Adapter is displayed for Socket Status When the above message does not appear the WLI PCM is not operating correctly Refer to Add New Hardware Wizard does not appear when the WLI PCM is inserted Windows98 95 ...

Страница 46: ...on and select Settings Control Panel 2Double click the System icon 3Click the Device Manager tab 4Select MELCO WLI PCM 802 11 Network Adapter and click the Properties button If MELCO WLI PCM 802 11 Net work Adapter is not listed click the mark on the left of Network adapters Continued on next page ...

Страница 47: ...PCM is not operating correctly Uninstall and re install the driver referring to Add New Hardware Wizard does not appear when the WLI PCM is inserted Windows98 95 Or an error mark appears next to MELCO WLI PCM 802 11 Network Adapter on page 100 6Click the Resources tab Check that No conflicts is displayed in the Conflicting device list Continued on next page ...

Страница 48: ...02 11 Network Adapter on page 100 7Click the Start button and select Settings Control Panel 8Double click the PC Card PCMCIA icon 9Check that MELCO WLI PCM 802 11 Network Adapter is displayed for Socket Status When the above message does not appear the WLI PCM is not operating correctly Uninstall and re install the driver referring to Add New Hardware Wizard does not appear when the WLI PCM is ins...

Страница 49: ...ng Removing the WLI PCM 1Click the Start button and select Settings Control Panel 2Double click the PC Card PCMCIA icon 3Select MELCO WLI PCM 802 11 Network Adapter and click the Stop Windows98 or Finish Windows95 button 4When the following dialog box appears click the OK button 5Remove the WLI PCM ...

Страница 50: ...er 1Click the Start button and select Settings Control Panel 2Double click the System icon 3Click the Device Manager tab 4Select MELCO WLI PCM 802 11 Network Adapter and click the Remove button If MELCO WLI PCM 802 11 Net work Adapter is not listed click the mark on the left of Network adapters ...

Страница 51: ...oft Network Client Add File and printer sharing for Microsoft Networks Check computer name and workgroup name Set sharing TCP IP setting Checking NetBEUI TCP IP and Microsoft Network Client Preparing for connection to network 1Click the Start button and select Settings Control Panel 2Double click the Network icon 3Check that NetBEUI TCP IP and Microsoft Network Client are listed in The following n...

Страница 52: ...Client page 57 Adding NetBEUI page 58 and Add ing TCP IP page 59 Go to Adding File and printer sharing for Microsoft Networks on page 51 If multiple network adapters are installed NetBEUI MELCO WLI PCM 802 11 Network Adapter and TCP IP MELCO WLI PCM 802 11 Network Adapter appear in The following network components are installed However this does not imply any problem ...

Страница 53: ...ing computer name and workgroup name on page 52 1Click the File and Print Sharing button 2Check I want to be able to give others access to my files and I want to be able to allow others to print to my printer s and click the OK button 3File and printer sharing for Microsoft Networks is added ...

Страница 54: ...roup and Computer Description and click the OK button The same workgroup must be assigned to all the computers included in the network Refer to Identification window of Windows98 95 on page 121 for details of the computer name workgroup and computer description 2Click the Yes button to restart Windows98 95 The Enter Network Password window appears Continued on next page ...

Страница 55: ...aring the C drive in My Computer 3Enter your user name and password and click the OK button Be sure to enter your user name and password whenever this window appears or you will not be able to access the network 1Double click the My Computer icon on the desk top 2Click the icon for the C drive with the right mouse button and select Sharing Continued on next page ...

Страница 56: ... 3Select Shared As and check or change Shared Name Comment Access Type and Password Click the OK button Refer to Sharing in Windows98 95 on page 120 for details of Shared Name Comment Access Type and Password 4The icon for the C drive changes as shown below ...

Страница 57: ...WLI PCM User s Manual 55 Setting TCP IP 1Click the Start button and select Settings Control Panel 2Double click the Network icon 3Select TCP IP and click the Properties button Continued on next page ...

Страница 58: ... on page 79 4Click the IP address tab Set the IP address and click the OK button Refer to Assign IP address on page 115 for IP address settings Contact the network administrator and check the IP address Windows98 95 restarts and TCP IP settings are completed ...

Страница 59: ...ent on page 49 1Click the Start button and select Settings Control Panel 2Double click the Network icon 3Click the Add button 4Select Client and click the Add button 5Select Microsoft for Manufacturer and Microsoft Network Client for Net work Clients and click the OK button to return to the Network screen step 3 ...

Страница 60: ...ent on page 49 1Click the Start button and select Settings Control Panel 2Double click the Network icon 3Click the Add button 4Select Protocol and click the Add button 5Select Microsoft for Manufacturer and NetBEUI for Network Clients and click the OK button to return to the Network screen step 3 ...

Страница 61: ...cking NetBEUI TCP IP and Microsoft Network Client on page 49 1Click the Start button and select Settings Control Panel Network 2Click the Add button 3Select Protocol and click the Add button 4Select Microsoft for Manufacturer and TCP IP for Network Protocol and click the OK button 5The Network window step 2 appears ...

Страница 62: ...that the status for pcmcia is start The WLI PCM cannot be inserted or removed with the computer on There is no resume function for WindowsNT4 0 The installation procedure for the driver differs depending on the operating envi ronment of your computer Select the applicable case When installing the driver to a computer with WindowsNT4 0 already set up go to When WindowsNT4 0 is already set up on pag...

Страница 63: ...driver has been installed before on page 66 When installing driver for first time Follow the steps below when installing the driver for the first time after setting up WindowsNT4 0 1Start WindowsNT4 0 and log on as administrator 2Click the Start button and select Settings Control Panel 3Double click the Network icon 4Click the Yes button The message Please wait while WindowsNT prepares Network Set...

Страница 64: ...WLI PCM User s Manual 62 5Select Wired to the network and click the Next button 6Click the Select from list button 7Click the Have Disk button Continued on next page ...

Страница 65: ...ual 63 8Insert the LAN Card Utility for WLI PCM disk into the floppy disk drive 9Enter A WINNT when the floppy disk drive is A and click the OK button 10Click the OK button 11 Click the Next button Continued on next page ...

Страница 66: ...WLI PCM User s Manual 64 12Select the network protocol to be used for the network and click the Next but ton 13Click the Next button 14Click the Next button Continued on next page ...

Страница 67: ...er D I386 when the CD ROM drive is D and click the Continue button 17Enter A WINNT when the floppy disk drive is A and click the Continue button 18The current settings for the WLI PCM IRQ level I O port address Memory base are displayed Check the settings and click the OK button ...

Страница 68: ...d Please select another value appears change the set tings Setting items ESS ID To be set later from Client Manager DS channel Do not change Packet size Maximum packet size usually set to 1500 Infrastructure Delete the check mark if present Install the driver as instructed by the wizards 1Start WindowsNT4 0 and log on as administrator 2Click the Start button and select Settings Control Panel 3Doub...

Страница 69: ...al 67 5Click the Have Disk button 6Insert the LAN Card Utility for WLI PCM disk into the floppy disk drive 7Enter A WINNT when the floppy disk drive is A and click the OK button 8Click the OK button Continued on next page ...

Страница 70: ...lick the OK button When the message This IRQ level I O port address Memory base is used by another board Please select another value appears change the set tings Setting items ESS ID To be set later by Client Manager DS channel Do not change Packet size Maximum packet size usually set to 1500 Infrastructure Delete the check mark if present ...

Страница 71: ...al Select the driver Specify the driver name MELCO WLI PCM 802 11 Network Adapter Refer to steps 6 to 11 in When installing driver for first time page 61 for details WLI PCM settings Check the current settings for the WLI PCM IRQ level I O port address Memory base and click the OK button Go to Changing settings on page 70 10 MELCO WLI PCM 802 11 Network Adapter is added Click the OK button Install...

Страница 72: ...port address Memory base Changing settings 1Start WindowsNT4 0 and log on as administrator 2Click the Start button and select Settings Control Panel 3Double click the Network icon 4Click the Adapters tab Select MELCO WLI PCM 802 11 Network Adapter and click the Properties button Continued on next page ...

Страница 73: ...rt address Memory base are displayed Change the settings as required and click the OK but ton Setting items ESS ID To be set later from Client Manager DS channel Do not change Packet size Maximum packet size usually set to 1500 Infrastructure Delete the check mark if present 6Restart the computer to activate the new settings ...

Страница 74: ...ion 1Click the Start button and select Programs Administrative Tools Common WindowsNT Diagnostics 2Click the Resources tab 3Click Devices 4Select Wlipcm from the Device list and click the Properties button 5Check that Input Output Range Memory Range and Interrupt Request are displayed If no settings are displayed or Wlipcm is not listed in the Device list change the resource settings Also check th...

Страница 75: ...alled before you can use the WLI PCM Follow the procedure below to install the driver Installing the ESS ID Driver 1Click the Start button and select Settings Control Panel 2Double click the Network icon 3Click the Services tab and then click the Add button ...

Страница 76: ...WLI PCM User s Manual 74 4Click the Have Disk button 5Enter A when the floppy disk drive is A and click the OK button 6Check that MELCO WLI PCM ESS ID Driver is displayed and then click the OK button ...

Страница 77: ...o to Preparing for connection to network on page 76 7Check that the MELCO WLI PCM ESS ID Driver is installed and then click the Close button The message Do you want to restart your computer now is displayed Click Yes to restart ...

Страница 78: ... TCP IP Setting TCP IP Checking TCP IP If TCP IP Protocol is not listed add it referring to Adding TCP IP on page 78 Go to Setting TCP IP on page 77 Preparing for connection to network 1Click the Start button and select Settings Control Panel 2Double click the Network icon 3Click the Protocol tab and check that TCP IP Protocol is listed in the Net work Protocols column ...

Страница 79: ... 2Double click the Network icon 3Click the Protocol tab Select TCP IP Protocol and click the Properties but ton 4Set the IP address and click the OK button Refer to Assign IP address on page 115 for IP address settings Contact the network administrator to check the IP address set ting 5WindowsNT4 0 restarts and TCP IP settings are completed ...

Страница 80: ... already on your computer Go to Checking TCP IP on page 76 1Click the Start button and select Settings Control Panel Network 2Double click the Network icon 3Click the Protocol tab and the Add button 4Select TCP IP Protocol and click the OK button 5The Network window step 2 appears ...

Страница 81: ...w the steps below to install Client Manager to all computers using the WLI PCM Installation 1Insert the LAN Card Utility for WLI PCM disk into the floppy disk drive 2Click the Start button and select Run 3Enter the path for setup exe on the LAN Card Utility for WLI PCM disk and click the OK button e g A setup exe when the floppy disk drive is A 4Quit any other applications that are running and cli...

Страница 82: ...e destination directory for Client Manager and click the Next button If you want to change the directory enter a new path and click the Next but ton 7Check the destination directory again and click the Start button Files are copied to the specified directory ...

Страница 83: ...Go to Connection to Network on page 83 8Click the Yes button Client Manager is registered in the Startup menu Click No when you do not want to add Client Manager to the Startup menu 9Click the OK button to complete installation ...

Страница 84: ...ck the Start button and select Programs MELCO WLI PCM Utility Uninstall Client Manager 2Click the OK button Client Manager is removed and related files and icons are automatically deleted 3Click the OK button Uninstallation of Client Manager is completed 4Click the OK button The computer restarts ...

Страница 85: ...re for your operating environment Connection between wireless LAN PCs The factory default ESS ID RoamLAN can be used for connection between wireless LAN PCs however we recommend that you change the ESS ID to ensure further security If you change the ESS ID be sure to change that of the destination computer Computers with different ESS IDs cannot be connected Con tact the administrator for the ESS ...

Страница 86: ...icon to start Client Manager 2Select File Manual 3Enter the ESS ID select the DS channel and click the OK button If the desired ESS ID is registered in the Frequently Used ESS ID list select it from there and click the OK button Click the Add button after entering the ESS ID to register it as a frequently used ESS ID Select any unused ESS IDS in the list and click the Delete button to delete it Th...

Страница 87: ...vailable on page 88 to acquire the information files 1Click the Start button and select Programs MELCO WLI PCM Utility Cli ent Manager If the following icon is displayed in the task tray on the screen you can dou ble click this icon to start Client Manager 2Select File Open 3Select the access point information file and click the Open button Contact the network administrator to check the file to be...

Страница 88: ...WLI PCM User s Manual 86 4The access point appears in the list in gray Select the target access point 5Select Open Connect 6Click the OK button ...

Страница 89: ... the access point is completed The access point in the list turns from gray to black and an antenna mark appears when your computer is connected to the access point Refer to The access point cannot be accessed using Client Man ager access point is displayed in gray even when it is found on page 106 if the access point in the list does not change to black ...

Страница 90: ... file is not available Contact the network administrator to check the ESS ID before connecting to the network 1Click the Start button and select Programs MELCO WLI PCM Utility Cli ent Manager If the following icon is displayed in the task tray on the screen you can dou ble click this icon to start Client Manager 2Select File Manual ...

Страница 91: ... Used ESS ID list select it from there and click the OK button Contact the network administrator to check the ESS ID The ESS ID is upper lower case sensitive and can consist of up to 32 alphanumeric characters including the under bar _ 4Click the OK button The ESS ID is changed 5The ESS ID is changed and the access point is searched automatically Continued on next page ...

Страница 92: ...oint in the list turns from gray to black and an antenna mark appears when your computer is connected to the access point Refer to The access point cannot be accessed using Client Man ager access point is displayed in gray even when it is found on page 106 if the access point in the list does not change to black ...

Страница 93: ...XXX XXX XXX XXX Where XXX XXX XXX XXX is the IP address of the target destination e g When the IP address of the target destination is 192 168 100 123 C ping 192 168 100 123 3If the devices are connected correctly the following is displayed Pinging 192 168 100 123 with 32 bytes of data Reply from 192 168 100 123 bytes 32 time 1ms TTL 32 Reply from 192 168 100 123 bytes 32 time 10ms TTL 32 Reply fr...

Страница 94: ...ccess point Client Manager is used to check connection conditions between the WLI PCM and an access point 1Click the Start button and select Programs MELCO WLI PCM Utility Cli ent Manager 2Select the access point and then File Test Connection Diagnostic 3Check the connection ...

Страница 95: ...WLI PCM User s Manual 93 Go to Results of test on page 94 4The result of the test is displayed ...

Страница 96: ... 2 Request the access point administrator to change the location of the access point 3 Eliminate obstacles between the wireless LAN PC and the access point 4 Check that there is no source of interference such as a microwave oven near the access point or wireless LAN PC Go to Connection to other computers on page 97 Connection Signal Results Very good Very good Acceptable No communication problems ...

Страница 97: ...rst time 1Move the access point to the desired location 2Click the Start button and select Programs MELCO WLI PCM Utility Cli ent Manager 3Select the access point and then File Test Connection Continuous 4Check the number of sent packets and received packets and percentage indicating the connection and signal conditions Continued on next page ...

Страница 98: ...WLI PCM User s Manual 96 5Move the client to check the effective communication range 6Determine the location of the access point where the best communication conditions are ensured ...

Страница 99: ...ple Connection to other computers 1Double click the Network Neighborhood icon Computers connected Peer to Peer are listed 2Double click the icon of the target computer Refer to Computers are not listed after double clicking the Network Neighborhood icon on page 103 3The drive s set to be shared page 53 are listed Double click the desired drive Continued on next page ...

Страница 100: ...an be connected to other com puters on the same wireless or wired LAN You can now operate your computers in a comfortable environment using both the wireless and wired LANs 4The contents of the selected drive are displayed and you can access the desired folder ...

Страница 101: ...Possible cause The PC card slot on the computer is faulty Solution If your computer has two slots insert the WLI PCM to the other slot If you have another computer insert the WLI PCM to that computer to locate the cause of the problem Possible cause The computer s power management function is activated Solution Turn the power management function off Refer to the instruction manual pro vided with t...

Страница 102: ...ollow the steps below to uninstall and re install the driver Check that the WLI PCM is inserted to the PC card slot on the computer Add New Hardware Wizard does not appear when the WLI PCM is inserted Windows98 95 Or an error mark appears next to MELCO WLI PCM 802 11 Network Adapter 1Click the Start button and select Settings Control Panel 2Double click the System icon 3Click the Device Manager ta...

Страница 103: ...Adapter may be included in Other devices If so select MELCO WLI PCM 802 11 Network Adapter and click the Remove button 4Click the No button 5Double click the Network icon 6If MELCO WLI PCM 802 11 Network Adapter is displayed remove it Continued on next page ...

Страница 104: ...n and select Programs Explorer 2 Select View Folder Options and click the View tab 3 Check Show all files and click the OK button 4 Select C Windows INF OTHER MicrosoftNetwlip2 inf and click the Delete button 8Exit Windows98 95 and turn the computer off 9Remove the WLI PCM Check the PC card driver referring to Checking 32 bit PC card driver on page 16 Then re install the driver following the steps...

Страница 105: ...s not correct Solution Check that the IP address is set correctly Refer to Assign IP address on page 115 Possible cause The driver is not installed correctly Solution Check that the driver is installed correctly When using Windows98 95 refer to Checking after installation on page 40 When using WindowsNT4 0 refer to Checking after installation on page 72 Possible cause The computer cannot communica...

Страница 106: ...lows 1 Click the Start button and select Find Computer 2 Enter the name of the target computer and click the Find Now button 3 Double click the icon of the computer found to access it Possible cause The workgroup is not set correctly Solution Check the settings for the workgroup Computers are not listed after double clicking the Network Neighborhood icon continued ...

Страница 107: ... to network on page 76 Possible cause TCP IP is not installed or configured correctly Solution Check the TCP IP settings again Windows98 95 1 Click the Start button and select Run Enter WINIPCFG in the window displayed and click the OK button 2 Select MELCO WLI PCM Adapter and check the IP address If the IP address is not correct refer to Setting TCP IP on page 55 Computers are not listed after do...

Страница 108: ...appear when the WLI PCM is inserted Windows98 95 and then re install the driver Possible cause The driver is not installed correctly Solution Check that the driver is installed correctly Also check that the lamp on the WLI PCM is lit When using Windows98 95 refer to Checking after installation on page 40 When using WindowsNT4 0 refer to Checking after installation on page 72 Ethernet adapter wlipc...

Страница 109: ...t refer to Setting TCP IP on page 55 WindowsNT4 0 1 Click the Start button and select Programs Command Prompt 2 Enter IPCONFIG and press the RETURN key 3 Check that the correct IP address is displayed for IP Address under WLIPCM Adapter If the IP address is not correct refer to Setting TCP IP on page 77 The access point cannot be accessed using Client Manager access point is displayed in gray even...

Страница 110: ...ion Shorten the distance between the WLI PCM and access point or remove any obstacles between them and re try communication Possible cause The access point has not completed starting Solution It takes 1 2 minutes for the access point to start after power is supplied Wait for 2 minutes or longer before attempting connection after turning the access point on Solution Refer to Change target access po...

Страница 111: ...efer to Setting TCP IP on page 55 WindowsNT4 0 1 Click the Start button and select Programs Command Prompt 2 Enter IPCONFIG and press the RETURN key 3 Check that the correct IP address is displayed for IP Address under WLIPCM Adapter If the IP address is not correct refer to Setting TCP IP on page 77 Communication between wireless LAN PCs is impossible No reply is returned when execut ing the PING...

Страница 112: ... on the WLI PCM is lit When using Windows98 95 refer to Checking after installation on page 40 When using WindowsNT4 0 refer to Checking after installation on page 72 Possible cause The ESS ID is different from the target computer Solution The ESS ID is upper lower case sensitive Check the ESS ID for your computer and the target computer Refer to Connection to Network on page 83 Communication betw...

Страница 113: ...lution Perform connection test using Client Manager to check connection conditions between the wireless LAN PC and access point Refer to Checking connection between the WLI PCM and an access point on page 92 Solution Contact the network administrator to check the TCP IP settings IP address presence of DHCP server etc Also refer to Assign IP address on page 115 Communication between wireless LAN PC...

Страница 114: ...en you move from one cell to another in a wireless network the target access point must be changed Follow the steps below to change the target access point Change target access point 1Click the Start button and select Programs MELCO WLI PCM Utility Cli ent Manager 2Select the target access point at the destination 3Select File Connect ...

Страница 115: ...WLI PCM User s Manual 113 4Click the OK button The target access point is changed ...

Страница 116: ...on is 192 168 100 123 C ping 192 168 100 123 3If the devices are connected correctly the following is displayed Pinging 192 168 100 123 with 32 bytes of data Reply from 192 168 100 123 bytes 32 time 1ms TTL 32 Reply from 192 168 100 123 bytes 32 time 10ms TTL 32 Reply from 192 168 100 123 bytes 32 time 4ms TTL 32 Reply from 192 168 100 123 bytes 32 time 10ms TTL 32 If they are not connected correc...

Страница 117: ...le 2 You cannot assign the network start address XXX XXX XXX 0 or end address XXX XXX XXX 255 to a device on the network The network number is included in the IP address and communication is impossible if the network num ber is different Example If the sub net mask is 255 255 255 0 devices are regarded to be on the same network when the first 3 elements of the IP address are the same The IP addres...

Страница 118: ...168 2 1 Rule 3 The following IP addresses are generally used for a LAN 192 168 0 0 192 168 255 255 255 255 255 0 There are a large number of detailed books about TCP IP available that you can refer to Be sure to consult your network administrator if possible before assign ing IP addresses Windows98 95 When TCP IP is installed follow the steps below to check the MAC address Check MAC address 1Click...

Страница 119: ...anual 117 WindowsNT4 0 Follow the steps below to check the MAC address 1Click the Start button and select Programs Administrative Tools Common WindowsNT Diagnostics 2Click the Network tab and then the Transports button ...

Страница 120: ...information between the CPU and peripheral devices An I O port address is assigned to each device in order to determine which port is used by which device IRQ Interrupt Request Requests from all peripheral devices connected to your computer are processed by the CPU however the CPU cannot estimate when a request is sent from which device If the CPU monitors all devices continuously the monitoring t...

Страница 121: ... the transport and network protocol of the OSI protocol model Integrating NetBEUI and NetBIOS ensures an effective communication system in a work group LAN This protocol is supported by Windows98 95 NT4 0 Peer to Peer connection Communication between computers of the same level performed via LAN or WAN Different from the server client system all computers on the network can allow other users to ac...

Страница 122: ...are Name The shared drive name can be changed Access Type Check an option to determine the operation allowed to users Read Only Check this option to make the drive a read only disk Full Check this option to allow users to write and read data in the drive Depends on Password Check this option to determine operation permission according to the password Password Password for Access Type Read Only Pas...

Страница 123: ...tching the environment Each user can log in by entering a new user name and password Identification window of Windows98 95 Window Window descriptions Windows98 Double click the Network icon and click the Identification tab The follow ing window appears Windows95 Double click the Network icon and click the Identification tab The follow ing window appears Computer name Name identifying each computer...

Страница 124: ...rules for transmitting data between terminals on a network For example when two computers are communicating with each other several requirements for communication must be determined such as which one sends what message first how the other one receives the message and replies to it the data format and measures for communication errors These requirements ensure correct data communication Resources s...

Страница 125: ...pliant half duplex Max distance between terminals 450 ft outdoors 150 ft indoors may vary depending on operating environment Compatible computers IBM AT compatible equipped with PC card slot type II Frequency range 2400 2483 5 MHz Data transmission rate 2 Mbps 1 Mbps automatically switched Security ESS ID Operating voltage 4 5 5 5 V Power consumption Sending 500 mA Typ Receiving 320 mA Typ Operati...

Страница 126: ...tection against harmful interference in a residental instration This equipment generates uses and can radiate radio frequency energy and if not installed and used in accordance with the instructions may cause harmful interference to radio communications However there is no guar antee that interference will not occur in a particular installation If this equipment does cause harmful interference to ...

Страница 127: ......

Страница 128: ...WLI PCM User s Manual 18 June 1999 First revision PY00 25025 DM10 01 Manufactured by MELCO INC Japan http www melcoinc com ...

Отзывы: