background image

28

ENGLISH

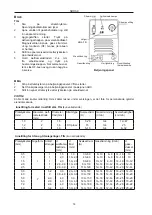
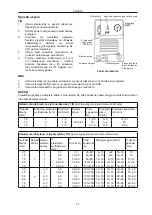
Control panel

Use

TIG

1. 

Set the power switch to the ON position. 

Voltage status lamp goes on.

2. 

Open  the  gas  cylinder  valve  and  set  the 

required flow.

3. 

The machine fan starts. Press the 

activation button on the welding handle. 

The  solenoid  valve  opens,  gas  flows  out 

and the ignition arc (HF) lights up (arc is 

audible).

4. 

Set the requisite welding current for the 

thickness of the workpiece.

5. 

Hold the tungsten electrode 2–4 mm from 

the workpiece and press the arc ignition 

button. When the welding arc ignites the 

HF arc goes off and you can start welding.

MMA

1. 

Set the power switch on the control panel to the ON position. The fan starts.

2. 

Set the function selector on the control panel to ARC.

3. 

Set the requisite current for the thickness of the workpiece.

IMPORTANT:

Connect all cables securely. If cables come loose while welding is in progress there is a risk of personal 

injury and/or material damage.

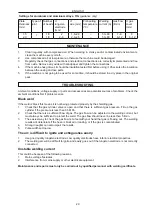
Setting for stainless steel plate, TIG 

(guidance only)

Plate 

thickness 

(mm)

Diameter, tungsten 

electrode (mm)

Diameter, 

wire (mm)

Current 

type

Welding 

current (A)

Gas flow 

(l/min)

Welding speed 

(cm/min)

1,0

2

1,6

DC plus

7–28

3–4

12–47

1,2

2

1,6

15

3–4

25

1,5

2

1,6

5–19

3–4

8–32

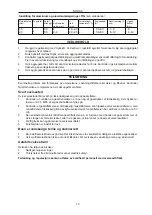
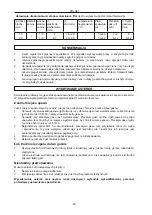
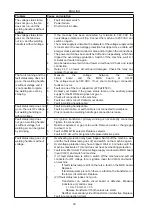
Settings for titanium and titanimum alloys, TIG 

(guidance only)

Plate 

thickness 

(mm)

Type of 

joint

Number 

of beads

∅ 

tungsten 

electrode 

(mm)

∅ 

wire (mm)

Welding 

current 

(A)

Gas flow (l/min)

∅ 

gas 

cover 

(mm)

0.5

I

1

1.5

1.0

 30–50

 8–10

 6–8

14–16

10

1.0

1

2.0

1.0–2.0

 40–60

 8–10

 6–8

14–16

10

1.5

1

2.0

1.0–2.0

 60–80

10–12  8–10 14–16

10–12

2.0

1

2.0–3.0

1.0–2.0

 80–110 12–14 10–12 16–20

12–14

2.5

1

2.0–3.0

2.0

110–120 12–14 10–12 16–20

12–14

3.0

Y

1–2

3.0

2.0–3.0

120–140 12–14 10–12 16–20

14–18

4.0

2

3.0–4.0

2.0–3.0

130–150 14–16 12–14 20–25

18–20

5.0

2–3

4.0

3.0

130–150 14–16 12–14 20–25

18–20

6.0

2–3

4.0

3.0–4.0

140–180 14–16 12–14 25–28

18–20

7.0

2–3

4.0

3.0–4.0

140–180 14–16 12–14 25–28

20–22

8.0

3–4

4.0

3.0–4.0

140–180 14–16 12–14 25–28

20–22

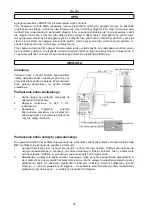
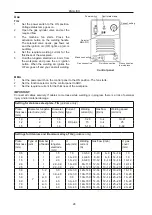
Power switch

Fault status lamp

Selector 

MMA/TIG

Minus connection

Gas connection

Quick connection

Plus connection 

to workpiece

Current setting

Содержание 210-053

Страница 1: ... PL Instrukcja obsługi w oryginale EN Operating instructions in original Jula AB 21 0 201 Bruksanvisning för TIG MMA svets Bruksanvisning for TIG MMA sveiseapparat Instrukcja obsługi spawarki TIG MMA Operating Instructions for TIG MMA Welding Machine 210 053 ...

Страница 2: ...yset fra sveisebuen skader øyne og hud 11 Brannfare 11 TEKNISKE DATA 12 Støy kan forårsake hørselsskader 12 Ved feil på utstyret 12 SIKKERHETSANVISNINGER 12 Arbeidsmiljø 12 Sikkerhetsanvisninger 12 Installasjon 13 Tilkobling av spenningstilførselskabel 13 Tilkobling av sveisehåndtakskabel 13 Bruk 14 Svart sveisested 15 Buen er vanskelig å tenne og slukner lett 15 Ustabil sveisestrøm 15 Polski 18 Z...

Страница 3: ...harmful to health 25 The light from the welding arc damages the eyes and skin 25 Fire hazard 25 TECHNICAL DATA 26 Exposure to loud noise can cause hearing impairments 26 If there is a fault on the equipment 26 SAFETY PRECAUTIONS 26 Working environment 26 Safety instructions 26 DESCRIPTION 27 USE 27 Installation 27 Connection of voltage supply cable 27 Connection of welding handle cable 27 Use 28 M...

Страница 4: ...r endast användas av kvalificerad personal Undvik elolycksfall Aggregatet får endast anslutas till korrekt jordat nätuttag Rör aldrig vid spänningsförande delar elektrod eller ledare med bara händer Använd alltid torra svetshandskar vid arbete med aggregatet Se alltid till att vara isolerad från arbetsstycket Vid svetsning bildas hälsoskadlig rök gas Undvik att andas in rök gas från svetsning Anvä...

Страница 5: ...s utlöses överlastskyddet och stänger av aggregatet Stäng inte av aggregatet med strömbrytaren utan låt fläkten gå Aggregatet aktiveras igen när det svalnat till normal arbets temperatur 3 Undvik överspänning Överskrid inte tillåten ingående spänning enligt tekniska data det kan skada aggregatet 4 Aggregatets hölje ska anslutas till jord med ledare med tvärsnittsarea minst 10 mm2 ansluten till jor...

Страница 6: ...äkringarna Var noga med att ansluta kablarna med rätt polaritet För svetsning med sura elektroder ansluts arbetsstycket till och svetshandtaget till För svetsning av rostfritt stål ansluts svetshandtaget till och arbetsstycket till 230 VAC Tig svetshandtag Arbetsstycke Mma svetshandtag Jord Flödesregulator Gas behållare BESKRIVNING MMA TIG svetsaggregat med funktionsväljare Vid MMA svetsning manue...

Страница 7: ...G endast vägledande Plåttjocklek mm Diameter volfram elektrod mm Diameter tråd mm Strömtyp Svetsström A Gasflöde l min Svetsningshastighet cm min 1 0 2 1 6 DC plus 7 28 3 4 12 47 1 2 2 1 6 15 3 4 25 1 5 2 1 6 5 19 3 4 8 32 Inställning för titan och titanlegeringar TIG endast vägledande Plåttjocklek mm Fogform Antal strängar volfram elektrod mm tråd mm Svetsström A Gasflöde l min gaskåpa mm 0 5 I 1...

Страница 8: ...ontrollera först omgivningsförhållanden Svart svetsställe Om svetsstället blir svart skyddas det inte korrekt av skyddsgasen 1 Kontrollera att gasbehållarens ventil är öppen och att gastrycket är tillräckligt Om trycket är lägre än 0 5 MPa ska gasbehållaren fyllas på 2 Kontrollera att gasflödet är tillräckligt Gasflödet kan anpassas till svetsströmmen men måste alltid vara tillräckligt för att sky...

Страница 9: ...skabeln Felindikeringslampan lyser inte HF spänning före ligger svetshand taget är spänningslöst 1 Avbrott i svetshandtagskabeln 2 Avbrott i jordkabeln eller jordkabeln är inte ansluten till arbetsstycket 3 Plusanslutningen eller svetshandtagets gasanslutning är lös Felindikeringslampan lyser inte svetshandtaget är spänningslöst svetsbågen kan tändas med skraptändning 1 Bågtändningstransformatorns...

Страница 10: ... återställ samtliga anslutningar Mycket stänk vid MMA svetsning svårt att svetsa med basisk elektrod 1 Polaritetsfel Byt plats på kablarna till jordklämma respektive svetshandtag Rätten till ändringar förbehålles Vid eventuella problem kontakta vår serviceavdelning på telefon 0200 88 55 88 Jula AB Box 363 532 24 SKARA www jula se ...

Страница 11: ...valifisert personell Unngå el ulykker Aggregatet skal kun kobles til et korrekt jordet strømuttak Spenningsførende deler elektroder eller ledere må aldri berøres med bare hender Bruk alltid tørre sveisehansker når du jobber med aggregatet Sørg alltid for å være isolert fra arbeidsemnet Ved sveising dannes helseskadelig røyk gass Unngå å puste inn røyk gass fra sveising Bruk aggregatet kun på godt ...

Страница 12: ...ning utløses overlastvernet og slår av aggregatet Slå ikke av aggregatet med strømbryteren men la viften gå Aggregatet aktiveres igjen når det har kjølnet til normal arbeidstemperatur 3 Unngå overspenning Overskrid ikke tillatt inngangsspenning i henhold til tekniske data det kan skade aggregatet 4 Aggregatets deksel skal kobles til jord med leder med tverrsnittsareal på minst 10 mm2 koblet til jo...

Страница 13: ...ler utløse nettskringene Vær nøye med å koble til kablene med riktig polaritet For sveising med sure elektroder kobles arbeidsemnet til og sveisehåndtaket til For sveising av rustfritt stål kobles sveisehåndtaket til og arbeidsemnet til 230 VAC TIG sveisehåndtak Arbeidsemne MMA sveisehåndtak Jording Strømningsregulator Gassbeholder BESKRIVELSE MMA TIG sveiseaggregat med funksjonsvelger Ved MMA sve...

Страница 14: ...ledende Platetykkelse mm Diameter wolf ramelektrode mm Diameter tråd mm Strømtype Sveisestrøm A Gasstrømning l min Sveisehastighet cm min 1 0 2 1 6 DC pluss 7 28 3 4 12 47 1 2 2 1 6 15 3 4 25 1 5 2 1 6 5 19 3 4 8 32 Innstilling for titan og titanlegeringer TIG kun veiledende Platetykkelse mm Fugeform Antall strenger wolframe lektrode mm tråd mm Sveisestrøm A Gasstrømning l min gass deksel mm 0 5 I...

Страница 15: ...e i omgivelsene hvis det oppstår problem Svart sveisested Hvis sveisestedet blir svart gir ikke dekkgassen god nok beskyttelse 1 Kontroller at ventilen på gassbeholderen er åpen og at gasstrykket er tilstrekkelig Hvis trykket er lavere enn 0 5 MPa skal gassbeholderen fylles på 2 Kontroller at gasstilførselen er tilstrekkelig Gasstilførselen kan tilpasses etter sveisestrømmen men må alltid være til...

Страница 16: ...orlampen lyser ikke HF spenning foreligger sveisehåndtaket er spenningsløst 1 Brudd i kabelen til sveisehåndtaket 2 Brudd i jordkabelen eller jordkabelen er ikke koblet til arbeidsemnet 3 Plusstilkoblingen eller gasstilkoblingen til sveisehåndtaket er løs Feilindikatorlampen lyser ikke sveisehåndtaket er spenningsløst sveisebuen kan tennes med skraptenning 1 Buetenningstransformatorens primærvikli...

Страница 17: ...till samtlige tilkoblinger Mye sprut ved MMA sveising vanskelig å sveise med basisk elektrode 1 Polaritetsfeil Bytt plass på kablene til jordklemmen og sveisehåndtaket Med forbehold om endringer Ved eventuelle problemer kan du kontakte vår serviceavdeling på telefon 67 90 01 34 Jula Norge AS Solheimsveien 6 8 1471 LØRENSKOG www jula no ...

Страница 18: ...ażenia prądem Agregat można podłączać wyłącznie do właściwie uziemionego gniazdka sieciowego Nigdy nie dotykaj gołymi rękami elementów przewodzących napięcie elektrod ani przewodów Podczas pracy z agregatem zawsze używaj suchych rękawic spawalniczych Pamiętaj by zawsze odizolować się od obrabianego przedmiotu Podczas spawania powstaje szkodliwy dla zdrowia dym gaz Unikaj wdychania dymu gazu powsta...

Страница 19: ... się zabezpieczenie przed przeciążeniem które wyłączy agregat Nie wyłączaj agregatu za pomocą przełącznika lecz pozwól pracować wentylatorowi Agregat aktywuje się ponownie gdy schłodzi się do normalnej temperatury pracy 3 Nie doprowadzaj do przepięcia Nie przekraczaj wartości dozwolonego napięcia wejściowego zgodnego z danymi technicznymi może to uszkodzić agregat 4 Obudowę agregatu należy uziemić...

Страница 20: ...u kabli Do spawania elektrodami kwaśnymi obrabiany element podłączany jest do bieguna a uchwyt spawalniczy do bieguna Do spawania stali nierdzewnej uchwyt spawalniczy podłączany jest do bieguna a obrabiany przedmiot do bieguna 230 V AC Uchwyt spawalniczy TIG Spawany element Uchwyt spawalniczy MMA Uziemienie Regulator przepływu Butla gazowa OPIS Agregat spawalniczy MMA TIG z przełącznikiem wyboru f...

Страница 21: ...e pomocnicza informacja Grubość blachy mm Średnica elektroda wolframowa mm Średnica drut mm Rodzaj prądu Prąd spawania A Przepływ gazu l min Prędkość spawania cm min 1 0 2 1 6 DC plus 7 28 3 4 12 47 1 2 2 1 6 15 3 4 25 1 5 2 1 6 5 19 3 4 8 32 Ustawienia dla tytanu i stopów tytanu TIG jest to wyłącznie pomocnicza informacja Grubość blachy mm Kształt spoiny Liczba warstw spoiny elektroda wolframowa ...

Страница 22: ...najpierw sprawdź warunki otoczenia Czarne miejsce spawu Jeżeli miejsce spawu staje się czarne nie jest ono właściwie chronione przez osłonę gazów 1 Sprawdź czy zawór butli gazowej jest otwarty i czy ciśnienie gazu jest wystarczające Jeżeli ciśnienie jest niższe niż 0 5 MPa należy uzupełnić butlę gazem 2 Sprawdź czy przepływ gazu jest wystarczający Przepływ gazu można dostosować do prądu spawania l...

Страница 23: ...czego za pomocą zapalenia kontaktowego 1 Zmierz napięcie między dolną płytką drukowaną a płytką MOS przy VH 07 Napięcie powinno wynosić 380 V DC Jeśli nie ma takiej wartości może to oznaczać zwarcie lub błąd połączenia 2 Uszkodzony jest któryś z czterech kondensatorów 470 µF 450 V 3 Skontaktuj się z dystrybutorem jeżeli nie pali się zielona kontrolka zasilania pomocniczego płytki MOS 4 Skontroluj ...

Страница 24: ...at i wyciągnij przewód napięcia HF do zapalania łuku w pobliżu wentylatora VH 03 po czym włącz agregat Jeżeli kontrolka sygnalizująca uszkodzenie świeci nadal oznacza to że płytka MOS jest uszkodzona Wymień ją Jeżeli kontrolka sygnalizująca uszkodzenie nie świeci oznacza to uszkodzenie transformatora na dolnej płytce drukowanej Wymień go 2 Jeżeli kontrolka sygnalizująca uszkodzenie nie świeci Tran...

Страница 25: ...ed personnel Avoid the risk of electric shock The machine must only be connected to a correctly earthed mains outlet Never touch live parts electrodes or conductors with your bare hands Always use dry welding gloves when working with the machine Always make sure that you are insulated from the workpeice Welding produces fumes gas that are harmful to health Avoid inhaling fumes gas from the welding...

Страница 26: ...otection will trip and switch off the machine if it is overloaded Do not switch off the machine with the switch but allow the fan to run The machine will be reactivated when it has cooled to normal temperature 3 Avoid overvoltage Do not exceed the permitted input voltage in the technical data this could damage the machine 4 The machine casing must be connected to earth with a conductor with a cros...

Страница 27: ...the cables with the right polarity For welding with acidic electrodes the workpiece is connected to and the welding handle to For welding of stainless steel the welding handle is connected to and the workpiece to 230 VAC TIG welding handle Workpiece MMA welding handle Earth Flow regulator Gas cylinder DESCRIPTION MMA TIG welding machine with function selector During MMA welding manual metal arc we...

Страница 28: ...ainless steel plate TIG guidance only Plate thickness mm Diameter tungsten electrode mm Diameter wire mm Current type Welding current A Gas flow l min Welding speed cm min 1 0 2 1 6 DC plus 7 28 3 4 12 47 1 2 2 1 6 15 3 4 25 1 5 2 1 6 5 19 3 4 8 32 Settings for titanium and titanimum alloys TIG guidance only Plate thickness mm Type of joint Number of beads tungsten electrode mm wire mm Welding cur...

Страница 29: ...ons first if problems arise Black weld If the weld is black this means it is not being protected properly by the shielding gas 1 Check that the gas cylinder valve is open and that there is sufficient gas pressure Fill up the gas cylinder if the pressure is less than 0 5 MPa 2 Check that there is a sufficient flow of gas The gas flow can be adjusted to the welding current but must always be suffici...

Страница 30: ...Contact your dealer 6 Fault in welding handle cable Fault status lamp does not go on there is HF voltage but welding handling is without voltage 1 Fault in welding handle cable 2 Fault in earth cable or earth cable is not connected to workpiece 3 Plus connection or welding handle gas connection is loose Fault status lamp does not go on welding handle is without voltage but welding arc can be ignit...

Страница 31: ...2 Check and reset all connections Lof of spatter during MMA welding difficult to weld with basic electrode 1 Polarity fault Switch cables to earth clip and welding handle Jula reserves the right to make changes In the event of problems please contact our service department Jula AB Box 363 532 24 SKARA www jula com ...

Отзывы: