background image

ENGLISH 


23

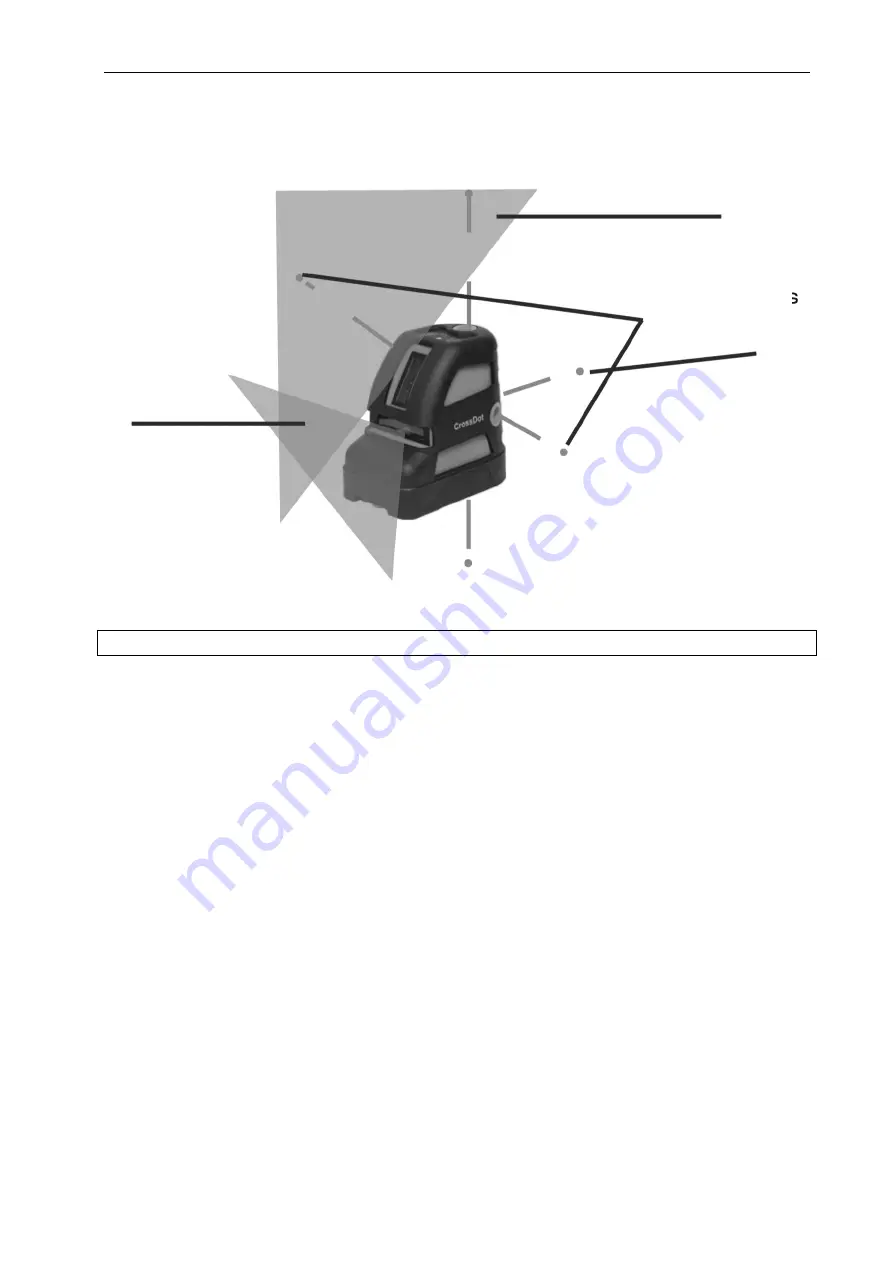
Laser lines and points 


USE 

Replacing the batteries 

Carefully open the battery compartment locking mechanism (underneath the appliance). Insert 3 alkaline 
AA batteries with the correct polarity. Close the battery compartment. 

NOTE:

 Remove the batteries from the appliance if it is not going to be used for some time. 

Checking the precision of the instrument (left, right, forwards) 

1. 

Checking the alignment of the laser beams. 


Place the appliance between two walls at a relative distance of 5 m. 


Start the appliance and mark the point A1 on the wall where the horizontal and vertical laser lines 
cross each other. 


Turn the appliance 180° and mark the corresponding intersection point, A2, between the laser lines 
on the opposite wall. 


Place the appliance 0.5 m from the first wall. 


Point the appliance at the wall on which point A1 is marked. Mark the line intersection point B1 on 
the wall. 


Turn the appliance 180° and mark the corresponding intersection point, B2, between the laser lines 
on the opposite wall. 


The appliance complies with its specified precision if (A1 – B1) – (A2 – B2) < 2 mm. If the gap is 
more than 2 mm, hand in the appliance to an authorised service centre. 


Use the same method to check the positions for the front, left and right laser points. If the gap is 
more than 3 mm, hand in the appliance to an authorised service centre. 

Vertical line 

Zenith point 

Horizontal 
line 

Plumb point 

Front point 

Front point 

Содержание 160210

Страница 1: ...nktslaser Instrukcja obs ugi lasera krzy owego liniowego pi ciopunktowego User Instructions for Cross Line Five point Laser 160 210 SV Bruksanvisning i original NO Bruksanvisning i original PL Instruk...

Страница 2: ...re h yre fremre 11 VEDLIKEHOLD 14 rsaker til feil m leresultat 14 Elektromagnetisk kompatibilitet 14 POLSKI 15 ZASADY BEZPIECZE STWA 15 DANE TECHNICZNE 15 OPIS 16 Klawiatura 16 Linie i punkty lasera 1...

Страница 3: ...rstr len Maximal str lningseffekt h gst 1 mW vid v gl ngd 635 nm LASERKLASS 2 Apparaten r laserutrustning av klass 2 enligt DIN IEC 60825 1 2007 vilket inneb r att vissa f rsiktighets tg rder ska iakt...

Страница 4: ...r punkt 6 Str l ppning zenitpunkt 7 Str l ppning frontpunkt 8 Str l ppning h ger punkt 9 Str l ppning lodpunkt 10 Gummid mpare 11 Batterifack 12 F stskruv Knappsats 1 Till fr n knapp f r laserstr len...

Страница 5: ...d apparaten 180 och markera motsvarande sk rningspunkt A2 mellan laserlinjerna p den motsatta v ggen Placera apparaten 0 5 m fr n den f rsta v ggen Rikta apparaten mot v ggen p vilken punkt A1 r marke...

Страница 6: ...ggarna M t avst nden mellan A och C B och D C och B samt mellan D och A Om n got avst nd r st rre n 2 mm ska apparaten l mnas till beh rig servicerepresentant 3 Kontroll av horisontallinjens samt fr...

Страница 7: ...r A Om avst ndet mellan A och C r mindre n 1 5 mm uppfyller apparaten sin specificerade noggrannhet 5 Kontroll av zenit och lodpunktens noggrannhet Placera apparaten 1 m ver golvet i ett rum med takh...

Страница 8: ...t t eller slag Om detta har h nt kontrollera apparatens noggrannhet L mna om s visar sig n dv ndigt apparaten till beh rig servicerepresentant Kraftiga temperaturvariationer exempelvis p grund av att...

Страница 9: ...aserstr len Maks str leeffekt h yst 1 mW ved b lgelengde 635 nm LASERKLASSE 2 Apparatet er laserutstyr av klasse 2 iht DIN IEC 60825 1 2007 som inneb rer at visse sikkerhetstiltak skal iakttas ved bru...

Страница 10: ...pning venstre punkt 6 Str le pning senitpunkt 7 Str le pning frontpunkt 8 Str le pning h yre punkt 9 Str le pning loddpunkt 10 Gummidemper 11 Batterirom 12 Festeskrue Tastatur 1 Av p knapp for laserst...

Страница 11: ...re Drei apparatet 180 og marker tilsvarende skj ringspunkt A2 mellom laserlinjene p den motsatte veggen Plasser apparatet 0 5 m fra den f rste veggen Rett apparatet mot veggen der punkt A1 er markert...

Страница 12: ...vstanden mellom A og C B og D C og B samt mellom D og A Er avstanden st rre enn 2 mm mellom noen av punktene m apparatet leveres til en autorisert servicerepresentant 3 Kontroll av n yaktighet for hor...

Страница 13: ...Hvis avstanden mellom A og C er mindre enn 1 5 mm oppfyller apparatet sin spesifiserte n yaktighet 5 Kontroll av n yaktighet for senit og loddpunktene Plasser apparatet 1 m over gulvet i et rom med t...

Страница 14: ...ller slag Hvis det er tilfelle m apparatets n yaktighet kontrolleres Lever om n dvendig apparatet til en autorisert servicerepresentant Store temperaturendringer for eksempel hvis apparatet brukes i k...

Страница 15: ...ZE ENIE Promieniowanie laserowe Nigdy nie patrz w wi zk lasera Maksymalna moc promieniowania 1 mW przy d ugo ci fali 635 nm KLASA LASERA 2 Urz dzenie stanowi urz dzenie laserowe klasy 2 zgodnie z DIN...

Страница 16: ...t lewy 6 Otw r wi zki punkt zenitu 7 Otw r wi zki punkt przedni 8 Otw r wi zki punkt prawy 9 Otw r wi zki punkt pionu 10 Amortyzator gumowy 11 Komora baterii 12 ruba mocuj ca Klawiatura 1 Prze cznik W...

Страница 17: ...rzeci cia A2 pomi dzy liniami lasera na przeciwleg ej cianie Umie urz dzenie w odleg o ci 0 5 m od pierwszej ciany Skieruj urz dzenie w stron ciany na kt rej wyznaczony zosta punkt A1 Zaznacz punkt pr...

Страница 18: ...dleg o mi dzy punktami A i C B i D C i B oraz D i A Je eli kt rakolwiek z odleg o ci wyniesie wi cej ni 2 mm nale y zleci przegl d urz dzenia autoryzowanemu serwisantowi 3 Kontrola dok adno ci linii p...

Страница 19: ...y punktem A a C jest mniejsza ni 1 5 mm urz dzenie zachowuje dok adno zgodnie ze specyfikacj 5 Kontrola dok adno ci punktu zenitu i pionu Umie urz dzenie 1 m nad pod og w pomieszczeniu z sufitem na wy...

Страница 20: ...uderzenia Je eli do tego dosz o sprawd dok adno urz dzenia W razie konieczno ci zle przegl d urz dzenia autoryzowanemu serwisantowi Mocne wahania temperatury na przyk ad zwi zane z u ytkowaniem urz d...

Страница 21: ...radiation Do not stare at the laser beam Maximum radiation effect 1 mW at wavelength of 635 nm LASER CLASS 2 The appliance consists of laser equipiment of class 2 in accordance with DIN IEC 60825 1 2...

Страница 22: ...t 6 Beam opening zenith point 7 Beam opening front point 8 Beam opening right point 9 Beam opening plumb point 10 Rubber damper 11 Battery compartment 12 Retaining screw Keypad 1 ON OFF button for las...

Страница 23: ...ach other Turn the appliance 180 and mark the corresponding intersection point A2 between the laser lines on the opposite wall Place the appliance 0 5 m from the first wall Point the appliance at the...

Страница 24: ...on the walls Measure the distance between A and C B and D C and B and between D and A If any gap is more than 2 mm hand in the appliance to an authorised service centre 3 Checking the precision of th...

Страница 25: ...A and C is less than 1 5 mm the appliance complies with its specified precision 5 Checking the precision of the zenith and plumb points Place the appliance 1 m over the floor in a room with a ceiling...

Страница 26: ...iance has been dropped or exposed to knocks and blows If this has happened check the precision of the appliance If necessary hand in the appliance to an authorised service centre Large variations in t...

Отзывы: