


Addendum
18
8 Addendum
TFT color panel
Diagonal(Viewable
image size)
19 inches (48.2cm)
Native resolution(Pixel
count)
1280dots x 1024lines
Dot pitch
0.294mm
Pixel array
R+G+B vertical stripe
Viewable angles*
(standard)
Left/Right: 80°/80° Up : 75° Down : 85° , CR
10
Touch-panel and
controller
Method
Analog capacitive
Processing
Non-Glare
Resolution
1024 (H) x 1024 (V)
Output
RS232C (Interactive, start-stop type)
Response speed
Approx. 3ms
Input signal
Video signal
Analog: 0.7Vp-p, Digital RGB
Synchronization signal Separate Synchronizing Signal (TTL compatible CompositeSync,Sync on Green)
Synchronization
range
Horizontal 30.0kHz~80.0kHz
Vertic
50Hz~75Hz
Display colors
16,700,000 (approx.)
Contrast ratio
1000 : 1
Active display area (standard)
376.32(H) mm× 301.06(V) mm
Luminance (standard)
300cd/m
2
Input/output signal
connectors
Video signal
Mini D-sub 15 pins (female) / DVI-D(female)
Touch communication
signal
D-sub 9 pins (male)
Environmental
consideration
Surrounding
temperature
5°C
〜
35°C
Humidity
30% to 80%RH (Non condensing)
Power supply
AC100-240V 50/60Hz
Power consumption (standard)
23W (default)
31W (at the maximum luminance setting)
Regulation compliance
VCCI Class B, UL, cUL
Outline Dimension
465mm(W) x 385mm(H) x 65.5mm(D)
(The height of the screw head located on the back is not included.)
Weight
Approx.6.5kg
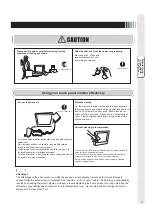
・
The power cord of the attachment is AC100V exclusive use .
Please prepare other power cord which is suitable for your condition, when using this monitor excluding AC100V.
* Viewable Angles: refers to angles that permit display at a white and black contrast ratio of more than 10.
· As for Sync on Green, it is needed to check your input signal in advance.
Speci
fi
cations
Содержание TSD-CT194-MN
Страница 2: ...2 VCCI B VCCI WindowsNT Windows Vista Windows Microsoft Corporation Macintosh Apple Inc...
Страница 3: ...3 AC100V AC100V...
Страница 4: ...4 During servicing disconnect the plug from the socket outlet...
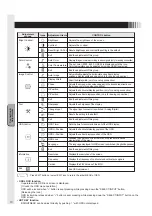
Страница 6: ...6 OSD OSD P10 MENU EXIT OSD OSD OSD OSD OSD 1 OSD SELECT SELECT INPUT OSD OSD OSD OSD SELECT P11 I...
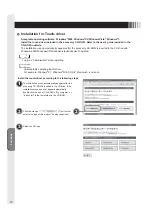
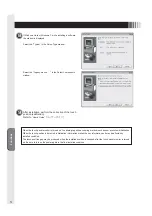
Страница 13: ...13 WindowsXP TouchWare5 64SR5 2 4 5 6 7 4 5 5...
Страница 14: ...14 WindowsVista Windows7 MT 7 Software Setup Type Typical Select Components Legacy mouse 8 9...
Страница 17: ...17 TSD CT194 MN 1 1...
Страница 18: ...18 9 2 TSD CT194 MN 1 TEL 1 2 3 1 2 3 4 5 4...
Страница 39: ......
Страница 40: ...40D871117B10...