background image

Chapter 1 Introduction 

- 1 - 

Chapter 1    Introduction 

1.1    General Description 

MD-6000P Bladder Scanner (hereinafter referred to as 

“the device”) is a hand-held device which 

utilizes  ultrasonic  distance  measuring  principle  to  calculate  urine  volume  in  the  bladder.  It 

integrates  a  2.5MHz  B-mode  3D  mechanical  sector  scan  probe,  a  1.3-inch  OLED  screen  and  a 

Li-ion battery, and comes with a charger. 

1.2    Main Features 

1.  The device utilizes ultrasonic distance measuring principle; it takes mechanical sector scan by 

2.5MHz ultrasonic waves and recognizes the reflected waves of the front and back walls of 

bladder  to  get  the  area  of  bladder  section.  It  makes  12  scans  at  an  interval  of  15°,  and 

calculates the urine volume in the bladder with volume integral algorithm. 

2.  The hand-held design structure offers convenience to users. 

3.  The device has a pre-scan positioning function, which can locate the real-time position of the 

bladder  through  scanning  bladder  positioning  algorithms,  and  directly  guide  users  to  adjust 

the scanning direction of the device for the convenience of accurate positioning. 

4.  After measurement, the projection of bladder can be displayed with one-click. 

5.  Rechargeable battery-driven offers great convenience for use in hospital wards. 

6.  It  can  be  used  together  with  Tablet  PC  through  Wi-Fi  connection,  in  order  to  achieve  data 

transmission, case information management, medical report printing and other functions. 

1.3    Intended Use 

It is intended to measure the urine volume in human bladder. 

1.4    Intended Conditions of Use 

The device is intended to be used in medical and nursing care institutions. 

It should be operated by trained professionals. 

The probe cover should be cleaned and disinfected according to the requirements in 

Chapter 5

 of 

this User Manual. 

1.5    Contraindications 


It is not intended for use on pregnant women. 


It can not be used on wounded skin. 

1.6    Software Version 

MD60P V1.0

Содержание MD-6000P

Страница 1: ...MEDA Co Ltd www meda com cn MD 6000P Bladder Scanner USER MANUAL...

Страница 2: ...Tel 86 22 83713808 Fax 86 22 83713880 URL http www meda com cn E mail export meda com cn Shanghai International Holding Corp GmbH Europe Eiffestrasse 80 20537 Hamburg GERMANY Tel 49 40 2513175 Fax 49...

Страница 3: ...ION 2 2 5 PRODUCT CLASSIFICATION 3 2 6 LI ION BATTERY 3 CHAPTER 3 INSTALLATION 4 3 1 STRUCTURE 4 3 2 ENVIRONMENTAL REQUIREMENT 6 3 3 CONNECTION 6 3 3 1 Charging 6 3 3 2 Using Together with Tablet PC 7...

Страница 4: ...4 3 15 Patient List 35 4 3 16 Pair Key 37 4 3 17 Automatic Connection Switch 37 4 3 18 Main Unit Time Setting 37 4 3 19 About 37 4 4 PRESET CASE LIST MODE 38 4 4 1 Patient List Preset 38 4 4 2 Medica...

Страница 5: ...2 1 Accessory 47 7 2 2 Optional Accessory 47 7 2 3 Consumable 48 ANNEX A CONSERVATION CONCEPT DECLARATION 49 A 1 DECLARATION 49 A 2 ALARA 49 ANNEX B ACOUSTIC OUTPUT REPORTING TABLE 50 ACCORDING TO UD...

Страница 6: ...installed and used in accordance with the instructions may cause harmful interference to radio communications However there is no guarantee that interference will not occur in a particular installatio...

Страница 7: ...using it and contact your local distributor or the manufacturer for service If the Main Unit is accidentally broken stop using it and contact your local distributor or the manufacturer for service The...

Страница 8: ...ge before transportation For any question please contact your local distributor Cautions Federal US Law restricts this device to sale by or on the order of a physician How to prevent cross infection B...

Страница 9: ...e Refer to User Manual Manufacturer Logo of Manufacturer ON or OFF Charger Interface CE Conformity Marking Authorized Representative in the European Community The battery meets RoHS requirements Dispo...

Страница 10: ...Labels and Indicators VIII Explanation of Labels and Symbols on the Packing Box This Way Up Fragile Handle with Care Keep Dry Stacking Limit by 4 Temperature Limit Humidity limitation...

Страница 11: ...ning function which can locate the real time position of the bladder through scanning bladder positioning algorithms and directly guide users to adjust the scanning direction of the device for the con...

Страница 12: ...is not less than 6 hours for normal work when the Main Unit is fully charged Measuring Range 0 ml 999 ml Measuring Accuracy 15 or 15ml take the maximum value 2 3 Safety 1 Basic safety and essential p...

Страница 13: ...The Main Unit IPX1 The Probe Cover IPX7 See Fig 3 1a 4 According to the method of disinfection recommended by the manufacturer See 5 Cleaning and Disinfection 5 According to the degree of safety of ap...

Страница 14: ...Main Unit and Charger which can be used together with Tablet PC a Main Unit b Main Unit Charger Fig 3 1 External Structure OLED Screen Menu Key Power Indicator Function Key Anti Drop Lanyard Hole Pro...

Страница 15: ...h the top of which ultrasound signals are transmitted 7 Scan Button Press the Scan Button and hold it to access the Pre scan Positioning Mode Release the Scan Button under the Pre scan Positioning to...

Страница 16: ...ht 3 3 Connection 3 3 1 Charging As shown in Fig 3 1 b connect the DC output of the charger to the charging socket of the device and connect the other end of the charger to the mains socket The chargi...

Страница 17: ...between the tablet PC and the Main Unit Through Wi Fi connection data transmission and application management can be realized The recommended Tablet PC is Lenovo YT3 850F for specific operation see 4...

Страница 18: ...can be charged Tablet PC data transmission insert a flash drive that supports USB On The Go OTG function for data transmission you can also insert a data cable to connect the Tablet PC to the computer...

Страница 19: ...is started and before use 1 Whether the power indicator lights up 2 Whether the touch screen works properly 3 Whether the keys work 4 Press the Scan button and hold it to check whether it initiates a...

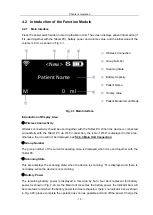
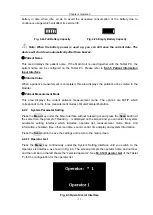
Страница 20: ...l not be displayed see 4 3 4 Main Unit Connection Group Number The group number of the current measuring case is displayed when it is used together with the Tablet PC Scanning State This area displays...

Страница 21: ...easurement mode The options are M F P which corresponds to the three measurement modes of Male Female Pediatrics 4 2 2 System Parameter Setting Press the Menu key under the Main Interface without rele...

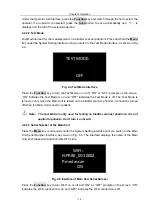
Страница 22: ...OFF indicates the Test Mode is off The Test Mode is turned on only when the Main Unit is tested on the bladder scanner phantom it should be turned off when the Main Unit is used on patient Note The Te...

Страница 23: ...r the setting is completed if there is no operation within the setting time limits the system automatically shuts down the OLED screen thereby improving the continuous working time of the device 4 2 2...

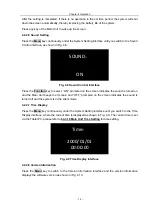
Страница 24: ...screen indicates the sound is turned on and the Main Unit beeps the it scans and OFF prompted on the screen indicates the sound is turned off and the system is in the silent mode 4 2 2 7 Time Display...

Страница 25: ...ex and press the Scan button to save the setting and start scanning SEX Male SEX Female SEX Pediatrics F u n c t i o n k e y Function key Function key Fig 4 11 Sex Selection b When the group number is...

Страница 26: ...ladder Positioning Fig 4 13 Patient Position Correct positioning of the bladder is the basis for accurate measurement of bladder volume As shown in Fig 4 14 the bladder is located in the lower abdomen...

Страница 27: ...the Main Unit is directed towards the patient s head and the handle is directed towards the patient s feet 4 2 4 2 Pre scan Positioning Mode The Pre scan Positioning Mode can help the operator to bet...

Страница 28: ...d that is the circular graph appears on the screen When the bladder is found in the scanning area it is displayed as a circular graph The center of the circle is the center of the bladder and the size...

Страница 29: ...ter the 3D Scanning Mode 1 Place the Main Unit onto the patient s abdomen over the bladder 2 Press the Scan button of the Main Unit and hold and then the screen displays the positioning image of the b...

Страница 30: ...ect after scanning the device switches to the bladder projection interface which can display the bladder projection image as shown in Fig 4 18a If the projection is close to roundness basically locate...

Страница 31: ...ent result is inaccurate Adjust the angle and position of the Main Unit to the lower side of the patent and re measure it Fig 4 19b Incorrect Position Fig 4 19b The bladder projection is beyond the ce...

Страница 32: ...ou need to change the system parameters select or replace the operator press the Menu key and the Scan button at the same time to enter the System Parameter Setting Interface 3 Configure the patient t...

Страница 33: ...the enclosure of the device and the OLED screen 3 Above check ups should be done before you start up the device 4 3 1 2 Start up Press the power switch button until the LCD lights up 4 3 1 3 Check up...

Страница 34: ...of for Medascan application displays on the Tablet PC 4 3 3 Main Interface After the Tablet PC is started click of Medascan application icon to start the application procedure The Main Interface of t...

Страница 35: ...the mark of the scanning section of the Main Unit which corresponds to the ultrasound image one by one as shown in Fig 4 21 a The 12 Scanning Section Marks on the Interface b Scanning Section Marks v...

Страница 36: ...oups of measurement result which are displayed by order of measurement The green arrow indicates the current measured value By clicking on a different measured value the user may also let other measur...

Страница 37: ...t and click the Main Unit to be paired as shown in Fig 4 22a and then click OK they are successfully paired as shown in Fig 4 22b Return to the Main Interface after pairing and there is a prompt of Co...

Страница 38: ...d Fig 4 24 Successful Connection 4 3 5 Patient Information Interface Click the NEW key in the Main Interface to enter the Patient Information Interface as shown in Fig 4 25 You can input the patient I...

Страница 39: ...en Input patient s name with the soft keypad after that click the input box again the soft keypad hides automatically and the patient s name appears in the Name input box at the same time OK Confirmat...

Страница 40: ...g Mode 3D Scanning Mode refers to the process that the Main Unit makes a scan and obtains the bladder s cross sectional areas and then transforms the scanning planes automatically with an interval of...

Страница 41: ...ient s case information is saved to the patient medical record database The saved record includes the patient information name sex age and ID 12 bladder ultrasound images bladder projection measuremen...

Страница 42: ...the Tablet PC 4 3 11 Patient Case Management Click the LOAD key in the Main Interface to enter the Patient Case Management interface and load the stored patient medical records as shown in Fig 4 29 Th...

Страница 43: ...key Select the patient record to be deleted click this key and confirm deletion to delete this patient s medical record Select All select all key Click the key to select all patient medical records i...

Страница 44: ...f Operator to enter the Operator List Interface as shown in Fig 4 32 When you enter the interface the software automatically reads the operator list stored in the Main Unit to the Tablet PC and displa...

Страница 45: ...date key Click the key to update the selected and ticked operator to the Main Unit The operator list is written to the Main Unit only when the synchronous prompt displays that update is successful if...

Страница 46: ...eted EDIT Edit key Click this key to edit patient s information UPDATE Update key Click the key to update the selected and ticked patient to the Main Unit The patient list is written to the Main Unit...

Страница 47: ...ch the switch status is as follows When the switch is switched to ON the software automatically connects the paired Main Unit When the switch is switched to OFF the software does not automatically con...

Страница 48: ...ment Note Do not configure the Patient List until the patient s measurement is complete to avoid clearing the measurement data 4 4 2 Medical Record Saving and Loading Case Saving After a patient s sca...

Страница 49: ...surface of the Main Unit 2 Remove the residual detergent or disinfectant with clean soft cloth dampened in sterile water Make sure the Main Unit is completely dry before putting it into use again Note...

Страница 50: ...into the container with 500ml cleaning solution for 5 minutes Clean the probe cover carefully in the cleaning solution with a soft silk brush and shake it to wash and then take it out and wipe off th...

Страница 51: ...d power on the device for about 1 hour every month to prevent the device from being influenced by humidity 6 When moving the device avoid droppage and severe vibration Pay particular attention to prot...

Страница 52: ...ding to 3 3 1 Charging 9 The rechargeable battery for the device is a Li ion battery Please contact the manufacturer to purchase a new one when the battery efficiency is reduced and need to be replace...

Страница 53: ...o to the hospital for further treatment 6 2 3 Warnings 1 If the charging time is much more more than 24 hours than the normal charging time please stop charging The abnormal charging will cause the ba...

Страница 54: ...lead to the reduction of the battery performance and service life 4 Read the User Manual carefully before use and as often as necessary 5 Charging Mode Please use the charger provided by the manufact...

Страница 55: ...connected shut down the Main Unit and restart it Click the Wi Fi icon on the Tablet PC to re pair the connection If above instructions don t work please don t open the housing without authorization Co...

Страница 56: ...oting 46 6 6 Disposal of Device after its Life Cycle Disposal of the device after its life cycle shall comply with the relevant local environment protection regulations The same way with the electroni...

Страница 57: ...ade damages Damages caused by unauthorized service Damages caused by inappropriate operation 4 We provide continuous maintenance and services after warranty period with certain charges 7 2 Accessories...

Страница 58: ...tes The Main Unit Charger used with the device must be provided by the manufacturer Using accessories other than those provided by the manufacturer may cause increased electromagnetic emissions or dec...

Страница 59: ...in a ultrasound diagnosis On the premise of diagnostic data please use lowest level of ultrasound and shortest time while the energy amount of ultrasound is decided by the output intensity and diagnos...

Страница 60: ...3 2 zpii cm 3 2 fawf MHz 2 136 2 136 2 136 2 136 Other information prr Hz 250 srr Hz 3 1 npps 1 Ipa at zpii W cm 2 1 187 Ispta at zpii or zsii mW cm 2 0 010 Ispta at zpii or zsii mW cm 2 0 015 pr at...

Страница 61: ...V m 810 870 930 MHz 28 V m 28 V m 1720 1845 1970 MHz 28 V m 28 V m 2450 MHz 28 V m 28 V m 5240 5500 5785 MHz 9 V m 9 V m Fast Transient BURST IEC 61000 4 4 2kV for AC Power Port 2kV Surge Transient IE...

Страница 62: ...Main Specification of Wireless Wi Fi 52 Annex D Main Specification of Wireless Wi Fi Frequency Range RF Output Power EIRP Modulation Mode of Operation Simplex Duplex 2 412 2 462 MHz 13 50 dBm DSSS OFD...

Страница 63: ...lume J The Journal of Urology 1994 152 2083 2085 4 Coombes Graham Millard Richard J 1994 The Accuracy of Portable Ultrasound In The Measurement Of Residual Urine Volume The Journal of Urology 152 2083...

Отзывы: