background image


Opera 240 System Manual


DM 1030 


Page 74


Step 2 

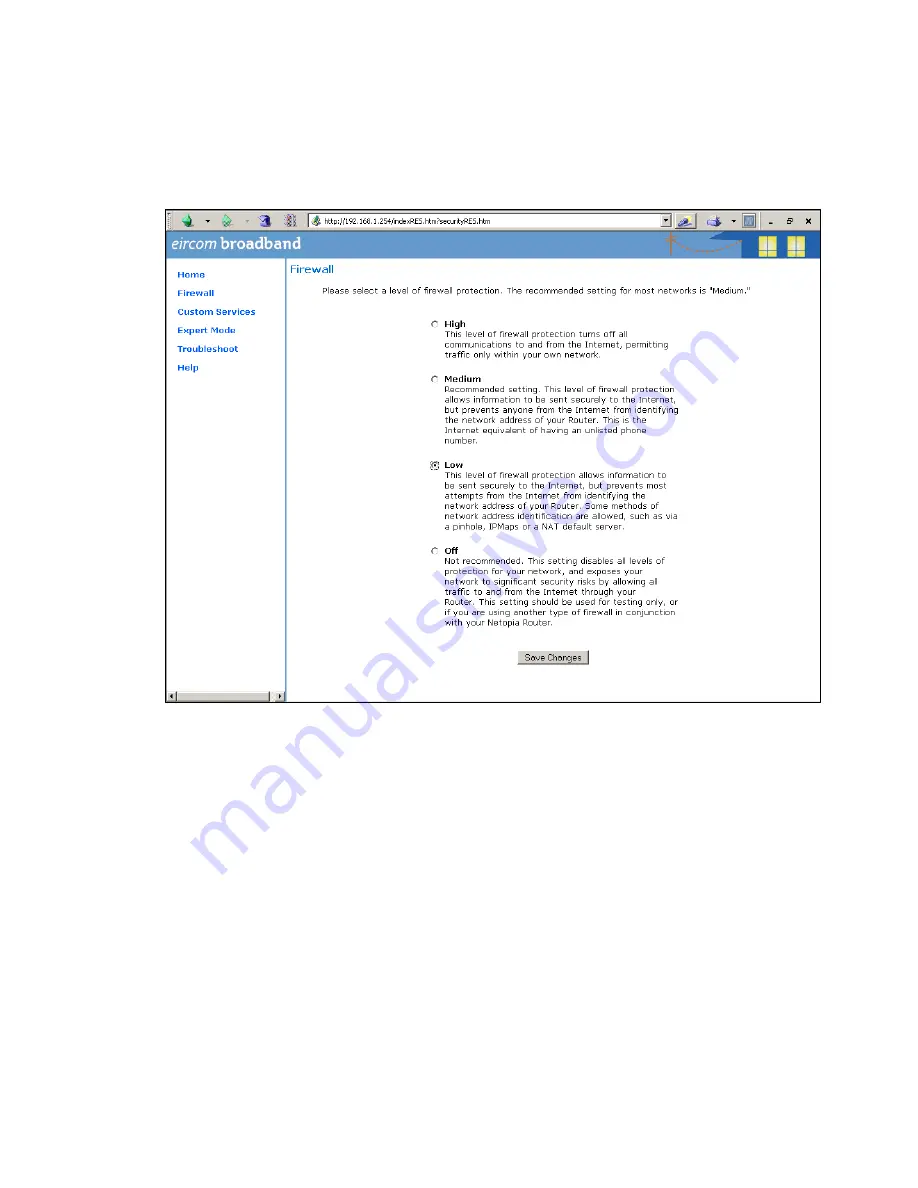
Lower the level of Firewall protection 

 
Click on the link Firewall in the top left corner of this page and the following screen 
will be displayed 
Set the level of firewall protection to LOW and press the button ‘Save Changes’. 
 

Содержание Opera 240

Страница 1: ...Opera 240 System Manual...

Страница 2: ...Specifications are subject to change without notice Facilities described may or may not be supported by your network Opera 240 and Operafone are the registered trademark of MDS Gateways This documenta...

Страница 3: ...sed programming 20 3 2 Enter Browser Based System Programming 20 3 3 System Programming Page 22 3 4 Manual Programming of the SIP trunk lines 23 3 5 Programming the External Lines 27 3 6 Programming t...

Страница 4: ...tw wa ar re e l li ic ce en nc ce es s f fo or r a ad dd di it ti io on na al l f fu un nc ct ti io on na al li it ty y 4 47 7 8 1 Installing software licences 48 8 2 Licence activation 50 Appendix I...

Страница 5: ...r via the ISDN network using a simple analogue phone or an Operafone IP Executive phone or an Operafone IP Professional phone or a two wire digital system phone In its basic configuration the Opera 24...

Страница 6: ...xed keys and a loudspeaker The Operafone Soft is PC or iPhone based version of the Operafone Executive with full system phone functionality over the LAN or WAN Up to two hundred and eight IP system ph...

Страница 7: ...of voicemail boxes 1 2 Status LEDs There are eight LEDs on the fixed section of the front panel The functions of these LEDs follow Status ON OFF Flashing System starting Power off Power On Normal ope...

Страница 8: ...RJ45 sockets numbered 1 8 for FXS analogue ports in a 2 4 configuration To the right of the FXS sockets there are two door open relay RJ45 sockets labelled R1 and R2 in a 2 1 configuration To the righ...

Страница 9: ...N2 Four Basic Rate Access card A BRA card in the left of the 3 plug in slots is assigned the trunk line number T1 to T4 in the centre T5 to T8 and on the right T9 to T12 Licensed SIP trunks are assign...

Страница 10: ...system phone card in the left of the 3 plug in slots is by default assigned the extension numbers 101 to 108 in the centre 109 to 116 and on the right 117 to 124 This numbering plan can be altered in...

Страница 11: ...der 2 1 group number destination If not leader 2 1 group number destination group PIN Cancel forwarding of all calls for Group If leader 21 group number If not leader 21 group number group PIN Restric...

Страница 12: ...er number Universal page 7 7 Intercom force handsfree answer to system phone user 77 user number Door opening code 7 8 Intrude at busy tone 7 9 Access voicemail 9 9 Connect to a user s Mailbox 9 9 use...

Страница 13: ...ss with the range of the LAN and then connecting the system on the LAN then accessing the system browser for configuration then getting Internet access and only then connecting the IP system phones to...

Страница 14: ...ng to the left Mark the positions of the fixing holes at either side 3 Drill the holes in the positions marked insert rawl plugs 4 Fix the unit parallel to the wall by inserting two screws in each of...

Страница 15: ...systems current IP address or Subnet mask 1 Plug an analogue phone into one of the analogue ports 2 Dial 01 for the IP address or 02 for the Subnet mask 3 The system will call out the current setting...

Страница 16: ...eed to manually set the local IP address in the Phone depress Menus key for 10 seconds then scroll to Local IP Params Change IP Address Once it has a Local IP address the phone will then connect back...

Страница 17: ...s are already connected The IP address of the system can be changed in a number of ways 2 5 1 Change the IP address of the system using an analogue phone Connect an analogue phone to one of the analog...

Страница 18: ...ect a PC directly to the LAN port of the system using an Ethernet cable Configure the IP address of the PC in the same address range as the Opera 240 system default address 192 168 1 250 The first thr...

Страница 19: ...net Mask 255 255 255 0 Default Gateway 192 168 1 254 Make sure that the configuration that appears on your PC is correct In order to test the IP connection between the PC and the Opera 240 type ping f...

Страница 20: ...Button on each feature programming page On clicking the Help button the Help page appears on screen giving an explanation of the feature and indicating how to program the feature Programming is carri...

Страница 21: ...Opera 240 System Manual Page 21 Enter Username admin Password 1000 The main configuration page the system programming page is displayed...

Страница 22: ...ain configuration screen similar to that shown below is displayed This shows a list of links for all the programmable settings for the system divided into related groups for ease of programming Clicki...

Страница 23: ...Each account has a user name and password These details are provided by the operator of the network The parameters of the SIP accounts are displayed here Press the edit button to configure The followi...

Страница 24: ...the details of this account The parameters of the SIP trunk are altered or edited on this page The following parameters may be configured Basic Settings NAME The Opera 240 system can allocate a name...

Страница 25: ...he address of a STUN server with the account details it should be entered here Subscriber Settings USERNAME This is the username provided by the network operator for the SIP account PASSWORD This is t...

Страница 26: ...ven digits may be dialled immediately and The number 999 may be dialled immediately and The number 911 may be dialled immediately DIAL TIMEOUT This is a pre defined period without dialling which is in...

Страница 27: ...ules described earlier while SIP trunks are configured using the registration information from the provider as described earlier When ISDN2 basic access trunks are connected you must program the ISDN...

Страница 28: ...interfaces on the External No Trunk assignment page under ISDN Trunks as shown below This enables outgoing ISDN calls present a CLI that is recognised as a valid number for the Trunk interface at the...

Страница 29: ...By default three ringing modes are defined Day ringing and Night ringing and Operator Mode and there are two additional modes that can be defined by the user By default all external lines are programm...

Страница 30: ...IP13 to IP22 are SIP trunks Dialling the digit 0 will select any trunk line Dialling 91 will select the ISDN2 basic access T1 Dialling 92 will select the ISDN2 basic access T2 Dialling 93 will select...

Страница 31: ...are selectable on the lower right hand corner of the UPN Phone Assignment page Each of the 8 available UPN ports on the card inserted in slot 2 in the example above offers a drop down menu of extensi...

Страница 32: ...ammed Default Gateway address default 192 168 1 254 it sets port forwarding at the Gateway based on the settings in the Gateway Configuration page see below It also queries the Gateway for its WAN IP...

Страница 33: ...odem router has been altered from 192 168 1 254 the Opera system must be manually programmed with the IP address of the Default Gateway i e the router for Internet access The local Default Gateway IP...

Страница 34: ...accessing the modem router Gateway browser programming as per the example in the Appendices UDP packets typically on WAN ports 50000 to 50479 of the Gateway should be forwarded to the local IP addres...

Страница 35: ...to the LAN until the system has access to Internet otherwise the WAN address of the system relayed by router UPnP will not be captured by the IP system phone at power up Note Do not power up the IP sy...

Страница 36: ...registers with its remote Opera system from anywhere in the world over the public Internet If the phone had not been connected with its system on a LAN the public IP address or url of the system must...

Страница 37: ...he IP Phone Registration page in Browser based Programming If you arrive at a hot desk and the phone is registered to another user you can re register it to your own user account as follows Press the...

Страница 38: ...ee expansion slots The three expansion slots may be fitted with any combination of 8 UPN and 8 a b FXS cards All devices connected at the expansion Slave racks must register as IP users on the Master...

Страница 39: ...the slave rack IP address is 192 168 1 251 if you install more than one slave rack you must reprogramme the IP addresses so tat each rack has a different address When you connect the Opera system to a...

Страница 40: ...Opera 240 System Manual Page 40 Enter the IP address of the Master system as indicated above Press Save and then Back to return to the Slave Settings Browser programming front page...

Страница 41: ...40 System Manual Page 41 6 3 Register Slave extensions with the Master system Click on the Extension Registration link on the Slave Browser programming front page to arrive at a page in the following...

Страница 42: ...ed d U Us se er r P Po or rt ta al l Each user can easily manage their phone settings personal phonebook call forwarding and voicemails by logging into the Opera 240 from any standard Browser running...

Страница 43: ...ne volume and settings and function key assignments 7 2 Install the Communicator synchronisation program on the User PC The Communicator program allows loading of Contacts and synchronisation with Gma...

Страница 44: ...the Communicator shortcut icon on your desktop or run from the Windows Start menu On the Settings page enter the IP URL address of the PBX together with the User Name and the associated Password the...

Страница 45: ...ail or Outlook contacts to the PBX At the Export Import Contacts page select either Gmail or Outlook contacts for download and click on the tick By logging in as the Administrator e g with User name a...

Страница 46: ...ts on the PBX with those on Gmail or Outlook and synchronise them according to the rules set on the Sync Contacts page At the Sync Contacts page select the synchronisation Direction from the drop down...

Страница 47: ...nstall several music files in WAV or MP3 format to be played to callers on hold Computer Telephony Integration SIP extension users on the LAN allow WLAN FMC Fixed Mobile Convergence with single number...

Страница 48: ...Manual Page 48 8 1 Installing software licences Browse to the IP address of the system and enter the user name and password e g admin 1000 to get to the main programming page and then select the Syst...

Страница 49: ...Opera 240 System Manual Page 49 Paste the purchased licence keys into the box Click Save Please note that the system must be restarted for new licences to take effect...

Страница 50: ...een loaded and the system restarted go to the appropriate programming page e g SIP Accounts Automated Attendant or VoIP Networking and activate the feature To activate IP user licences go to the IP Ph...

Страница 51: ...k the box corresponding to the extension user for whom the relevant feature licence should be activated Then click Save Click on the Registration link to return to the previous page where the IP Regis...

Страница 52: ...en Pin 7 Brown White Pin 8 Brown A A Ap p pp p pe e en n nd d di i ix x x I I II I I S S Sy y ys s st t te e em m m T T To o on n ne e es s s The following is a list of tones that are used on the syst...

Страница 53: ...Part Code Description Advantage Cable 26716 01 Vista Headset to QD Quick Disconnect Supra 32184 04 H51 Headset One Ear Headband 32186 04 H51N Noise Cancelling Headset One Ear Headband Tristar 33647 0...

Страница 54: ...nsert a Pause after Recall when programming function keys A A Ap p pp p pe e en n nd d di i ix x x I I IV V V M M Mi i is s sc c ce e el l ll l la a an n ne e eo o ou u us s s t t ti i im m me e er r...

Страница 55: ...f fi i ic c ca a at t ti i io o on n ns s s Operating temperature 5C to 45C Humidity 10 to 90 non condensing Mains voltage 110 230 10 Max power consumption 10W Maximum AC V A 120VA Maximum input watts...

Страница 56: ...s s si i ig g gn n nm m me e en n nt t ts s s a a an n nd d d C C CL L LI I Is s s USER SETTINGS TABLE 1 IP Users User New User Number New User Name Trunk Line Access T L1 T L2 T L3 T L4 T L5 T L6 T L...

Страница 57: ...e Trunk Line Access T L1 T L2 T L3 T L4 T L5 T L6 T L7 T L8 Level of Access 1 2 3 4 5 6 7 Users with Operator Functionality Enabled 41 42 43 44 45 46 47 48 49 50 51 52 53 54 55 56 57 58 59 60 61 62 63...

Страница 58: ...urb DND DND Override Call Diversion Conference Internal Paging Direct Line Seizure DLS User Programming Voice Mail Voice Mail Password Call Back Called Party Missed Call List Roaming PIN Extensions D...

Страница 59: ...isturb DND DND Override Call Diversion Conference Internal Paging Direct Line Seizure DLS User Programming Voice Mail Voice Mail Password Call Back Called Party Missed Call List Roaming PIN Exrensions...

Страница 60: ...R RINGING ASSIGNMENT Enter the extensions to ring for the MSN Line for each ringing mode DAY RINGING NIGHT RINGING MODE 3 MODE 4 MODE 5 1 2 3 4 5 6 7 8 9 10 11 12 13 14 15 16 17 18 19 20 21 22 23 24 2...

Страница 61: ...USER CLI TABLE USER CLI NUMBER CLI RESTRICTION SET USER CLI NUMBER CLI RESTRICTION SET 11 11 12 12 13 13 14 14 15 15 16 16 17 17 18 18 19 19 20 20 21 21 22 22 23 23 24 24 25 25 26 26 27 27 28 28 29 2...

Страница 62: ...58 108 158 9 59 109 159 10 60 110 160 11 61 111 161 12 62 112 162 13 63 113 163 14 64 114 164 15 65 115 165 16 66 116 166 17 67 117 167 18 68 118 168 19 69 119 169 20 70 120 170 21 71 121 171 22 72 1...

Страница 63: ...T SETTING NEW SETTING IP Address 192 168 1 250 ___ ___ ___ ___ Subnet Mask 255 255 255 0 ___ ___ ___ ___ HTTP Port 80 DATA CALL MANAGEMENT Maximum Number of Data Calls 4 Maximum Number of ISP Calls 6...

Страница 64: ...DM 1030 Page 64 REMOTE ACCESS NUMBERS MSN 1 CLI LIST 1 2 3 4 5 6 7 8 9 10 INTERNET BARRING INDEX PC NAME to identify IP Address with a user IP NUMBER BARRED tick if barred 1 2 3 4 5 6 7 8 9 10 11 12...

Страница 65: ...put may be extracted and used by external applications for example Microsoft Excel to generate reports and accumulate statistics It is beyond the scope of this guide to describe how to use this output...

Страница 66: ...of call in the format HH MM SS 04 Line Number 20 Alphanumeric representation of Line number e g Line 01 05 Extension number 20 Numeric representation of extension number e g 623 6 Extension Name 20 Al...

Страница 67: ...160058 1 2 3 4 5 6 7 8 9 10 11 12 13 14 Logging Outgoing Calls When an outgoing call is made by an extension the Call Type field 7 and Connection field 8 fields are updated to O and Y respectively in...

Страница 68: ...is externally forwarded In both of these records the Extension Number Extension Name the Calling Number of the forwarding extension are stored Logging Auto attendant Calls If an incoming call is answ...

Страница 69: ...8 9 10 11 12 13 14 15 Logging Software Download Calls The Opera system can receive software upgrades by connecting to a download server over an ISDN line These calls are initiated by a user on the sys...

Страница 70: ...ne 04 676 Joe Bloggs O Y 00 25 03 00 04 05281169 1 20 1 2 3 4 5 6 7 8 9 10 11 12 13 14 15 16 17 Diagnostic Logging In addition to providing the call logging information for voice calls on the system t...

Страница 71: ...stic Logging The Opera system contains a buffered record of the most recent actions performed on the system This buffered information is dumped out en bloc to provide a history of the most recent acti...

Страница 72: ...gure port forwarding for Voice over IP traffic on the Netopia Modem Router Cayman 3346 In this example voice traffic coming from the Internet to the Opera system called Advantage here in the Office lo...

Страница 73: ...ress is 192 168 1 254 This may have been changed however by the LAN administrator at installation In this case check with the LAN administrator and enter the current address When this is done the home...

Страница 74: ...e 74 Step 2 Lower the level of Firewall protection Click on the link Firewall in the top left corner of this page and the following screen will be displayed Set the level of firewall protection to LOW...

Страница 75: ...Opera 240 System Manual DM 1030 Page 75 Step 3 Define the port forwarding for TCP Click on the link Custom Services on the top left corner of the screen and the following screen is displayed...

Страница 76: ...Opera 240 System Manual DM 1030 Page 76 Click on the button Define Custom Service to display the next screen Select the button Port Forwarding Range of Ports as shown and press Next...

Страница 77: ...ual DM 1030 Page 77 At the next screen type in the following information as shown Service Name Advantage TCP Global Port Range 5075 5075 Base Host Port 5075 Protocol TCP Press Next and on the followin...

Страница 78: ...Opera 240 System Manual DM 1030 Page 78 On the next screen open the dropdown list and select the service Advantage TCP which you have defined and press the button Enable...

Страница 79: ...Opera 240 System Manual DM 1030 Page 79 The following screen is displayed In the dropdown box Select Host Service choose the local LAN IP address of the Opera here called Advantage system Press Enable...

Страница 80: ...Opera 240 System Manual DM 1030 Page 80 All TCP traffic on port 5075 will now be forwarded to the Opera system called Advantage in this example and this is recorded as shown on the following screen...

Страница 81: ...pera 240 System Manual DM 1030 Page 81 Step 4 Define port Forwarding for UDP Press the button Define Custom Service to display the following screen Select Port Forwarding Range of Ports and press Next...

Страница 82: ...82 Type in the following information on the next screen as shown Service Name Advantage UDP Global Port range 50000 50031 Base Host Port 50031 Protocol UDP Press Next and on the following screen pres...

Страница 83: ...Opera 240 System Manual DM 1030 Page 83 Select Advantage UDP from the drop down menu and press Enable...

Страница 84: ...Opera 240 System Manual DM 1030 Page 84 In the following screen select the local LAN IP address of the Opera Advantage system in the box Select Host Device and press Enable...

Страница 85: ...anual DM 1030 Page 85 All UDP traffic on ports 50000 to 50031 will now be forwarded to the Opera Advantage system and this is recorded as shown on the next screen This completes the configuration of t...

Страница 86: ...System Manual DM 1030 Page 86 A A Ap p pp p pe e en n nd d di i ix x xI I I X X XI I I S S Sy y ys s st t te e em m m C C Co o on n nn n ne e ec c ct t ti i io o on n n C C Ca a ap p pa a ac c ci i it...

Отзывы: