background image

14

McQuay IM 777-2

Installation Guidelines

Internal Isolation Assembly Adjustment

On units with internally isolated fan and motor assemblies, the 
assemblies are secured for shipment. with a tie-down at each 
point of isolation.

Before Operating the Unit:

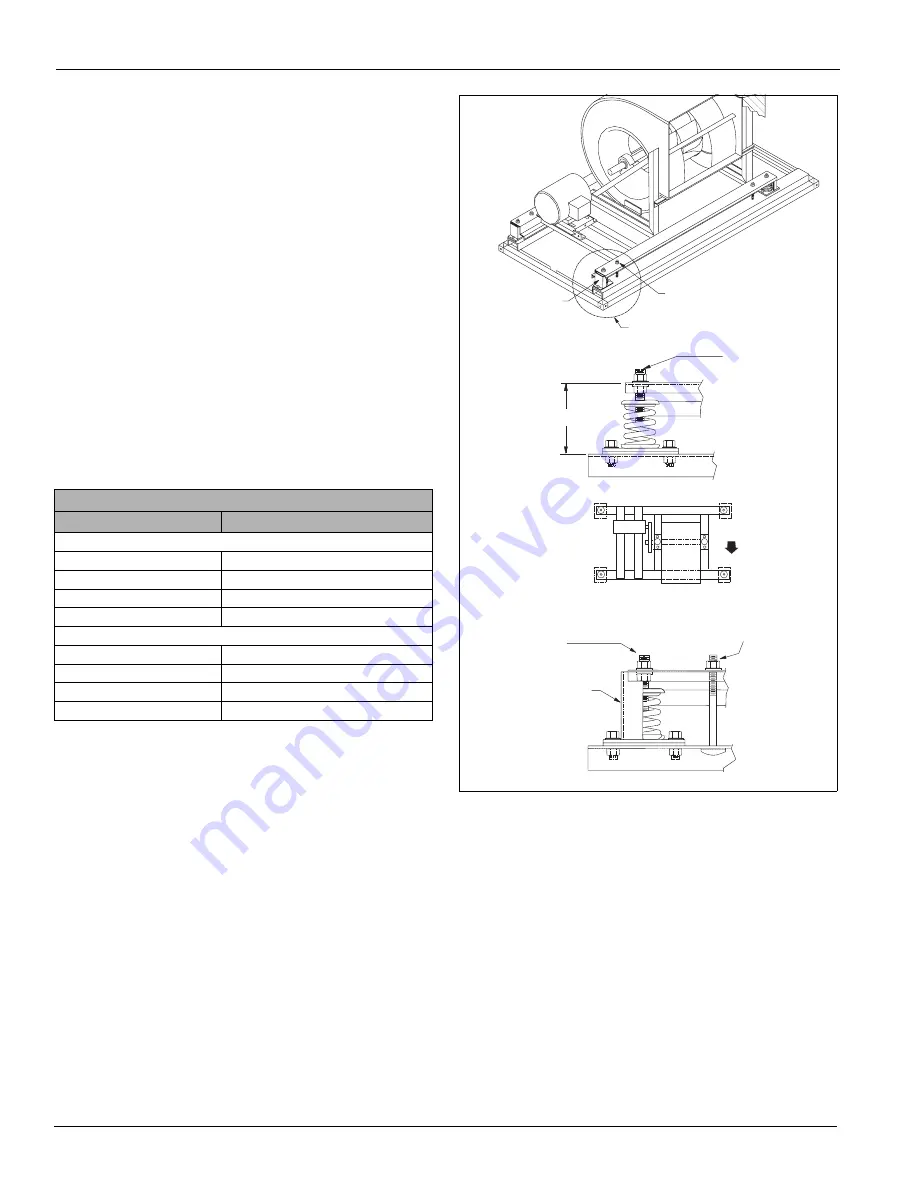
Remove the shipping brackets and tie-down bolts (see 
Figure 22) and discard. The shipping brackets located on the 
opposite drive side of the unit are difficult to access from the 
drive side of the unit. Either remove them before the unit is 
assembled, or remove the panel on the opposite drive side to 
gain access.

The spring isolators under the four corners of the fan and 
motor assembly are factory adjusted while the fan was not 
running. See Table 1 below. With the unit operating at normal 
cfm and static pressure, all the isolators should be at the same 
height opening. If adjustments are required, loosen the 1/2" 
cap screw on top of the isolator and turn the adjusting bolt to 
lower or raise the fan and motor base. Retighten the cap screw 
when adjustments are completed. 

For models 040 through 090, the isolators should be at equal 
height during fan operation (6"). Center the fan outlet in the 
outlet panel opening. If adjustment is required, loosen the cap 
screw on top of the isolator assembly. Turn the adjustment nut 
below the fan frame to lower or raise the fan motor and frame 
assembly. Retighten the cap screw on top of the isolator 
assembly. 

Figure 22: Removing Shipping Brackets

Table 1: Spring Mount Adjustments

Spring mount adjustment at rest

Fan discharge position

Top or bottom horz. (dim "H")

Unit sizes 003–035

1

3.75

2

4.25

3

4.25

4

3.75

Unit sizes 040–-090

1

6.00

2

6.50

3

6.50

4

6.00

M o t o r

F a n

P O S   1

P O S   2

P O S   3

P O S   4

A i r f l o w

F a n   i s o l a t o r   p o s i t i o n   n u m b e r s

D i m   " H "  

S p r i n g   h e i g h t
a d j u s t m e n t   s c r e w

S p r i n g   h e i g h t

a d j u s t m e n t   s c r e w

S h i p p i n g   h o l d

d o w n   s c r e w

S h i p p i n g

b r a c k e t

D e t a i l   A

S h i p p i n g   h o l d   d o w n

r e m o v e   a n d   d i s c a r d

( T y p i c a l   4   p l a c e s )

S e e   d e t a i l   " A "

S h i p p i n g   b r a c k e t

r e m o v e   a n d   d i s c a r d

( T y p i c a l   4   p l a c e s )

Unit sizes 006 - 090

Содержание Skyline IM 777-2

Страница 1: ...Installation and Maintenance Manual IM 777 2 Skyline Air Handler Group Applied Air Sizes 003 090 Part Number IM 777 Date July 2007 2007 McQuay International...

Страница 2: ...ounting 10 Piping Vestibules 10 Piping and Coils 10 Drain Pan Traps 13 Internal Isolation Assembly Adjustment 14 Electrical Installation 14 Operation Guidelines 16 Startup Checks 16 Fan Wheel Alignmen...

Страница 3: ...and shaft before unit installation to verify this has not happened Screws bolts etc for assembling sections are supplied in a bag attached to each section All necessary gasketing is applied in the fa...

Страница 4: ...12 deep See Figure 2 Figure 1 Servicing Space Requirements Figure 2 Service Clearance for Electrical Power Devices Rigging Skyline air handlers ship as separate sections completely assembled or in mo...

Страница 5: ...1 Caulk all assembly joints of the unit Before joining the sections apply at least 1 4 inch diameter bead of sealant to the mating faces of the cabinet Use the splice joint as a guide for applying th...

Страница 6: ...flanges Bend the ends of the splice cap down to secure in place 6 Assemble the small splice plate at the top rail to secure the sections together at the top Use 5 16 bolts See Figure 9 Figure 9 Splic...

Страница 7: ...quire the use of tools to access compartments containing moving parts or electrical wiring See Figure 11 1 Remove padlock if one is present 2 Insert 1 2 socket into cup and rotate 1 4 turn clockwise a...

Страница 8: ...ccur If larger heavier components require mounting on unit panels use through bolts with flat washers through both outer and inner panels To maintain panel integrity seal both ends with an industrial...

Страница 9: ...er Between Hoods Mounting Actuators The installing contractor is responsible for the mounting of all field installed actuators No provisions are made for the location of these actuators due to the num...

Страница 10: ...cal codes and industry standards Do not apply undue stress at the connection to coil headers always use a backup pipe wrench Support pipework independently of the coils Water Cooling Coils Note Use gl...

Страница 11: ...thermostatic or bucket traps for low pressure steam On high pressure steam use bucket traps Use thermostatic traps only for air venting Use bucket traps for on off control only Locate traps at least 1...

Страница 12: ...Return main 12 min Vacuum breaker 1 2 check valve Steam main Return main 12 min Full size of return conn Check Valve Strainer Gate Valve Control valve modulating two position Float and thermostatic tr...

Страница 13: ...drain pan trap to allow condensate to drain freely On both blow through and draw through units the trap depth and the distance between the trap outlet and the drain pan outlet must be twice the static...

Страница 14: ...when adjustments are completed For models 040 through 090 the isolators should be at equal height during fan operation 6 Center the fan outlet in the outlet panel opening If adjustment is required lo...

Страница 15: ...vicing Perform lockout tagout procedures to ensure that power can not be energized For variable frequency drives or other energy storing components that have been furnished and mounted by either McQua...

Страница 16: ...Can cause property damage personal injury or death Wire fan power supply and ground motor frame in accordance with local electric codes AVERTISSEMENT Risques d incendie et d lectrocution pouvant cause...

Страница 17: ...by loosening wheel hub setscrews shifting wheel s axially as needed and retightening setscrews Figure 26 Wheel to Inlet Funnel Relationship Plenum Fans Table 2 Wheel to Inlet Funnel Relationship Airf...

Страница 18: ...line Fans Wheel funnel overlap Size Overlap 150 375 165 438 182 562 200 625 222 688 245 750 270 812 300 875 330 1 000 365 1 125 402 1 250 445 1 375 Overlap Table 6 Bearing Collar and Wheel Hub Set Scr...

Страница 19: ...56 24 00 Maximum rpm Class I 3000 3000 2300 2000 1700 1500 Maximum rpm Class Il 4335 3918 3457 2858 2427 2255 300 250 200 150 100 90 80 Torque in lb 350 400 450 500 600 650 700 750 800 850 1000 1500...

Страница 20: ...ameter 13 5 15 16 5 18 25 20 22 25 24 5 27 30 33 36 5 40 25 44 50 49 54 25 60 Maximum rpm Class I 2895 2589 2376 2256 2077 1875 1691 1479 1328 1209 1073 972 882 799 725 651 Maximum rpm Class II 3786 3...

Страница 21: ...t or debris on wheel blades b Loose set screws in wheel hub or bearing to shaft c Wheel distorted from overspeed 2 Bent shaft 3 Drive faulty a Variable pitch sheaves Axial and radial runout of flanges...

Страница 22: ...nts Upon completion of the air balance replace the variable pitched motor sheave with a properly sized fixed sheave A matching fixed sheave provides longer belt and bearing life and minimizes vibratio...

Страница 23: ...3 Replace external key E and securely tighten setscrews B over key and setscrews C into keyway in fixed half of the sheave 4 Put on belts and adjust belt tension Do not force belts over grooves See F...

Страница 24: ...ews E 9 Put on belts and adjust belt tension Do not force belts over grooves See Fan Drive Belt Adjustment on page 26 10 Before starting the drive ensure that all keys are in place and all setscrews a...

Страница 25: ...s or 6 turns for the B belts Do not open C sheaves more than 9 1 2 turns Do not open 5V sheaves more than 6 turns Do not open 8V sheaves more than 8 turns 6 Tighten BOTH locking screws A in the outer...

Страница 26: ...o N o t R e m o v e I n n e r L o c k i n g R i n g O u t e r L o c k i n g R i n g S p l i t T a p e r B u s h i n g 3 H o l e s f o r S p a n n e r W r e n c h o r D r i f t Belt span Deflection Bel...

Страница 27: ...Filter Gauge Table 15 Belt Deflection Force per Browning specifications Cross section Sheave diameter in Deflection force lbs Smallest sheave diameter range rpm range Cross section A B 5V Cross secti...

Страница 28: ...ls Removing and Replacing Components See Access Doors and Panels on page 7 for instructions on removing panels and opening fan access doors to remove or replace components Removing the Fan Section The...

Страница 29: ...in place with a clamp See Figure 41 1 Disconnect all piping and remove the brass plugs for the vents and drains located in the connections 2 Remove all screws and remove the access panel 3 Remove the...

Страница 30: ...ce bolt the coil to the section 4 Caulk the mounting surface of the steel plate and install the plate on the coils 5 Caulk the mounting surface of the drain trough and install the drain trough on the...

Страница 31: ...arges must be prepaid The return of the part does not constitute an order for replacement Therefore a purchase order must be entered through the nearest McQuay representative The order should include...

Страница 32: ...training or call 540 248 9646 and ask for the Training Department Warranty All McQuay equipment is sold pursuant to its standard terms and conditions of sale including Limited Product Warranty Consul...

Отзывы: