background image

Overview

2 - 3

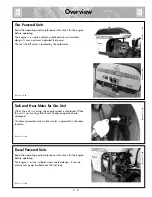
Gas Powered Units

Read the operating and maintenance instructions for the engine 
before operating.
The engine is a single cylinder, overhead valve, air cooled 
design. It uses a vacuum operated fuel pump.
The fuel shutoff valve is located by the carburetor.


TX01987-1-10-02

PH01965-11-15-00

Diesel Powered Units

Read the operating and maintenance instructions for the engine 
before operating.
The engine is a twin cylinder water cooled design. It uses an 
electric fuel pump located near the fuel tank.

TX01855-11-15-00

PH01960-11-15-00

Tach and Hour Meter for Gas Unit

When the unit is running, the engine speed is displayed. When 
the unit is not running, total hours of engine operation are 
displayed.
On diesel powered units an hour meter is provided in the same 
location.

TX01892-11-15-00

PH01988-11-15-00

PH02243-1-10-02

Содержание TracStar 28

Страница 1: ...Manual T1210801 Revision C 7 04 TracStar No 28 TracStar No 412 TracStar No 618 Fusion Machines Operator s Manual Patent No s 5 814 182 6 212 748 6 212 747 6 021 832 other patents pending ...

Страница 2: ...California Proposition 65 Warning Engine exhaust from this product contains chemicals known to the State of California to cause cancer birth defects or other reproductive harm ...

Страница 3: ... this machine please read this manual thoroughly and keep a copy with the machine for future reference This manual is to be considered part of your machine Always return the manual to the literature compartment World Class Training This manual is intended as a guide only and does not take the place of proper training by qualified instructors The information in this manual is not all inclusive and ...

Страница 4: ...hall be directed to McElroy Manufacturing Inc P O Box 580550 833 North Fulton Tulsa Oklahoma 74158 0550 918 836 8611 Fax No 918 831 9285 www mcelroy com Register Your Warranty Online www mcelroy com DISCLAIMER OF LIABILITY McElroy Manufacturing Inc accepts no responsibility of liability for fusion joints Operation and maintenance of the product is the responsibility of others We recommend qualifie...

Страница 5: ...7 Hearing Protection Required 1 7 Positioning Fusion Machine 1 7 Overview Theory of Heat Fusion 2 1 Carriage Assembly 2 2 Chassis 2 2 Gas Powered Units 2 3 Tach and Hour Meter for Gas Unit 2 3 Diesel Powered Units 2 3 Diesel Gas Engine Controls 2 4 Power for Heater 2 4 Oil Reservoir 2 4 Hydraulic Oil Filter 2 4 Hydraulic Manifold Block 2 5 Hydraulic Cylinders 2 5 Facer 2 6 Insulated Heater Stand 2...

Страница 6: ... Joint 3 10 Install Next Piece of Pipe 3 10 Special Operations In Ditch Disconnect Hydraulic Hoses 4 1 Remove Carriage Assembly from the Chassis 4 1 Remove 3 Jaw Assembly from the Carriage 4 2 Remove Facer from TracStar No 412 No 618 4 3 Remove Facer from TracStar No 28 4 4 Manual Facer Operation 4 5 Removing Top Jaws 4 6 Lower 3 Jaw or 4 Jaw Carriage into Ditch 4 6 Clamp Carriage Assembly to Pipe...

Страница 7: ...ystem Diesel 7 4 Engine Oil System Gasoline 7 4 Check Gauge Calibration 7 5 Clean Jaws and Inserts 7 5 Clean Thrust Bearings 7 5 Clean Eyebolt Threads 7 5 Clean the Clamping Chains 7 6 Fasteners Must Be Tight 7 6 Facer Blades 7 6 Check Add Antifreeze 7 6 Clean Heater Surfaces 7 7 Bleeding Air From Hydraulic System 7 7 Installing Butt Fusion Heater Adapter 7 8 Adjusting Heater Temperature 7 8 Indic...

Страница 8: ...IMPORTANT can help you do a better job or make your job easier in some way PELIGRO Read and Understand Do not operate this equipment until you have carefully read and understand the Safety and Operation sections of this manual and all other equipment manuals that will be used with it Your safety and the safety of others depends upon care and judgment in the operation of this equipment Follow all a...

Страница 9: ...sses and other applicable personal protective equipment Remove jewelry and rings and do not wear loose fitting clothing or long hair that could catch on controls or moving machinery WR00053 12 2 92 TX00114 4 22 93 TX00032 4 7 93 Fuel Handling Gasoline and diesel fuel are extremely flammable and their vapors will explode if ignited Do not fill the fuel tank while the engine is hot or running as spi...

Страница 10: ...ent the heater should be brought up to temperature in a safe environment then unplugged before entering the hazardous atmosphere for fusion TX00100 9 16 94 WR00034 11 30 92 PELIGRO Carbon Monoxide Engine exhaust gases contain carbon monoxide which can cause severe nausea fainting and death Avoid inhaling exhaust fumes and never run the engine in a closed or confined area TX00954 5 14 96 WR00093 5 ...

Страница 11: ...to separate power circuits Do not plug into both outlets of one duplex receptacle NOTICE Disconnect the machine from the power source before attempting any maintenance or adjustment TX00105 4 12 93 WR00055 4 7 93 WR00025 11 30 92 Battery Do not expose the battery to flames or electrical sparks Hydrogen gas generated by battery action is explosive Blindness or serious injury can result from an expl...

Страница 12: ... any maintenance or adjustment TX00102 4 16 93 WR00073 4 6 93 Units With Hydraulics Although the hydraulic pressures in this machine are low compared to some hydraulically operated equipment it is important to remember that a sudden hydraulic oil leak can cause serious injury or even be fatal if the pressure is high enough Escaping fluid under pressure can penetrate the skin causing serious injury...

Страница 13: ...for towing Attempting to tow the machine can result in machine damage Always transport the machine by flat bed truck or similar means and make sure that unit is properly secured TX01888 11 15 00 CD00401b 9 27 00 0 100 200 300 400 500 600 700 800 900 1000 DIRECTIONAL CONTROL VALVE FACING PRESSURE HEATING PRESSURE FUSING PRESSURE SELECTOR VALVE Operating Fusion Machine Place fusion machine on as lev...

Страница 14: ...vel ground as possible If it is necessary to operate machine on unlevel grade chock the tracks and block the unit to make it as stable as possible TX01889 11 15 00 CD00633 9 27 00 Fusion Procedures Obtain a copy of the pipe manufacturer s procedures for the pipe being fused Follow the procedure carefully and adhere to all specified parameters Failure to follow pipe manufacturer s procedure could r...

Страница 15: ... conditions The principle operations include Clamping The pipe pieces held axially to allow all subsequent operations to take place Facing The pipe ends must be faced to establish clean parallel mating surfaces perpendicular to the centerline of the pipes Alignment The pipe ends must be aligned with each other to minimize mismatch or high low of the pipe walls Heating A melt pattern that penetrate...

Страница 16: ...11 15 00 PH01959 11 15 00 Carriage Assembly The carriage assembly consists of two fixed jaws and two hydraulically operated movable jaws bolted to the skid For remote operation the carriage can be set in ditch and connected to the machine with optional hydraulic extension hoses The carriage assembly A can be disconnected from the chassis B and removed for remote operation The optional extension ho...

Страница 17: ...d Units Read the operating and maintenance instructions for the engine before operating The engine is a twin cylinder water cooled design It uses an electric fuel pump located near the fuel tank TX01855 11 15 00 PH01960 11 15 00 Tach and Hour Meter for Gas Unit When the unit is running the engine speed is displayed When the unit is not running total hours of engine operation are displayed On diese...

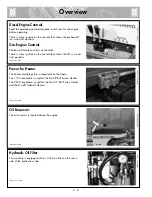
Страница 18: ...art positions Gas Engine Controls Choke and throttle control is on the dash There is a key ignition on the console that shows the off run and start positions TX01986 1 10 02 PH01969 11 15 00 Oil Reservoir The oil reservoir is located above the engine TX02306 7 28 04 PH02709 07 29 04 Power for Heater The heater cord plugs into a receptacle on the frame The 110V receptacle is used for the No 28 Butt...

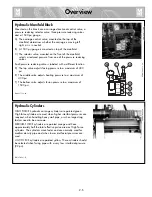
Страница 19: ... adjusts heating pressure to a maximum of 400 psi F The bottom valve adjusts fusion pressure to a maximum of 1500 psi TX00357 11 3 94 Hydraulic Cylinders HIGH FORCE hydraulic carriage cylinders are painted green High force cylinders are used when higher interfacil pressures are required when handling heavy wall pipe or when large drag factors need to be overcome MEDIUM FORCE cylinders are painted ...

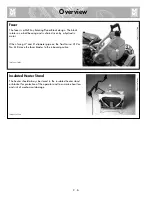
Страница 20: ... and risk of mechanical damage TX00363 9 15 94 PH02334 07 08 02 Overview Facer The facer is a McElroy Rotating Planer Block design The block rotates on a ball bearing and is chain driven by a hydraulic motor When fusing 4 and 6 diameter pipe on the TracStar no 412 or No 618 move the facer blades to the inboard position TX01989 1 10 02 PH01915 11 15 00 2 6 ...

Страница 21: ...til the set temperature is reached The light then goes off and on slowly as the heater maintains temperature Coated butt fusion heater adapters are available for non coated heaters NOTICE Non coated heaters should never be used without butt fusion heater adapters installed To prevent a build up of plastic pipe residue from accumulating on the heater plates loss of surface temperature and pipe stic...

Страница 22: ...ly clean oil from an unopened container TX02305 7 28 04 PH02710 07 29 04 Diesel Engine Read the operating and maintenance instructions for the engine before operating The key ignition has four positions Preheat off run and start NOTICE Set the engine to slow speed before starting Never use starting fluid Open facer valve and unplug the heater Turn switch to preheat for five seconds A horn will sou...

Страница 23: ...on procedure Place heater in insulated heater stand Plug heater into the appropriate outlet on machine IMPORTANT Engine must be in high speed to provide electric power to the heater Refer to the Maintenance section of this manual for instructions how to adjust heater temperature Allow heater to warm up to operating temperature TX01871 11 15 00 Operation PH02334 7 08 02 3 2 PH01900 11 15 00 PELIGRO...

Страница 24: ...the calculated gauge pressure Drag pressure should be determined using the following procedure After facing the pipe move the carriage so that the pipe ends are approximately 2 apart Shift the carriage control valve to the middle neutral position Select the heating mode and adjust the middle pressure reducing valve to its lowest pressure by turning the valve counterclockwise Shift the carriage con...

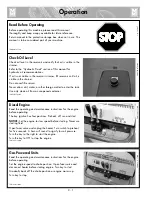
Страница 25: ...tion Move the carriage control valve to the left If the facer stalls adjust the facing pressure so the facer continues to cut IMPORTANT When drag pressure exceeds 300 psi it is necessary to move the carriage to the left bringing the pipe ends into contact with the facer before opening the facer valve Let the carriage bottom out on facer stops Turn facer off Move the carriage to the right so the fa...

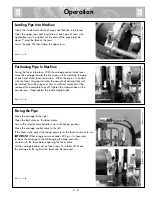
Страница 26: ...o bring into alignment IMPORTANT Always tighten the side that is higher never loosen the low side When the pipe is properly aligned tighten outside clamps to insure against slippage Ensure there is no unacceptable gap between the pipe ends If there is an unacceptable gap return to Loading Pipe into Machine NOTICE When clamping do not over tighten the clamp knobs because machine damage can result C...

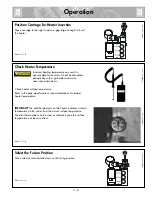
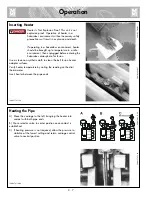
Страница 27: ...meter on the heater indicates internal temperature which varies from the actual surface temperature The dial thermometer can be used as reference once the surface temperature has been verified TX00375 11 1 94 Select the Fusion Position Move selector valve handle down to the fusing position TX00376 9 15 94 Position Carriage for Heater Insertion Move carriage to the right to open a gap large enough ...

Страница 28: ... explosion proof Operation of heater in a hazardous environment without necessary safety precautions will result in explosion and death If operating in a hazardous environment heater should be brought up to temperature in a safe environment then unplugged before entering the hazardous atmosphere for fusion Use a clean non synthetic cloth to clean the butt fusion heater adapter surfaces Verify heat...

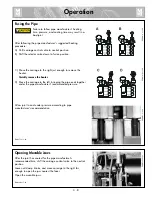
Страница 29: ...may result in a bad joint After following the pipe manufacturer s suggested heating procedure A Shift carriage control valve to neutral position B Shift the selector valve down to fusion position C Move the carriage to the right just enough to remove the heater Quickly remove the heater D Move the carriage to the left bringing the pipe ends together under the pipe manufacturer s recommended pressu...

Страница 30: ... TX00382 9 16 94 Hydraulic Pipe Lifts The TracStar No 618 is equipped with two hydraulic pipe lifts controlled by a valve mounted on the outer fixed jaw When not in use latch the valve in the down position TX01991 1 10 02 Opening Fixed Jaws Open the fixed jaws TX00381 9 16 94 Operation PH01903 11 15 00 3 9 PH01905 11 15 00 PH02369 9 19 02 1 3 2 ...

Страница 31: ...e or pull the pipe through the jaws until the end of the pipe is protruding 1 past the jaw face of the fixed jaw TX00383 9 15 94 PH01906 11 15 00 Install Next Piece of Pipe Insert a new piece of pipe in movable jaws and repeat all previous procedures TX00384 10 12 95 PH00308 9 24 93 ...

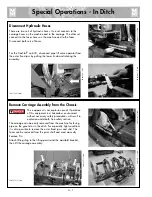
Страница 32: ...roof Operation of this equipment in a hazardous environment without necessary safety precautions will result in explosion and death See safety section The carriage can be easily removed from the machine for fusing pipe on the ground or in the ditch For especially tight conditions it is also possible to remove the outer fixed jaws and skid The facer can be removed from the pivot shaft and used manu...

Страница 33: ...ove the four bolts holding carriage assembly to the chassis with the wrench provided Attach lifting strap as shown and lift the carriage assembly TX01875 11 8 00 PH01939 11 15 00 Special Operations In Ditch 4 2 PH01945 11 15 00 PH01947 11 115 00 PH01954 11 15 00 PH01949 11 15 00 ...

Страница 34: ... rod bracket Remove facer locking bolts Lift facer out of the carriage and set on cardboard or wood blocks off of ground Attach rear guide rod bracket in the position shown TX01992 1 10 02 Special Operations In Ditch 4 3 PH01907 11 15 00 PH01936 11 15 00 PH01933 11 15 00 ...

Страница 35: ...olt Lift facer out of the carriage and set on cardboard or wood blocks off of ground Remove rear guide rod bracket Attach rear guide rod bracket in the position shown TX01874 11 8 00 Special Operations In Ditch PH01930 11 15 00 PH01981 11 15 00 PH01980 11 15 00 4 4 ...

Страница 36: ...4 5 Special Operations In Ditch Manual Facer Operation Lift as shown Lock onto back guide rod then latch on front guide rod TX01887 11 15 00 PH019388 11 15 00 PH01946 11 15 00 ...

Страница 37: ...ift carriage assembly and lower into ditch 3 Jaw Attach lifting sling to the manifold bracket Lift carriage assembly and lower into ditch TX01864 9 29 00 Special Operations In Ditch PH01983 11 15 00 4 6 Removing Top Jaws If the carriage is going to be hand carried or if the carriage needs to be hoisted and slid underneath the pipe the top jaws need to be removed Loosen all clamp knobs Take out the...

Страница 38: ...f the pipe Lift pipe and slide carriage assembly under pipe Rotate carriage assembly around to a normal upright position Attach the top jaws and loosely clamp around pipe TX00879 2 19 96 CD00193b 2 19 96 CD00194b 2 19 96 CD00195a 2 19 96 Special Operations In Ditch 4 7 ...

Страница 39: ...mble Fusion Machine Install carriage assembly to the chassis and connect carriage hoses Lift facer into position and bolt to facer mount Do not tighten Pivot facer down and bring jaws inward against the facer to establish facer position Open jaws away from facer and pivot facer out Tighten the facer mounting bolts Connect facer hoses Install pipe lift operator on the TracStar no 618 Replace top ja...

Страница 40: ...es Attach the adapters to the heater Place heater in insulated heater blanket Plug heater into the vehicle IMPORTANT Engine must be in high speed to provide electric power to the heater TX01888 11 15 00 Saddle Fusion Procedure for TracStar No 28CU The combination unit is capable of saddle fusing up to an 8 200 mm branch on any size main TX00454 9 22 94 Special Operations Saddle Fusion Procedure PH...

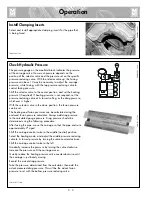
Страница 41: ...r position to set the pressure for heating if heating pressure differs from fusion pressure With the selector valve in the down position the fusion pressure can be set Consult the pipe manufacturer for proper pressures TX00459 9 16 94 Install Clamping Inserts Select and install appropriate clamping inserts in the movable jaw s TX00457 9 16 94 Special Operations Saddle Fusion Procedure PH00304 9 23...

Страница 42: ...o properly position the fitting on the main Tighten the clamp knobs Be sure to allow enough travel for the melt pattern and fusion to occur 3 4 min TX00461 9 15 94 Special Operations Saddle Fusion Procedure PH00399 9 21 94 5 3 PH00390 9 21 94 Clean Surfaces Use 50 or 60 grit utility cloth to clean and rough the main to expose fresh material Rough the base of the fitting unless the manufacturer spe...

Страница 43: ... as specified by the material supplier TX00464 9 14 94 Special Operations Saddle Fusion Procedure PH00402 9 21 94 5 4 PH00404 9 21 94 Prepare Heater Heater is Not Explosion Proof Operation of heater in a hazardous environment without necessary safety precautions will result in explosion and death If operating in a hazardous environment heater should be brought up to temperature in a safe environme...

Страница 44: ...e right bringing the fitting and main together under the pipe manufacturer s recommended pressure TX00466 9 14 94 PH00403 9 21 94 Allow Joint to Cool Allow the joint to cool under pressure as specified by the pipe manufacturer To maintain fusion pressure during cooling the carriage control valve must be positioned in the right hand direction TX00467 9 14 94 PH00405 9 21 94 ...

Страница 45: ... TX01881 11 10 00 PH01955 11 15 00 Crush Points Crush points exist on this machine Keep hands and body parts away from the machine Be aware of yourself and others when moving equipment TX01895 11 15 00 Heavy Overhead Load Fusion machine and plastic pipe are heavy If loaded or lifted improperly they could crush or kill Handle load carefully with proper overhead rigging and equipment of adequate loa...

Страница 46: ...cable at position B When lifting the TracStar No 618 pivot the facer out before attaching the lifting sling The cable attached at position A will run through the inner fixed jaw Small pipe diameter inserts in the upper fixed jaw may need to be removed to prevent the cable from deflecting TX02059 9 19 02 Lifting Safety Follow all applicable federal state local and industry specific regulations when...

Страница 47: ... Fluids section of this manual for hydraulic oil recommendations TX00431 9 15 94 Maintenance Washing the Machine The machine should be cleaned as needed with a soap and water wash TX00429 9 15 94 Check Hydraulic Fluid The hydraulic fluid level should be checked daily If hydraulic oil is not visible in the reservoir strainer Refer to the Hydraulic Fluids section of this manual for hydraulic oil rec...

Страница 48: ...hten Align the rear latches and fasten the latch making sure it locks The cowl should be outside the dash panel Align and fasten the front latch the same way Reverse the procedure to remove the cowls TX01994 1 10 02 PH01976 11 15 00 Maintenance 7 2 PH01974 11 15 00 PH01975 11 15 00 PH02245 1 10 02 ...

Страница 49: ...orce of 7lb should deflect the belt 1 8 inch If oil has gotten on the belt it will need to be replaced TX01996 1 10 02 PH01918 11 15 00 PH01957 11 15 00 Maintenance 7 3 Adjusting System Pressure Remove the right side engine cover to gain access to the hydraulic pump Start the engine and select high speed The system pressure should be at 1800 psi on TracStar No 28 No 412 and 2000 psi on the TracSta...

Страница 50: ...the bottom of the oil pan The oil filler cap and dip stick are located on top of the engine TX01884 11 10 00 PH01914 11 15 00 Maintenance 7 4 Engine Oil System Gasoline Change engine oil after the first 20 hours of operation After the first oil change change the oil and filter every 100 hours of operation Read the engine maintenance instructions Use appropriate single weight oil for the ambient te...

Страница 51: ...ng a stiff bristled brush TX00433 9 15 94 Clean Thrust Bearings The thrust bearings located in the clamp knobs must turn freely Wash the clamp knob bearing assembly with a solvent and then lubricate with 30W or lighter oil TX00434 9 13 94 Check Gauge Calibration Gauge calibration should be checked daily The gauge should read zero when the unit is not running Damaged gauges should be replaced TX004...

Страница 52: ...ure and in place TX00437 9 13 94 Clean the Clamping Chains On the combination unit clean the side fusion chains as needed Clean using a stiff bristled brush and oil generously Wipe away any excess oil TX00436 9 13 94 PH00378 9 14 94 PH00433 11 1 94 PH01912 11 15 00 Check Add Antifreeze Add antifreeze in a 50 50 mix with water as needed on diesel units Replace antifreeze mixture once each year or a...

Страница 53: ...stem proceed as follows Remove upper jaws clamping eye bolts from the two movable clamp jaws to expose the bleed plugs recessed in top of the lower jaws Tilt machine so the fixed jaw end is higher than the opposite end Shift the directional control and move the carriage to the fixed jaw end Adjust the pressure to approximately 50 100 psi before proceeding Loosen the bleed plug on one cylinder next...

Страница 54: ...ob to point to the same temperature as the pyrometer Tighten setscrew in the knob Turn knob to desired temperature Allow heater to stabilize at the new temperature 5 to 10 minutes after adjusting The thermometer on the heater body indicates internal temperature and should be used as a reference only TX02034 7 08 02 PH02333 7 08 02 PH02313 7 08 02 7 8 Heater Indicator Light The heater has a red ind...

Страница 55: ...ter lifting Measure the deflection between the bottom center roller and the inside surface of the rubber track Track tension is normal when this distance is about 1 2 If the deflection is more or less than this the tension needs to be adjusted CD00463 2 25 98 TX01885 11 10 00 Engine Maintenance Refer to the operation and maintenance manual for the engine PH01960 11 15 00 TX01500 3 5 98 ...

Страница 56: ...high pressure and cause serious injury Never loosen grease valve more than one turn Injury could also result if the grease nipple is loosened Never loosen the grease nipple Remove screws and cover to access the adjustment system To loosen the track turn hex shaped valve counterclockwise no more than 1 turn If grease does not start to drain out then slowly rotate the track When correct track tensio...

Страница 57: ... crankcase is filled to correct level Cooling system level is correct Hydraulic hoses are in good condition Engine starts and runs properly Jaws are properly aligned Facer pivot operates properly Facer operates smoothly Face off is square Inserts fit and pin properly Voltage to heater is correct Carriage and Selector Valves operate smoothly Pressure Reducing Valves operate in their range Heater Co...

Страница 58: ...f Pipe 11 Recommended Interfacial Pressure 75 PSI Using a Model 28 Fusion Unit O D 8 625 t 0 784 SDR 11 TEPA 4 710 From Table O D t t IFP GAUGE PRESSURE 30 P S I DRAG TEPA 8 625 784 784 3 1416 75 GAUGE PRESSURE 30 P S I DRAG 338 PSI 4 710 TX00343 12 9 93 9 1 Determining Fusion Pressure Fusion High Force Medium Low Force Model Standard Force High Extra High Velocity Velocity 28 4 71 1 67 412 11 78 ...

Страница 59: ...epending on the pressure setting age of the pump wind etc Exxon Univis N46 hydraulic oil is installed at our factory The advantage of this oil is a wider temperature range however this oil should not be used for continuous operation below 20 F For use in extremely cold ambient temperatures we suggest Mobil DTE 11M which can be used to 16 F This oil should not be used for continuous operation above...

Страница 60: ...arting System Electric Fuel Type Diesel Fuel Tank Capacity 5 Gals Operational Tank Capacity 8 Hrs System Pressure 1750 PSI Hydraulic Reservoir Capacity 8 Gals Vehicle Speed 2 5 MPH AC Output 120 240V 60Hz 15 Amp Entire Machine Weight 1 500 lbs 680kg 3 jaw Carriage Weight 283 lbs 128 4kg 4 jaw Carriage Weight 343 lbs 155 6kg Facer Weight 57 lbs 25 6kg Heater Weight 22 lbs 10kg 0 100 200 300 400 500...

Страница 61: ...tional Tank Capacity 8 Hrs System Pressure 2000 PSI Hydraulic Reservoir Capacity 8 Gals Vehicle Speed 1 5 MPH AC Output 120V 240 V 60Hz 15 Amp Entire Machine Weight 2000 lbs 909kg 3 jaw Carriage Weight 363 lbs 165kg 4 jaw Carriage Weight 441 lbs 200kg Facer Weight 89 lbs 40kg Heater Weight 29 lbs 13 2kg 50 4 1280mm 98 5 2502mm 42 5 1080mm 52 1320mm 44 1118mm 30 762mm ...

Страница 62: ...This manual is waterproof tear resistant grease resistant abrasion resistant and the bonding quality of the printing ensures a readable durable product The material does not contain any cellulose based materials and does not contribute to the harvesting of our forests or ozone depleting constituents This manual can be safely disposed of in a landfill and will not leach into ground water TX001660 8...

Страница 63: ......

Отзывы: