background image

18

Authorisation required

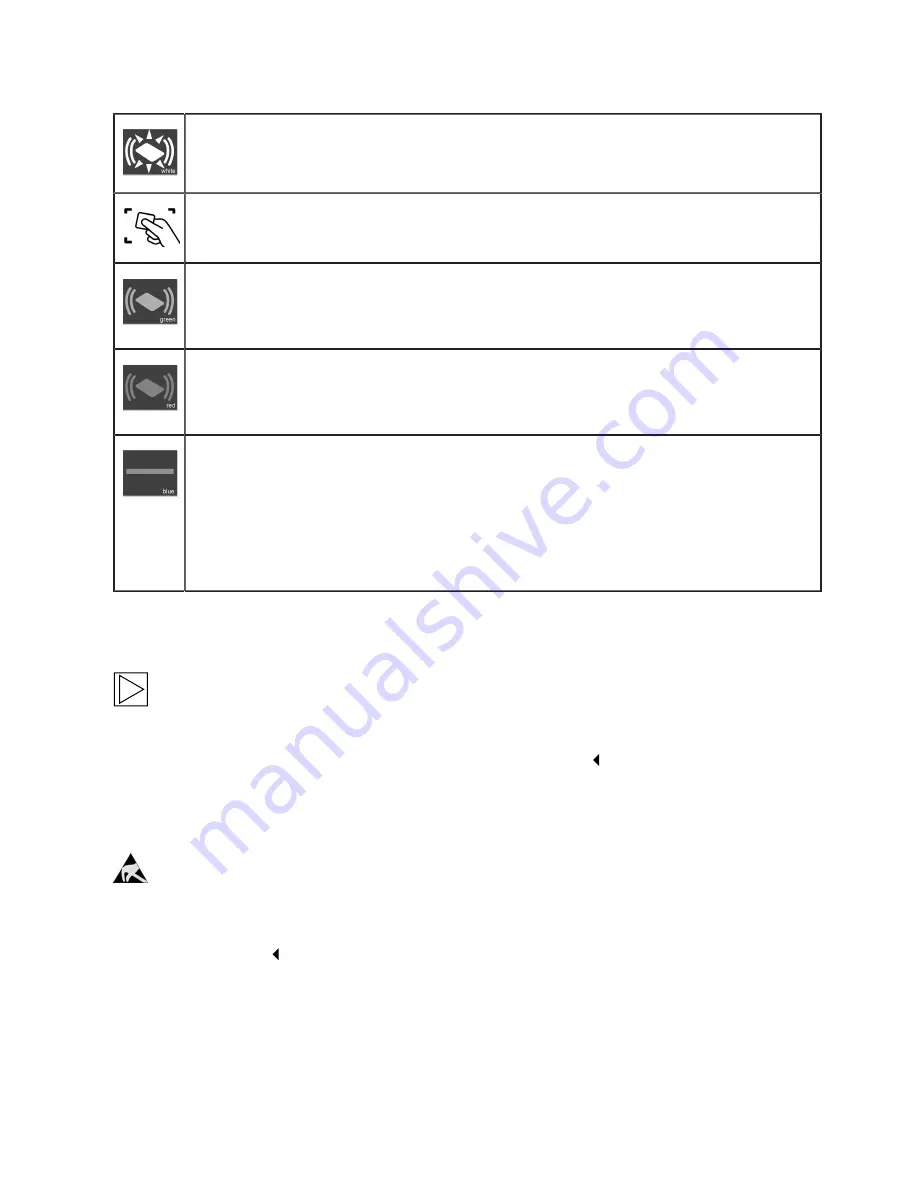
The RFID status indicator 

2

 and the border of the RFID reading area 

3

 flash in 

white

.

1. Hold the RFID card in front of the RFID reading area 

3

.

Authorisation successful

Successful authorisation is indicated by a rising sequence of tones, and the RFID status

indicator 

2

 will be lit for 2 seconds in 

green

.

Authorisation failed

Failed authorisation is indicated by a falling sequence of tones, and the RFID status

indicator 

2

 will be lit for 2 seconds in 

red

.

Charging process enabled

If the charging process is not started within 

60 seconds

 of a successful authorisation,

the system enable will be revoked automatically: During the enable time, the status LED 

1

will be lit in 

blue

. During this time it is not possible to enable or disable the system using a

different card.
1. Now connect the vehicle. The charging process can then be started from the vehicle.

Configuring the authorisation function

Note

The authorisation function of the Wallbox can be disabled. To disable the authorisation function

and delete the user cards, it is necessary to remove the housing cover and the terminal panel

cover from the Wallbox to gain access to the 

service button

Service button

Notes on opening the cover:

Danger of damage. Electronic components may be destroyed if touched.

Before handling modules, perform an electrical discharge process by touching a metallic

earthed object. 

Содержание i Wallbox Plus

Страница 1: ...BMW i Wallbox Plus Owner s manual Freude am Fahren BMW i ...

Страница 2: ......

Страница 3: ...BMW i Wallbox Plus Owner s manual 5 EN ...

Страница 4: ......

Страница 5: ...ID cards 17 RFID authorisation 17 Configuring the authorisation function 18 CONFIGURATION 21 Web interface 21 FAUL TS 22 Troubleshooting 22 Possible causes of errors for a fault status LED flashes in red 24 MAINTENANCE 27 Cleaning 27 Maintenance and repair work 27 DISPOSAL 28 SOFTWARE UPDATE 29 PRODUCT INFORMATION PAGE 30 HOUSING 31 Remove the housing cover 31 Remove the terminal panel cover 32 In...

Страница 6: ...6 Install the housing cover 34 INDEX 35 ...

Страница 7: ...on protected by copyright All rights reserved especially the rights of reproduction and distribution No part of this documentation may be reproduced photocopying scanning or any other procedures or processed copied or distributed in any form using electronic systems without the written consent of Bayerische Motorenwerke Aktiengesellschaft Contraventions are liable to compensation ...

Страница 8: ...60electric index html Have fun and enjoy your BMW Wallbox BMW AG Pictograms You will find information and warnings about possible dangers at various points in the manual The symbols used in the manual have the following meanings WARNING Means that death or serious physical injury may occur if the appropriate precautions are not taken CAUTION Means that property damage or minor physical injury may ...

Страница 9: ...at are currently available It therefore also describe systems and functions which may not be available to you as a result of the device version or the specific installation and configuration of your device In rare instances this may also mean that there are differences between the description and your device ...

Страница 10: ...ox is not permitted and may be completed only by the manufacturer or a trained expert Wallbox replacement Do not make any unauthorised changes or modifications to the Wallbox Do not remove any identifiers such as safety symbols warning instructions rating plates labels or cable markings The Wallbox does not have its own mains switch The device plug or if there is none the output fuse in the distri...

Страница 11: ...danger in terms of property damage or to the health of people This product must be earthed In the event of a fault the earth connection will reduce the danger of an electric shock It is fitted with a device plug with an earth connection or alternatively is permanently connected using a protective conductor The device plug must be connected to a corresponding socket which has been installed in comp...

Страница 12: ...12 This manual is aimed at the following target groups End customers users of the Wallbox Commissioning technicians service technicians ...

Страница 13: ... external electricity meters local monitoring of domestic connection rating post meter fuse Fleet charging solution using a Wallbox Connect as the master and up to 15 Wallbox Plus as slaves Can be retrofitted with a communication module for BMW DCS BMW Digital Charging Service upgrade to Wallbox Connect 1 Status LED 2 RFID status indicator 3 RFID reading area 4 Charging cable plug holder 5 Chargin...

Страница 14: ...rting charging process RFID authorisation optional If your Wallbox has RFID functionality please refer to the instructions in section RFID authorisation Connect the vehicle to the Wallbox if it is not already connected While it attempts to mechanically lock the charging cable plug version with a charging socket and perform internal self tests the status LED will be lit for several seconds in orang...

Страница 15: ...ng process can also be ended by logging off using the RFID card used for the authorisation process 1 Disconnect the charging cable from the vehicle and coil the charging cable around the Wallbox Storing the charging cable 1 Coil the charging cable around the Wallbox 2 Place the charging cable plug in its holder 1 for safekeeping Note The form of the illustration may differ depending on the version...

Страница 16: ... is used segments S1 and S2 of the status LED will flash in orange if the connection to the energy meter is lost The charging current will be reduced to 10 A until the connection to the energy meter is restored Temperature cut out If the maximum temperature limit of the Wallbox is exceeded the charging process will be temporarily stopped and segments S3 and S4 of the status LED will flash in orang...

Страница 17: ...l the RFID cards are different colours which if the communication module is upgraded can also be assigned to a vehicle in the BMW DCS BMW Digital Charging Service 1 RFID master card white 2 RFID user card red green blue RFID authorisation The RFID sensor is designed to provide contactless authorisation of a user for charging at the Wallbox using RFID cards which comply with ISO14443 and ISO15693 1...

Страница 18: ...on the system enable will be revoked automatically During the enable time the status LED 1 will be lit in blue During this time it is not possible to enable or disable the system using a different card 1 Now connect the vehicle The charging process can then be started from the vehicle Configuring the authorisation function Note The authorisation function of the Wallbox can be disabled To disable t...

Страница 19: ... also be used to authorise a charging process Programming additional RFID user card 1 Hold the RFID master card in front of the RFID reading area and wait for the signal tone 2 Within 5 seconds hold the new RFID user card in front of the RFID reading area and wait for the signal tone The RFID status indicator will change to orange 3 Within 5 seconds hold the new RFID user card in front of the RFID...

Страница 20: ...he saved RFID cards including the master card will now be deleted and an automatic restart will be performed 2 The RFID function will be disabled if no RFID card is held in front of the reading zone for the next 60 seconds After it has been disabled the RFID status indicator will go out ...

Страница 21: ...her the values of the meter installed for domestic connection monitoring can be read correctly Note The IP address of the Wallbox has been configured as described in the installation instructions and must be identified in the DHCP setting for example using the router on your network Opening the web interface 1 Enter the IP address or the DNS name of the Wallbox assigned by your router into the add...

Страница 22: ... service partner if necessary Charging process is not started 1 The charging cable plug has not been inserted correctly remove the charging cable plug and reconnect it version with charging socket 2 The charging cable plug may be dirty or damaged in the locking zone clean the charging cable plug or have it replaced version with charging socket 3 The vehicle does not require any energy or has a fau...

Страница 23: ...t garage For the version with a charging socket conduct a visual inspection of the plug for signs of dirt wear or damage Contact your service partner if necessary Charging cable plug cannot be disconnected Version with charging socket 1 The charging process has not been ended by the vehicle end the charging process as described in the manual provided by the vehicle manufacturer 2 The charging cabl...

Страница 24: ...cted during the charging process The charging cable plug was not correctly locked disconnect the charging cable plug and reconnect correctly ensuring that it locks properly white white red white Error 2 0010 version with charging socket only BMW fast charging cable not recognised Disconnect and reconnect the fast charging cable have it checked at the workshop if necessary white white orange orange...

Страница 25: ...ich comply with the standard may be charged Remove the unauthorised load and restart the charging process red white white white Error 8 1000 The charging cable plug on the Wallbox is emitting an invalid state Cable hardware error disconnect the charging cable plug and reconnect properly if necessary replace the cable Errors on the power unit displayed in red and blue blue blue blue red Error 8001 ...

Страница 26: ...n the vehicle The vehicle has not complied with the permitted maximum current and was shut down if the problem continues have the vehicle inspected in a workshop Resetting an error If an interruption occurs during a connection or charging process the Wallbox will attempt to restart the cycle automatically a maximum of five times If the charging process cannot be restarted this must be acknowledged...

Страница 27: ...oduct Note We recommend using cleaning and care products which have been tested by BMW Special matt paint cleaner for the housing number 83 12 2 285 244 Glass cleaner for high gloss surfaces number 83 12 2 288 901 Maintenance and repair work If you have any questions or problems please contact your electrical installation contractor Repair work may only be carried out by trained personnel Before y...

Страница 28: ...it indicates that electrical and electronic devices including accessories must be disposed of separately from general household waste There are instructions on the product in the instructions for use or on the packaging The materials can be recycled as shown by their labelling You can make a significant contribution to protecting our environment by reusing recycling the material or other forms of ...

Страница 29: ...gain access to the USB connector Follow the instructions in the manual for updating the software supplied with the update package The latest software can be downloaded from the internet at http www bmwgroup com 360electric index html A new software version may for example take account of changed standards or improve compatibility with new electric or plug in hybrid vehicles ...

Страница 30: ...30 PRODUCT INFORMATION PAGE The complete CE declaration of conformity for this product can be downloaded from the Internet at http www bmwgroup com 360electric index html ...

Страница 31: ...ocks 1 for the housing cover on the underside of the Wallbox upwards The housing cover should then jump out slightly at the bottom 2 Swing the housing cover forwards a little on the underside 2 3 Then release the housing cover by raising it 3 Note Keep the housing cover in the packaging to prevent it being scratched or suffering other damage ...

Страница 32: ...lic earthed object 1 Undo the four screws used to secure the terminal panel cover 1 WARNING Electrical danger The terminal cover 3 next to the terminal panel 2 may be removed only by appropriately trained qualified and authorised electricians 2 Remove the terminal panel cover The terminal panel 2 is now accessible 3 Remove the silica bag from the terminal panel and dispose of it properly ...

Страница 33: ... if this cover is missing or damaged Alternative covers must not be used Fastening screws 1 Insert the terminal panel cover 1 again 2 Install the terminal panel cover again using the four screws Housing marking 1 Tighten the four screws until the housing markings on the right and left of the terminal panel cover are flush with the housing 2 The terminal panel cover must correctly seal the housing ...

Страница 34: ... correctly attached 1 2 Press the cover downwards and then swing the housing cover 2 backwards The housing cover must slide into the bottom guides without any major resistance IMPORTANT Ensure that the housing cover is correctly positioned in the housing guide on all sides There must be only a uniform minimum gap Locks 1 Press the bottom section of the housing cover on to the Wallbox until the loc...

Страница 35: ...D Deleting RFID cards 19 Disabling RFID function 20 Disposal 28 E Ending charging process 15 Energy meter 16 F Faults 22 I Installing the terminal panel cover 33 Install the housing cover 34 Intended use 11 M Maintenance 27 Model plate 27 O Opening the web interface 21 P Programming additional RFID user card 19 Programming RFID master card 19 R Remove the housing cover 31 ...

Страница 36: ...rminal panel cover 32 Repair 27 RFID 17 RFID cards 17 S Safety information 10 Service button 18 Software update 29 Starting charging process 14 Status LED 16 T Temperature cut out 16 U USB connector 29 W Web server 21 ...

Страница 37: ......

Страница 38: ......

Страница 39: ......

Страница 40: ...Mehr über BMW www bmw de www bmw com Freude am Fahren 100672 1 0 ...

Отзывы: