


MBNLED
DMX STRIP 30
www.mbnled.com
17
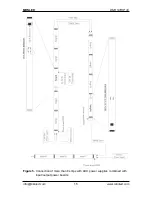
4. Power Up and Software Setup
When you finished the installation of the strips, follow the steps below to configure
them:
1. Switch on the power supply.
2. After power on within 2 sec you have to see a GREEN light at each
first
segment of the strips. If you can’t see it or you see a RED light, please refer to
the troubleshooting section in this manual.
3. The factory setting for each DMX strip is
DMX Address=001,
AutoDMXAddressing=ON, SegmentNumber=15
. If you don’t want to modify
this setup and use Auto DMX addressing, continue with the 9
th
step.
4. To modify the setup, press the OK button [7] on the strip. (You have to do the
modification separately on each board; there is NO global changing for all
strips!). The DMX address is displayed in a binary format (RED means the
corresponding Bit=0, the GREEN means the Bit=1), the value of each bit is
displayed by the LEDs.
5. To modify the address (go to MANUAL DMX SET) press the OK button once
again. You see now one segment (12
th
) lighting RED or GREEN depending on
the setup. RED means the strip is in AUTO DMX Mode, GREEN means the


