MBNLED DMX STRIP 30
Bedienungsanleitung
User’s Guide
Rev. 1.1 07.05.2010
Страница 1: ...MBNLED DMX STRIP 30 Bedienungsanleitung User s Guide Rev 1 1 07 05 2010...
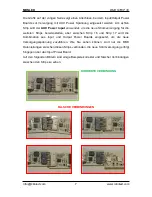
Страница 2: ...t der Ober und Unterseite des Strips sowie die wesentlichen Funktionselemente dargestellt deren Beschreibung in dieser Anleitung mit eckigen Klammern gekennzeichnet ist z B 2 Abb 1 R ckansicht des LED...
Страница 3: ...uell steuerbaren RGB Segmente DMX ADDRESSIERUNGS MODUS Auto oder Manual Modus zur Festlegung der DMX Start Adresse DMX START ADDRESS 1 bis 512 Wenn der Adressierungsmodus auf Manual gesetzt ist geben...
Страница 4: ...eine neue Reihe mit einem weiteren Stromversorgungs PCB beginnen oder den AUX Power Anschluss verwenden siehe n chste Seite ACHTEN SIE BESONDERS AUF EINEN KORREKTEN ANSCHLUSS DER PCB s DER WEISSE STE...
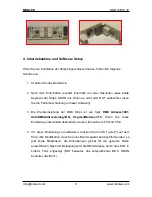
Страница 5: ...jedem achten Strip muss in gleicher Weise eine zus tzliche AUX Power Stromversorgung angeschossen werden Anmerkung Die AUX Power Stromversorgung kann dieselbe sein mit der der erste Strip versorgt wir...
Страница 6: ...MBNLED DMX STRIP 30 info mbnled com www mbnled com 6 Abb 5 Betrieb von mehr als acht Strips mit AUX Power Stromversorgungen kombiniert Input Output Power Boards...
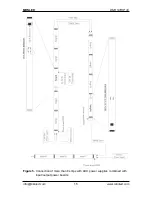
Страница 7: ...weiteren Strips bereitzustellen aber zwischen Strip 16 und Strip 17 wird die Kombination aus Input und Output Power Boards eingesetzt um die neue Versorgungsspannung zuzuf hren Wie Sie sehen k nnen si...
Страница 8: ...eser Anleitung 3 Die Werkseinstellung der DMX Strips ist wie folgt DMX Adresse 001 AutoDMXAddressierung ON SegmentNummer 15 Wenn Sie diese Einstellung unver ndert bernehmen wollen fahren Sie mit Schri...
Страница 9: ...5 6 die gew nschte Zahl Segmente 15 5 3 oder 1 Segment aus Dr cken Sie OK um die Einstellung zu speichern ACHTUNG NACHDEM DIESE EINSTELLUNG MODIFIZIERT WURDE M SSEN SIE DIE STRIPS AUS UND WIEDER EINSC...
Страница 10: ...eten berpr fen Sie den Programmierkontakt 7 L cher neben der OK Taste unter dem zweiten Segment ob dieser m glicherweise durch ein Kabel oder hnliches bei der Installation kurzgeschlossen wurde Entfer...
Страница 11: ...etup of the Strips The following figures show the layout of each side of the strips and the main functional parts which will be referred in the manual by numbers in brackets e g 2 Figure 1 Backside vi...
Страница 12: ...Number of individually controllable RGB segments DMX ADDRESSING MODE Auto or Manual Automatic or manual setting of the DMX start address DMX START ADDRESS 1 to 512 If the address mode is manual the s...
Страница 13: ...fter it you have to start a new line with new input power PCB or refer to the use of AUX supply in the next page TAKE EXTRA CARE TO THE RIGHT CONNECTION OF THE PCBs THE WHITE CONNECTOR IS ALWAYS THE P...
Страница 14: ...bridges on the backside of the 8th strip After every 8th strip you have to connect an AUX power supply Note The AUX power supply can be the same as the one you used to supply the first strip if it has...
Страница 15: ...MBNLED DMX STRIP 30 info mbnled com www mbnled com 15 Figure 5 Connection of more than 8 strips with AUX power supplies combined with input output power boards...
Страница 16: ...ditional power for the next strips but between strip16 and strip17 a combination of input output power boards is used to supply new power As you can see only the DMX data lines are connected between t...
Страница 17: ...s 001 AutoDMXAddressing ON SegmentNumber 15 If you don t want to modify this setup and use Auto DMX addressing continue with the 9th step 4 To modify the setup press the OK button 7 on the strip You h...
Страница 18: ...DMX ADDRESSES 7 After pressing OK you see a GREEN light on the first segment of the strip If you see a RED light refer to the troubleshooting section of the manual 8 If you have modified the addressi...
Страница 19: ...there is any short circuit by a piece of wire or similar after the installation If there is remove it and try again If the problem still persists contact your dealer for service external EEPROM malfu...