background image

USER'S MANUAL

USER'S MANUAL

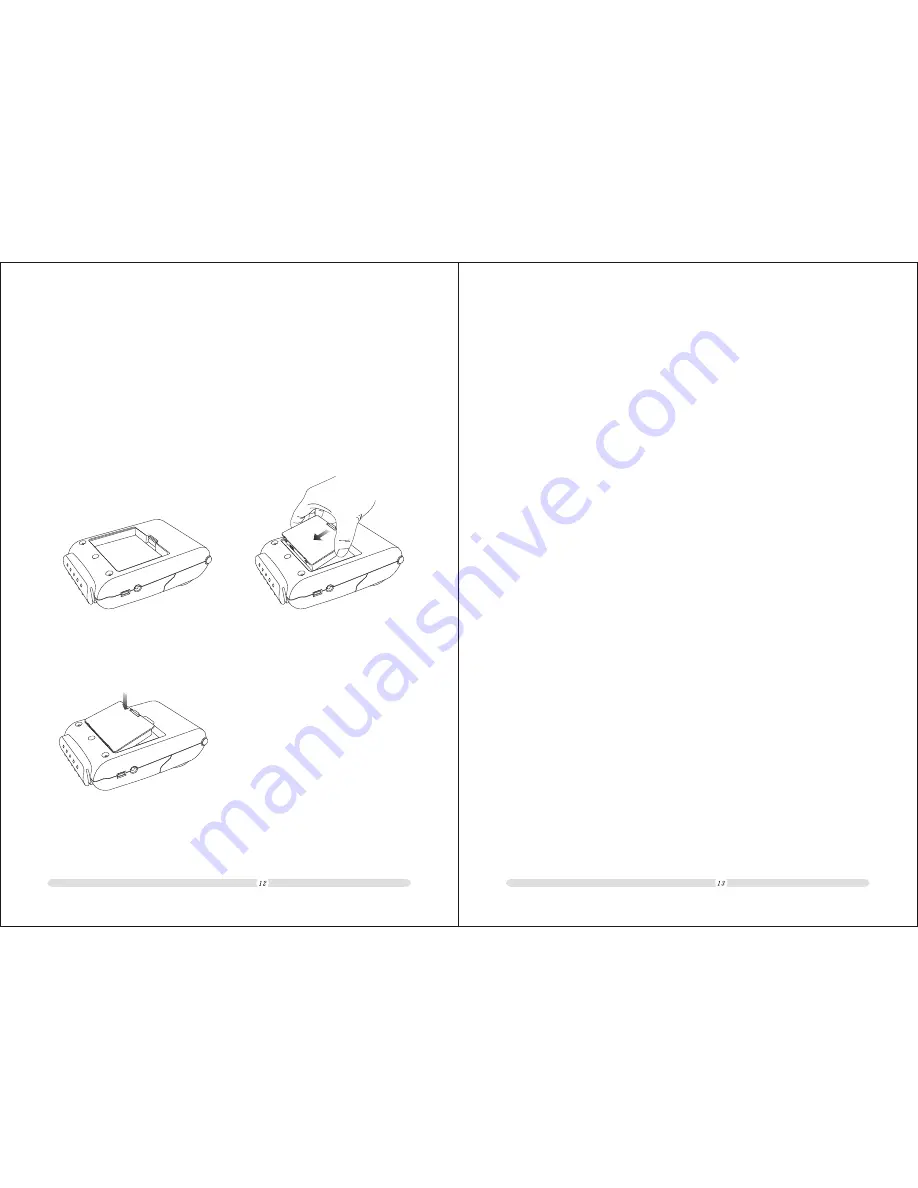
Chapter 5  Battery installation

The MOB-58 is battery power supplied. Battery should  be 
fully recharged and  properly installed in  the printer before  using.

Follow the picture steps as below:

1.  invert the printer to the  back battery cabin.
2.  put  the  battery in the  printer battery cabin in right position.
3.  press the  battery till a  voice from the button.

Chapter 6  Self test

Self test checks  whether the printer  can perform normally or not, except  to 
functions of communication  and recharging.

Follow the  steps to  initial a  self  test:

1. Make sure  paper roll has  been installed properly,
2. Press on  the FEED button  and hold on  the POWER button  for more than 3 
    seconds, then the  self test performs.
3. The printer is ready to receive data after  it fininshed the  self test.

A

B

C

Содержание MOB-58

Страница 1: ...MOB 58 Mobile Printer USER S MANUAL MANUAL REVISION EN1 0 FE ED PO WER RGE F A U H LL C POW ER M O D E E R R O R...

Страница 2: ...the printer in case that splash into the printer The print head has a high temperature after work Please don t touch the print head or touch the motor shell in case scalded NOTICE Do not plug or unpl...

Страница 3: ...x 2 Low noise thermal printing 3 RS 232 USB Bluetooth interfaces integrated 4 The data buffer allows the unit to receive print data even during printing 5 Bar code printing is possible by using a bar...

Страница 4: ...ler for assistance 2 1 Unpacking MOB 58 Serial Cable Roll paper Recharger USB Cable USER S MANUAL USER S MANUAL s Manual er ow M P o d e l l u F E e r g r r o a r h C er ow M P o d e l l u F E e r g r...

Страница 5: ...ellow BAUDRATE SETTING For example Set 9600BPS baudrate Before setting baudrate make sure the printer is on off Status 1 Press POWER button and hold on till MODE light turns blue 2 Press POWER button...

Страница 6: ...SR DTR S G PRINTER SIDE HOST SIDE Pin No 1 3 2 7 8 6 5 4 Press FEED button One time Two times Three times Four times Five times Six times Seven times Signal name FG TxD RxD RTS CTS DSR SG DTR Directio...

Страница 7: ...s than 5 meters is required 3 1 2 USB Connection 3 2 Connect the cables 3 2 1 Connect the AC recharger to the printer to recharge the battery NOTE To remove the DC cable connector make sure that the p...

Страница 8: ...r comes off the roll 6 Pull out a small amount of paper then close the cover As picture shows Turn off the printer open the paper roll cover and clean the thermal elements of the print head with a cot...

Страница 9: ...battery cabin in right position 3 press the battery till a voice from the button Chapter 6 Self test Self test checks whether the printer can perform normally or not except to functions of communicati...

Страница 10: ...FEED button once to advance paper one line Press the FEED button and hold on to feed paper continuously 7 3 Tear paper After finished printing every receipt users need to tear off the receipt by thems...

Страница 11: ...recharge the indicator light turns green 3 Please don t use the printer while recharging otherwise the battery s life span would be decreased Chapter 10 Specifications Printing Paper Supply Method Ch...

Страница 12: ...e width print mode Cancel character Double width print selection Select character print mode Define downloaded bit image Print downloaded bit image Hexadecimal Code 0A 0C 0D 18 10 04 n 1B 0C 1B 20 n 1...

Страница 13: ...status in real time n Function 1 Transmit printer status 4 Transmit paper roll sensor status 11 2 Control Commands LF FF HT Print and feed line ASCII LF Hex 0A Decimal 10 In standard mode prints the d...

Страница 14: ...ESC m nL nH d1 dk ESC n Set absolute print position ESC nL nH nL nH nL nH 0 nL nH x 256 65535 0 nH 255 0 nL 255 Sets the next print starting position and the absolute print position in reference to th...

Страница 15: ...the horizontal tab position ASCII Hex 1B 44 Decimal 27 68 1 Name Format Range Description Name Format Range Description Name Format Range Default Description ESC E n ESC G n ESC J n ESC L ESC M n Turn...

Страница 16: ...ut put format ESC S Select standard mode ESC S Switches from page mode to standard mode Any data stored in the printer for printing in page mode is cleared ASCII Hex 1B 53 Decimal 27 83 Name Format De...

Страница 17: ...ulation pitch inches Vertical start point yL yH x 256 x basic calculation pitch inches Horizontal length dxL dxH x 256 x basic calculation pitch inches Vertical length dyL dyH x 256 x basic calculatio...

Страница 18: ...Decimal 28 20 This order can cancel character Double width print mode set by FS SO FS n Name Format Range 0 n 255 Description Select print modes using n as follows Select character print mode ASCII FS...

Страница 19: ...n n 255 where 1 Enlargement in vertical direction 8 1 Enlargement in horizontal direction 8 n 0 Selects character size enlargement in vertical and horizontal directions ASCII GS Hex 1D 21 Decimal 29...

Страница 20: ...adecimal Decimal Number of Data The following commands are enabled in the user setting mode Function 2 through Function 12 of GS E GS I Function 2 GS E pL pH fn d1 d2 d3 fn 2 Function 3 GS E pL pH fn...

Страница 21: ...parity d Function 56 Select 8bit length d Function 48 Select Flow control DTR DSR d Function 48 Select no parity Flow control a 3 is specified by d as follows Data Length a 4 is specified by d as foll...

Страница 22: ...this printer is constructed by Header NUL as shown in the ASCII G Hex 1D 49 62 Decimal 29 73 98 Name Format Range Default Description Name Format Description Notes Transmitted data Hex Decimal Amount...

Страница 23: ...d 57 65 d 90 d 32 36 37 43 45 46 47 4 1 k For 1 USER S MANUAL USER S MANUAL GS L nL nH GS W nL nH GS nL nH Set left margin S L nL nH nL nH nL nH nL 255 0 nH 255 nL nH x 256 0 nL 0 nH 0 Sets the left m...

Страница 24: ...1 2 49 50 Name Format Range Description For 2 m 67 68 73 Bar Code System JAN13 EAN13 JAN 8 EAN8 CODE128 Range of k 12 k 13 7 k 8 2 k 255 Range of d 48 d 57 48 d 57 48 d 57 65 d 90 d 32 36 37 43 45 46...

Отзывы: