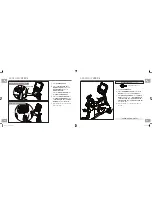
background image

52

53

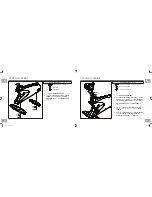
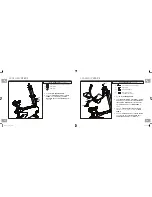
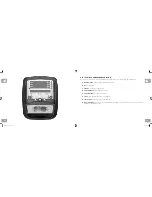
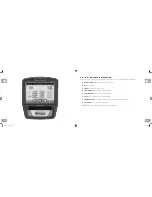
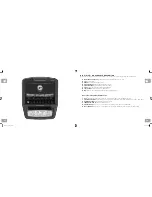
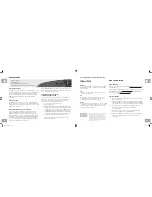
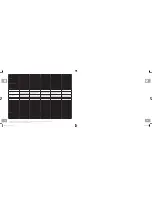
H3XE / U3XE / R3XE CONSOLE DESCRIPTION

Note: There is a thin protective sheet of clear plastic on the overlay of the console that should be removed before use. 

A)  MULTI-PURPOSE KEYS: 

Keys have different functions depending on each screen.

B)  GO: 

One Touch Start.

C)  ENTER:

 Use to confirm each program setting.

D)  BACK:  

Use to undo or go back one screen.

E)  UP/DOWN LEVEL: 

Use to increase or decrease resistance level.

F)  UP/DOWN TIME: 

Use to adjust workout time.

G)  STOP:

 Ends workout and shows workout summary data.

H)  NUMBER KEYPAD: 

Workout data input for workout setup. Resistance level adjustment during workout.

I)  COOL DOWN: 

Puts the console into Cool Down mode.

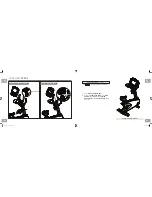
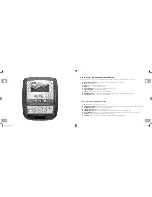
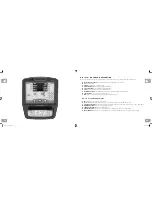
H3XE / U3XE/ R3XE ENTERTAINMENT ZONE 

J)  TV: 

Will take the user to directly the TV screen.

K)  VOLUME UP/DOWN: 

Adjusts the volume output through the headphone jack of either integrated console TV or iPod output.

L)  NUMBER KEYPAD: 

Allows for easy TV channel selections.

M)  CHANNEL UP/DOWN: 

Allows for channel selection.

N)  DISPLAY MODE: 

Allows user to cycle through console display options, iPod, TV or profile display.

O)  LAST CHANNEL: 

Allows the user to cycle between the current channel and the previous channel they were viewing.

P)  HOME:  

Changes the channel to the channel defined as Home.

Q)  CC/MUTE: 

Press to cycle through the different closed caption and mute configurations.

bikes_om_r1.5.indd   52-53

9/9/11   8:20 AM

Содержание H3x

Страница 1: ...CYCLES OWNER S MANUAL H7xe H7x H5x H3xe H3x R7xe R7x R5x R3xe R3x U7xe U7x U5x U3xe U3x bikes_om_r1 5 indd 1 9 9 11 8 19 AM...

Страница 2: ...It is the responsibility of the owner to ensure that all users of this product are adequately informed of all warnings and precautions If you have any questions after reading this guide contact Custo...

Страница 3: ...ep power cord away from heated surfaces Do not carry this unit by its supply cord or use the cord as a handle Do not use other attachments that are not recommended by the manufacturer Attachments may...

Страница 4: ...running off of it If the distance from the circuit breaker box to each outlet is 100 ft or less then 12 gauge wire may be used For any distance greater than 100 ft from the circuit breaker box to the...

Страница 5: ...8 9 BASIC OPERATION bikes_om_r1 5 indd 8 9 9 9 11 8 19 AM...

Страница 6: ...HEIGHT To adjust the seat height on the Recumbent Cycle locate the yellow lever under the right side of the seat before you mount the Cycle Place your right hand on the orange adjustment handle under...

Страница 7: ...directly over your sternum with the logo facing out NOTE The chest strap must be tight and properly placed to receive an accurate and consistent readout If the chest strap is too loose or positioned...

Страница 8: ...unreadable or missing contact Matrix Fitness Systems for a replacement 1 866 693 4863 www matrixfitness com MAINTAIN ALL EQUIPMENT Preventative maintenance is the key to smooth operating equipment Eq...

Страница 9: ...only Never use solvents on plastic parts Cleanliness of your bike and its operating environment will keep maintenance problems and service calls to a minimum For this reason we recommend that the fol...

Страница 10: ...ARCWASHER Z42 BUTTON HEAD BOLT M8x15L SPRINGWASHER FLATWASHER Z53 Z51 Z52 4 GREEN 4 4 GREEN GREEN FLATWASHER BUTTON HEAD BOLT M8x15L FLATWASHER DESCRIPTION BUTTON HEAD BOLT M8x20L BUTTON HEAD BOLT M8...

Страница 11: ...VER and place it in one of the holes inside the MAIN FRAME E Attach the GUIDE RAIL SET to the MAIN FRAME using 4 BOLTS G 4 FLAT WASHERS H 4 SPRING WASHERS I and 4 NUTS J YELLOW HARDWARE BAG CONTENTS A...

Страница 12: ...teps D E on the opposite side of the bike SPRING WASHER BUTTON HEAD BOLT M8x25L BUTTON HEAD BOLT M5x10L Z11 Z12 Z13 4 2 4 WHITE HARDWARE BAG CONTENTS ASSEMBLY STEP 3 A Open RED HARDWARE BAG B Attach t...

Страница 13: ...25L Z34 2 BLUE HARDWARE BAG CONTENTS ASSEMBLY STEP 6 P02 P20 P11 P06 CONSOLE SCREW ASSEMBLY STEP 5 A Open HARDWARE BAG B Slide 1 FLAT WASHER N 1 WAVY WASHER O and another FLAT WASHER N onto the LOWER...

Страница 14: ...e and may cause irritating noises To prevent damage to the elliptical the assembly instructions must be reviewed and corrective actions should be taken Before proceeding find your unit s serial number...

Страница 15: ...BLACK WHITE BLACK BLACK RED RED RED PACKAGE COLOR GREEN GREEN YELLOW WHITE YELLOW YELLOW BUTTON HEAD HEX SOCKET CAP SCREWW NYLOC M8x20L Z31 4 SPRINGWASHER Z32 4 SPRINGWASHER Z12 4 FLATWASHER Z33 4 SP...

Страница 16: ...t up on the MANUAL INCLINE LIFT LEVER and place it in one of the holes inside the MAIN FRAME E Attach the GUIDE RAIL SET to the MAIN FRAME using 4 BOLTS G 4 FLAT WASHERS H 4 SPRING WASHERS I and 4 NUT...

Страница 17: ...SET with MAIN FRAME as shown D Lift up on the MANUAL INCLINE LIFT LEVER and place it in one of the holes inside the MAIN FRAME E Attach the GUIDE RAIL SET to the MAIN FRAME using 4 BOLTS G 4 FLAT WAS...

Страница 18: ...RING WASHERS B and 2 ARC WASHERS C on each side HEX SOCKET HEAD CAP SCREW M8x25L Z34 2 BLUE HARDWARE BAG CONTENTS Z13 C11 Z34 C22 CONSOLE SCREW ASSEMBLY COMPLETE STEP 5 FINAL ASSEMBLY C11 Z34 C22 CONS...

Страница 19: ...se and may cause irritating noises To prevent damage to the elliptical the assembly instructions must be reviewed and corrective actions should be taken Before proceeding find your unit s serial numbe...

Страница 20: ...2 RED ADJUSTMENT FOOT FASTENERS REFERENCE SKETCH DESCRIPTION QUANTITY BUTTON HEAD BOLT M8x25L Z11 4 SPRINGWASHER Z12 4 BUTTON HEAD BOLT M5x10L Z13 2 BUTTON HEAD BOLT M8x20L Z21 8 FLATWASHER Z22 8 SPR...

Страница 21: ...E LIFT LEVER and place it in one of the holes inside the MAIN FRAME E Attach the GUIDE RAIL SET to the MAIN FRAME using 4 BOLTS G 4 FLAT WASHERS H 4 SPRING WASHERS I and 4 NUTS J RED HARDWARE BAG CONT...

Страница 22: ...ne of the holes inside the MAIN FRAME E Attach the GUIDE RAIL SET to the MAIN FRAME using 4 BOLTS G 4 FLAT WASHERS H 4 SPRING WASHERS I and 4 NUTS J RED HARDWARE BAG CONTENTS ASSEMBLY STEP 3 A Open BL...

Страница 23: ...FRAME using 2 BOLTS A 2 SPRING WASHERS B and 2 ARC WASHERS C on each side BLACK HARDWARE BAG CONTENTS Z41 CONSOLE SCREW ASSEMBLY COMPLETE STEP 5 FINAL ASSEMBLY Z41 CONSOLE SCREW CONSOLE SCREW Z41 3X...

Страница 24: ...46 47 CYCLE OPERATION bikes_om_r1 5 indd 46 47 9 9 11 8 20 AM...

Страница 25: ...he machines It may be accessed by pressing ENTER 1 0 0 1 Enter To change a setting press Enter on the keypad and use the Level buttons and numeric keypad to change the values Pressing Enter again will...

Страница 26: ...Start C ENTER To confirm each program setting D UP DOWN LEVEL Use to adjust level selection E UP DOWN TIME Use to adjust workout time F STOP Ends workout and shows workout summary data G COOL DOWN Put...

Страница 27: ...adjustment during workout I COOL DOWN Puts the console into Cool Down mode H3XE U3XE R3XE ENTERTAINMENT ZONE J TV Will take the user to directly the TV screen K VOLUME UP DOWN Adjusts the volume outpu...

Страница 28: ...C ENTER To confirm each program setting D UP DOWN LEVEL Easy information and level selection E UP DOWN TIME Easy information and time adjustment F STOP Ends workout and shows workout summary data G NU...

Страница 29: ...uts the bike into Cool Down mode I FAN Allows for fan speed selection fan has three operating speeds H7X U7X R7X ENTERTAINMENT ZONE J TV Will take the user to directly the TV screen K IPOD Will take t...

Страница 30: ...Cool Down mode H FAN Allows for fan speed selection fan has three operating speeds H7XE U7XE R7XE ENTERTAINMENT ZONE I IPOD Will take the user directly to the iPod screen to allow for iPod control and...

Страница 31: ...heart rate monitor or continually hold onto the contact heart rate grips for this workout To enter into this workout on a 5x use the following guidelines 1 Choose TARGET HEART RATE by selecting the ta...

Страница 32: ...ER 25 525 3 Enter your desired Time using the ARROW KEYS or NUMBER KEYPAD and press ENTER 4 Enter your Weight using the ARROW KEYS or NUMBER KEYPAD and press ENTER 12 Selecting START will start progra...

Страница 33: ...r using the ARROW KEYS or the NUMBER KEYPAD and press ENTER To enter into this workout on a 7x or 7xe follow the onscreen prompts FAT BURN WORKOUT OPERATION Fat burn is a level based workout that is d...

Страница 34: ...ore data The test starts at a low intensity level and gradually increases in intensity difficulty every 2 minutes As it increases the user must maintain 60 80RPM to advance to the next level The test...

Страница 35: ...USB FEATURES SOFTWARE UPDATES The USB port is used to update the console firmware Copy the updated software file to the root directory of your USB drive and insert into the USB port with the console a...

Страница 36: ...97 L8 111 111 108 111 108 L9 122 122 120 122 120 L10 133 133 131 133 131 L11 144 144 142 144 142 L12 155 155 153 155 153 L13 167 167 165 167 165 L14 178 178 176 178 176 L15 189 189 187 189 187 L16 20...

Страница 37: ...DEL NAME R 3x 5x 7x CYCLE TYPE R7xe Recumbent R7x Recumbent R5x Recumbent R3xe recumbent R3x Recumbent FRAME PART R 3x 5x 7x F CONSOLE PART HURESAC 7xe C HURESC 7x C HURE 5x C HURES 3xe C HURE 3x C FE...

Страница 38: ...UGH MANAGER MENU ENGLISH GERMAN FRENCH ITALIAN SPANISH DUTCH PORTUGUESE SWEDISH FINNISH JAPANESE YES ENGLISH GERMAN FRENCH ITALIAN SPANISH DUTCH PORTU GUESE CHINESE JAPANESE KOREAN SWEDISH FINNISH RUS...

Страница 39: ...Matrix Bikes 1 5 2011 Matrix Fitness 1 866 693 4863 www matrixfitness com Matrix Fitness 1600 Landmark Drive Cottage Grove WI 53527 bikes_om_r1 5 indd 76 9 9 11 8 20 AM...

Отзывы: