background image

52

DO NOT DIVE.

SWIM SPA CONTROLS - ICON SPA TOUCH

THE SET TEMPERATURE AND LIGHTS

105

DO NOT DIVE.

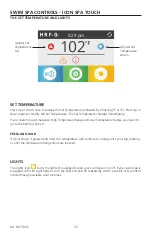
SET TEMPERATURE 

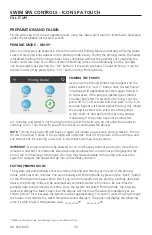
Press Up or Down once to display the Set Temperature (indicated by a flashing ºF or ºC). Press Up or 
Down again to modify the Set Temperature. The Set Temperature changes immediately.

If you need to switch between High Temperature Range and Low Temperature Range you need to 
go to the Settings Screen.

PRESS-AND-HOLD

If Up or Down is pressed and held, the temperature will continue to change until you stop pressing, 
or until the Temperature Range limits are reached.

5:29 pm

Adjusts Set  
Temperature  
Up

Adjusts Set  
Temperature  
Down

LIGHTS 

The Lights Icon 

 turns the lights (if equipped) inside your swim spa on or off. If your swim spa is 

equipped with LED Light System, turn the lights on and off repeatedly within a couple of seconds to 
rotate through available color schemes. 

Содержание INT MP MOMENTUM 80 D

Страница 1: ...OWNER S MANUAL LIMITED WARRANTY...

Страница 2: ...mprove its product without prior notice REGISTER YOUR SWIM SPA Please be sure to register your swim spa so we can efficiently assist with any questions you may have Until your swim spa has been regist...

Страница 3: ...rizing Storing Your Swim Spa 34 Model Specifications 35 Installation Instructions 36 46 Site Preparation General Guidelines 36 38 Electrical Requirements 39 46 Configuration 3 39 40 Configuration 5 41...

Страница 4: ...most concern The sign should be mounted with screws or another type of permanent fastener Additional or replacement signs can be obtained from your dealer or direct from the factory INTRODUCTION It s...

Страница 5: ...s unit to connect a minimum 6 AWG 13 302mm2 solid copper conductor between this unit and any metal equipment metal enclosures of electrical equipment metal water pipe or conduit within 5 feet 1 5m of...

Страница 6: ...ldren cannot use this swim spa unless they are supervised at all times DANGER Risk of Injury The suction fittings in this swim spa are sized to match the specific water flow created by the pump Should...

Страница 7: ...ion should consult a physician before using a swim spa since some medication may induce drowsiness while other medication may affect heart rate blood pressure and circulation For swim spas with a gas...

Страница 8: ...uthorized entry and injuries WARNING People with infections sores or the like should not use the swim spa Warm and hot water temperatures may allow the growth of infectious bacteria if not properly di...

Страница 9: ...ns provided in the electric supply service panel with a continuous copper wire equivalent in size to the circuit conductors supplying this equipment At least two lugs marked Bonding Lugs are provided...

Страница 10: ...NT PAS UTILISER UNE CUVE DE RELAXATION WARNING TO AVOID INJURY EXERCISE CARE WHEN ENTERING OR EXITING THE SWIM SPA OR HOT TUB AVERTISSEMENT POUR VITER DES BLESSURES USER DE PRUDENCE EN ENTRANT DANS UN...

Страница 11: ...MISTRY IN ACCORDANCE WITH MANUFACTURER S INSTRUCTIONS ATTENTION LA TENEUR DE L EAU EN MATI RES DISSOUTES DOIT TRE CONFORME AUX DIRECTIVES DU FABRICANT Hyperthermia occurs when the internal temperature...

Страница 12: ...Appliances Safety General Requirements 206 95 EC EC Low Voltage Directive 204 108 EMC Directive 93 68 EEC CE Marking Directive Our propulsion swim spas comply with the following industry standards UL...

Страница 13: ...suction is created at this fitting Users of the spa swim spa must be instructed not to come in contact with this fitting in such a way as to block its orifice If a user of the spa swim spa blocks thi...

Страница 14: ...immediately It is recommended that suction components be inspected at least monthly Replace the suction within 7 years from the installation date Contact your dealer or local service center for quotin...

Страница 15: ...he top flange of the swim spa this smaller valve adjusts water flow to the waterfalls and or water features in your swim spa NOTE When the swim spa is not in use this valve should be turned mostly shu...

Страница 16: ...Maintenance Procedures section for detailed instructions on filter assemblies 13 WEIR GATE The weir gate is the horizontal door located in front of the filters that helps keep debris trapped in the f...

Страница 17: ...or the lighting in your swim spa is located on the topside control panel near the therapy seats 24 EXERCISE SWIM JETS H2X Swim Spas These large jets are grouped at the end of your swim spa to offer wa...

Страница 18: ...ntrolled amounts Like Mother Nature when controlled releases of copper and zinc oxides are carried into the filtered water they kill bacteria and provide hostile conditions for algae and fungal growth...

Страница 19: ...o outer filter When snapped in to locked position EcoPur Charge handle aligns with molded points on outer filter NOTE EcoPur Charge should be replaced every 6 months Initial snap in fit of inner EcoPu...

Страница 20: ...after heavy bather use or any time free chlorine levels test lower than total chlorine levels To do this either add oxidizer non chlorine shock to burn off the chloramines or add extra chlorine to ra...

Страница 21: ...180 days Useful life may vary by usage and bather load 10 DEFOAMER A chemical used to temporarily reduce foaming Causes of foaming include body oils cosmetics lotions surface cleaners high pH or alga...

Страница 22: ...h quicker evaporation and also will cause minerals and metals to precipitate out of solution 3 AIR Dust and other airborne contaminants are introduced into the swim spa 4 ENVIRONMENT The environment s...

Страница 23: ...tizing the swim spa water Bathers should not enter the swim spa until the chlorine levels drop below 5 0 ppm Always refer to the chemical manufacturers dosage recommendations listed on the container I...

Страница 24: ...ted damage See Cleaning Your Filter Elements in the Maintenance section of this manual for more information EVERY 180 DAYS Drain and refill your swim spa with fresh water install a new EcoPur filter e...

Страница 25: ...that whatever is put into it have a pH as close to neutral as possible That is why only chemicals made for swim spas should be used Always refer to the chemical manufacturer s dosage recommendations l...

Страница 26: ...l and refill with filtered water CLOUDY AND GREEN WATER Total alkalinity levels are low Use a pH increaser Sanitizer levels are low Apply oxidizer non chlorine shock treatment and adjust sanitizer CLE...

Страница 27: ...5 Turn off disconnect your submersible pump once it is no longer able to suck up any further water indicated by a suctioning sound and water no longer coming out of the drainage hose If you plan to fu...

Страница 28: ...ome difficult to turn or not turn at all CAUTION TURN OFF SWIM SPA BEFORE PROCEEDING WITH THIS MAINTENANCE FOLLOW THE STEPS BELOW 1 Remove the handle from the top of diverter valve by grasping the han...

Страница 29: ...stagnant water in the water line if not used often CLEANING YOUR FILTER ELEMENTS The filter elements are one of the most important components of your swim spa Not only are they essential for clean wat...

Страница 30: ...u could break the floating weir door Damage to weir door is not warranted CLEANING YOUR FILTER ELEMENTS continued 3 With a garden hose spray each element under pressure Monthly the standard filter ele...

Страница 31: ...loth applying light pressure Rinse with clean water and blot dry with a dry soft cloth Remove as much residual soap as possible from swim spa to prevent foaming when refilled Scale and mineral i e cal...

Страница 32: ...me cleaner Use a good car cleaning wax for extra protection Leave cover removed for at least 15 minutes after adding chemicals to the swim spa water Never Clean with mineral acids or bleaches Clean wi...

Страница 33: ...ovided through the cover manufacturer and may not be through Master Spas Check the tags and labeling on your cover to verify manufacturer and refer to the manufacturer s care maintenance and warranty...

Страница 34: ...roblem Electrical problems include but are not limited to a faulty GFCI breaker swim spa component power fluctuations and or improper wiring If this is a new electrical service and GFCI installation a...

Страница 35: ...m should be displaying a message indicating why it can t heat Check the control panel for diagnostic messages Refer to Spa Control Section titled System Related Messages Follow steps to alleviate the...

Страница 36: ...accumulating Swim spa covers are a great insulator but will allow some precipitation to enter the swim spa For this reason it is highly advised to also cover the swim spa with a water tight tarp whil...

Страница 37: ...30A GFCI 7 5 Spa 2 Swim 2 325 8 80 275 1 04 Spa 2 050 7 76 Swim 3700 1678 24390 11063 3 1 As configured from factory See appropriate Electrical Requirements section for further details 2 Total bather...

Страница 38: ...of the swim spa must be accessible for regular maintenance or in the event that service is needed Periodical maintenance checks require entry into the equipment bay When possible it is wise planning f...

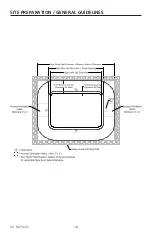
Страница 39: ...e Pad Requirements Do not backfill with sand gravel or earth Doing so will void the warranty Plan for complete drainage so that water accumulation drains away from the swim spa perimeter and standing...

Страница 40: ...38 DO NOT DIVE 102 DO NOT DIVE SITE PREPARATION GENERAL GUIDELINES...

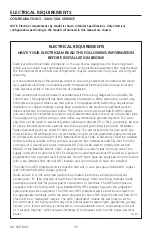
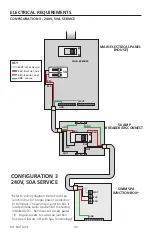
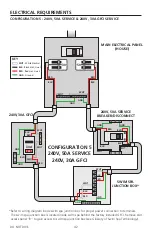
Страница 41: ...ly conductors to comply with section 422 20 of the National Electrical Code A disconnect must be installed and be readily accessible to the swim spa occupants but installed at least five feet from the...

Страница 42: ...im spa junction box for proper power connection to terminals The swim spa junction box is located inside swim spa behind the factory installed GFCI Remove skirt access panel B to gain access to swim s...

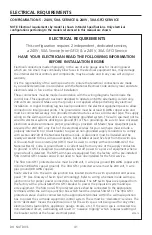
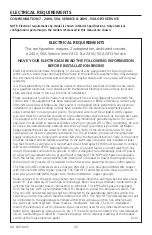
Страница 43: ...talled and be readily accessible to the swim spa occupants but installed at least five feet from the swim spa A Ground Fault circuit interrupter GFCI must be used to comply with section 680 42 of the...

Страница 44: ...spa junction box for proper power connection to terminals The swim spa junction box is located inside swim spa behind the factory installed GFCI Remove skirt access panel B to gain access to swim spa...

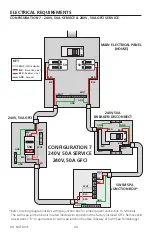
Страница 45: ...e to the swim spa occupants but installed at least five feet from the swim spa A Ground Fault circuit interrupter GFCI must be used to comply with section 680 42 of the National Electric Code A ground...

Страница 46: ...junction box for proper power connection to terminals The swim spa junction box is located inside swim spa behind the factory installed GFCI Remove skirt access panel B to gain access to swim spa jun...

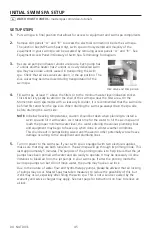
Страница 47: ...OTE In below freezing temperatures caution should be taken when planning to install a swim spa and fill it with water As it takes time for the water to fill the swim spa and reach the proper minimum w...

Страница 48: ...epeat this process if needed 6 Be sure the jets in your swim spa are open 7 Adjust water chemistry according to the instructions provided in the Water Maintenance section 8 Your swim spa water will he...

Страница 49: ...47 DO NOT DIVE SWIM SPA CONTROLS ICON SPA TOUCH THE MAIN SCREEN 100 DO NOT DIVE 5 29 pm 5 29 pm 5 29 pm...

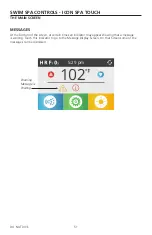
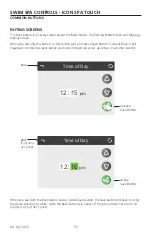
Страница 50: ...en Various features and main menus can be accessed from this screen The actual water temperature can be seen and the Set Temperature can be adjusted Time of Day Ozone and Filter Cycle status is visibl...

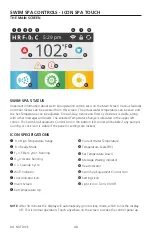
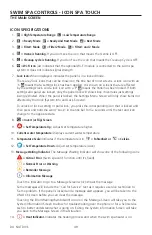
Страница 51: ...ress and hold the word Lock in the title bar for 5 seconds until the text and icon change to the opposite state 8 Invert or flip Screen 9 Set Temperature Up Adjust set temperature higher 10 Current wa...

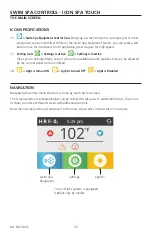
Страница 52: ...specific features that can be adjusted by the control panel can be modified 18 Light is turned ON Light is turned OFF Light is Disabled NAVIGATION Navigating the entire menu structure is done by touc...

Страница 53: ...at certain times an indicator may appear showing that a message is waiting Touch this indicator to go to the Message Display Screen On that Screen some of the messages can be dismissed 5 29 pm Warning...

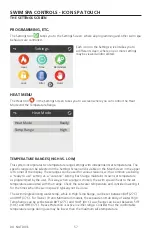
Страница 54: ...ange and Low Temperature Range you need to go to the Settings Screen PRESS AND HOLD If Up or Down is pressed and held the temperature will continue to change until you stop pressing or until the Tempe...

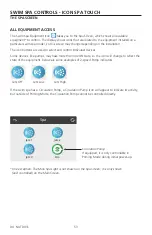
Страница 55: ...vices Some devices like pumps may have more than one ON state so the icon will change to reflect the state of the equipment Below are some examples of 2 speed Pump indicators Jets Off Jets Low Jets Hi...

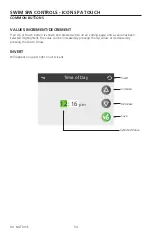
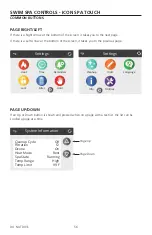
Страница 56: ...NT If an Up or Down button is shown and pressed when on an editing page and a value has been selected highlighted the value can be increased by pressing the Up Arrow or decreased by pressing the Down...

Страница 57: ...Save Button it means Back or Exit It appears on editing screens before you have changed any value as well as on all other screens When you see both the Back button and an Active Save button the Save b...

Страница 58: ...m of the screen it takes you to the previous page PAGE UP DOWN If an Up or Down button is shown and pressed when on a page with a text list the list can be scrolled a page at a time Settings Heat Time...

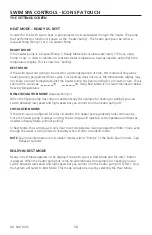
Страница 59: ...maintains its own set temperature as programmed by the user This way when a range is chosen the swim spa will heat to the set temperature associated with that range Check the set water temperature and...

Страница 60: ...freezing temperatures NON CIRCULATION MODE 2 speed Pump 1 When the heater pump has come on automatically for example for heating or polling you can switch between low speed and high speed but you cann...

Страница 61: ...w the pumps to continue to run Turn the swim spa off then back on and repeat the process NOTE Turning the power off and back on again will initiate a new pump priming session Do not do this more than...

Страница 62: ...Most circulation pumps operate continuously 24 hours with the exception of turning off for 30 minutes at a time when the water temperature reaches 3 F 1 5 C above the set temperature most likely to h...

Страница 63: ...s CLEAN UP CYCLE OPTIONAL When a pump is turned on by a button press a clean up cycle begins 30 minutes after the pump is turned off or times out The heat filter pump and the ozone generator will run...

Страница 64: ...make changes to the highlighted green field You can toggle between hours and minutes to make changes by touching the numbers on the screen When finished Save and the green field will turn white Time...

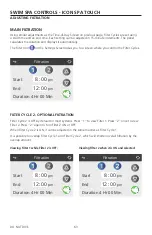
Страница 65: ...FILTER CYCLE 2 OPTIONAL FILTRATION Filter Cycle 2 is OFF by default on most systems Press 1 to view Filter 1 Press 2 once to view Filter 2 Press 2 again to turn Filter 2 ON or OFF When Filter Cycle 2...

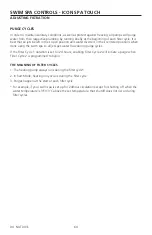
Страница 66: ...e using the swim spa so all jets get water flow during purge cycles If the Filter Cycle 1 duration is set for 24 hours enabling Filter Cycle 2 will initiate a purge when Filter Cycle 2 is programmed t...

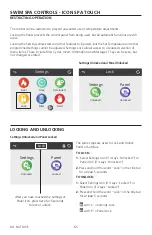
Страница 67: ...Messages They can be seen but not changed or edited The same steps are used to Lock and Unlock Panel or Settings TO LOCK 1 Select Settings Icon if it says Unlocked or Panel Icon if it says Unlocked 2...

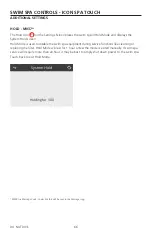
Страница 68: ...is used to disable the swim spa equipment during service functions like cleaning or replacing the filter Hold Mode will last for 1 hour unless the mode is exited manually If swim spa service will req...

Страница 69: ...you ve last touched the screen Utilities Panel Messages GFCI Test MESSAGES LOG The Messages Log is a record of the last 24 errors or messages that can be reviewed by a service tech Use the Up and Dow...

Страница 70: ...ay to change the clock between 12 HR and 24 HR display Reminders are preprogrammed routine maintenance reminders that appear on the Main Screen as at different intervals and will help guide you in tak...

Страница 71: ...e Settings Screen takes you to the Cleanup Cycle screen NOTE Cleanup cycles do not apply to systems set for 24hr circulation pump mode as the circulation pump performs as the heat and filter pump to p...

Страница 72: ...lays the checksum for the system configuration file CURRENT SETUP Displays the currently selected Configuration Setup Number DIP SWITCH SETTINGS Displays a number that represents the DIP switch positi...

Страница 73: ...FCI The GFCI should trip within several seconds and the swim spa should shut down If it does not shut down the power and manually verify that a GFCI breaker is installed and that the circuit and swim...

Страница 74: ...isabled System will auto reset when the swim spa water temp is below 108 F 42 2 C Check for extended pump operation i e filter cycle durations or extended swim spa pump use beyond the 15 minute timeou...

Страница 75: ...LOW RELATED CHECKS Check filters for possible blockage Try cleaning or replacing filters especially if swim spa is equipped with 24 hour circulation pump Check for low water level suction flow restric...

Страница 76: ...t receiving communication from the System Contact your Master Spas dealer or service organization TEST SOFTWARE INSTALLED The Control System is operating with test software Contact your Master Spas de...

Страница 77: ...SYSTEM COULD NOT TEST THE GFCI M036 North America Only May indicate an unsafe installation Contact your Master Spas dealer or service organization as well as your electrician A GFCI replacement will...

Страница 78: ...and adjust with the appropriate chemicals CLEAN THE FILTER May appear on a regular schedule i e every 30 days TEST THE GFCI OR RCD May appear on a regular schedule i e every 30 days The GFCI or RCD is...

Страница 79: ...pa function and sanitary conditions EcoPur elements should be replaced every 180 days Refer to Cleaning Your Filter Elements section in Routine Maintenance CHANGE THE UV May appear on a regular schedu...

Страница 80: ...Propulsion Control Pump 1 Air Control Master Spas Pump 1A Spa Touch Panel Pump 2A Air Control Pump 1 Water Feature Control Pump 2A Pump 2 A B Diverter REV 012019 Laminar Jets Pump1 Laminar Jets Pump1...

Страница 81: ...Pump 2A Pump 1 Water Feature Control Pump 1 Air Control Pump 2A Air Control Pump 2 A B Diverter Spa Touch Panel Swim Touch Panel Propulsion Control REV 012019 Standing Therapy Cove SWIM SPA CONTROLS...

Страница 82: ...Standing Therapy Cove Pump 1 Remote Water Feature Control Pump 2 Air Control Pump 1 Air Control Pump 2 A B Diverter Spa Touch Panel Spa Side Swim Touch Panel Propulsion Control Spa Touch Panel Swim Si...

Страница 83: ...ercise against This propulsion system is controlled by the revolutionary Swim NumberTM System Along with this your MP Swim Spa is equipped with a WiFi module which allows control of the system through...

Страница 84: ...Number indicates the speed of the propulsion system Speed is indicated in numbers from 1 to 100 where the higher number indicates faster water flow Start button starts the propulsion system after a 5...

Страница 85: ...g Rise 7 Jog 15 1 1 Switch Legs 8 Jog 30 1 1 Trailing Forward Back Both Flow Directions 9 Jog 45 1 1 Flies 10 Jog 45 1 1 Push Pulls 11 Jog 45 1 1 Push Downs 12 Jog 45 1 1 Hip Flexion Extension 13 Jog...

Страница 86: ...8 Jog 25 1 1 Straight leg rise out 9 Jog 25 1 1 Switch legs 10 Jog 45 1 1 Flies forward 11 Jog 45 1 1 Switch legs 12 Jog 45 1 1 Flies side 13 Jog 45 1 1 Switch legs 14 Jog 45 1 1 Push Pulls 15 Jog 45...

Страница 87: ...1 1 Straight leg rise in 11 Jog 45 1 1 Switch legs 12 Jog 75 1 1 Flies forward 13 Jog 75 1 1 Switch legs 14 Jog 75 1 1 Flies side 15 Jog 75 1 1 Switch legs 16 Jog 75 1 1 Alternating push pulls 17 Jog...

Страница 88: ...7 Jog 30 1 1 Arm circles backward 8 Jog 60 45 39 High knees 9 Jog 60 1 1 Row bars 10 Jog 60 45 39 Running in place 11 Jog 30 1 1 Band bicep curl right arm 12 Jog 30 1 1 Band bicep curl left arm 13 Jog...

Страница 89: ...houlder press 12 Swim 60 45 39 Breast stroke 13 Jog 60 1 1 Band chest press 14 Swim 60 34 30 Free style swim 15 Jog 60 1 1 Band bicep curl right arm 16 Jog 60 1 1 Band bicep curl left arm 17 Swim 60 3...

Страница 90: ...ast stroke 18 Jog 60 1 1 Band bicep curl right arm Step Mode Seconds Wave XP Swim Number Wave XP Pro Swim Number Recommended Exercise 19 Jog 60 1 1 Band bicep curl left arm 20 Swim 120 56 48 Free styl...

Страница 91: ...e 10 Jog 60 1 1 Jog in Place 11 Swim 60 47 40 Free Style Swim 12 Swim 60 41 35 Kick Chore 13 Swim 60 34 30 Catch Up Drill 14 Swim 60 47 40 Backstroke 15 Jog 60 1 1 Jog in Place 16 Swim 60 47 40 Free S...

Страница 92: ...t 10 55 FR EZ 9 Swim 120 1 1 Free Style Moderate Effort 10 Swim 60 45 39 Free Style Hard Effort 11 Jog 30 1 1 Jog in Place 12 Swim 60 45 39 Fly Drill 2 2 2 13 Swim 60 1 1 W Fly 5 Strokes Fast 10 55 FR...

Страница 93: ...Z Kick 18 Swim 60 47 40 Moderate Kick 19 Swim 60 54 46 Hard Kick Step Mode Seconds Wave XP Swim Number Wave XP Pro Swim Number Recommended Exercise 20 Swim 60 47 40 Catchup with Steady Kick 21 Swim 60...

Страница 94: ...pulsion grate fasteners 4 per grate X717900 Propeller Wave XP X400820 Wave XP PRO X400820 Max Frequency Wave XP 60Hz Wave XP PRO 68Hz This is the certified maximum frequency Actual frequency setting m...

Страница 95: ...use HANDHELD REMOTE CONTROL SYNCHRONIZING The remote should already be paired from the factory but if you need to synchronize the remote follow the steps below 1 Make sure BlueCube Media Player is po...

Страница 96: ...Press and hold No function Press once Listen to FM preset station 1 Press and hold Set preset FM station 1 2 Press once No function Press and hold No function Press once Listen to FM preset station 2...

Страница 97: ...file 5 Press and hold FAST REWIND FAST FORWARD buttons to fast forward fast rewind the song file 6 Previous next track and volume up down can be controlled directly from your Bluetooth device or dire...

Страница 98: ...k another station 2 Press once FAST REWIND FAST FORWARD to 0 05kHz or 0 05kHz to the frequency SAVING RADIO CHANNEL TO MEMORY To save the current frequency to memory press and hold the or for more tha...

Страница 99: ...3 In the audio menu press and hold AUDIO AUDIO to save and exit the audio menu back to the original mode If you have chosen preset equalizer Rock Classic or Pop the previous Bass Treble settings will...

Страница 100: ...Light Package is available for most deep swim spa models This feature utilizes a light sensor to turn on as daylight diminishes dusk and remains on through the night You can manually shut off the ligh...

Страница 101: ...fe place 4 Gently pull the Lamp Wires till the top of the UV Lamp is out of the Lamp Retainer Grasp the white ceramic end of the UV Lamp and pull until it is fully removed IF YOU ARE NOT REPLACING THE...

Страница 102: ...solation Valves the swim spa must be drained below where the Spa Solar Eclipse is mounted 2 Remove the Upper Enclosure Assembly and UV Lamp as described in the UV Lamp Removal instructions and set asi...

Страница 103: ...retainer is snug Be careful not to over tighten and damage lamp retainer If leaking continues contact your Master Spas dealer for service 6 SHUT DOWN the swim spa once you have confirmed that there a...

Страница 104: ...ffness Chlorine bleach and water mixture isopropyl rubbing alcohol or other household cleaner such as SoftScrub Simple Green and 409 can be used to clean the pads Be sure any soap or cleaning product...

Страница 105: ...te of original retail purchase Master Spas will provide replacement jet internal parts only The cost of shipping and installation of any jet internals is the sole responsibility of the purchaser 5 YEA...

Страница 106: ...ghting system in the swim spa skirt will not malfunction due to defects in workmanship and materials If the Wave Lighting system or any of its components thereof has malfunctioned due to defects in wo...

Страница 107: ...maintenance or lack of normal maintenance as prescribed in the Master Spas Owner s Manual an act of God weather conditions or other damage from causes beyond the control of Master Spas Misuse or abuse...

Страница 108: ...ves the right for its dealers or approved service centers to collect from the retail purchaser reasonable travel expenses In addition access charges will be assessed if the swim spa is not reasonably...

Страница 109: ..._____________ _____________________________________________________________________________________ _____________________________________________________________________________________ ______________...

Страница 110: ..._______________________ _____________________________________________________________________________________ _____________________________________________________________________________________ ____...

Страница 111: ..._______________________ _____________________________________________________________________________________ _____________________________________________________________________________________ ____...

Страница 112: ..._______________________ _____________________________________________________________________________________ _____________________________________________________________________________________ ____...

Страница 113: ..._______________________ _____________________________________________________________________________________ _____________________________________________________________________________________ ____...

Страница 114: ..._______________________ _____________________________________________________________________________________ _____________________________________________________________________________________ ____...

Страница 115: ..._______________________ _____________________________________________________________________________________ _____________________________________________________________________________________ ____...

Страница 116: ...mited warranty Your dealer is an independent businessperson or company and not an employee or agent of Master Spas LLC We cannot and do not accept any responsibility or liability for any other represe...

Отзывы: