


4
2. Wichtige Informationen
zur Inbetriebname
Der Entkuppler wird aus Gründen
der Transportsicherheit komplett
montiert ausgeliefert. Für die Monta-
ge wird die Antriebseinheit des Ent-
kupplers (mit 2 Schrauben befestigt)
demontiert.
Hierbei ist besonders zu
beachten, dass die Mechanikeinheit
des Entkupplers mit der Gummitülle
fixiert ist (ist im Auslieferungszu
-
stand um die Entkupplungsbügel
geschoben)
. Diese darf erst entfernt
werden, wenn der Entkuppler kom-
plett montiert ist. Ohne Gummitülle
besteht Gefahr, dass die Mechani-
keinheit außeinander rutscht und
Kleinteile verloren gehen.
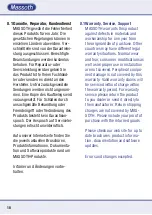
3. Inbetriebnahme des Entkupplers
Bitte halten Sie bei der Inbetriebnah-
me die folgenden Schritte ein:
3.1 Vorbereitung zur Montage
•
Stellen Sie sicher, dass die Gum-
mitülle um die Entkupplungsbügel
fixiert ist.
•
Entfernen Sie die zwei Schrauben
aus der Antriebseinheit (Schritt 1).
•
Ziehen Sie die Antriebseinheit nach
unten ab (Schritt 2).
•
Das Befestigungsloch für den
Entkuppler befindet sich in der
Mechanikeinheit (Schritt 3).
2. Important information
For transport reasons the Automatic
Uncoupler is delivered fully assem-
bled. It must be partially disassem-
bled for installation. The Uncoupler
is made up of a mechanical unit and
a drive unit which are held together
by 2 screws (see illustration #1,
image 1).
A rubber sleeve has been
placed around elements of the me-
chanical unit to keep it from coming
apart during installation.
This rubber
sleeve should not be removed until
the Uncoupler is completely attached
to the locomotive.
3. Getting started
To get started please follow the
steps as listed below:
3.1 Preparation for installation
•
DO NOT Remove the rubber sleeve
until the installation is complete.
•
Remove the two screws that hold
the drive unit and the mechanical to-
gether (see illustration #1, image 1)
•
Separate the drive unit from the me-
chanical unit as shown in illustration
#1, image 2.
•
The uncoupler‘s mounting hole is
located in the mechanical unit as
shown in illustration #1, image 3.


