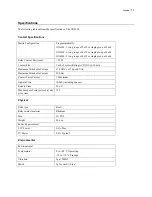


Installation and Connections
21
Board Installation
Before you Begin
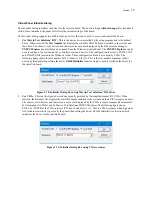
Install the GXSW driver as described in the prior section.
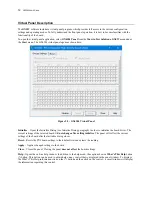
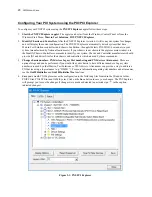
Configure your PXI/PC system using
PXI/PCI Explorer
as described in the prior section.
Verify that all the components listed in the packing list (see previous section in this chapter) are present.
Electric Static Discharge (ESD) Precautions
To reduce the risk of damage to the GX6384 board, the following precautions should be observed:
Leave the board in the anti-static bags until installation requires removal. The anti-static bag protects the board
from harmful static electricity.
Save the anti-static bag in case the board is removed from the computer in the future.
Carefully unpack and install the board. Do not drop or handle the board roughly.
Handle the board by the edges. Avoid contact with any components on the circuit board.
Caution
–
Do not insert or remove any board while the computer is on. Turn off the power from the PXI
chassis before installation.
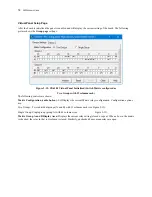
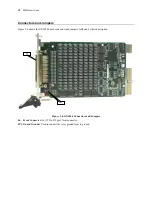
Installing a Board
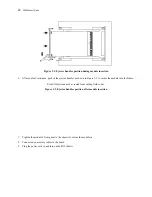
Install the board as follows:
1.
Install first the GXSW Driver as described in the next section.
2.
Turn off the PXI chassis and unplug the power cord.
3.
Locate a PXI empty slot on the PXI chassis.
4.
Place the module edges into the PXI chassis rails (top and bottom).
5.
Carefully slide the PXI board to the rear of the chassis, make sure that the ejector handles are pushed
out
(as
shown in Figure 3-2).
Содержание GX6384-1
Страница 2: ......
Страница 7: ...GX6384 User s Guide v Index 55 ...
Страница 8: ...vi GX6384 User s Guide ...
Страница 36: ...28 GX6384 User s Guide ...


