background image

 44

Maxxyz

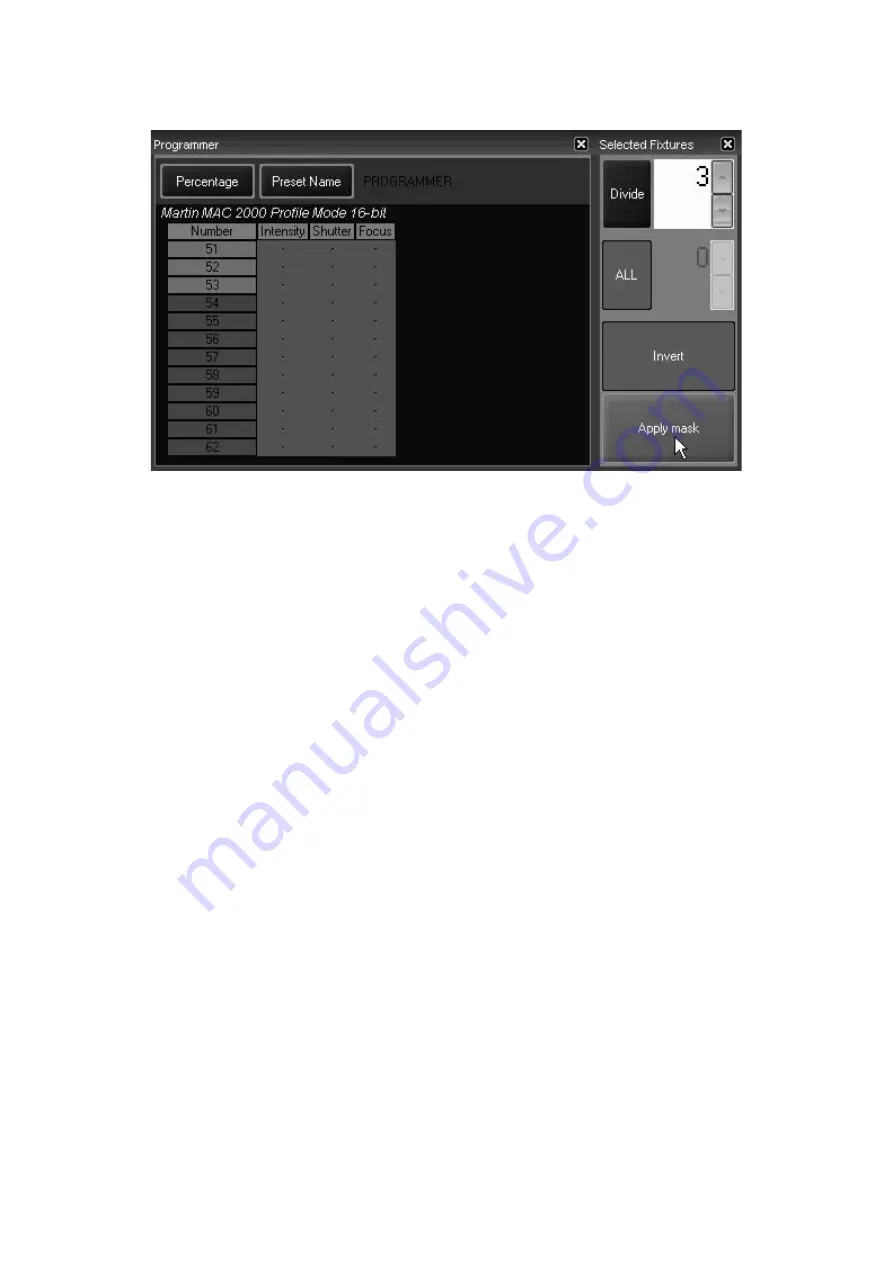
if the number counter is set at 3 and then “Apply mask” is pressed, the first 4 fixtures (12 divided 
by 3) will be selected as illustrated below

Pressing “Next” will advance to the next 4 fixtures and pressing “Previous” will move to the
previous 4 fixtures.

F

I X T U R E

  S

E L E C T I O N

  O

R D E R

,   F

I L T E R I N G

  A

N D

  R

E C O R D I N G


G

R O U P S

It is useful to note that when recording a group, the order in which the fixtures are entered (and
subsequently sorted) will be stored with the group. In other words, you can have one group with
your Mac 600s stored as 1-24 and a second group that has them stored as 24-1. Further, any
filters that were applied when the group was recorded will also be stored with that group. This
allows for the rapid selection of, for example, all Mac 600s every 3rd, all Mac 500 in blocks of 4,
etc.

Содержание Maxxyz

Страница 1: ...Maxxyz user manual For Use with Software Version 1 3 78 ...

Страница 2: ...onal A S Denmark All rights reserved No part of this manual may be reproduced in any form or by any means without permission in writing from Martin Professional A S Denmark Printed in Denmark P N 35000115 Rev B January 2005 ...

Страница 3: ...NG THE MAXXYZ 21 PATCHING FIXTURES 22 ADDING FIXTURES TO THE PATCH 22 PATCH SHORTCUT 30 DELETING FIXTURES FROM PATCH 32 DELETING A FIXTURE FROM PATCH 32 THE MAXXYZ VISUALIZER 33 LOADING THE MAXXYZ VISUALIZER 33 MAXXYZ VISUALIZER TOOLBARS 35 THE MISCELLANEOUS BAR 35 THE OPERATIONS BAR 37 THE CAMERA OPERATIONS BAR 37 THE CAMERA BAR 38 THE DISPLAY MODE BAR 38 SELECTING FIXTURES 39 SELECTING FIXTURES ...

Страница 4: ... GROUP 64 DELETING A GROUP 65 SELECTING GROUPS 65 GROUP PAGES 65 PRESETS 65 THE PRESET SCREEN 66 RECORDING PRESETS 66 MOVING AND COPYING PRESETS 67 EDITING PRESETS 67 TO ADD FIXTURES TO A PRESET 67 TO REPLACE THE FIXTURES IN AN EXISTING PRESET 68 DELETING A PRESET 68 THE PROGRAMMER WINDOW 69 PROGRAMMER MODES 69 THE PROGRAMMER DISPLAY 69 LOADING FIXTURES INTO THE PROGRAMMER 71 LOADING THE PROGRAMME...

Страница 5: ...CHASE 96 LCD KEY DEFINITIONS 96 DISPLAYS WHEN CUELIST TYPE IS OVERRIDE SUB GROUP DIM OR TIMECODE 97 THE MAIN GO BUTTONS 97 SNAP KEY 97 PLAYBACK PAGES BANKS 98 LABELING A BANK 98 CREATING AND WORKING WITH CUELISTS 99 CUELIST TOUCH SCREEN BUTTONS 99 LABELING A CUELIST 100 CUELIST COLUMN HEADERS 100 LABELING A CUE 101 LABELING A COMMENT 101 SETTING CUE TIMING 101 SETTING A CUE S BASE FADE TIME 102 SE...

Страница 6: ...128 TO COPY FROM ONE VIRTUAL CUELIST BUTTON TO ANOTHER VIRTUAL CUELIST BUTTON 128 TO MOVE FROM ONE VIRTUAL CUELIST BUTTON TO ANOTHER VIRTUAL CUELIST BUTTON 128 DELETING A VIRTUAL CUELIST 129 TO DELETE A VIRTUAL CUELIST 129 PLAYBACK BUTTON PAGE 129 PLAYBACK BUTTON DISPLAY 129 MOVING AND COPYING CUELISTS WITH THE PLAYBACK BUTTON DISPLAY 130 DELETING CUELISTS IN THE PLAYBACK BUTTON DISPLAY 130 TO DEL...

Страница 7: ...N CUELIST 145 SPEED IN THE SAME CUELIST 146 SHOW FILE MANAGEMENT 147 IMPORTANT NOTICE 147 BACKING UP YOUR SHOWFILE DATA 147 BACKING UP YOUR VISUALIZATION FILE 147 SAVE A SHOW 148 LOADING A SHOW 148 DOWNLOADING AND UPLOADING FILES 148 RECOMMENDED FILE LOCATION 148 SERVICE 149 LOADING MAXXYZ SOFTWARE UPGRADES 149 CLEANING 149 TECHNICAL SUPPORT 149 APPENDIX 1 MAXXYZ SPECIFICATIONS 150 PHYSICAL 150 AC...

Страница 8: ...8 Maxxyz ...

Страница 9: ...d on the console If you have questions about how to operate the console safely please contact your Martin dealer or call the Martin 24 hour service hot line at 45 70 200 201 or 1 954 858 1800 Always ground earth the console electrically Use only a source of AC power that complies with local building and electrical codes and has both overload and ground fault protection Do not expose the console to...

Страница 10: ... monitor stands from back of console 4 Disconnect desk lamps 5 Place the console in the bottom of the flight case 6 Place cables and desk lamps in cavity at back of console 7 Place monitor stands in space provided at back of console 8 Fold dust cover and place in the rear of the flight case between the monitor stands and the console Note The Maxxyz flight case is constructed to very tight toleranc...

Страница 11: ...utput The pin out on all sockets is pin 1 to shield pin 2 to data compliment and pin 3 to data true Use shielded twisted pair cable designed specifically for DMX devices standard microphone cable cannot transmit control data reliably 24 AWG cable is suitable for runs up to 300 meters 1000 ft Heavier gauge cable and or an amplifier is recommended for longer runs To split the DMX link into multiple ...

Страница 12: ... The Maxxyz comes with an auto sensing auto ranging switch mode power supply Manual adjustments to the mains voltage and frequency are not necessary as the Maxxyz automatically adapts PO W E R C O N N E C T I O N Important Connect the Maxxyz directly to AC power Do not connect it to a dimmer system doing so may damage the console You may need to install a cord cap that fits your supply on the powe...

Страница 13: ...times when you are using the playback side for programming and vice versa depending on the functions you are performing A Playback View Buttons B Playback Screen Control C Playback Touch Screen D Main Go E Playback Control F Playback Command G Screen Swap H Master Control I Keypad Entry J Programmer View Buttons K Programmer Screen Control L Programmer Touch Screen M Programmer Control N Trackball...

Страница 14: ...ated with them The 10 directly below the Playback Touch Screen are motorized and will vary in position dependent upon the playback page selected and the level assigned to the fader Track Belt There are 11 track belts on the Maxxyz The two located next to the touch screens Screen Controls are used to scroll through the touch screen displays The 8 in the Programmer Controls are used to change the va...

Страница 15: ... desk is designed primarily for playback use However the 5 LCD keys and track belt on the right side of the Playback Controls are used for setting and recording timings into cues changing the playback banks and other functions SNAP REL II BACK GO 1 2 3 4 5 6 7 8 9 10 PREVIEW MENU MACRO GM FM A B ...

Страница 16: ...of the desk is designed primarily for selecting and manipulating fixtures and cues When a fixture is selected its attributes will be loaded into the programmer controls RECORD UPDATE LOAD GROUP CUE ENTER 0 1 2 3 4 5 6 7 8 9 FULL THRU COPY EDIT MOVE UNDO DELETE CLEAR X Y Z ...

Страница 17: ... affected by the Highlight button can be changed to suit your needs To do so simply record a preset with the desired attribute settings and label it HighLightPreset all one word with capitalization as shown For information on recording presets please see Recording Presets on page 66 The function of the next previous keys is dependant on whether or not there are fixtures selected in the programmer ...

Страница 18: ... side you will find the controls for operator audio These include Speaker Volume Head Phones Volume Intercom Mic Volume Mic In Speech On Off With the current release of Maxxyz only Speaker Volume and Phones Volume are used Speaker Volume controls the level of the built in speaker system when playing CDs or DVDs while Phones Volume controls the output to the headset jacks Grand Master The Grand Mas...

Страница 19: ...itor Cuelist This view key will display the cuelist view in the touch screen and the programmer and cuelist values on the external monitor Patch This view key will display the patch screen in the touch screen and the 2D stage layout on the external monitor PlaybButtons This view key will display cue playback button page in the touch screen and the selected cuelist view and cuelist values touch scr...

Страница 20: ...ing views without recording them When the appropriate view key is pressed again the view will return to the earlier saved view Also please note that with the current software windows selected from the Menu list can only be added to the right hand touch screen and external monitors While it is possible to close and resize windows on the left hand touch screen and external monitors it is not current...

Страница 21: ...ly select Continue with current show after displaying the Welcome Screen for 10 seconds This setting is stored in the console and will take effect the next time the console if started Note The Maxxyz console automatically and continually saves the current show as you are working on it Therefore if you select Load a show please be aware that you will be recording over your existing show Further if ...

Страница 22: ... show the default screen will appear in the Playback Touch Screen and the operator touch screen To patch we ll only be using the Programmer Touch Screen To access the patch you will need to press the View key located directly above the Patch label on the Programmer Touch Screen ...

Страница 23: ...Patching Fixtures 23 This will bring you to the main patch screen From here select the Fixtures softkey using either the trackball or pressing the touch screen ...

Страница 24: ...24 Maxxyz This will bring you to the patch spreadsheet screen At this point select the Add softkey again using either the trackball or pressing the touch screen ...

Страница 25: ...Patching Fixtures 25 This will bring up the fixture library The fixture library is sorted by manufacturer Select the Martin library and you will be presented with the following screen ...

Страница 26: ...res Selecting this softkey will generate the following screen From this screen you can select the Mode Lens and other Options for your fixtures Use the selections highlighted above Press OK and you will be sent to a new screen where you will be ...

Страница 27: ...er of fixtures to 12 and press OK to return to the patch spreadsheet As you can see 12 MAC 500s have been added to the show but they have not yet been patched Before patching the MAC 500s add 12 MAC 600 E NT Mode 2 To do that press the Add softkey and repeat the process used in adding the MAC 500s ...

Страница 28: ...28 Maxxyz Now that the fixtures have been added to the patch spreadsheet they need to be patched to their appropriate DMX addresses ...

Страница 29: ...X Universe pop up screen Here you can choose which DMX universe 1 64 to patch the specified fixture You can enter the DMX universe number with the numeric keypad in the Keypad Entry section or you can scroll up and down using the scroll arrows to the right of the universe number Set the universe number to 1 and then press OK ...

Страница 30: ...et the address to 1 and press OK All the MAC 500s are now addressed with the proper offsets Using the range selection technique described above now select the universe for all the MAC 600s and set them to universe 2 Then select the addresses for the MAC 600s and range edit those fixtures with the first unit set to address 1 You can also range edit a number of other fixture attributes including fix...

Страница 31: ...vailable address In the event that the specified DMX address is already used by another fixture the Maxxyz console will select the next available address in the next available universe Similarly if the number of fixtures being added exceeds 512 DMX addresses the Maxxyz console will continue on into the next available universe Once this is done your patch spreadsheet should look as follows Importan...

Страница 32: ...ces to the deleted fixture will be removed Patching a new fixture to the same address will not restore the information The only way to retrieve the fixture information is from a previously stored showfile For this reason if you need to temporarily disable a fixture it is recommended that you patch the fixture to a phantom DMX universe That is to say that you patch the fixture to a DMX universe tha...

Страница 33: ...ssed below The visualization is always displayed on the programmer external monitor While the visualization component of the Maxxyz console is not required for creating and running shows it is a very valuable tool when pre programming or learning the console particularly if you are not connected to physical fixtures LOADING THE MAXXYZ VISUALIZER When you first start the Maxxyz console the visualiz...

Страница 34: ...Documents MSD4 Scenes2 In order for the visualization to be accurate the fixture type including mode the fixture number DMX universe number and DMX address must be exactly the same in both the Maxxyz patch and the MSD scene file For more information please see Show File Management on page 147 Note Maxxyz does not provide for an association between the scene file and the console showfile By default...

Страница 35: ...er contains fixtures Objects and fixtures are assigned to specific layers when the visualization file is created in Martin Show Designer The Edit Fixture and Edit Object Layers in the visualizer determine how these layers will be depicted Misc Bar This toolbar contains the standard Windows tm functions for new file open save etc as well as two very application specific options Operations Bar This ...

Страница 36: ...an be particularly useful when working on a show with a large number of fixtures and you wish to focus on a specific group To the right of the Fixtures tab at the top of the window is the Objects tab Selecting it will change the window to show the Object layers As with the Fixtures window you can select whether or not specific object layers are visible 4 There is also an option for Intersect When ...

Страница 37: ... quite difficult To the right of the camera position icons are the icons for camera view undo and camera view redo These will undo or redo several of the last camera move commands issued to the console Directly to the right of these buttons is the Full View button Pressing this will cause the camera to move to a position where the entire scene is visible At the far right of the Camera Operations b...

Страница 38: ...at selecting a specific camera view as described above will change to that view regardless of the Camera Bar selection TH E DI S P L A Y MO D E BA R The Display Mode is used to determine whether objects and beams are displayed as wireframes or solid objects By default all objects and beams are set to their highest and more realistic settings However in very large shows it may be desirable to reduc...

Страница 39: ...N D S P E C I F Y I N G A N I N T E N S I T Y Using the above keys in conjunction with the at or Full keys allows you to set specified fixtures to specified intensity values Note that when bringing fixtures to Full you are not required to use the or Enter keys When entering any other value these keys are required 1 Enter This will select fixture 1 1 2 Enter This will select fixture 1 and 2 1 Thru ...

Страница 40: ...er 3 decimal 0 zero Enter Decimal zero enter will select every fixture that is patched in your show and place it in the programmer in a selected state USING THE SELECTED FIXTURES SCREEN The Maxxyz console also make use of a Selected Fixtures Screen You can find this screen by selecting the Groups Select view key over the Playback Controls touch screen or the Fixture Filter view key over the Progra...

Страница 41: ... the selection MOVING A SPECIFIED FIXTURE 1 Select the fixture to be moved by clicking in the Model field It will be highlighted in red 2 Use the up or down arrows on the right of the screen to move the fixture through the list Note the in the current version of software if you wish to move a fixture up or down more than one location you will need to reselect the fixture RANDOM FIXTURE ORDER The o...

Страница 42: ...is the number counter by default this number is 2 This number can be incremented or decremented by pressing the and keys to the right of the number All By pressing this button and then the Apply mask button all fixtures currently in the programmer will be selected Every By pressing this button and then the Apply mask button the filter will select every xth fixture where x is a number between 2 and...

Страница 43: ...nter For example if the number counter is set at 3 and then Apply mask is pressed the first 3 fixtures will be selected as illustrated below Pressing Next will advance to the next 3 fixtures and pressing Previous will move to the previous 3 fixtures Divide By pressing this button and then the Apply mask button the filter will divide the total number of fixtures in the programmer by x where x is a ...

Страница 44: ...I N G AN D RE C O R D I N G GR O U P S It is useful to note that when recording a group the order in which the fixtures are entered and subsequently sorted will be stored with the group In other words you can have one group with your Mac 600s stored as 1 24 and a second group that has them stored as 24 1 Further any filters that were applied when the group was recorded will also be stored with tha...

Страница 45: ...ols This screen is automatically populated with the fixtures used in your show The fixtures are sorted by the fixture number as assigned in the patch Numbers that are skipped are not displayed Note that fixture 24 a Mac 600 is followed on the next row by fixture 31 a Mac 500 The label of the fixture defaults to the fixture type Future releases of Maxxyz software will support changing these labels ...

Страница 46: ...e is a fixture that while in the programmer will not be affected by changes made in the programmer That is to say that changes made using the trackbelts touch screens etc will have no effect on deselected fixtures For more information please see Loading the Programmer Using Fixture Selection on page 71 Active Channel An active channel is a channel in the programmer that by default will be recorded...

Страница 47: ...reviously selected fixtures CLEARING SELECTED FIXTURES To completely clear the programmer of all fixtures press the Clear button twice The first time you press Clear the Clear Options window will appear The second time you press Clear all fixtures will be cleared At that point the programmer screen5 will be emptied and the visualizer will return to its previous state It is also possible to clear o...

Страница 48: ...will be highlighted in green or red in the visualizer While both the red and green fixtures are selected it is important to note that only the attributes of the red fixture the last fixture number of the selected range are displayed in the Programmer Control although any fixtures that are highlighted will be under the control of the keys and track belts on the Programmer Control Once you have adju...

Страница 49: ... feature POSITION FANNING As with the Fast Focus feature you can also use the visualizer to fan a group of fixtures and have their focus evenly distributed over a line or around a circle As with Fast Focus you may find it useful to be in the Top view when using this feature To Create a Position Fan For the first examples we will use the Mac 500 s in the Maxxyz Demo scn file 1 Select the Mac 500 s ...

Страница 50: ...s from the Top perspective We can see in this top view that the first fixture selected number 31 which is the furthest upstage right fixture is focused on the start position and the last unit selected number 42 is focused downstage left All other fixtures have been evenly distributed based on their selection order evenly between them Changing to the 3D FOH Front of House view from the Select Camer...

Страница 51: ...an as you desire This is because the fixtures are distributed by selection order Clicking on the Fan Pos button in the Focus Fan window will result in the following Here you can see that the Maxxyz console has calculated the shortest distance for each of the points along the selected fan line resulting in a smoother fan ...

Страница 52: ...n a circular pattern The linear Center to side is similar to the Side to side option used in the examples above except that when you select your start point by double clicking and holding the left trackball button you are not selecting an end but instead selecting the middle of your distribution line Fixtures will be evenly distributed on each side of your start point for a distance determined by ...

Страница 53: ...ntrol those attributes The left four track belts jog dial and LCD keys are used to control fixture attributes while those on the right are primarily used to program effects for information regarding effects please see Effects on page 140 Using fixture 51 a MAC 2000 Profile we can see that attribute groups have loaded into the left LCD keys7 From top to bottom the attribute groups are Dim Focus Thi...

Страница 54: ...information that is loaded into the programmer touch screen is dependant on the attributes of the selected fixtures When multiple fixture types are selected 7 Different fixture types will result in different attribute groups being loaded into the LCD keys Only those attribute groups appropriate to the fixture will be loaded If differing fixture types are selected in the programmer simultaneously t...

Страница 55: ...labels across the top of the Programmer Touch Screen that correspond to the Programmer View Buttons found directly about the touch screen These labels are used to change the layout of the Programmer Touch Screen Pressing the view keys two sets of four keys found directly above the Programmer Touch Screen will change the display of both the touch screen and the associated external monitor You can a...

Страница 56: ...a dark blue label near the bottom of the screen in this case Dimmer Shutter and Focus The values of these attributes can be changed in two different ways you can touch or click on the touch screen to select the desired setting or you can use the track belt below each column to scroll through the values There is also a light blue label at the bottom of each column that identifies whether the values...

Страница 57: ...ch screen are four miscellaneous controls Control resolution Located in the lower left hand corner of the menu is the control resolution box Pressing or clinking on this box will cycle the setting between 16 and 8 bits in one step increments with 16 bit providing the highest degree of resolution and 8 bit providing coarser but faster control of selected attributes Relative Absolute toggle This tog...

Страница 58: ...t if the console is not behaving in the manner you anticipate that you first check the command line before pursuing other alternatives At the far right hand side of the command line are two buttons labeled Assist and Esc escape Pressing the escape key will clear the entire command line Pressing assist creates two pull down menus on the left hand side of the command line These pull down menus will ...

Страница 59: ...the same type or within any specific numeric range RE C O R D I N G G R O U P S To record a group bring up the Fixture Groups screen on the Playback Touch Screen by pressing the view button directly above the Fixture Groups label You can then select fixtures as described earlier Once the fixtures are selected press Record and then press or click on the desired group button and the group will be re...

Страница 60: ...en set Fixture Filter to Every 2 and apply Record Group11 then type 600 2 then press Enter 3 31 Thru 42 Enter Record Group2 then type All 500 then press Enter 4 31 Thru 42 Enter then set Fixture Filter to Every 2 and apply Record Group12 then type 500 2 then press Enter 5 51 Thru 62 Enter Record Group5 then type All 2K Profile then press Enter 6 51 Thru 62 Enter then set Fixture Filter to Every 2 ...

Страница 61: ...d you wish to move or copy a group from one location to the another you can use one of the following methods TO MOVE OR COPY AN INDIVIDUAL GROUP To move an individual group you can use the Move key found in the keypad entry area directly above the numeric entry keys using the following syntax Move Group xx yy Alternatively you can press the Move key then press the desired group on the touch screen...

Страница 62: ...peration you must use the keypads The following is an example of the syntax utilized in this command Move Group 1 Thru 3 12 5 Enter The following is the result of that screen Note that the Mac 600 group formerly group 1 is now at Group 5 and the other selected groups have moved in relation to the Mac 600 group In the event that one or more of the groups to be moved lands on an already recorded gro...

Страница 63: ...h Group 6 At this point press Abort You will note that Group 5 did move to Group 1 but Group 6 and 7 remained in their original position Cancel Cancel is similar to abort except that the entire command would be ignored The entire action whether or not there is an empty group in the target group range is cancelled Please note that if all of the target groups are empty you will not have this option ...

Страница 64: ...ll be added to the fixtures that were previously in the group TO REPLACE THE FIXTURES IN AN EXISTING GROUP 1 Select the desired fixture s 2 Press Record and the button of the group you wish to replace The following pop up window will appear 3 Select REPLACE with current selection The fixtures that were previously in the group will be replaced by the selected fixtures The CANCEL current command but...

Страница 65: ...selected GR O U P PA G E S The Maxxyz console is capable of managing thousands of groups Naturally these can not all be displayed on a single screen However you can arrange your groups on various pages The number of groups per page is dependant on the size of the group window with the default view set at 60 Therefore the first group of the second page is 61 If you were to resize the window to disp...

Страница 66: ...r As with groups if you wish to label the preset press record the desired preset button and then enter text using the keyboard and press Enter You can also label a preset after it has been created by simply pressing the desired preset and then entering the text with the keyboard If you now select the Color attribute group on the Programmer Touch Screen you will note that the preset page changes an...

Страница 67: ...ld you wish to move a preset from one location to the another you can use the Move key found in the keypad entry and the following command line syntax Move Presetxx Presetyy Or you can press the Move key then press the desired preset on the touch screen and then press its new location You can move presets between pages if you wish 11 Similarly if you wish to copy a preset use the Copy key and the ...

Страница 68: ...appear 3 Select REPLACE with current data and the appropriate fixture attributes will be recorded in the preset The CANCEL current command button will abort the command and clear the command line The EDIT current command button will abort the command but will leave the command line active so that you can edit it and then record DELETING A PRESET To delete a preset press the Delete hard key the des...

Страница 69: ...e programmer will be recorded or updated PROGRAMMER MODES There are two programmer modes available on the Maxxyz the first is Live and the second is Blind When in Live mode all attribute information in the programmer will be output to the stage When in Blind mode information in the programmer is not output however it can still be recorded into cues groups presets etc It simply won t be seen on sta...

Страница 70: ...e numeric value of the preset is displayed The numeric value will be either percentage or decimal as determined by the Percentage Toggle If the selected fixtures are at a value that is not determined by a preset the Preset Name Toggle will have no effect Show Base This key is permanently on and can not be deselected This key displays the base attribute information in the programmer Show FX When ac...

Страница 71: ...s are in open white while the odd fixtures are running a pan tilt effect LOADING FIXTURES INTO THE PROGRAMMER There are three ways to load information into the programmer 1 Selecting a fixture or fixtures as described above 2 Using the Edit key from the keypad to edit cues 3 Using the Load key from the keypad to load groups attribute groups or individual attributes LO A D I N G T H E P R O G R A M...

Страница 72: ... 51 61 are green while it is red for fixture 62 The number field is color coded as follows Blue Fixture is in programmer but is not currently selected and will be unaffected by changes made by the programmer keys Red Fixture is selected will be affected by changes made using the programmer keys and is the specific fixture displayed in the programmer controls Green Fixture is selected as part of a ...

Страница 73: ...E D I T Once a cue has been created it can be loaded into the programmer for editing Editing a cue is similar but has some differences You must first make a cuelist active please see Playback Controls on page 93 for information on activating cuelists You can then press Edit Cue and a cue number from the active cuelist and then Enter For example Edit Cue 1 Enter loads cue 1 of the selected cuelist ...

Страница 74: ...he specified base value attributes whether they are at a value or not 12 If one or more of the attributes that is read by a Load function is at a level for example the attribute is in an active cue then that value will be loaded into the programmer as well THE LOAD OPTIONS WINDOW To use the Load Options window and filters employ the following steps 1 Press Load 2 Set your filters as desired Press ...

Страница 75: ...bo etc Effect Value default off These values are those that are associated specifically with effects pan swing pan speed pan mode etc For more information please refer to Effects on page 140 Timing Value default off These values are those that are associated with the Delay and Fade overrides used to control when and how long a particular attribute will move For more information please see Setting ...

Страница 76: ... information from all the different cues and submasters will be loaded into the programmer14 You can then make changes as desired and save them to a new group cue or preset or merge them into an existing group cue or preset USING LOAD LOAD The Load function also provides a very rapid means of capturing all information for any selected fixtures in the programmer After selecting the desired fixtures...

Страница 77: ...of the Group touch screens 2 Press the Dim Focus LCD key in the programmer key section if not already selected Note that it is important to select the appropriate group before proceeding with the next step otherwise that attribute group will be loaded not the individual attribute 3 Press and hold the Load key on the keypad 4 Press the hard key directly below the Intensity label on the touch screen...

Страница 78: ...to copy information from one or more fixture s to one or more of the same type of fixture This process is known as cloning When cloning there are two types of fixtures source and target Source Fixture This is a fixture loaded in the programmer that contains the information you wish to clone to another fixture Target Fixture This is a fixture of the same type as the source fixture that you wish to ...

Страница 79: ...hich specific attributes you wish to have the target fixtures clone from the source fixture If you wished to have the targets clone only the position and the intensity of the source you would set your filter accordingly You can also clone more than one fixture to a number of other fixtures 1 Select fixture 51 bring it to full and set the pan tilt gobo and color attributes of that fixture to a non ...

Страница 80: ...mation in the programmer Press Clear fixture number Enter and then minus same fixture number Enter The Clear command deletes the attribute information and the Minus command removes the fixture from the programmer 15 For more information on the Clear command see Clearing Individual Attributes on page 84 SAVING CHANGES MADE IN THE PROGRAMMER Once you have made your changes to the values in the progr...

Страница 81: ...g cue group or preset CLEAR AND THE PROGRAMMER Fixture and attribute information entered into the programmer will remain there until it is cleared The Clear button on the keypad serves three different functions within the programmer it can be used to deselect active fixtures it can be used to clear the programmer entirely or it can be used to clear specific attributes or attribute groups At this p...

Страница 82: ...e programmer It may still have a value but as it is not in the programmer it is not considered either active or inactive and is therefore null Fast Clear Command These keys are used to make attributes inactive and do not require an Enter command to execute These commands also will ignore any other filtering that may be in place Clear Options These keys determine whether a clear or an inactive func...

Страница 83: ...ffects pan swing pan speed pan mode etc For more information please refer to Effects on page 140 Timing Value default on These values are those that are associated with the Delay and Fade overrides used to control when and how long a particular attribute will move For more information please see Setting an Individual Attribute Fade Time on page 103 and Setting an Attribute Delay Time on page 105 I...

Страница 84: ... s we would use the following keystrokes 1 Select the group 2k Profile 2 from the Group touch screen 2 Select the Color LED key on the programmer 3 Press and hold the Clear key on the keypad 4 Press the hard key in the programmer that is directly below the Cyan label in the Programmer Touch Screen The programmer screen will then look like this Set Pressing this button will cause the Maxxyz console...

Страница 85: ...The Programmer Window 85 You can see that the cyan attribute on the odd Mac 2k s is now set to null This is sometimes referred to as knocking out ...

Страница 86: ...ed THE RECORD OPTIONS WINDOW The Record Cue Options window contains several buttons that are broken down into five categories Record Options These functions are used primarily with cues but can be useful in presets and groups as well Source Options Used in determining exactly what attributes will be recorded these buttons are of interest whenever you are recording Extra Filtering These buttons det...

Страница 87: ...y non null value This will work on any attribute as well Merge When selected the merge command will add all selected attributes to the specified cue group or preset Attributes that were previously in the cue group or preset will not be affected unless they are carried in the information to be added Replace Where Merge adds information the Replace function will overwrite all existing attributes Any...

Страница 88: ...an those set up by placing attribute values in the programmer will work with Record Remove Record Remove can also not be used with range recording of cues SO U R C E OP T I O N S CA T E G O R Y This category contains two buttons that toggle between each other and deal with active vs inactive attributes For a definition of active inactive attributes see Selected Deselected and Active Inactive on pa...

Страница 89: ... Channels When selected the Effects Channels those defined in the Regular Effect and Time Effect attribute groups found on the programmer LCD keys will not be recorded Timing Channels These values are those that are associated with the Delay and Fade overrides used to control when and how long a particular attribute will move For more information please see Setting an Individual Attribute Fade Tim...

Страница 90: ... as shown below MODIFYING RECORDED CUES Once a cue has been recorded there are a number of different ways that it can be modified including copying deleting and re recording Set Pressing this button will cause the Maxxyz console to remember any of the filters you have applied so that the next time you press Record those same filters will be selected Note there is no feedback when you press this bu...

Страница 91: ...nd cue 25 DE L E T I N G A CU E If once a cue has been recorded it is determined that it is no longer adding to the aesthetic quality of your production it can be deleted You can only delete a cue from the selected cuelist To delete a cue press Delete Cue xx Enter The specified cue will be removed from the cuelist You can also delete a range of cues using the same syntax used to record a range of ...

Страница 92: ...the target cuelist at the specified cue number Range Copying is not supported in the current version of software MO V I N G A CU E In the current release of software it is not possible to move a cue or a range of cues You can however copy an existing cue to a new location and then delete the original cue ...

Страница 93: ...efinitely until it receives a specific command to change Maxxyz also makes no differentiation as to where the information comes from16 It can come from any cue on any cuelist in any playback fader Last Takes Precedence PLAYBACK CONTROLS There are 10 sets of LED Keys Hard keys and motorized faders in the Playback Controls Each of these controls pertains to an individual cuelist The LCD Key at the b...

Страница 94: ...iven time Note that a cuelist needn t be selected in order to be playing back the cuelist To select a cuelist press the LCD button at the bottom of the desired Playback Control The LCD will invert its display clear lettering on a darkened background to indicate that it is currently selected 17 PLAYBACK COMMAND Located to the right of the playback faders and the left of the main keypad is the playb...

Страница 95: ...ressing this key will advance the playback fader bank by one Previous Bank Pressing this key will decrement the playback fader bank by one Bank By pressing this key and a number between 1 and 100 you will jump to that bank Delay This button is used in the setting of delay offsets for fanning the timing of selected attributes Fade This button is used to set the Fade In time of a specified attribute...

Страница 96: ...etween Go Wait and Follow Pause Back When this key is pressed once the selected cuelist will stop its fade Pressing it a second time will cause the previous cue to be activated Go Pressing this button will cause the next cue in the selected cuelist to execute Fade In This button currently has no functionality Time This button currently has no functionality LCD Key Legend Page 1 default Legend Page...

Страница 97: ...ause Back buttons in the Main Go area will execute cues in that cuelist Also in this area are the Release key and the Snap key The Snap key can be used to override the cue timings in a cuelist and force the cue to execute in a time of zero SN A P KE Y The Snap key can be used to override the timings of previously recorded cues There are a number of different functions assigned to the Snap key all ...

Страница 98: ...ecode cuelist is selected other changes in the Playback Touch Screen will make that apparent Light Blue A chase is loaded in this playback Bright Red An override is loaded in this playback Green This cuelist is acting as a submaster Yellow this cuelist is acting as a group master Dark Blue No cuelist is loaded in this playback For more information on cuelist types please see Changing the Cuelist T...

Страница 99: ...he playback 5 Change the attributes on the selected fixtures and repeat steps 1 3 until you have a total of 5 cues When finished the Cuelist window will look similar to this CU E L I S T T O U C H SC R E E N B U T T O N S The Cuelist touch screen contains a number of buttons with varying levels of functionality in the header of the cuelist Options This button will be discussed in detail later in t...

Страница 100: ...re executed and the highlight bar remains at the last selected cue but when Follow Grid is selected the cuelist will automatically scroll down following the carat Add Macro This button is discussed in detail in Using Macros on page 119 Insert Link This button is discussed in detail in Linking Cues on page 121 Edit Mode Finally to the far right is the Edit Mode button This button locks access the N...

Страница 101: ...ay time is displayed here For further information see Setting Cue Timing on page 101 Note that an Override column will be added to the right of the Delay column if a Delay Override is recorded into the cue Fade The fade time of the cue is displayed here For further information see Setting Cue Timing on page 101 Note that an Override column will be added to the right of the Fade column if a Fade Ov...

Страница 102: ...ed and the command line will read Set Cue 2 Fade 3 On the main keypad type 5 Enter The cell will now show a time of 5 seconds and revert to a highlighted blue state You can also select a range of cues in the same manner you select a range of cells in Patch Use the trackball to click and drag or you can touch and drag using your finger To change the base time to 5 seconds for all cues 1 Select the ...

Страница 103: ...back Command 5 Press the hard key directly below the desired attribute label in the touch screen For this example use Intensity 19 6 Press 0 on the keypad Once you have done this you will see the following in the contents of the command line This indicates that the selected fixtures will be set to an intensity fade time of zero 7 Press Enter to record the change into the programmer Here we can see...

Страница 104: ...onds the display would read 0s 10s SETTING THE FADE TIME FOR AN ATTRIBUTE GROUP In the example above we examined how to set a fade time for an individual attribute intensity It is also possible to set the fade time for an entire attribute group such as color To do so 1 Select the desired cuelist 2 Select the fixtures you wish to change 3 Press the Fade LCD key in the Playback Command 4 Press the C...

Страница 105: ...an Tilt Speed attributes of the odd MAC 2k s all have a delay time of 2 5 seconds To complete this process 6 Press Record Cue xx Merge Enter SE T T I N G A ST A G G E R E D D E L A Y T I M E DE L A Y FA N N I N G The Maxxyz console makes it very quick and simple to fan the attributes of a group of fixtures Fanning can be defined as taking a delay time range such as 0 to 11 seconds and applying tha...

Страница 106: ...ear to clear the programmer DELAY FANNING FROM MULTIPLE POINTS In much the same way that a standard fan is created you can use change the delay time so that the fade will begin at multiple points throughout the selected fixtures For example 1 Press Edit Cue 2 Enter 2 Press the Delay LCD key in the Playback Command 3 Press the Pan Tilt LCD key in the programmer controls 4 On the main keypad press 0...

Страница 107: ...the top of the cuelist screen you will see the three trigger values and a button for Trigger Time 4 Press the Wait button 5 The cuelist will display Wait 0 s in the Trigger cell of cue 2 6 To change the Wait Time press the trigger value again where it currently says Wait 0s 7 This time select Trigger Time 8 The cuelist will revert to its normal state but the command line will read Set Cue2 Trigger...

Страница 108: ...e desired time in seconds and press Enter 10 Select another cue and repeat if desired When the Wait and Follow times have been set for cues 2 and 3 the cuelist screen will display this information CUELIST OPTIONS CH A N G I N G T H E CU E L I S T T Y P E A N D OP T I O N S As mentioned earlier Maxxyz supports several different cue types Cuelist the default we have been working with We ll now look ...

Страница 109: ...dless of cuelist type selected Each of these groups is listed below The groups that are specific to a certain cuelist type will be discussed later in the manual Priority Aside from setting the priority level of a cuelist this group contains selections that determine the behavior of a cuelist when its contents are overridden by another cuelist Advanced This section determines the behavior of a cuel...

Страница 110: ...cuelist This will be our Drummer cuelist 4 Clear the programmer Note Cue 1 in both the Keyboard and Drummer cuelists have the same fixtures and both have position information for those fixtures However cue 1 in the Keyboard cuelist also contains color information Therefore the contents of cue 1 of Drummer are a subset of the contents of cue 1 in Keyboard the superset 5 Open the cuelist options for...

Страница 111: ... been returned to the control of the Drummer cuelist Backtrack default On As mentioned earlier the Maxxyz console is a Last Takes Precedence console This means that a recorded cue contains only those values that have changed from the previous cue When going through the cuelist sequentially from the top this wouldn t necessarily be noticed However if you were to start in the middle of the cuelist y...

Страница 112: ...g attributes x y and z 6 When cuelist B is released attributes x y and z return to the control of cuelist A Please note that in order for Autorelease to function in the manner described above the cue in cuelist B must contain all the attributes of the cue in cuelist A Otherwise when cuelist B is released those attributes taken from A will be sent to zero Release when Restart By default Release whe...

Страница 113: ... will drive the current cue to full regardless of the position of the fader and will then Release the cuelist as you release the button and it goes up Default Fader Behavior In the current release of software the only thing that will be affected by the fader except in an Override cuelist is the intensity level However how this can be modified UP GO When selected the next cue in the cuelist will be...

Страница 114: ... now run the chase by closing the Cue Options pop up and pressing the go button on the appropriate playback fader Note than when a cuelist is set as a chase any internal cue timings fades or delays are overridden and only the end state of the cue is used Also a chase cuelist will not trigger any macros that may be recorded in it Beats Per Minute BPM This setting determines the length of time betwe...

Страница 115: ...ammer Your programmer should look something like this 4 Record the contents of the programmer to an available playback 5 Clear the programmer 6 In the Cuelist View open the Options screen and set the cue type to Override You have now created your override cue To view the effects of the override perform the following steps 7 Start the chase created earlier or any other cue by pressing the appropria...

Страница 116: ...ed by the associated fader As the fader is raised the intensity will raise to the values recorded in the submaster Other groups or cuelists can drive the fixtures contained in that submaster to a higher level in a highest takes precedence manner GROUP MASTER The Group Master is an inhibitive submaster It can not be used to raise the level of the fixtures it contains but the position of its associa...

Страница 117: ...al connection and Internal SMPTE are supported at this time After you have made your selection press Confirm to set the cuelist to the desired timecode source Once this is done you will notice that the cuelist has changed to reflect its status as a timecode cuelist TIMECODE CUELIST HEADER You will note several additions to the header information in a Timecoded cuelist 00 00 00 00 This is where the...

Страница 118: ...it Mode on press or click the legend Manual Trigger on the cue you wish change The command line will read Set Cue xx TC Time To set the trigger time to 1 minute and 15 frames press 1 1 5 Enter The Pause button is used to stop the internal timecode generator without resetting it to zero To resume press the Play button The stop button is used to stop the internal timecode generator Pressing this but...

Страница 119: ...l manually advance the cuelist When the timecode then catches up to your position in the cuelist it will begin to trigger cues based on their trigger time again Note that the cues that have already been executed manually will not be re executed via the timecode signal Pressing the Pause Back button will pause your advancement in the cue list To resume press Go and the cuelist will jump to the last...

Страница 120: ...as pressing Go button on specified cuelist Release Will release the specified cuelist Pause Will pause any cue running in the specified cuelist Select Selects the specified cuelist Select Main Changes the cuelist assigned to the Main Go area Go to Bank Loads the specified bank onto the playback faders Script Execute This option is for application specific instances only Please contact Technical Su...

Страница 121: ...macro can later be edited or deleted Use the following procedure 1 Select the desired cuelist and view it in the Cuelist window 2 Press the macro action the cell that contains the macro type followed by the cuelist number 3 To edit the macro enter any changes in the trigger or cuelist selection then press apply 4 To delete the macro press Delete Macro 5 The edits to the macro will be applied LINKI...

Страница 122: ...k will be repeated the Count is 1 To edit this 5 Under the Fade column press COUNT 1 The command line will read Set Cue 6 5 Loop Count 6 Press xx number of times the link is to loop back Enter 22 When selecting cues in the cuelist be careful to select the cue number by pressing under the No column not the Name column Selecting the Name column will cause the command line to read Set Cue xx Name and...

Страница 123: ... L C U E L I S T To release an individual cuelist use the Rel button in the Main Go area 1 Press and hold the Rel button 2 Press the Go button of the desired Playback Control 3 Release both buttons RE L E A S I N G AL L CU E L I S T S There are two ways to release all cuelists REL SNAP 1 Press and hold the Rel and then the Snap button in the Main Go area All attributes in all faders on all banks w...

Страница 124: ...ved to the specified Bank and Fader CO P Y I N G A CU E L I S T T O A P L A Y B A C K FA D E R O N T H E S A M E BA N K Copying a cue from one playback fader to another is quite similar to moving a cue 1 Press the Copy key found in the main key area 2 Press the LCD Playback key of the cuelist you wish to copy 3 Press the target LCD Playback key where you wish to copy the cuelist Just as you can mo...

Страница 125: ...ess the LCD Playback key of the cuelist you wish to delete 3 Press Enter24 The selected cuelist has been deleted from the playback Accidentally delete a cuelist Don t worry See Virtual Cuelist on page 126 24 Note that you can also press and hold the Delete key and then press and LCD playback button When Delete is then released the specified cuelist will be removed from the fader ...

Страница 126: ...e not actually recording it into the playback fader in fact you are recording it into the Virtual Cuelist It may help you in your understanding of the Virtual Cuelist if you think of it as the Master Cuelist In order to view the Virtual Cuelist it may be necessary to create a custom view See Editing Display Screens on page 20 for information One way to think of the Virtual Cuelist is to compare it...

Страница 127: ...t it is active Here we see that cuelist 31 labeled chase is active The circular icon in the lower left hand corner denotes it is active and the CH in the upper right hand corner identifies it as a chase And lastly we see cuelist 31 an override is also active MO V I N G A N D CO P Y I N G F R O M T H E V I R T U A L C U E L I S T In the case of the Virtual Cuelist moving and copying to playback fad...

Страница 128: ...rom one location in the Virtual Cuelist to another is simple to do but it is important to understand what is happening TO COPY FROM ONE VIRTUAL CUELIST BUTTON TO ANOTHER VIRTUAL CUELIST BUTTON 1 Press Copy 2 Select the virtual cuelist you desire from the touch screen 3 Press the target Virtual Cuelist button on the touch screen where you wish to copy the cuelist When you perform this function you ...

Страница 129: ...h the playback faders While the detailed level of information that is readily accessible in a playback fader is missing the rapid access to a large number of cuelists presents you with the ability to make very quick changes There are 26 pages of buttons each by default containing 100 buttons in a 10 by 10 arrangement To access the playback button page press the view hard key found directly over th...

Страница 130: ...CUELIST 1 Press Delete 2 Select the cuelist you wish to delete on the touch screen 3 Press Enter AC T I V E C U E L I S T VI E W To the right of the playback button display is the Active Cuelist View In the screen shot on page 129 you can see that the cuelist number and label are displayed in this case cuelist 64 with a label of override Pressing a cuelist in this view has the effect of selecting ...

Страница 131: ...phical interface 2D LAYOUT OVERVIEW Below is an image of the unpopulated 2D Stage Layout25 You can clearly see the gridded blank space for adding elements of the design and little explanation is required there However we will discuss the series of buttons along the top of the page 25 Note this screen shot is cropped Zoom There are four levels of zoom in the 2D layout Pressing the magnifying glass ...

Страница 132: ...o ensure smooth operation it is recommended that only one element fixture truss or text be highlighted at any given time Add This button opens either a pop up window or dialog box to add either truss or text Adding fixtures is handled separately see Adding fixtures to the 2D Layout on page 135 Change The Change button opens a new window Color Clicking on this button brings up a pull down menu with...

Страница 133: ...red action now 3 If you wish to move the object rather than modify it click again If the cursor has moved away from the object it will return to the center of the object with this click 4 You can now use the trackball to position the element To place the element and deselect it click again C H A N G E M E N U The Change Menu allows for a number of modifications to be performed on the various eleme...

Страница 134: ...7 Click on Deselect All TO COPY AND PASTE AN ELEMENT 1 Select the element to be copied 2 Click on Copy 3 Click on Deselect All 4 Move your cursor to the location where the new element is to be added 5 Click on Paste 6 Press Deselect All Please note that with all the above commands you can right click and draw a selection box around the desired elements to select more than one element at once You c...

Страница 135: ...ke to add to the 2D layout 4 Press the Edit key After pressing the Edit key a new window will open in the Patch screen 5 Select the page you wish to put the fixtures on by scrolling through the list A through Z and press Ok 6 The fixtures will be added to the 2D view immediately but before leaving this screen press Apply and exit the spreadsheet view With the fixtures added to the 2D layout you ma...

Страница 136: ... the available views 4 Select the desired view and press Ok 5 The fixture s will immediately assume the new position 6 Press Back 7 Press Back again 8 Press Deselect All LO A D I N G F I X T U R E I N T O T H E P R O G R A M M E R W I T H 2D L A Y O U T Fixtures in the 2D Layout can be selected and loaded into the programmer and then focused just as if you had used traditional fixture selection me...

Страница 137: ...ces of the same truss click again 6 When finished placing truss select Add 7 Click Cancel in the pop up menu TO DELETE TRUSS 1 Select truss piece to be deleted 2 Click on Delete Note If truss does not immediately disappear from screen you may need to refresh the display To do this press Set Up to close the editing window and then press Set Up again to re open it TE X T TO ADD TEXT 1 Select Text fr...

Страница 138: ...2D layout to add textures scenic designs or other elements to your representation As noted earlier the layout area is grided in 1 meter squares Conveniently each meter corresponds to 100 pixels Therefore calculating the required size of your bitmap is quite easy TO ADD A BITMAP 1 Select Import Bitmap A pop up screen will appear in the playback touch screen 2 Select the drive that has the bitmap 3 ...

Страница 139: ...red to the upper left corner of the 2D layout It is not possible to move the bitmap TO DELETE A BITMAP 1 Select Import Bitmap 2 In the pop up window select the page that has the bitmap you wish to delete 3 Press Delete 4 Press Done The bitmap will be deleted ...

Страница 140: ...er PT Comb at the end of this section Please confirm that PT Comb is not highlighted for the first part of this section EFFECTS CONTROLS The effects controls are limited to the 4 right trackbelts and 2 of the 5 right LCD keys in the programmer controls The two LCD keys are RE G U L A R EF F E C T This loads the control elements for the motion of the attribute being controlled by the effect The ele...

Страница 141: ...owever that all fixture attributes except for pan and tilt have a nominal range of 0 128 pan and tilt have a nominal range of 0 64 In other words a fixture at 50 would have a baseline of 64 50 of 128 The swing range between an attributes maximum of 128 and the swing maximum of 170 can be used to overdrive the attribute This doesn t mean that you ll be able to get more than 100 intensity from your ...

Страница 142: ...at the baseline fade up the amount specified by the swing element return to the baseline and then fade below the baseline the same amount before returning to the baseline and starting again 2 This mode is identical to mode one except that we fade below the baseline first and the direction of travel is right to left This is only noticeable when working with groups of fixtures and using the Time Eff...

Страница 143: ... Maxxyz console We re in mode 1 which swings above and below the baseline Since our baseline is 64 and our swing is 64 when the intensity attribute is at the top of the wave were at full intensity baseline 64 swing value 64 128 full When we reach the bottom of the wave we re at zero baseline 64 swing value 64 0 Example 2 4 Continuing with where we were double click the hard key below the mode labe...

Страница 144: ...ts in that effect The number of points along the duration of the effect that the group of fixtures is divided into is set using Delay While Delay can be set using the trackbelt it is highly recommended that you use the touch screen either the pop up window or by touching the values listed in the Delay column The Delay pop up window will automatically populate with x number of Wave per x selections...

Страница 145: ...t Shift per 12 Set the fixtures to the other Step per x settings to see how they work PA N T I L T A N D P T CO M B By selecting the P T Comb button a new option for the regular effects is available As is apparent from the name this option is only available to the pan and tilt attributes To use the P T Comb feature 1 Select a group of fixtures and bring them to full 2 With the Pan Tilt attribute g...

Страница 146: ...ring them to full 2 Using the Swing and Speed attributes in Regular Effect set them to tilt up and downstage at a speed of 200 3 Record as cue 1 in a new cuelist do not clear the programmer 4 Increase the speed to 400 5 Record as cue 2 in the same cuelist and clear the programmer When we play these cues we can see that the speed increases when cue 2 is executed However if we wish to make changes i...

Страница 147: ...se are inexpensive devices readily available at most consumer electronics stores Please note that some software upgrades to the Maxxyz will overwrite the hard drives and erase any existing show information For that reason please back up any critical show files before performing an upgrade BA C K I N G UP Y O U R S H O W F I L E DA T A To back up showfile data 1 Connect the USB storage device to ei...

Страница 148: ...xxyz console To load a showfile 1 Turn on the console 2 When the welcome screen appears Starting the Maxxyz on page 21 select Load a Show 3 A pop up window will appear 4 Select the desired show and press Enter DOWNLOADING AND UPLOADING FILES Exchanging files between the Maxxyz console and other computers requires removable media Martin recommends a USB thumb drive To copy the visualization file pl...

Страница 149: ...ll need to click on the Installx x x icon to start the upgrade Also please refer to any specific upgrade instructions found with the upgrade CLEANING The Maxxyz requires periodic cleaning as does any computer The schedule depends heavily on the operating environment please consult a Martin service technician for recommendations if needed As with any computer never spray the cleaner directly onto t...

Страница 150: ... playback and two function assignable buttons 8 digital fader belts for fixture control Digital LCD buttons dynamically labeled Grandmaster fader Built in stereo loudspeakers Headphone mini jack connector Speaker and headphone volume controls 3 USB connectors for peripheral device connection 2 VGA connectors for external monitors 2 12 1 SVGA TFT industrial color touch screens 2 industrial motherbo...

Страница 151: ...rtual cuelist or effect on any playback fader 100 banks each of 10 playbacks selectable with a scroll wheel on the desk Full 16 bit fading for high resolution fixtures Individual fade in fade out times for all playbacks Manual override available at all times Cue memory with individual delay in fade in fade out and delay out timing on all fixtures and their parameters Freeze times and playbacks Liv...

Страница 152: ...cified cue in time zero hold Snap Release Fades all fixtures to zero and then releases them from all playback faders in the specified time hold Release Snap Releases all attributes of all fixtures in all playback faders simultaneously Edit Enter Loads all attributes of the active cue in the selected cuelist into the programmer for editing Record Enter Records the contents of the programmer into th...

Страница 153: ...Appendix 3 Wiring Charts 153 APPENDIX 3 WIRING CHARTS The following charts can be found on the inside and outside of the processor cover inside the Maxxyz console ...

Страница 154: ...154 Maxxyz ...

Страница 155: ...Appendix 3 Wiring Charts 155 ...

Страница 156: ...Appendix 3 Wiring Charts 156 ...

Страница 157: ... escape 58 Comment labeling 101 Control Resolution 57 Copy group 61 preset 67 Cue Only recording 89 Cuelist Playback Button page 129 autorelease 112 clear 123 copying 124 deleting 125 labeling 100 moving 124 options 108 priority 110 release 123 screen 99 selecting 94 type 108 chase 114 group master 116 override 115 submaster 116 timecode 117 virtual 126 Cuelist Options Window 108 Cues base delay t...

Страница 158: ...ying 61 Copying a range 62 copying a range 62 deleting 65 editing 64 labeling 59 moving 61 moving a range 62 recording 59 remove fixtures from 64 replace fixtures in 64 selecting 65 H Highlight button 17 HTP highest takes precedence 116 I Inhibitive Submaster see Group Master 116 Intensity Fanning 40 J Jog Dial 14 K Knocking Out Attribute 85 L Labeling comment 101 cuelist 100 101 groups 59 presets...

Страница 159: ...l attributes 84 display options 69 loading fixtures 71 using edit 73 using fixture selection 71 using load 74 saving changes 80 R Record Options Window 86 cue only 89 filters 89 Record Remove 87 Relative Fixture Control 57 Release all cuelists 98 dimmers first 113 when restart cuelist 112 S Save a Show 148 Selected Fixtures Screen 40 Selected Deselected 46 Selecting Fixtures deselecting 47 deselec...

Страница 160: ......

Отзывы: