background image

PAGE 1 OF 9 

0521 IH-5334


H-5334

TABLETOP PAPER 

MACHINE

1-800-295-5510

uline.com

TOOLS INCLUDED

TOOL NEEDED

1/8"

1/2" Wrench

5/16"

Allen Wrench

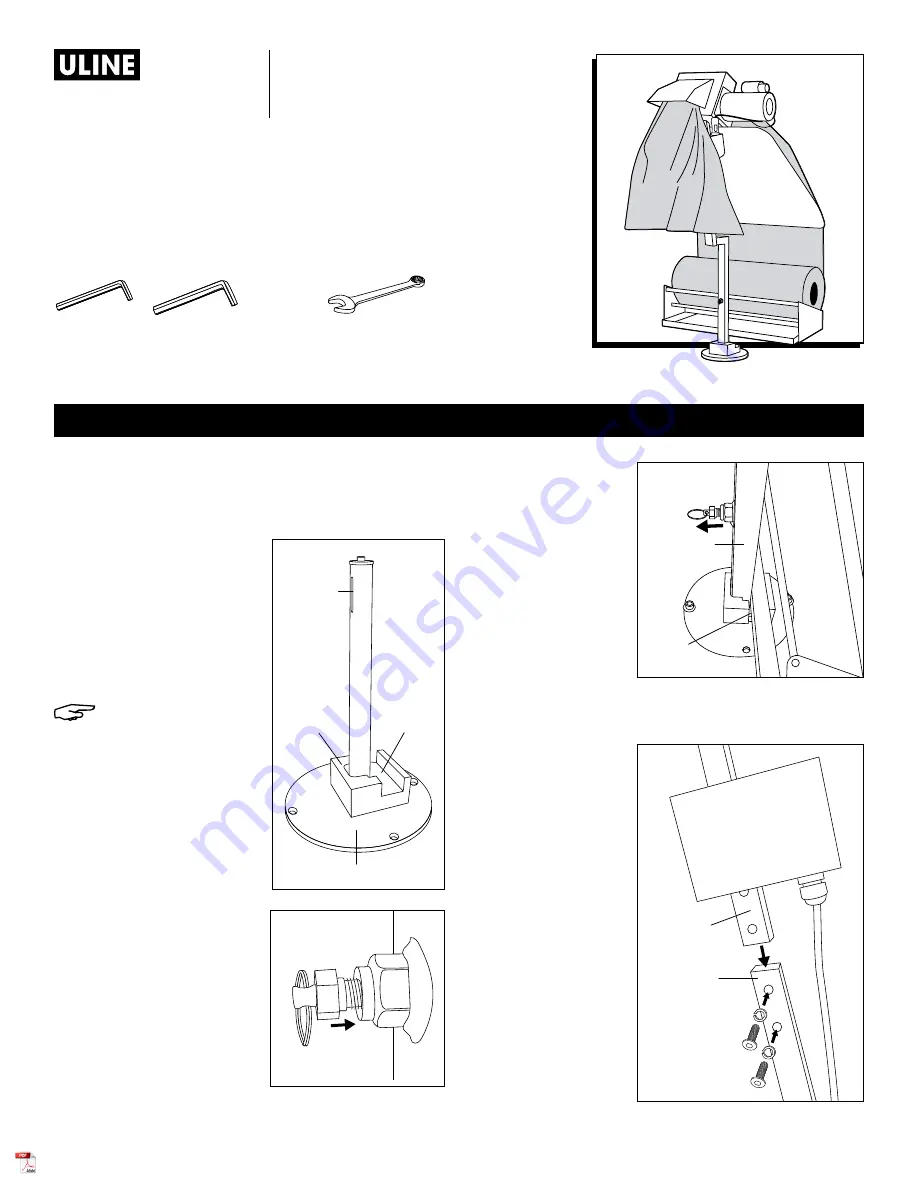
1.  Remove all parts from the three shipping cartons.

2.  Position the tabletop base on flat workstation 

surface.

3.  Rotate the base so the 

shaft channel is facing 
the direction you want the 
paper to exit the machine 
from. (See Figure 1) 

4.  Fasten the base to 

workstation using holes 

in base. (See Figure 1)

NOTE: Mounting 
bolts not included.

5.  Rotate black collar so 

the shaft channel is on 
the opposite side of 
the groove in the collar. 
(See Figure 1)

6.  Fasten spring-loaded 

pin and spacer using a 

1/2" wrench all the way 

into the welded nut on 
the front of the bottom 
mast. (See Figure 2)

7.  While pulling 

spring-loaded 
pin, place bottom 
mast onto the 
shaft of the 
tabletop base. 
Lower the body 
so crossbar fits 
into black collar 
groove.  

(See Figure 3)

8.  Release spring-loaded pin and rotate body until the 

pin clicks into the channel on the shaft.

9.  Position top mast 

so the paper exit 
is facing front. 
Insert the top mast 
into the top of 
the bottom mast. 
Secure with  

3/8-16 x 3/4" bolts 

and 3/8" lock 
washers (2 each).  
(See Figure 4)

10.  Pull spring-loaded 

pin out and turn 
unit 180 degrees.

ASSEMBLY

Tabletop Base

Collar

Groove

Black

Collar

Shaft

Chan-

Figure 1

Figure 2

Figure 4

Bottom

Mast

Top

Mast

Figure 3

Bottom

Mast

Black

Collar

Groove

Para Español, vea páginas 4-6.

Pour le français, consulter les pages 7-9.

Содержание H-5334

Страница 1: ...acer using a 1 2 wrench all the way into the welded nut on the front of the bottom mast See Figure 2 7 While pulling spring loaded pin place bottom mast onto the shaft of the tabletop base Lower the b...

Страница 2: ...Plug power cord into a standard 115V outlet 2 Make sure power switch is turned off 3 Pull spring loaded pin and turn unit 180 degrees to make paper cradle easily accessible 4 Load kraft paper onto the...

Страница 3: ...threading disk clockwise to advance paper Tighten the bolts on the top of the head a quarter turn at a time Repeat as needed until drive wheels grip paper Paper jamming Not using recommended paper Re...

Страница 4: ...de 1 2 fije el pin con resorte y espaciador hasta adentro de la tuerca soldada en la parte frontal del m stil inferior Vea Diagrama 2 7 Jale el pin con resorte y coloque el m stil inferior en el eje...

Страница 5: ...able el ctrico a un tomacorrientes est ndar de 115V 2 Aseg rese de que el interruptor de energ a est apagado 3 Jale el pin con resorte y gire la unidad 180 grados para facilitar el acceso a la cuneta...

Страница 6: ...e el disco roscado en el sentido de las manecillas del reloj para hacer avanzar el papel Apriete los pernos de la parte superior de la cabeza un cuarto de vuelta a la vez Repita hasta que las ruedas m...

Страница 7: ...ez la tige ressort et l entretoise compl tement dans l crou soud sur le devant du m t inf rieur Voir Figure 2 7 Tout en tirant sur la tige ressort posez le m t inf rieur par dessus l arbre de la base...

Страница 8: ...hez le cordon d alimentation dans une prise standard de 115 V 2 Assurez vous que l interrupteur d alimentation est en position d arr t 3 Tirez sur la tige ressort et tournez l unit de 180 degr s pour...

Страница 9: ...horaire pour faire avancer le papier Serrez les boulons situ s sur le haut de la t te en les tournant d un quart de tour la fois R p tez au besoin jusqu ce que les roues motrices se cramponnent au pa...

Отзывы: