background image

3

3. 

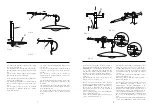
Join the connectors (J) and push the 

grommet (K) into the rear of the arm, fully 

engaging it by twisting.

3. 

Conectar los conectores (J) e insertar el 

pasacables (K) en la parte posterior del brazo 

presionando y girando hasta que quede 

completamente fijo.

3. 

Brancher les connecteurs (J) et insérer le 

serre-câble (K) à l'arrière du bras, en appuyant 

dessus et en le tournant jusqu'à ce qu'il soit 

complètement fixé.

3.

 Verbinden Sie die Anschlüsse (J) und führen 

Sie die Kabeltülle (K) in den hinteren Teil des 

Arms ein und drücken und drehen Sie sie, bis 

sie komplett fixiert ist.

J

K

4

4.

 LED-

Ginger XL 42: 

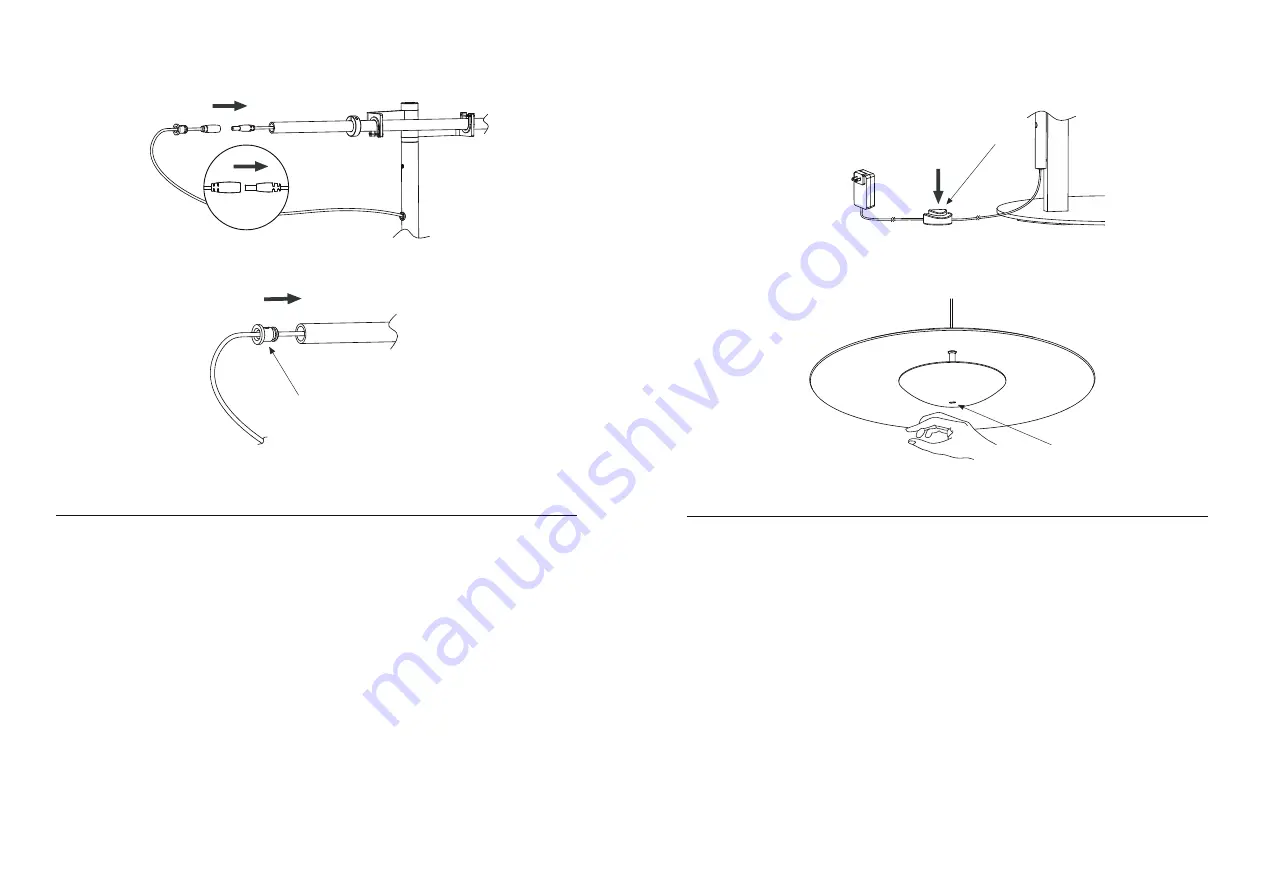
Use the foot switch (L) to 

switch the light on and off, as well as controlling 

the strength of the beam. 

Ginger XXL 60:


Switch the light on and off, as well as controlling 

the strength of the beam, by passing a hand 

over the sensor (M).

4.

 LED-

Ginger XL 42:

 Encender, apagar y 

regular la luminaria presionando el pulsador (L). 

Ginger XXL 60: 

Encender, apagar y regular la 

luminaria pasando la mano por el sensor (M).

4. LED-Ginger XL 42 :

 Allumer, éteindre et 

régler le luminaire en appuyant sur le bouton (L). 

Ginger XXL 60 : 

Allumer, éteindre et régler le 

luminaire en passant la main dans le capteur 

(M).

4. LED-Ginger XL 42: 

Sie können die Lampe 

einschalten, ausschalten und das Licht regulieren, 

indem Sie den Schalter (L) drücken. 

Ginger XXL 

60

: Sie können die Lampe einschalten, 

ausschalten und das Licht regulieren, indem Sie 

Ihre Hand entlang des Sensors (M) bewegen.

L

M

LED-Ginger XXL 60

LED-Ginger XL 42

Содержание LED-Ginger XL 42

Страница 1: ...ra necesario No utilizar alcohol u otros disolventes ATTENTION 1 Il est recommandé de faire exécuter l installation par un professionnel 2 Débranchez la connexion au réseau avant toute manipulation 3 Si le câble flexible ou fil du luminaire est endommagé il conviendra de faire appel au fabricant à son service technique ou encore à une personne qualifiée pour le remplacer et éviter ainsi tout risqu...

Страница 2: ... bracket remain tighted but just enought to allow the rotation through the axis 2 2 Place the arm in the bracket G as shown in Fig 2 2 2 3 Fasten the arm in place by means of the wire ties I as shown in Fig 2 3 2 1 Colocar el soporte G tal y como muestra la figura y asegurarlo atornillando el prisionero H ATENCIÓN Evitar roscar el prisionero en exceso Fijar el prisionero de forma que el soporte qu...

Страница 3: ...t on and off as well as controlling the strength of the beam Ginger XXL 60 Switch the light on and off as well as controlling the strength of the beam by passing a hand over the sensor M 4 LED Ginger XL 42 Encender apagar y regular la luminaria presionando el pulsador L Ginger XXL 60 Encender apagar y regular la luminaria pasando la mano por el sensor M 4 LED Ginger XL 42 Allumer éteindre et régle...

Страница 4: ...e point de collecte le plus proche ou contacter le distributeur qui vous a vendu le produit Dieses Symbol auf dem Produkt oder der Verpackung zeigt an dass diese nicht als normaler Hausmüll behandelt werden dürfen sondern den entsprechenden Stellen für Sondermüll zugeführt werden müssen Für weitere Informationen zum Thema Sondermüll wenden Sie sich bitte an Ihre Stadtverwaltung die nächste Annahme...

Отзывы: