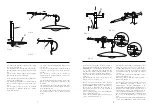
1.1.
Attach the tube (A) to the base (B), using
the screws provided (C).
1.2.
Feed the power wire (D) down the arm (E),
until the push-fit connector appears at the other
end.
1.3.
Insert the shade support (F) by pushing
and twisting until it is fully engaged.
1.1.
Fijar el tubo (A) en la base (B) utilizando los
tornillos suministrados (C).
1.2.
Introducir el cable (D) en el brazo (E) hasta
que el conector salga por el otro extremo del
tubo.
1.3.
Insertar el soporte (F) de la pantalla
presionando y girando hasta que quede
completamente fijo.
1.1.
Fixer le tube (A) à la base (B) à l'aide des vis
fournies (C).
1.2.
Insérer le câble (D) dans le bras (E) jusqu'à
ce que le connecteur sorte à l'autre extrémité
du tube.
1.3.
Insérer le support (F) de l'écran en
appuyant et en tournant jusqu'à ce qu'il soit
complètement fixé.
1.1.
Befestigen Sie das Rohr (A) am Sockel (B),
indem Sie die mitgelieferte Schrauben (C)
benutzen.
1.2.
Führen Sie das Kabel (D) durch den Arm
(E), bis der Anschluss an der anderen Seite des
Rohr herauskommt.
1.3.
Drücken und drehen Sie die Halterung (F)
des Lampenschirms, bis er komplett fixiert
wurde.
1
A
C
B
D
F
E
Fig.1.1
Fig.1.2
Fig.1.3
2
2.1.
Place the bracket (G), as shown in Fig. 3,
and secure it by tightening the small screw (H).
WARNING!: Do not tighten the small screw in
excess. The small screw must be fixed in the
way that the bracket remain tighted but just
enought to allow the rotation through the axis.
2.2.
Place the arm in the bracket (G), as shown
in Fig. 2.2.
2.3.
Fasten the arm in place by means of the
wire ties (I) as shown in Fig. 2.3.
2.1.
Colocar el soporte (G) tal y como muestra
la figura y asegurarlo atornillando el prisionero
(H). ATENCIÓN!: Evitar roscar el prisionero en
exceso. Fijar el prisionero de forma que el
soporte quede sujeto pero que permita la
rotación sobre el eje.
2.2.
Posicionar el brazo en el soporte (G) tal y
como muentra la figura 2.2.
2.3.
Asegurar el brazo mediante los cierres (I) tal
y como muestra la figura 2.3.
2.1.
Placer le support (G) comme indiqué sur la
figure et le fixer en vissant le goujon (H).
ATTENTION ! Éviter de visser trop fortement le
goujon. Fixer le goujon de sorte que le support
soit maintenu mais qu’il permette une rotation
sur l'axe.
2.2.
Positionner le bras sur le support (G) comme
indiqué sur la figure 2.2.
2.3.
Fixer le bras à l'aide des verrous (I) comme
indiqué à la figure 2.3.
2.1.
Befestigen Sie die Halterung (G) so wie auf
der Abbildung gezeigt, sodass die
Stellschraube korrekt verschraubt wird.
ACHTUNG: Vermeiden Sie die Abnutzung des
Gewindes der Stellschraube. Fixieren Sie die
Stellschraube, sodass die Halterung fest ist,
aber eine Rotation um die Achse möglich ist.
2.2.
Positionieren Sie den Arm an der Halterung
(G), so wie es auf Abbildung 2.2 beschrieben
wird.
2.3.
Sichern Sie den Arm mit den Drahtbindern,
so wie es auf Abbildung 2.3 beschrieben wird.
G
H
Fig.2.1
Fig.2.2
Fig.2.3


